Spring Boot实战:集成Swagger2
一、Swagger简介
上一篇文章中我们介绍了Spring Boot对Restful的支持,这篇文章我们继续讨论这个话题,不过,我们这里不再讨论Restful API如何实现,而是讨论Restful API文档的维护问题。
在日常的工作中,我们往往需要给前端(WEB端、IOS、Android)或者第三方提供接口,这个时候我们就需要给他们提供一份详细的API说明文档。但维护一份详细的文档可不是一件简单的事情。首先,编写一份详细的文档本身就是一件很费时费力的事情,另一方面,由于代码和文档是分离的,所以很容易导致文档和代码的不一致。这篇文章我们就来分享一种API文档维护的方式,即通过Swagger来自动生成Restuful API文档。
那什么是Swagger?我们可以直接看下官方的描述:
- THE WORLD'S MOST POPULAR API TOOLING
- Swagger is the world’s largest framework of API developer tools for the OpenAPI Specification(OAS),
- enabling development across the entire API lifecycle, from design and documentation, to test and deployment.
这段话首先告诉大家Swagger是世界上最流行的API工具,并且Swagger的目的是支撑整个API生命周期的开发,包括设计、文档以及测试和部署。这篇文章中我们会用到Swagger的文档管理和测试功能。
对Swagger的作用有了基本的认识后,我们现在来看看怎么使用。
二、Swagger与Spring boot集成
第一步:引入对应jar包:
- <dependency>
- <groupId>io.springfox</groupId>
- <artifactId>springfox-swagger2</artifactId>
- <version>2.6.0</version>
- </dependency>
- <dependency>
- <groupId>io.springfox</groupId>
- <artifactId>springfox-swagger-ui</artifactId>
- <version>2.6.0</version>
- </dependency>
第二步,基本信息配置:
- @Configuration
- @EnableSwagger2
- public class Swagger2Config {
- @Bean
- public Docket createRestApi() {
- return new Docket(DocumentationType.SWAGGER_2)
- .apiInfo(apiInfo())
- .select()
- .apis(RequestHandlerSelectors.basePackage("com.pandy.blog.rest"))
- .paths(PathSelectors.regex("/rest/.*"))
- .build();
- }
- private ApiInfo apiInfo() {
- return new ApiInfoBuilder()
- .title("Blog系统Restful API")
- .description("Blog系统Restful API")
- .termsOfServiceUrl("http://127.0.0.1:8080/")
- .contact("liuxiaopeng")
- .version("1.0")
- .build();
- }
- }
基础的配置是对整个API文档的描述以及一些全局性的配置,对所有接口起作用。这里涉及到两个注解:
@Configuration是表示这是一个配置类,是JDK自带的注解,前面的文章中也已做过说明。
@EnableSwagger2的作用是启用Swagger2相关功能。
在这个配置类里面我么实例化了一个Docket对象,这个对象主要包括三个方面的信息:
(1)整个API的描述信息,即ApiInfo对象包括的信息,这部分信息会在页面上展示。
(2)指定生成API文档的包名。
(3)指定生成API的路径。按路径生成API可支持四种模式,这个可以参考其源码:
- public class PathSelectors {
- private PathSelectors() {
- throw new UnsupportedOperationException();
- }
- public static Predicate<String> any() {
- return Predicates.alwaysTrue();
- }
- public static Predicate<String> none() {
- return Predicates.alwaysFalse();
- }
- public static Predicate<String> regex(final String pathRegex) {
- return new Predicate<String>() {
- public boolean apply(String input) {
- return input.matches(pathRegex);
- }
- };
- }
- public static Predicate<String> ant(final String antPattern) {
- return new Predicate<String>() {
- public boolean apply(String input) {
- AntPathMatcher matcher = new AntPathMatcher();
- return matcher.match(antPattern, input);
- }
- };
- }
- }
从源码可以看出,Swagger总共支持任何路径都生成、任何路径都不生成以及正则匹配和ant 模式匹配四种方式。大家可能比较熟悉的是前三种,最后一种ant匹配,如果不熟悉ant的话就直接忽略吧,前三种应该足够大家在日常工作中使用了。
有了上面的配置我们就可以看到效果了,我在com.pandy.blog.rest这个包下面有一个ArticleRestController这个类,源码如下:
- @RestController
- public class ArticleRestController {
- @Autowired
- private ArticleService articleService;
- @RequestMapping(value = "/rest/article", method = POST, produces = "application/json")
- public WebResponse<Map<String, Object>> saveArticle(@RequestBody Article article) {
- article.setUserId(1L);
- articleService.saveArticle(article);
- Map<String, Object> ret = new HashMap<>();
- ret.put("id", article.getId());
- WebResponse<Map<String, Object>> response = WebResponse.getSuccessResponse(ret);
- return response;
- }
- @RequestMapping(value = "/rest/article/{id}", method = DELETE, produces = "application/json")
- public WebResponse<?> deleteArticle(@PathVariable Long id) {
- Article article = articleService.getById(id);
- article.setStatus(-1);
- articleService.updateArticle(article);
- WebResponse<Object> response = WebResponse.getSuccessResponse(null);
- return response;
- }
- @RequestMapping(value = "/rest/article/{id}", method = PUT, produces = "application/json")
- public WebResponse<Object> updateArticle(@PathVariable Long id, @RequestBody Article article) {
- article.setId(id);
- articleService.updateArticle(article);
- WebResponse<Object> response = WebResponse.getSuccessResponse(null);
- return response;
- }
- @RequestMapping(value = "/rest/article/{id}", method = GET, produces = "application/json")
- public WebResponse<Article> getArticle(@PathVariable Long id) {
- Article article = articleService.getById(id);
- WebResponse<Article> response = WebResponse.getSuccessResponse(article);
- return response;
- }
- @RequestMapping(value = "/test/{id}", method = GET, produces = "application/json")
- public WebResponse<?> getNoApi(){
- WebResponse<?> response = WebResponse.getSuccessResponse(null);
- return response;
- }
- }
启动Spring boot,然后访问:http://127.0.0.1:8080/swagger-ui.html即可看到如下结果:
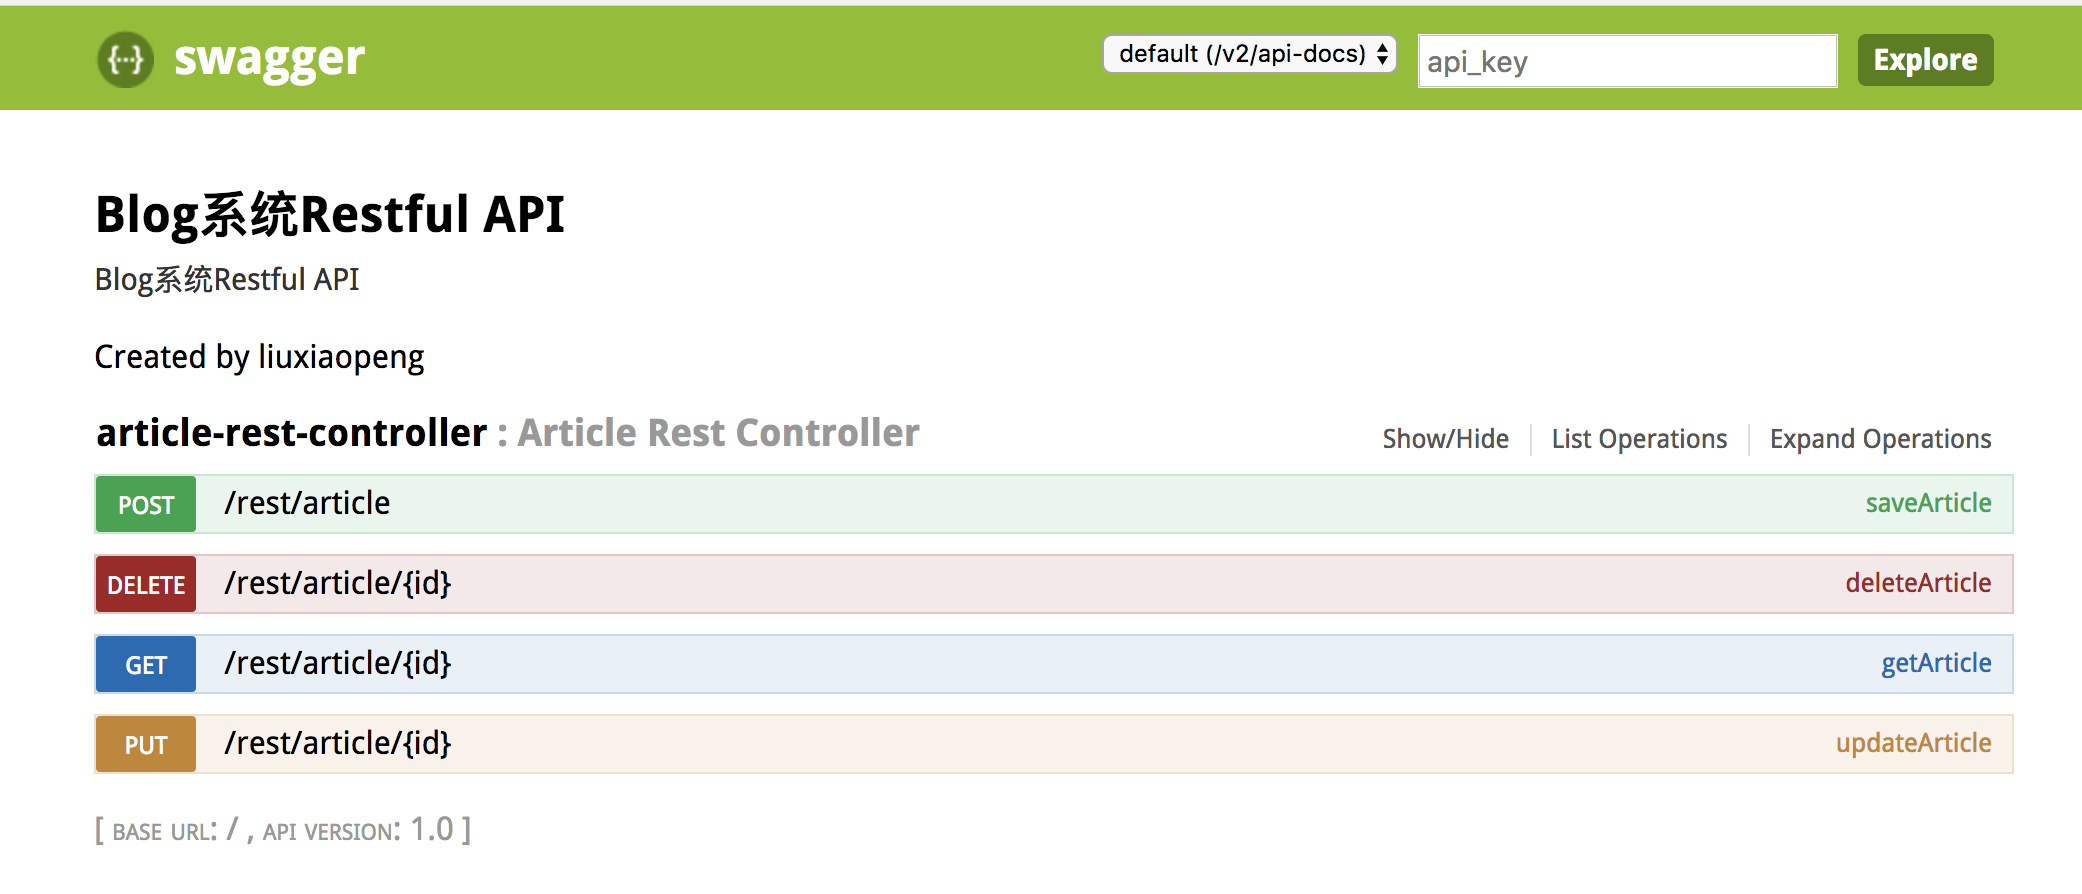
这个页面上可以看到,除了最后一个接口/test/{id}外,其他接口都生成对应的文档,最后一个接口因为不满足我们配置的路径——“/rest/.*”,所以没有生成文档。
我们还可以点进去看一下每一个具体的接口,我们这里以“POST /rest/article”这个接口为例:

可以看到,Swagger为每一个接口都生成了返回结果和请求参数的示例,并且能直接通过下面的"try it out"进行接口访问,方面大家对接口进行测试。整体上感觉Swagger还是很强大的,配置也比较简单。
三、Swagger API详细配置
不过大家看到这里肯定会有点疑问:
第一个问题:这个返回结果和请求参数都没有文字性的描述,这个可不可以配置?
第二个问题:这个请求参应该是直接根据对象反射出来的结果,但是不是对象的每个属性都是必传的,另外参数的值也不一定满足我们的需求,这个能否配置?
答案肯定是可以的,现在我们就来解决这两个问题,直接看配置的代码:
- package com.pandy.blog.rest;
- import com.pandy.blog.dto.WebResponse;
- import com.pandy.blog.po.Article;
- import com.pandy.blog.service.ArticleService;
- import io.swagger.annotations.ApiImplicitParam;
- import io.swagger.annotations.ApiImplicitParams;
- import io.swagger.annotations.ApiOperation;
- import io.swagger.annotations.ApiResponse;
- import io.swagger.annotations.ApiResponses;
- import org.springframework.beans.factory.annotation.Autowired;
- import org.springframework.context.annotation.Profile;
- import org.springframework.web.bind.annotation.PathVariable;
- import org.springframework.web.bind.annotation.RequestBody;
- import org.springframework.web.bind.annotation.RequestMapping;
- import org.springframework.web.bind.annotation.RestController;
- import java.util.HashMap;
- import java.util.List;
- import java.util.Map;
- import static org.springframework.web.bind.annotation.RequestMethod.DELETE;
- import static org.springframework.web.bind.annotation.RequestMethod.GET;
- import static org.springframework.web.bind.annotation.RequestMethod.POST;
- import static org.springframework.web.bind.annotation.RequestMethod.PUT;
- @RestController
- @RequestMapping("/rest")
- public class ArticleRestController {
- @Autowired
- private ArticleService articleService;
- @RequestMapping(value = "/article", method = POST, produces = "application/json")
- @ApiOperation(value = "添加文章", notes = "添加新的文章", tags = "Article",httpMethod = "POST")
- @ApiImplicitParams({
- @ApiImplicitParam(name = "title", value = "文章标题", required = true, dataType = "String"),
- @ApiImplicitParam(name = "summary", value = "文章摘要", required = true, dataType = "String"),
- @ApiImplicitParam(name = "status", value = "发布状态", required = true, dataType = "Integer")
- })
- @ApiResponses({
- @ApiResponse(code=200,message="成功",response=WebResponse.class),
- })
- public WebResponse<Map<String,Object>> saveArticle(@RequestBody Article article){
- articleService.saveArticle(article);
- Map<String,Object> ret = new HashMap<>();
- ret.put("id",article.getId());
- WebResponse<Map<String,Object>> response = WebResponse.getSuccessResponse(ret);
- return response;
- }
- @ApiOperation(value = "删除文章", notes = "根据ID删除文章", tags = "Article",httpMethod = "DELETE")
- @ApiImplicitParams({
- @ApiImplicitParam(name = "id", value = "文章ID", required = true, dataType = "Long")
- })
- @RequestMapping(value = "/{id}",method = DELETE,produces = "application/json")
- public WebResponse<?> deleteArticle(@PathVariable Long id){
- Article article = articleService.getById(id);
- article.setStatus(-1);
- articleService.saveArticle(article);
- return WebResponse.getSuccessResponse(new HashMap<>());
- }
- @ApiOperation(value = "获取文章列表", notes = "可以根据标题进行模糊查询", tags = "Article",httpMethod = "GET")
- @ApiImplicitParams({
- @ApiImplicitParam(name = "title", value = "文章标题", required = false, dataType = "String"),
- @ApiImplicitParam(name = "pageSize", value = "每页文章数量", required = false, dataType = "Integer"),
- @ApiImplicitParam(name = "pageNum", value = "分页的页码", required = false, dataType = "Integer")
- })
- @RequestMapping(value = "/article/list", method = GET, produces = "application/json")
- public WebResponse<?> listArticles(String title, Integer pageSize, Integer pageNum) {
- if (pageSize == null) {
- pageSize = 10;
- }
- if (pageNum == null) {
- pageNum = 1;
- }
- int offset = (pageNum - 1) * pageSize;
- List<Article> articles = articleService.getArticles(title, 1L, offset, pageSize);
- return WebResponse.getSuccessResponse(articles);
- }
- @ApiOperation(value = "更新文章", notes = "更新文章内容", tags = "Article",httpMethod = "PUT")
- @ApiImplicitParams({
- @ApiImplicitParam(name = "id", value = "文章ID", required = true, dataType = "Long"),
- @ApiImplicitParam(name = "title", value = "文章标题", required = false, dataType = "String"),
- @ApiImplicitParam(name = "summary", value = "文章摘要", required = false, dataType = "String"),
- @ApiImplicitParam(name = "status", value = "发布状态", required = false, dataType = "Integer")
- })
- @RequestMapping(value = "/article/{id}", method = PUT, produces = "application/json")
- public WebResponse<?> updateArticle(@PathVariable Long id,@RequestBody Article article){
- article.setId(id);
- articleService.updateArticle(article);
- return WebResponse.getSuccessResponse(new HashMap<>());
- }
- }
我们解释一下代码中几个注解及相关属性的具体作用:
@ApiOperation,整个接口属性配置:
value:接口说明,展示在接口列表。
notes:接口详细说明,展示在接口的详情页。
tags:接口的标签,相同标签的接口会在一个标签页下展示。
httpMethod:支持的HTTP的方法。
@ApiImplicitParams,@ApiImplicitParam的容器,可包含多个@ApiImplicitParam注解
@ApiImplicitParam,请求参数属性配置:
name:参数名称
value:参数说明
required:是否必须
dataType:数据类型
@ApiResponses,@ApiResponse容器,可以包含多个@ApiResponse注解
@ApiResponse,返回结果属性配置:
code:返回结果的编码。
message:返回结果的说明。
response:返回结果对应的类。
完成以上配置后,我们再看下页面效果:
列表页:
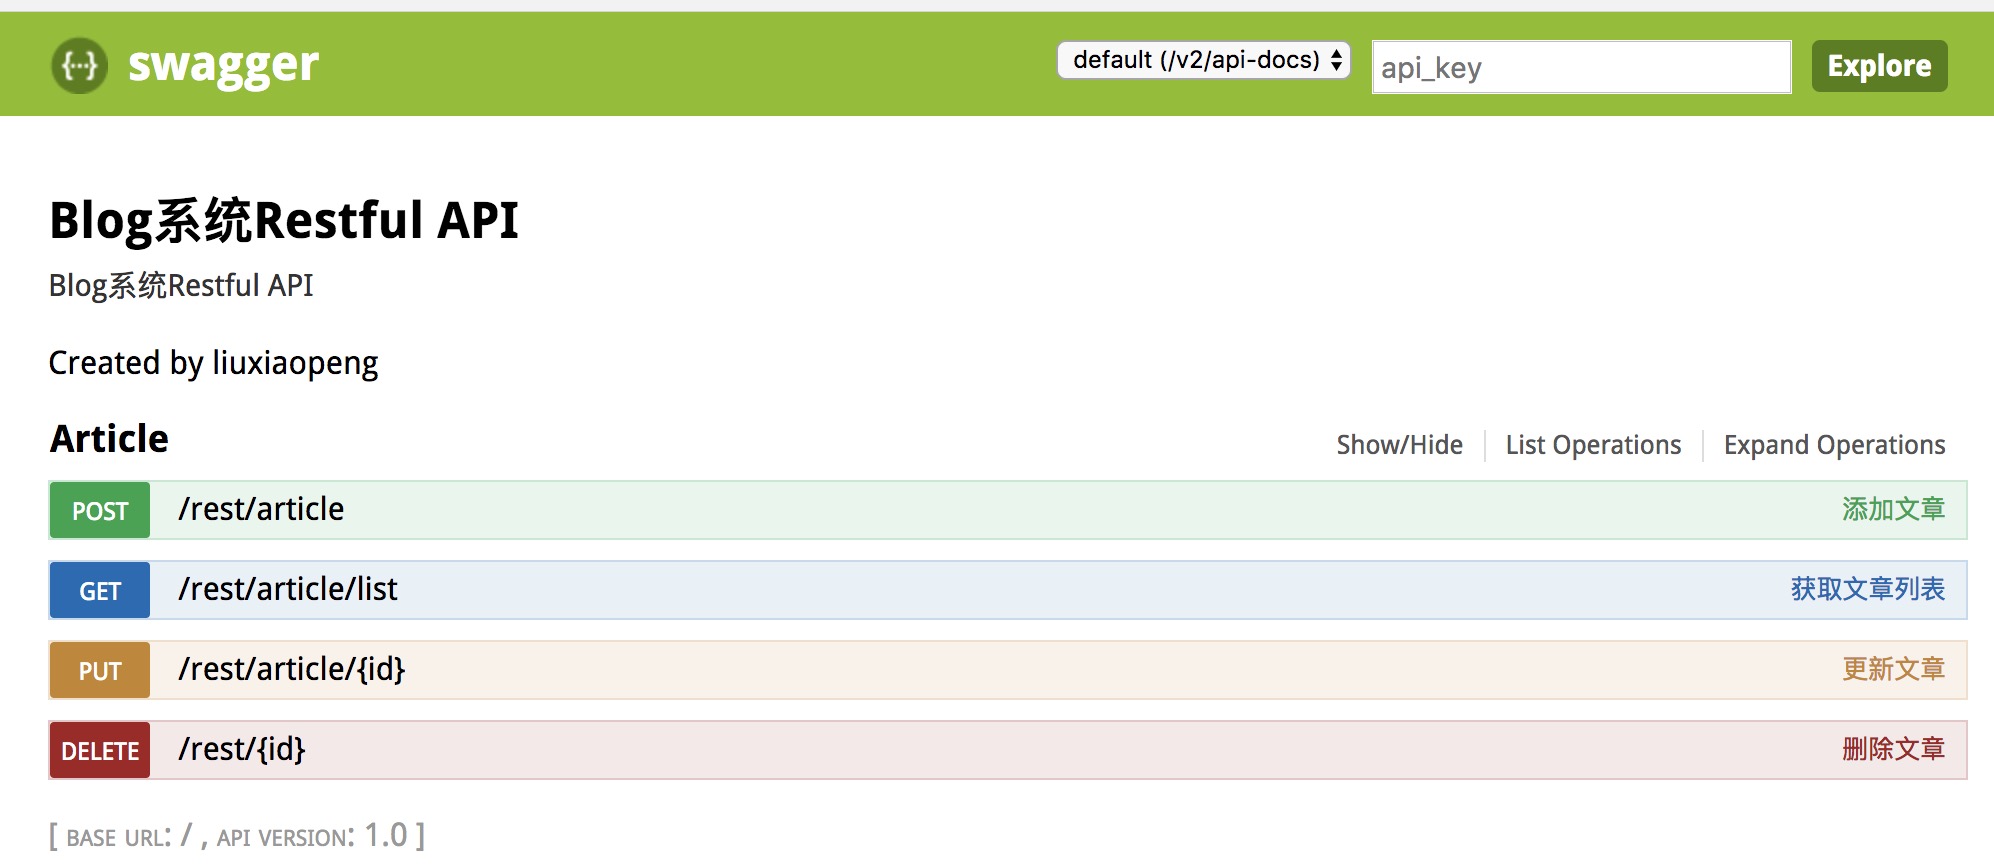
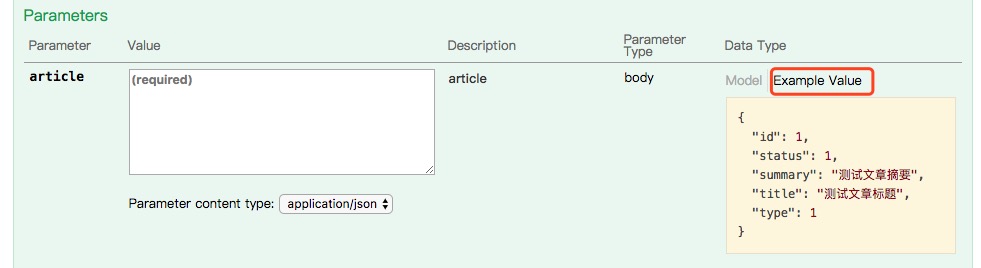
可以看到,现在接口都位于Article这个tag下,并且接口后面也有了我们配置好的说明。我们再看下”POST /rest/article“这个接口的详情页:
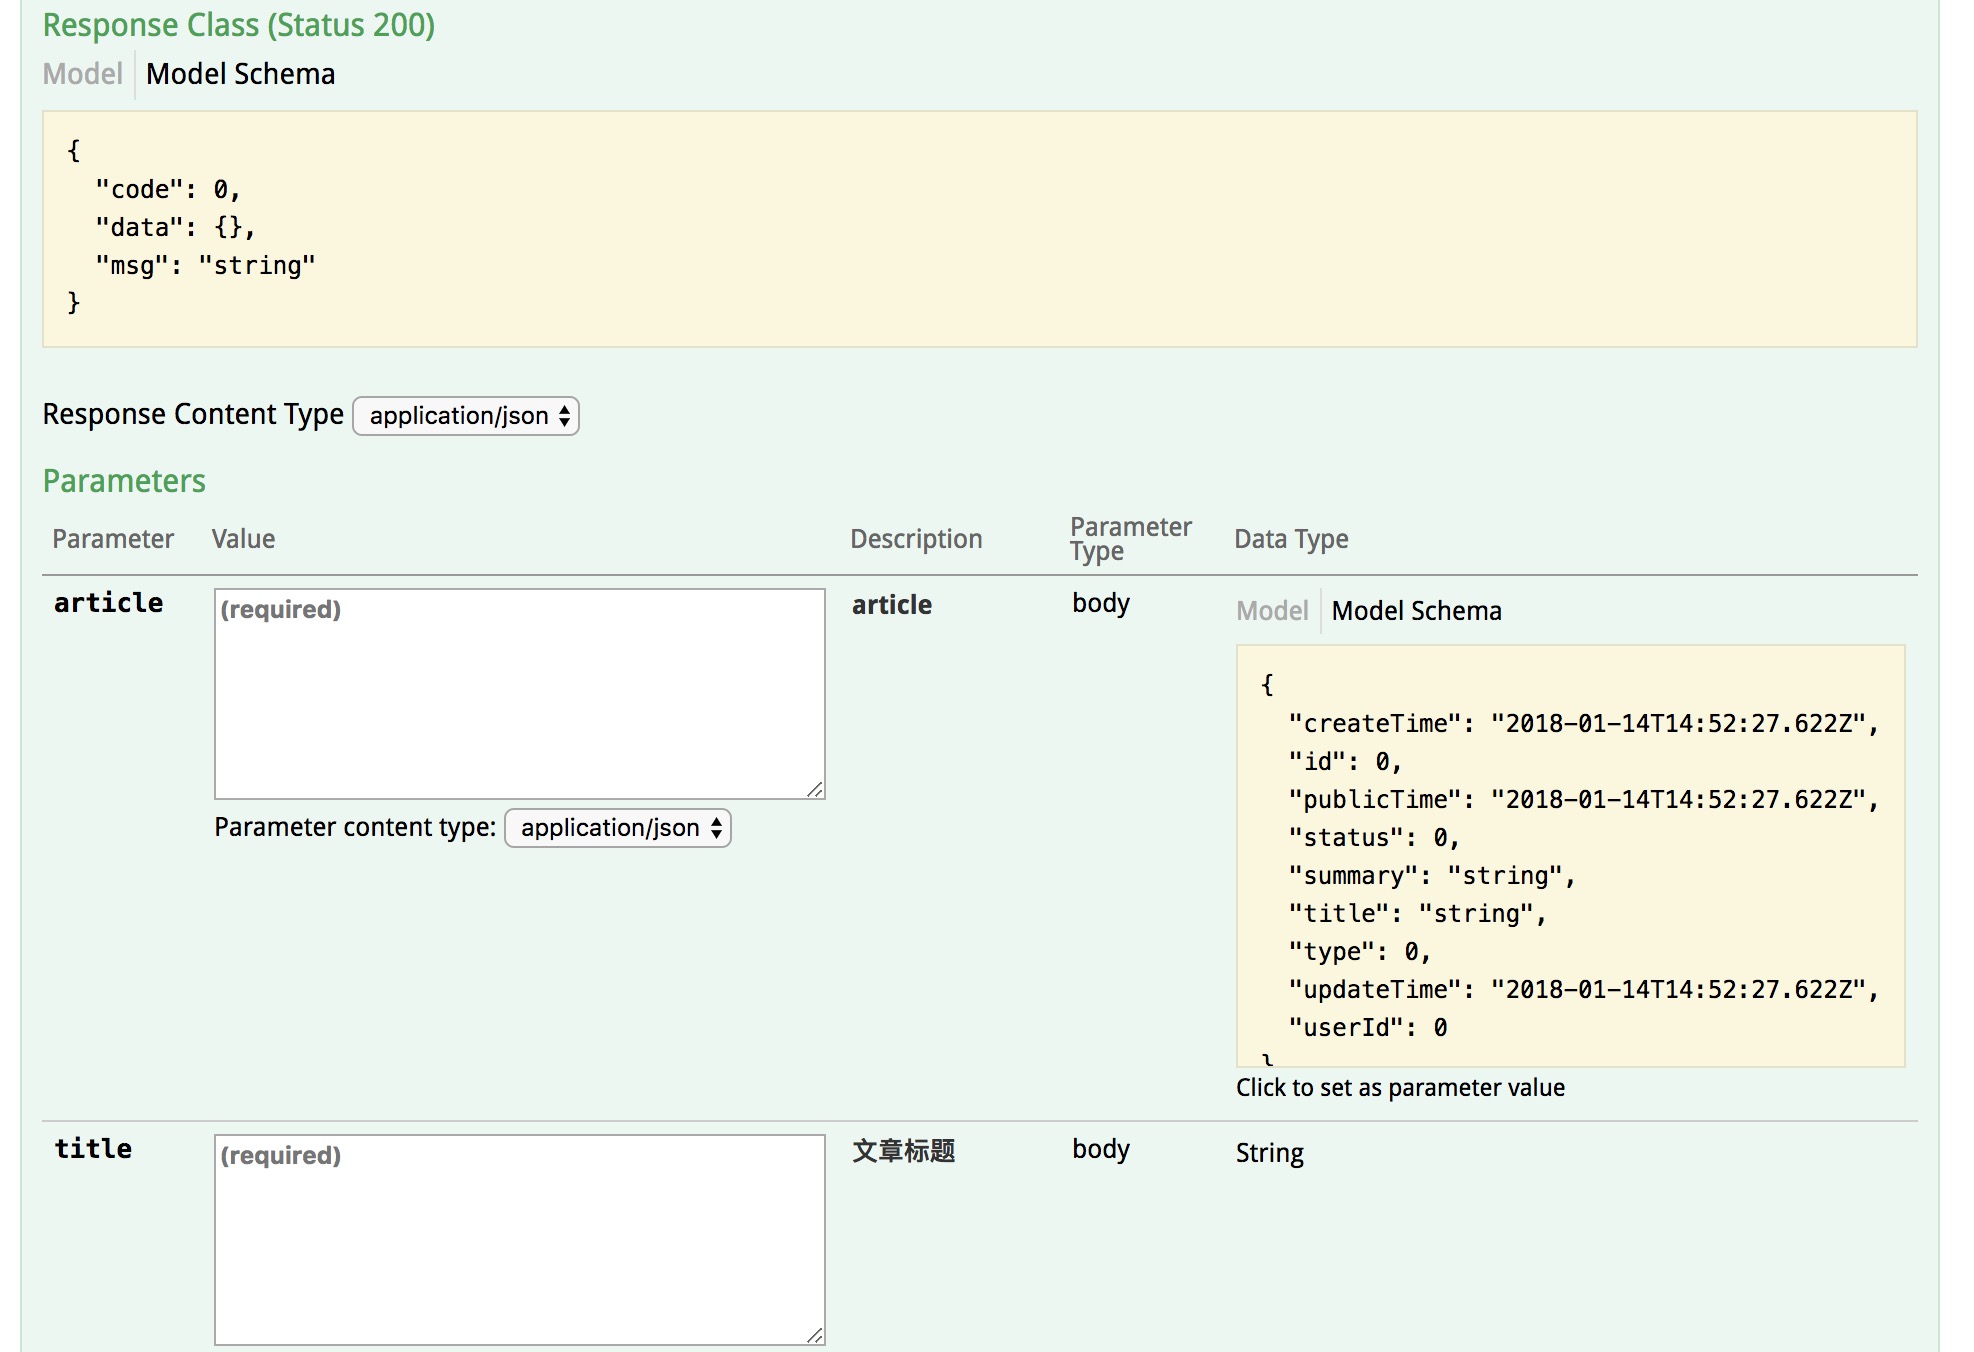
图片太大,只截取了title属性的展示,其他几个参数的类似。我们可以从页面上看到请求参数的说明是有的,不过这不是我们预期的效果,如果我们的参数仅仅是简单类型,这种方式应该没问题,但现在的问题是我们的请求参数是一个对象,那如何配置呢?这就涉及到另外两个注解:@ApiModel和@ApiModelProperty,我们还是先看代码,然后再解释,这样更容易理解:
- @ApiModel(value="article对象",description="新增&更新文章对象说明")
- public class Article {
- @Id
- @GeneratedValue
- @ApiModelProperty(name = "id",value = "文章ID",required = false,example = "1")
- private Long id;
- @ApiModelProperty(name = "title",value = "文章标题",required = true,example = "测试文章标题")
- private String title;
- @ApiModelProperty(name = "summary",value = "文章摘要",required = true,example = "测试文章摘要")
- private String summary;
- @ApiModelProperty(hidden = true)
- private Date createTime;
- @ApiModelProperty(hidden = true)
- private Date publicTime;
- @ApiModelProperty(hidden = true)
- private Date updateTime;
- @ApiModelProperty(hidden = true)
- private Long userId;
- @ApiModelProperty(name = "status",value = "文章发布状态",required = true,example = "1")
- private Integer status;
- @ApiModelProperty(name = "type",value = "文章分类",required = true,example = "1")
- private Integer type;
- }
@ApiModel是对整个类的属性的配置:
value:类的说明
description:详细描述
@ApiModelProperty是对具体每个字段的属性配置:
name:字段名称
value:字段的说明
required:是否必须
example:示例值
hidden:是否显示
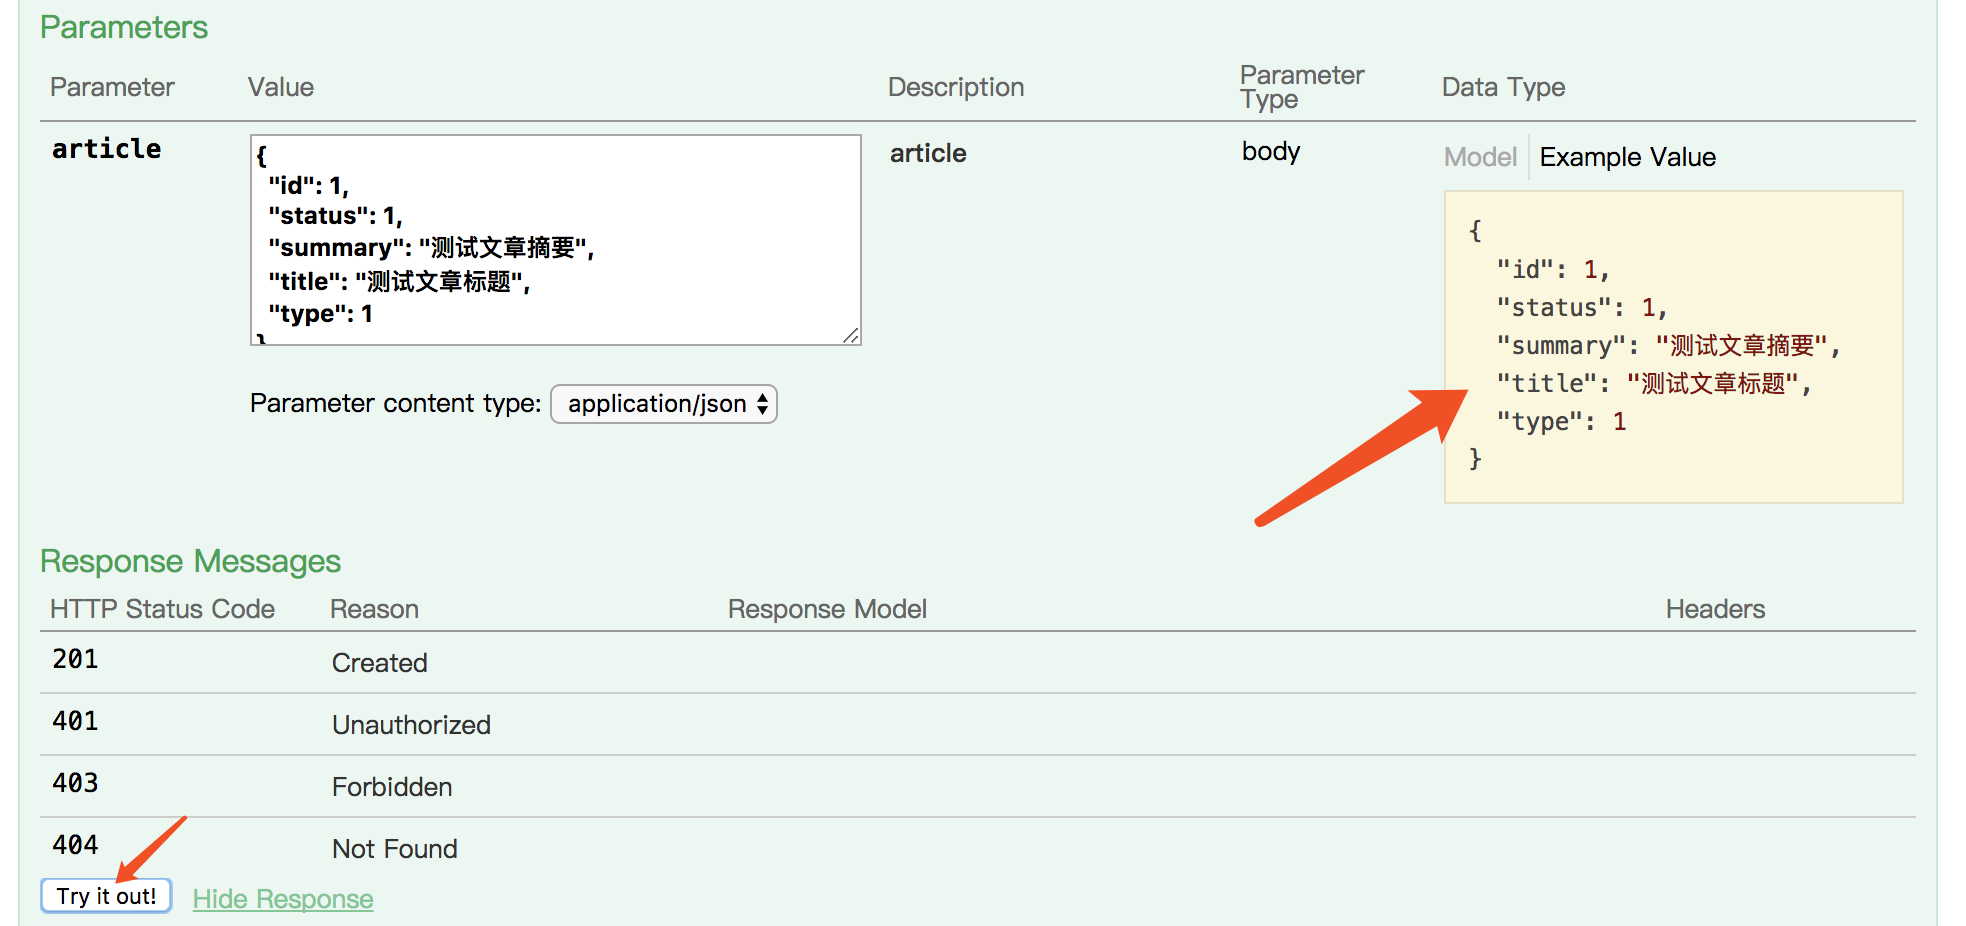
完成上面的配置后,我们再来看效果:
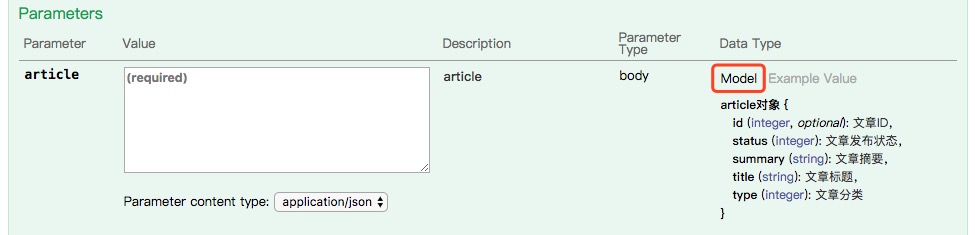
现在我们可以看到,字段的说明都已经展示出来,并且,示例中字段的值也变成了我们配置的example属性对应的值了。这样,一份完整的API文档就生成了,并且该文档与代码紧密的联系在一起,而不是隔离的两个部分。除此之外,我们还可以直接通过该文档很方便的进行测试,我们只需要点击Example Value下黄色的框,里面的内容就会自动复制到article对应的value框中,然后在点击“Try it out”就可以发起http请求了。
点击Try it out后,我们就可以看到返回的结果:
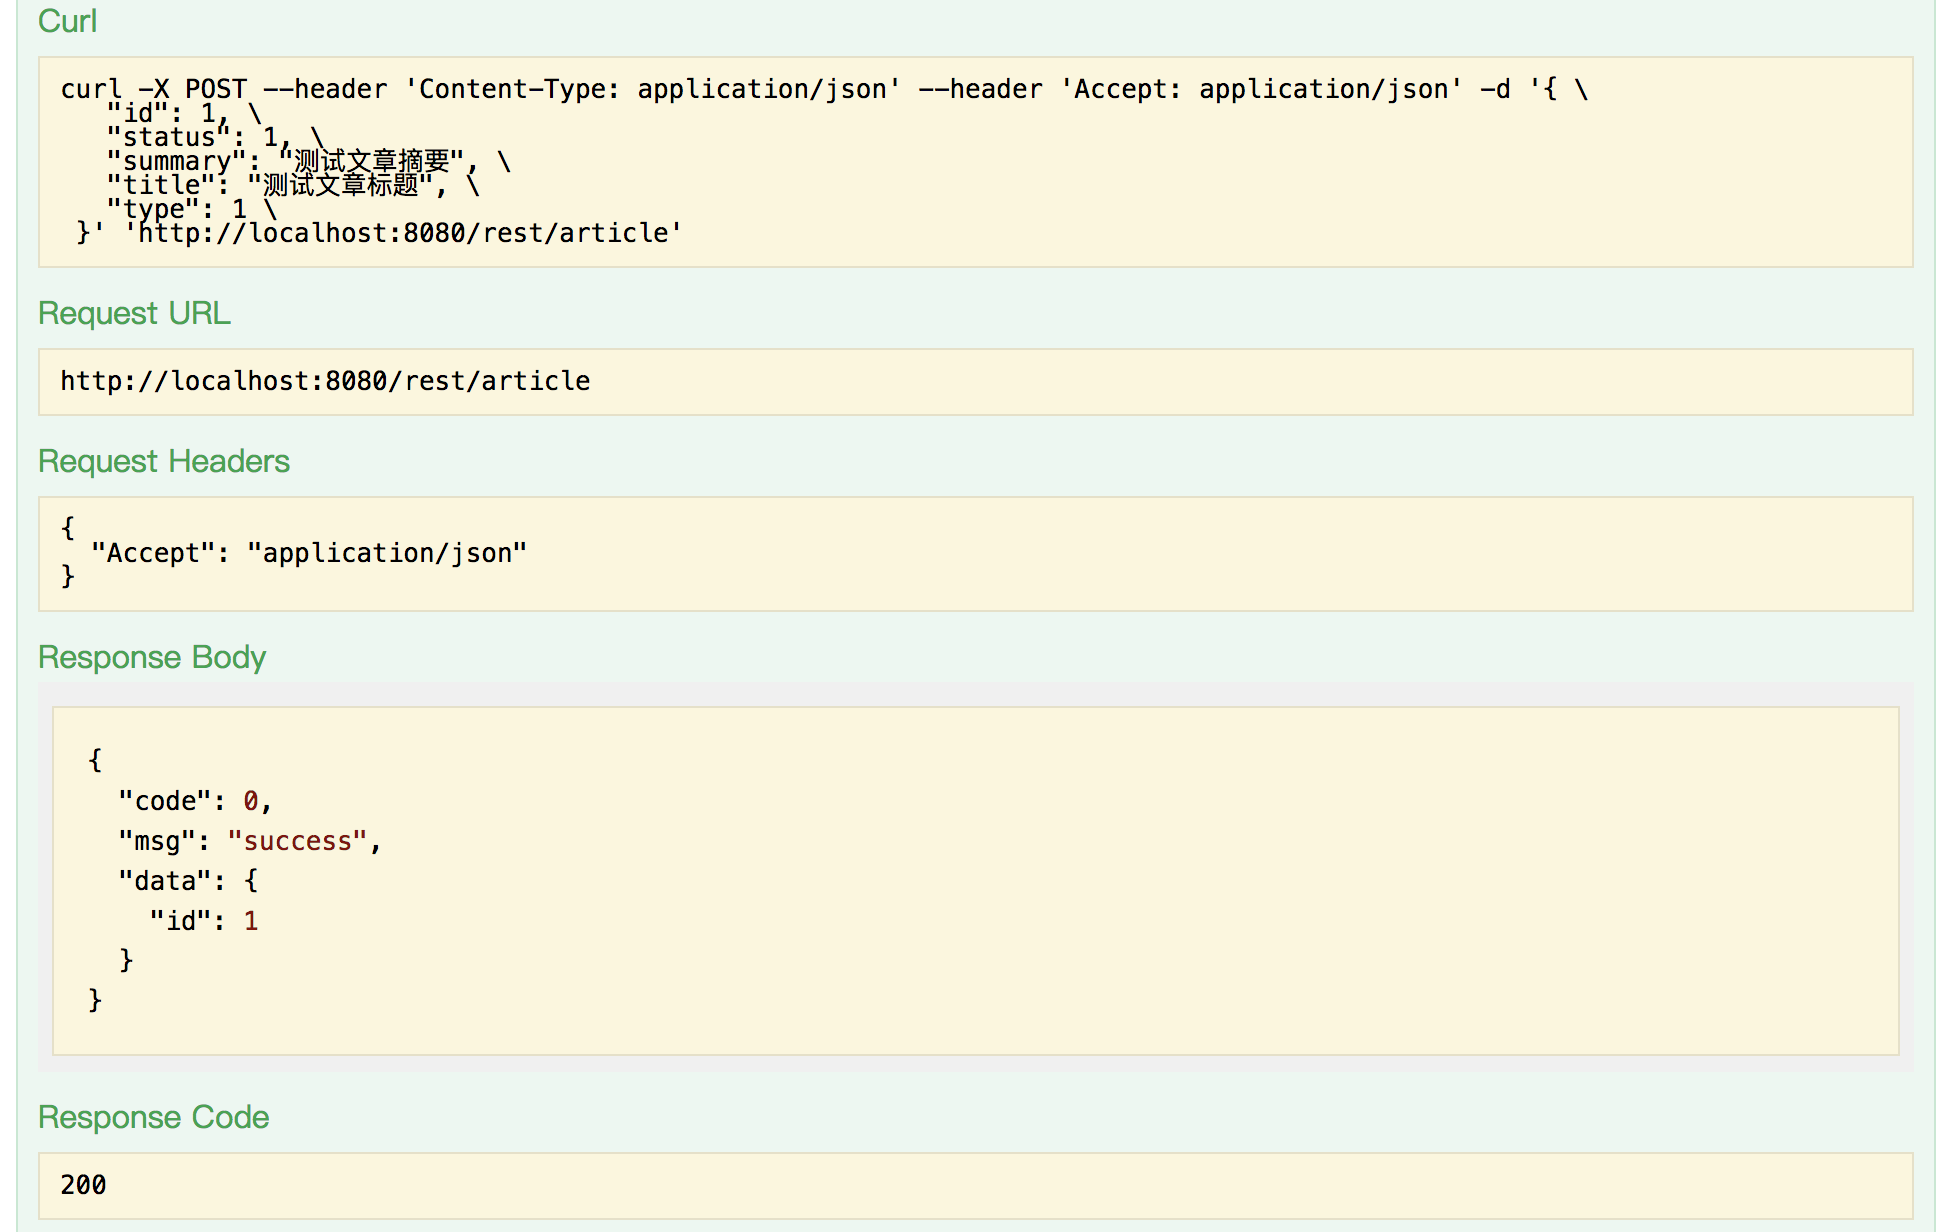
操作还是很方便的,相比Junit和postman,通过Swagger来测试会更加便捷,当然,Swagger的测试并不能代替单元测试,不过,在联调的时候还是有非常大的作用的。
四、总结
总体上来说,Swagger的配置还是比较简单的,并且Swagger能够自动帮我们生成文档确实为我们节省了不少工作,对后续的维护也提供了很大的帮助。除此之外,Swagger还能根据配置自动为我们生成测试的数据,并且提供对应的HTTP方法,这对我们的自测和联调工作也有不少的帮助,所以我还是推荐大家在日常的开发中去使用Swagger,应该可以帮助大家在一定程度上提高工作效率的。最后,留一个问题给大家思考吧,就是该文档是可以直接通过页面来访问的,那我们总不能把接口直接暴露在生产环境吧,尤其是要对外提供服务的系统,那我们怎么才能在生产环节中关闭这个功能呢?方法有很多,大家可以自己尝试一下。
Spring Boot实战:集成Swagger2的更多相关文章
- Spring Boot实战系列(7)集成Consul配置中心
本篇主要介绍了 Spring Boot 如何与 Consul 进行集成,Consul 只是服务注册的一种实现,还有其它的例如 Zookeeper.Etcd 等,服务注册发现在微服务架构中扮演这一个重要 ...
- Spring Boot中使用Swagger2构建RESTful APIs
关于 Swagger Swagger能成为最受欢迎的REST APIs文档生成工具之一,有以下几个原因: Swagger 可以生成一个具有互动性的API控制台,开发者可以用来快速学习和尝试API. S ...
- Spring Boot实战
Spring在java EE开发中是实际意义上的标准,但我们在开发Spring的时候可能会遇到以下令人头疼的问题: 1.大量配置文件的定义.2.与第三方软件整合的技术问题. Spring每个版本的退出 ...
- spring boot实战(第一篇)第一个案例
版权声明:本文为博主原创文章,未经博主允许不得转载. 目录(?)[+] spring boot实战(第一篇)第一个案例 前言 写在前面的话 一直想将spring boot相关内容写成一个系列的 ...
- 《Spring Boot实战》笔记(目录)
目录 目 录第一部分 点睛Spring 4.x第1 章 Spring 基础 .............................................................. ...
- spring boot 实战教程
二八法则 - get more with less Java.spring经过多年的发展,各种技术纷繁芜杂,初学者往往不知道该从何下手.其实开发技术的世界也符合二八法则,80%的场景中只有20%的技术 ...
- Spring Boot项目使用Swagger2文档教程
[本文版权归微信公众号"代码艺术"(ID:onblog)所有,若是转载请务必保留本段原创声明,违者必究.若是文章有不足之处,欢迎关注微信公众号私信与我进行交流!] 前言 Sprin ...
- Spring Boot中使用Swagger2构建强大的RESTful API文档
由于Spring Boot能够快速开发.便捷部署等特性,相信有很大一部分Spring Boot的用户会用来构建RESTful API.而我们构建RESTful API的目的通常都是由于多终端的原因,这 ...
- spring boot实战(第十三篇)自动配置原理分析
前言 spring Boot中引入了自动配置,让开发者利用起来更加的简便.快捷,本篇讲利用RabbitMQ的自动配置为例讲分析下Spring Boot中的自动配置原理. 在上一篇末尾讲述了Spring ...
- spring boot实战(第十二篇)整合RabbitMQ
前言 最近几篇文章将围绕消息中间件RabbitMQ展开,对于RabbitMQ基本概念这里不阐述,主要讲解RabbitMQ的基本用法.Java客户端API介绍.spring Boot与RabbitMQ整 ...
随机推荐
- Mybatis+Oracle批处理
1. 批处理 插入 非常多时候都涉及到一系列数据的插入,通过mybatis的动态sql语句可以非常好的解决问题.当然.oracle已经提供了批插入的语句: insert into students s ...
- Spring学习笔记(三)之装配Bean
除了组件扫描与自动装配之外还有基于Java代码的装配与基于XML的装配. 有一些场景是我们不能用自动装配的,比如我们要给第三方库中的组件装配到我们的应用中,这时自动装配无效,因为自动装配只能扫描本应用 ...
- Java基础(四)-异常处理机制及其设计
本篇主要是记录自己所理解的Java异常处理机制(基于jdk1.7)以及怎么去处理和设计异常.还记得当初学习Java异常这块的时候都没怎么注意它的用途,以为就是简单的处理下异常,我避免程序出现这样错误就 ...
- 你为什么还坚持.NET
C#换什么比较合适? 从TIOBE来看,Java.C++.C.Python都好,对了,还不能忘了JS. Sql Server换什么比较合适? MySql挺好,Oracle也不错,也还有不少选择. 都挺 ...
- Intellijidea建javaWeb以及Servlet简单实现
一.创建并设置javaweb工程1.创建javaweb工程File --> New --> Project... 点击Project后出现如下界面,选择Java Enterprise,选中 ...
- Jenkins in OpenCASCADE
Jenkins in OpenCASCADE eryar@163.com Abstract. Jenkins是一个开源软件项目,是基于Java开发的一个持续集成工具,用于监控持续复制的工作,旨在提供一 ...
- Intellij Idea配置MapReduce编程环境
原文参考地址:http://www点w2bc点com/article/229178 增加内容:question1: Hadoop2以上版本时,在Hadoop2的bin目录下没有winutils.exe ...
- Python 爬虫实战(一):使用 requests 和 BeautifulSoup
Python 基础 我之前写的<Python 3 极简教程.pdf>,适合有点编程基础的快速入门,通过该系列文章学习,能够独立完成接口的编写,写写小东西没问题. requests requ ...
- listbox控件使用
1. 属性列表: SelectionMode 组件中条目的选择类型,即多选(Multiple).单选(Single) Rows 列表框中显示总共多少行 Sel ...
- tensorflow ckpt文件转caffemodel时遇到的坑
p.p1 { margin: 0.0px 0.0px 0.0px 0.0px; font: 12.0px ".PingFang SC"; color: #454545 } p.p2 ...