[转]Writing Custom Middleware in ASP.NET Core 1.0
本文转自:https://www.exceptionnotfound.net/writing-custom-middleware-in-asp-net-core-1-0/
One of the new features from ASP.NET Core 1.0 is the idea of Middleware. Middleware are components of an application that examine the requests responses coming in to and going out from an ASP.NET Core application. It's a long-overdue piece of customization for ASP.NET apps that gives us developers total control over the HTTP pipeline. It might even help you avoid endless questions from annoying coworkers (maybe!).
As part of my ongoing learning process about ASP.NET Core, I decided to build a sample application that has a few pieces of middleware, so that I could play around with order, tasks, and so forth. It helped me understand what Middleware does, and why it might be important, so hopefully it'll help you too. Let's get started!
NOTE: This post was written using RC1 (Release Candidate 1) of ASP.NET Core, and as the framework gets closer to final release, some things may change. If they do, I'll do my best to keep this post up-to-date. If you notice anything that needs to be updated, let me know in the comments.
What Is Middleware?
Middleware, as explained above, are components that "sit" on the HTTP pipeline and examine requests and responses. This means that they are effectively "gateway" classes that can decide whether or not to continue allowing the request to be processed by other Middleware components further down the stream. The pipeline looks like this:
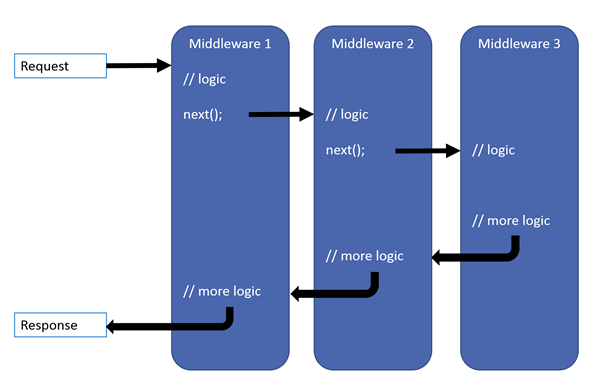 Image is © Microsoft, taken from docs.asp.net
The idea of Middleware, at least in ASP.NET, comes from the Open Web Interface for .NET (OWIN) project. OWIN's stated goal is to
...decouple server and application, encourage the development of simple modules for .NET web development, and, by being an open standard, stimulate the open source ecosystem of .NET web development tools.
Considering their ideas have been fully integrated into ASP.NET Core 1.0, I'd say they've more than achieved this goal.
At any rate, Middleware defines a system by which we can exert complete control over the HTTP pipeline into and out of our apps. It effectively replaces the functionality that was formerly covered by things like HttpModules and HttpHandlers.
Default Middleware
In some default ASP.NET Core 1.0 apps, particularly the ones created by Visual Studio, you are already using Middleware. Here's a sample from my earlier post covering the Startup.cs file in ASP.NET Core 1.0:
public void Configure(IApplicationBuilder app, IHostingEnvironment env, ILoggerFactory loggerFactory)

{

    loggerFactory.AddConsole(Configuration.GetSection("Logging"));

    loggerFactory.AddDebug();

    if (env.IsDevelopment())

    {

        app.UseBrowserLink(); //Middleware

        app.UseDeveloperExceptionPage(); //Middleware

    }

    else

    {

        app.UseExceptionHandler("/Home/Error"); //Middleware

    }

    app.UseIISPlatformHandler(); //Middleware

    app.UseStaticFiles(); //Middleware

    app.UseMvc(routes =>

    {

        routes.MapRoute(

            name: "default",

            template: "{controller=Home}/{action=Index}/{id?}");

    });  //Middleware

}
In this method, any time you see app.UseX(), you are using some of ASP.NET's default Middleware components. The concept of Middleware and the HTTP pipeline is central to how ASP.NET Core apps are developed. You can check out the other built-in Middleware by reading the docs.
Defining a Custom Middleware Component
A Middleware component, in an ASP.NET Core project, is a class like any other. The difference is that the Middleware component needs to have a private property of type RequestDelegate, like so:
public class AuthorizationMiddleware

{

    private readonly RequestDelegate _next;

    public AuthorizationMiddleware(RequestDelegate next)

    {

        _next = next;

    }

}
The _next property represents a delegate for the next component in the pipeline. Each component must also implement an async task called Invoke:
public async Task Invoke(HttpContext context)

{

    await _next.Invoke(context);

}
At the moment, this method does nothing other than call the next Middleware component in the pipeline. Let's see a simple task that we can do with our new Middleware component.
Middleware Tasks
Since each piece of Middleware can examine the incoming request and the corresponding response, one possible task Middleware could accomplish is that of authorization.
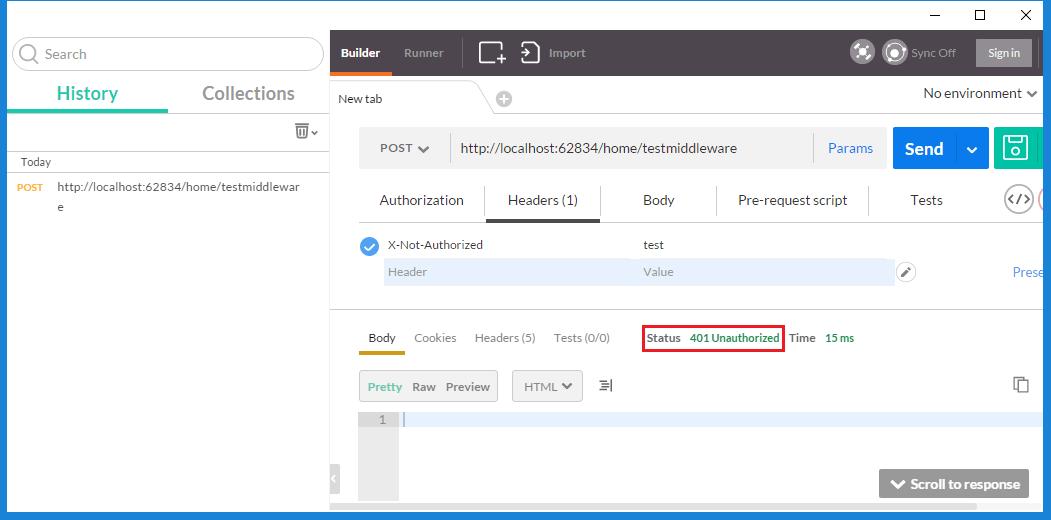
For a (trivial) example, let's say that each request must NOT have a header "X-Not-Authorized", and if it does, the response must be returned immediately with a 401 Unauthorized status code. Our Middleware component's Invoke method would now look like this:
public async Task Invoke(HttpContext context)

{

    if (context.Request.Headers.Keys.Contains("X-Not-Authorized"))

    {

        context.Response.StatusCode = 401; //Unauthorized

        return;

    }

    await _next.Invoke(context);

}
If we call any method in our app with a tool such as Postman, we'll get the following response:
Middleware can accomplish many sorts of things. For example:
- You might want to examine each incoming request to see if they have requested an image, and if they have, redirect them to an image handler, much like you would when we used HttpHandlers.
- You might have a component that logs all requests.
- You might have a component that checks to see if you annoying coworker Doug from down the hall is making a request, and if he is, redirect all his requests to Mary just so you don't have to deal with him anymore.
The possibilities are endless!
Other Example Middleware
For our sample project, we've already got one Middleware component (AuthorizationMiddleware) defined. Now we will define two more. First up is RequestHeaderMiddleware:
public class RequestHeaderMiddleware

{

    private readonly RequestDelegate _next;

    public RequestHeaderMiddleware(RequestDelegate next)

    {

        _next = next;

    }

    public async Task Invoke(HttpContext context)

    {

        if (context.Request.Headers.Keys.Contains("X-Cancel-Request"))

        {

            context.Response.StatusCode = 500;

            return;

        }

        await _next.Invoke(context);

        if (context.Request.Headers.Keys.Contains("X-Transfer-By"))

        {

            context.Response.Headers.Add("X-Transfer-Success", "true");

        }

    }

}
This Middleware component does two things:
- If the request contains a header called "X-Cancel-Request" then the server returns 500 Internal Server Error as the response.
- If the request contains a header called "X-Transfer-By" then the server adds a header to the response called "X-Transfer-Success".
Finally, let's add a third piece of middleware, called ProcessingTimeMiddleware:
public class ProcessingTimeMiddleware

{

    private readonly RequestDelegate _next;

    public ProcessingTimeMiddleware(RequestDelegate next)

    {

        _next = next;

    }

    public async Task Invoke(HttpContext context)

    {

        var watch = new Stopwatch();

        watch.Start();

        await _next(context);

        context.Response.Headers.Add("X-Processing-Time-Milliseconds", new[] { watch.ElapsedMilliseconds.ToString() });

    }

}
This component starts an instance of Stopwatch to record how long each request takes, then returns a header called "X-Processing-Time-Milliseconds" with that time in the response.
Now that we've got all the Middleware components we're going to use, let's see how we can insert them into our ASP.NET Core 1.0 app's pipeline!
Adding Middleware to the HTTP Pipeline
The environment for an ASP.NET Core 1.0 is set up in that app's Startup.cs file. In order to use our newly-created Middleware, we need to register them with the environment created by Startup.
There are two ways we can register the Middleware in the pipeline. One way is to go to the Startup file's Configure method and call a method on the IApplicationBuilder interface (simplified):
public void Configure(IApplicationBuilder app, IHostingEnvironment env, ILoggerFactory loggerFactory)

{

    ...

    app.UseMiddleware<AuthorizationMiddleware>();

    ...

}
Another way, and the way we're going to use, is to create extension methods for each piece of Middleware you want to register, and then call those methods from the Configure() method. Here's our Extensions class:
public static class MiddlewareExtensions

{

    public static IApplicationBuilder UseRequestHeaderMiddleware(this IApplicationBuilder builder)

    {

        return builder.UseMiddleware<RequestHeaderMiddleware>();

    }

    public static IApplicationBuilder UseAuthorizationMiddleware(this IApplicationBuilder builder)

    {

        return builder.UseMiddleware<AuthorizationMiddleware>();

    }

    public static IApplicationBuilder UseProcessingTimeMiddleware(this IApplicationBuilder builder)

    {

        return builder.UseMiddleware<ProcessingTimeMiddleware>();

    }

}
Now we can call these extensions in Startup like so (the below code contains a bug, read it carefully):
public void Configure(IApplicationBuilder app, IHostingEnvironment env, ILoggerFactory loggerFactory)

{

    loggerFactory.AddConsole(Configuration.GetSection("Logging"));

    loggerFactory.AddDebug();

    if (env.IsDevelopment())

    {

        app.UseBrowserLink();

        app.UseDeveloperExceptionPage();

    }

    else

    {

        app.UseExceptionHandler("/Home/Error");

    }

    app.UseIISPlatformHandler();

    app.UseStaticFiles();

    app.UseProcessingTimeMiddleware();

    app.UseRequestHeaderMiddleware();

    app.UseAuthorizationMiddleware();

    app.UseMvc(routes =>

    {

        routes.MapRoute(

            name: "default",

            template: "{controller=Home}/{action=Index}/{id?}");

    });

}
Did you spot it?
When you are registering Middleware with your environment, the order in which you add the Middleware components is very important. In the above code, we add ProcessingTimeMiddleware first, then RequestHeaderMiddleware, then AuthorizationMiddleware. This is the exact opposite order of what we should be using. The correct order looks like this (simplified):
public void Configure(IApplicationBuilder app, IHostingEnvironment env, ILoggerFactory loggerFactory)

{

    ...

    app.UseAuthorizationMiddleware();

    app.UseRequestHeaderMiddleware();

    app.UseProcessingTimeMiddleware();

    ...

}
Testing With Postman
Now that we've got our Middleware components in place, let's see some example request/response calls to a controller action in our app. The controller action we're using is very simple:
[HttpGet]

public IActionResult TestMiddleware()

{

    return Ok();

}
NOTE: Don't forget that, in ASP.NET Core 1.0 and MVC 6, MVC and Web API use the same stack.
Now let's make some Postman calls. First, let's make a call with no headers at all.
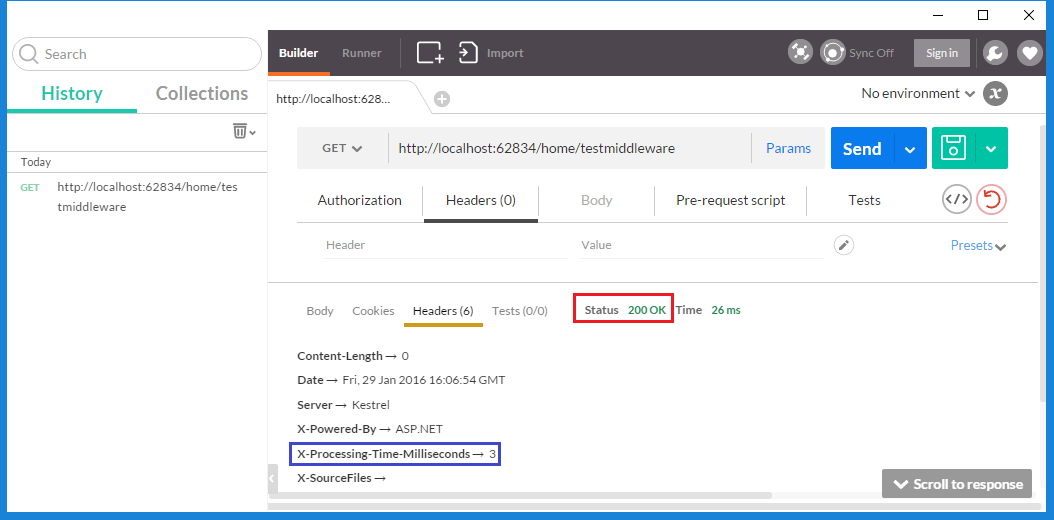
This is what we would expect to see. Neither the Authorization nor the RequestHeader Middleware components prevents execution, so the ProcessingTime component added the header and we got back the Action's 200 OK response.
Now let's see what happens if we add in the X-Not-Authorized header:
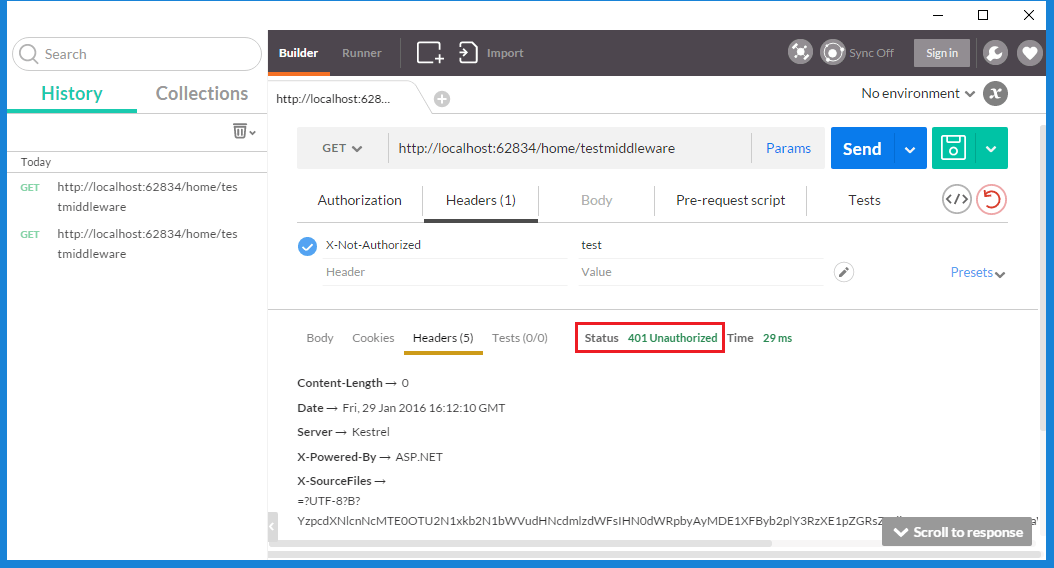
Great! The AuthorizationMiddleware component returned 401 Unauthorized, and because there's no "X-Processing-Time-Milliseconds" header isn't included in the response, the ProcessingTimeMiddleware component didn't fire. This is what we expect.
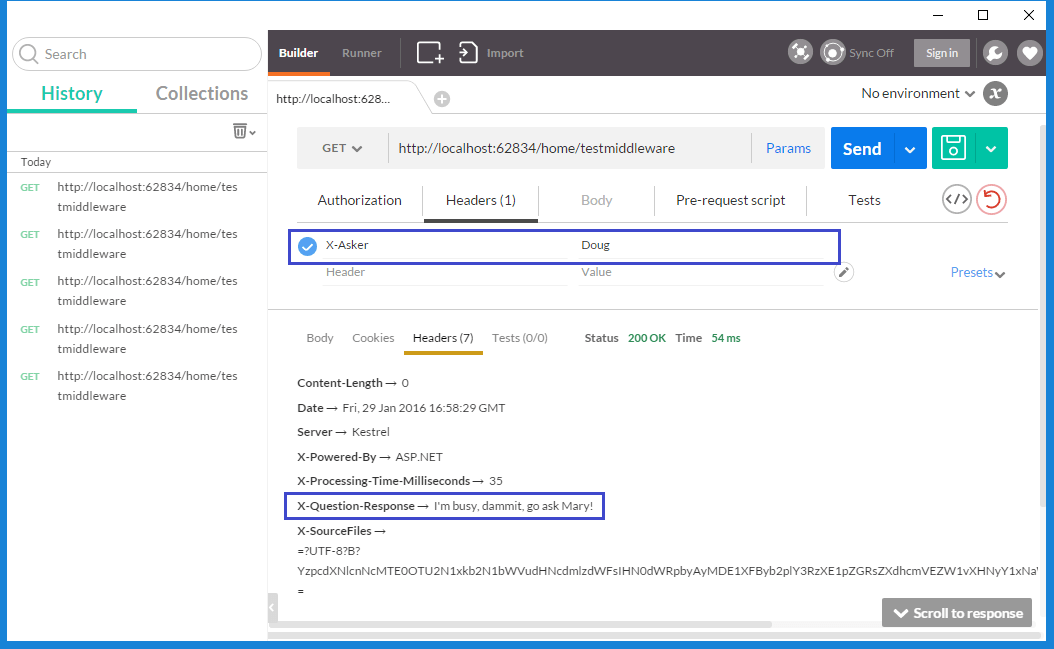
I'm sure you see where this is going by now. For the last test, let's see a request without "X-Not-Authorized" header but including "X-Transfer-By":
![]()
In this case, we see that both "X-Processing-Time-Milliseconds" and "X-Transfer-Success" returned, which means that both RequestHeaderMiddleware and ProcessingTimeMiddleware successfully fired. Looks like our scenarios work!
Let's try one more request.
Perfect!
Summary
Remember these three major points about Middleware in ASP.NET Core 1.0:
- Middleware components allow you complete control over the HTTP pipeline in your app.
- Among other things, Middleware components can handle authorization, redirects, headers, and even cancel execution of the request.
- The order in which Middleware components are registered in the Startup file is very important.
You can see the sample code for this project in the GitHub repository. As always, let me know what you think about this post in the comments, particularly if I missed something important.
Happy Coding!
[转]Writing Custom Middleware in ASP.NET Core 1.0的更多相关文章
- [译]Writing Custom Middleware in ASP.NET Core 1.0
原文: https://www.exceptionnotfound.net/writing-custom-middleware-in-asp-net-core-1-0/ Middleware是ASP. ...
- ASP.NET Core 3.0 自动挡换手动挡:在 Middleware 中执行 Controller Action
最近由于发现奇怪的 System.Data.SqlClient 性能问题(详见之前的博文),被迫提前了向 .NET Core 3.0 的升级工作(3.0 Preview 5 中问题已被修复).郁闷的是 ...
- ASP.NET Core 1.0中的管道-中间件模式
ASP.NET Core 1.0借鉴了Katana项目的管道设计(Pipeline).日志记录.用户认证.MVC等模块都以中间件(Middleware)的方式注册在管道中.显而易见这样的设计非常松耦合 ...
- 初识ASP.NET Core 1.0
本文将对微软下一代ASP.NET框架做个概括性介绍,方便大家进一步熟悉该框架. 在介绍ASP.NET Core 1.0之前有必要澄清一些产品名称及版本号.ASP.NET Core1.0是微软下一代AS ...
- ASP.NET Core 1.0 静态文件、路由、自定义中间件、身份验证简介
概述 ASP.NET Core 1.0是ASP.NET的一个重要的重新设计. 例如,在ASP.NET Core中,使用Middleware编写请求管道. ASP.NET Core中间件对HttpCon ...
- 从头编写 asp.net core 2.0 web api 基础框架 (1)
工具: 1.Visual Studio 2017 V15.3.5+ 2.Postman (Chrome的App) 3.Chrome (最好是) 关于.net core或者.net core 2.0的相 ...
- 【转载】从头编写 asp.net core 2.0 web api 基础框架 (1)
工具: 1.Visual Studio 2017 V15.3.5+ 2.Postman (Chrome的App) 3.Chrome (最好是) 关于.net core或者.net core 2.0的相 ...
- ASP.NET Core 2.0 : 三. 项目结构
本章我们一起来对比着ASP.NET Framework版本看一下ASP.NET Core 2.0的项目结构.(此后的文章也尽量这样对比着, 方便学习理解.) 关注差异, 也为项目迁移做准备. 新建项目 ...
- ASP.NET Core 2.0中如何更改Http请求的maxAllowedContentLength最大值
Web.config中的maxAllowedContentLength这个属性可以用来设置Http的Post类型请求可以提交的最大数据量,超过这个数据量的Http请求ASP.NET Core会拒绝并报 ...
随机推荐
- SSIS 属性:ExecValueVariable
有些Task组件执行完成之后,会产生输出结果,称作Execution Value,例如,Execute SQL Task在执行完成之后,会返回受影响的数据行数.Task组件的Execution Val ...
- FTP的搭建与虚拟目录作用<之简单讲解>
操作系统:win7 VS2010编写WebService与在IIS的发布<之简单讲解>中我已经说了IIS安装与使用,不明白的可以跳过去看. 1.添加FTP站点 2. 3. 4. 5. zq ...
- ASP.NET Core管道深度剖析[共4篇]
之所以称ASP.NET Core是一个Web开发平台,源于它具有一个极具扩展性的请求处理管道,我们可以通过这个管道的定制来满足各种场景下的HTTP处理需求.ASP. NET Core应用的很多特性,比 ...
- Oracle 集群】ORACLE DATABASE 11G RAC 知识图文详细教程之ORACLE集群概念和原理(二)
ORACLE集群概念和原理(二) 概述:写下本文档的初衷和动力,来源于上篇的<oracle基本操作手册>.oracle基本操作手册是作者研一假期对oracle基础知识学习的汇总.然后形成体 ...
- ASP.NET Core 中文文档 第二章 指南(4.5)使用 SQL Server LocalDB
原文:Working with SQL Server LocalDB 作者:Rick Anderson 翻译: 魏美娟(初见) 校对: 孟帅洋(书缘).张硕(Apple).许登洋(Seay) Appl ...
- 【十大经典数据挖掘算法】SVM
[十大经典数据挖掘算法]系列 C4.5 K-Means SVM Apriori EM PageRank AdaBoost kNN Naïve Bayes CART SVM(Support Vector ...
- xmpp
xmpp学习 下载: Openfire 服务器:Openfire 4.0.2 客户端:Spark 2.7.7 安装 Openfire安装: 根据提示一直下一步,服务器域名设置为:localhost(p ...
- Memcached初识
高性能分布式内存对象缓存系统. 参考: Memcached官网: Memcached简介-1:Memcached简介-2: Memcached 教程 | 菜鸟教程:
- hibernate.cfg.xml
<!DOCTYPE hibernate-configuration PUBLIC "-//Hibernate/Hibernate Configuration DTD 3.0//EN&q ...
- 【转】将grub2安装到u盘的方法
将grub2安装到u盘的方法 时间:2015-03-21来源:linux网站 作者:linux人 grub2在各大linux发行版中广泛采用,它非常强大,基本上大多数操作系统都是通过它引导起来的,它的 ...