照虎画猫写自己的Spring——依赖注入
前言
上篇《照虎画猫写自己的Spring》从无到有讲述并实现了下面几点
- 声明配置文件,用于声明需要加载使用的类
- 加载配置文件,读取配置文件
- 解析配置文件,需要将配置文件中声明的标签转换为Fairy能够识别的类
- 初始化类,提供配置文件中声明的类的实例
一句话概括:不借助Spring容器,实现了Bean的加载和实例化
要想契合Fairy取名时的初衷(东西不大,但是能量无穷),只有一套加载Bean的机制是远远不够的,所以还是需要照虎画猫,完善这个小精灵。
Spring之所以在Java企业级开发的众多框架中崭露头角光芒万丈,与他的依赖注入(又名控制反转IOC)和面向切面(AOP)两大杀手锏是密不可分的。在Fairy实现了加载实例化Bean的功能后,我们再往前走一步,看看依赖注入是如何实现的。
依赖注入
举个例子,大概介绍下依赖注入。
没有依赖注入之前,我们买白菜的时候,需要挎着篮子去菜市场挑选并购买;
有了依赖注入之后,我们需要白菜的时候,菜装在篮子里,已经放在你家门口。
这就是依赖注入。
对于Fairy,如果要实现依赖注入的功能,需要在上一版的代码上做一些小小的改动。
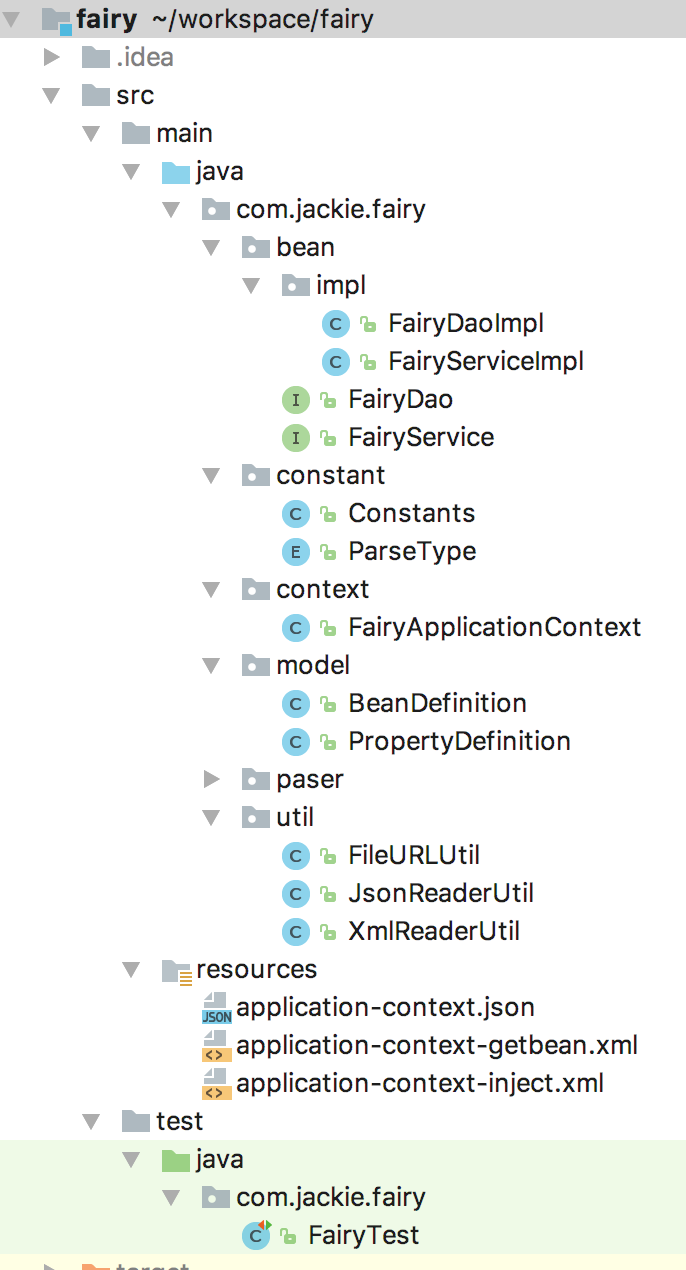
将原来的FairyBean接口和实现类FairyBeanImpl改为FairyDao接口和实现类FairyDaoImpl,除此以外,我们需要新加一个接口FairyService和实现类FairyServiceImpl。
这么声明,相信你一定明白这是为了使用依赖注入功能。
配置
我们依旧采用读取配置文件的方式来初始化容器。新建一个配置文件application-context-inject.xml
<beans>

    <bean id="fairyService" class="com.jackie.fairy.bean.impl.FairyServiceImpl">

        <property name="fairyDao" ref="fairyDao"></property>

        <property name="lightColor" value="blue"></property>

    </bean>

    <bean id="fairyDao" class="com.jackie.fairy.bean.impl.FairyDaoImpl">

    </bean>

</beans>
同时我们需要FairyService和FairyServiceImpl
FairyService
package com.jackie.fairy.bean;

/**

 * Created by jackie on 17/11/25.

 */

public interface FairyService {

    void greet();

    void fly();

    void lighting();

}
FairyServiceImpl
package com.jackie.fairy.bean.impl;

import com.jackie.fairy.bean.FairyDao;

import com.jackie.fairy.bean.FairyService;

/**

 * Created by jackie on 17/11/25.

 */

public class FairyServiceImpl implements FairyService {

    private FairyDao fairyDao;

    private String lightColor;

    public FairyDao getFairyDao() {

        System.out.println("===getFairyDao===: " + fairyDao.toString());

        return fairyDao;

    }

    public void setFairyDao(FairyDao fairyDao) {

        System.out.println("===setFairyDao===: " + fairyDao.toString());

        this.fairyDao = fairyDao;

    }

    public String getLightColor() {

        return lightColor;

    }

    public void setLightColor(String lightColor) {

        this.lightColor = lightColor;

    }

    @Override

    public void greet() {

        fairyDao.greet();

    }

    @Override

    public void fly() {

        fairyDao.fly();

    }

    @Override

    public void lighting() {

        System.out.println("----------Hi, I am light fairy. Exactly, " + lightColor + " color light fairy----------");

    }

}
- 没有使用@Autowired注入FairyDao,这是Spring的那一套
- 将FairyDao作为成员变量,添加setter和getter方法(后续做注入使用)
- 添加FairyService自己的实现方法lighting,这是一个会发光的小精灵的feature,小精灵的发光属性取决于lightColor,这个属性需要注入,所以也有相应的setter和getter方法
升级解析器类
上篇的XmlReaderUtil解析器只能解析这样的配置结构
<parent>

    <child>

    </child>

    ...

    <child>

    </child>

<parent>
但是我们现在需要支持的配置文件如上面的配置文件所示,所以需要升级解析器类,支持读取子标签的属性标签。
在此之前,需要新建模型PropertyDefinition,用于存储属性值
package com.jackie.fairy.model;

/**

 * Created by jackie on 17/11/25.

 */

public class PropertyDefinition {

    private String name;

    private String ref;

    private String value;

    public PropertyDefinition(String name, String ref, String value) {

        this.name = name;

        this.ref = ref;

        this.value = value;

    }

    public String getName() {

        return name;

    }

    public void setName(String name) {

        this.name = name;

    }

    public String getRef() {

        return ref;

    }

    public void setRef(String ref) {

        this.ref = ref;

    }

    public String getValue() {

        return value;

    }

    public void setValue(String value) {

        this.value = value;

    }

    @Override

    public String toString() {

        return "PropertyDefinition{" +

                "name='" + name + '\'' +

                ", ref='" + ref + '\'' +

                ", value='" + value + '\'' +

                '}';

    }

}
同时,需要在BeanDefinition模型中加入List,因为属性值是依附在BeanDefinition下面的。
XmlReaderUtil将核心代码改为
for (Iterator iterator = rootElement.elementIterator(); iterator.hasNext(); ) {

    Element element = (Element)iterator.next();

    String id = element.attributeValue(Constants.BEAN_ID_NAME);

    String clazz = element.attributeValue(Constants.BEAN_CLASS_NAME);

    BeanDefinition beanDefinition = new BeanDefinition(id, clazz);

    // 遍历属性标签

    for (Iterator propertyIterator = element.elementIterator(); propertyIterator.hasNext();) {

        Element propertyElement = (Element) propertyIterator.next();

        String name = propertyElement.attributeValue(Constants.PROPERTY_NAME_NAME);

        String ref = propertyElement.attributeValue(Constants.PROPERTY_REF_NAME);

        String value = propertyElement.attributeValue(Constants.PROPERTY_VALUE_NAME);

        propertyDefinitions.add(new PropertyDefinition(name, ref, value));

    }

    beanDefinition.setPropertyDefinitions(propertyDefinitions);

    beanDefinitions.add(beanDefinition);

    // 清空propertyDefinitions集合,因为有些bean没有property标签

    propertyDefinitions = Lists.newArrayList();

}
即添加了对于属性标签的解析和存储,详细代码可进入GitHub项目查看。
实现依赖注入函数
在FairyApplicationContext中添加实现依赖注入功能的函数,主要思路就是对某个需要依赖注入的主体(这里的FairyService),找到要依赖注入的类(这里的FairyDao),借助反射机制,通过setter方法将FairyDao注入到FairyService中。
injectObject()
private void injectObject() {

    for (BeanDefinition beanDefinition : beanDefinitions) {

        Object bean = instanceBeans.get(beanDefinition.getId());

        if (bean != null) {

            try {

                BeanInfo beanInfo = Introspector.getBeanInfo(bean.getClass());

                /**

                 * 通过BeanInfo来获取属性的描述器(PropertyDescriptor)

                 * 通过这个属性描述器就可以获取某个属性对应的getter/setter方法

                 * 然后我们就可以通过反射机制来调用这些方法。

                 */

                PropertyDescriptor[] propertyDescriptors = beanInfo.getPropertyDescriptors();

                for (PropertyDefinition propertyDefinition : beanDefinition.getPropertyDefinitions()) {

                    for (PropertyDescriptor propertyDescriptor : propertyDescriptors) {

                        // 用户定义的bean属性与java内省后的bean属性名称相同时

                        if (StringUtils.equals(propertyDescriptor.getName(), propertyDefinition.getName())) {

                            // 获取setter方法

                            Method setter = propertyDescriptor.getWriteMethod();

                            if (setter != null) {

                                Object value = null;

                                if (StringUtils.isNotEmpty(propertyDefinition.getRef())) {

                                    // 根据bean的名称在instanceBeans中获取指定的对象值

                                    value = instanceBeans.get(propertyDefinition.getRef());

                                } else {

                                    value = ConvertUtils.convert(propertyDefinition.getValue(), propertyDescriptor.getPropertyType());

                                }

                                // //保证setter方法可以访问私有

                                setter.setAccessible(true);

                                try {

                                    // 把引用对象注入到属性

                                    setter.invoke(bean, value);

                                } catch (Exception e) {

                                    LOG.error("invoke setter.invoke failed", e);

                                }

                            }

                            break;

                        }

                    }

                }

            } catch (Exception e) {

                LOG.error("invoke getBean failed", e);

            }

        }

    }

}
- 用到了Java内省获取Bean各个属性的setter和getter方法
- 使用了反射调用setter方法,将其注入FairyService类中
测试
编写测试代码
/**

 * bean依赖注入

 */

FairyApplicationContext autowiredApplicationContext =

        new FairyApplicationContext("application-context-inject.xml");

FairyService fairyService = (FairyService) autowiredApplicationContext.getBean("fairyService");

fairyService.greet();

fairyService.lighting();
得到结果
===setFairyDao===: com.jackie.fairy.bean.impl.FairyDaoImpl@6615435c

Hi, I am fairy

----------Hi, I am light fairy. Exactly, blue color light fairy----------
其中第一行打印结果是在通过反射执行setter.invoke(bean, value);时触发打印的。
至此,我们为Fairy实现了依赖注入的功能,项目地址
https://github.com/DMinerJackie/fairy
项目结构

Fairy项目改动盘点
- 添加
FairyApplicationContext(String configLocation)构造函数,默认加载的配置文件是xml格式 - 添加Json配置文件解析器,可以解析Json格式的配置文件并加载bean
- 重构测试Bean,将接口FairyBean改为FairyDao,并新增FairyService接口及实现类,方便本文的用例测试
- 升级XmlReaderUtil,支持Bean的自标签Property的解析
- 添加依赖注入函数,用户实现依赖注入功能
- 添加PropertyDefinition模型,用于存储property属性值
如果您觉得阅读本文对您有帮助,请点一下“推荐”按钮,您的“推荐”将是我最大的写作动力!如果您想持续关注我的文章,请扫描二维码,关注JackieZheng的微信公众号,我会将我的文章推送给您,并和您一起分享我日常阅读过的优质文章。

照虎画猫写自己的Spring——依赖注入的更多相关文章
- 照虎画猫写自己的Spring
从细节跳出来 看了部分Spring的代码,前面用了四篇内容写了一些读书笔记. 回想起来,论复杂度,Spring够喝上好几壶的.他就像一颗枝繁叶茂的大树,远处看,只是一片绿:走近看,他为你撑起一片小天地 ...
- 照虎画猫写自己的Spring——自定义注解
Fairy已经实现的功能 读取XML格式配置文件,解析得到Bean 读取JSON格式配置文件,解析得到Bean 基于XML配置的依赖注入 所以,理所当然,今天该实现基于注解的依赖注入了. 基于XML配 ...
- Spring依赖注入(IOC)那些事
小菜使用Spring有几个月了,但是对于它的内部原理,却是一头雾水,这次借着工作中遇到的一个小问题,来总结一下Spring. Spring依赖注入的思想,就是把对象交由Spring容器管理,使用者只需 ...
- Spring依赖注入 --- 简单使用说明
Spring依赖注入 --- 简单使用说明 本文将对spring依赖注入的使用做简单的说明,enjoy your time! 1.使用Spring提供的依赖注入 对spring依赖注入的实现方法感兴趣 ...
- Spring依赖注入 --- 模拟实现
Spring依赖注入 --- 模拟实现 面向接口编程,又称面向抽象编程, 数据库如果发生更改,对应的数据访问层也应该改变多写几个实现,需要用谁的时候在service里new谁就可以了面向抽象编程的好处 ...
- Java Web系列:Spring依赖注入基础
一.Spring简介 1.Spring简化Java开发 Spring Framework是一个应用框架,框架一般是半成品,我们在框架的基础上可以不用每个项目自己实现架构.基础设施和常用功能性组件,而是 ...
- 二十7天 春雨滋润着无形 —Spring依赖注入
6月11日,明确."夏条绿已密,朱萼缀明鲜.炎炎日正午,灼灼火俱燃." IT人习惯把详细的事物加工成的形状一致的类.正是这种一致,加上合适的规范.才干彰显对象筋道的牙感和bean清 ...
- 为什么多线程、junit 中无法使用spring 依赖注入?
为什么多线程.junit 中无法使用spring 依赖注入? 这个问题,其实体现了,我们对spring已依赖太深,以至于不想自己写实例了. 那么到底是为什么在多线程和junit单元测试中不能使用依赖注 ...
- Spring 依赖注入优化
Spring 依赖注入优化 原创: carl.zhao SpringForAll社区 今天 Spring 最大的好处就是依赖注入,关于什么是依赖注入,在Stack Overflow上面有一个问题,如何 ...
随机推荐
- Sqoop1.99.7将MySQL数据导入到HDFS中
准备 本示例将实现从MySQL数据库中将数据导入到HDFS中 参考文档: http://sqoop.apache.org/docs/1.99.7/user/Sqoop5MinutesDemo.html ...
- migo的增强
migo的增强 所用BADI:MB_MIGO_BADI 具体见例子:(SE19) CIN_PLUG_IN_TO_MIGO JVA_CRP_MIGO_BADI JV_CRP_MIGO_BADI WB ...
- WPF DataGrid复制单元格问题
当复制出现 以下错误时:System.Runtime.InteropServices.COMException (0x800401D0),这是在WPF剪贴板程序错误. 解决方法:则在需要在App.xa ...
- 使用HTML DOM 来分配事件 —— onmouseover和onmouseout ,onmousedown和onmouseup
一, onmouseover 和 onmouseout 事件 onmouseover 和 onmouseout 事件可用于在用户的鼠标移至 HTML 元素上方或移出元素时触发函数. 一个小例:鼠标未在 ...
- Python程序练习4--模拟员工信息数据库操作
1.功能简介 此程序模拟员工信息数据库操作,按照语法输入指令即能实现员工信息的增.删.改.查功能. 2.实现方法 架构: 本程序采用python语言编写,关键在于指令的解析和执行:其中指令解析主要 ...
- (转)HTTP1.0和HTTP1.1的区别
原文出自:http://www.cnblogs.com/gofighting/p/5421890.html 1.HTTP 1.1支持长连接(PersistentConnection)和请求的流水线(P ...
- 【20171025晚】alert(1) to win 第五题 正则表达式过滤
吃过晚饭,再练一题 第五题 function escape(s) { var text = s.replace(/</g, '<').replace(/"/g, '"' ...
- iPhone X 适配解决方案
在head里添加<meta name='viewport' content='initial-scale=1, viewport-fit=cover'> 这将导致一个页面允分利用iPhon ...
- Django web框架篇:基础
对于web开发者来说,socket是基础.因为Web应用,本质上其实就是一个socket服务端,用户的浏览器其实就是一个socket客户端. 对于真实开发中的python web程序来说,一般会分为两 ...
- KiKi's K-Number
KiKi's K-Number Time Limit: 4000/2000 MS (Java/Others) Memory Limit: 32768/32768 K (Java/Others) Tot ...
