(2)WCF客户端调用
一、visual studion引用生成代理
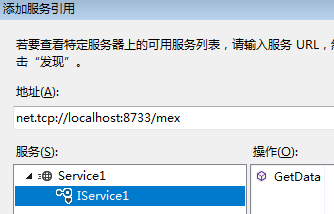
引入服务端发布元数据的地址(并不是服务的地址)
用服务端是控制台程序
例子1
服务端的配置
  <system.serviceModel>

    <services>

      <service name="WcfServiceLibrary6.Service1" behaviorConfiguration="HelloServiceBehavior">

        <!--host这段可以测试时启动wcf测试客户端,运行后除了弹出测试客户端,也可以在浏览器中用此address访问-->

        <host>

          <baseAddresses>

            <add baseAddress = "http://localhost:8733/" />

          </baseAddresses>

        </host>

        <endpoint address="" binding="basicHttpBinding" contract="WcfServiceLibrary6.IService1" />

      </service>

    </services>

    <!--元数据-->

    <behaviors>

      <serviceBehaviors >

        <behavior name="HelloServiceBehavior">

          <serviceMetadata httpGetEnabled="True"/>

        </behavior>

      </serviceBehaviors>

    </behaviors>

  </system.serviceModel>
用右键添加服务引用的方式

最后在客户端配置文件会自动添加xml
    <system.serviceModel>

        <bindings>

            <basicHttpBinding>

                <binding name="BasicHttpBinding_IService1" />

            </basicHttpBinding>

        </bindings>

        <client>

            <endpoint address="http://localhost:8733/" binding="basicHttpBinding"

                bindingConfiguration="BasicHttpBinding_IService1" contract="ServiceReference1.IService1"

                name="BasicHttpBinding_IService1" />

        </client>

    </system.serviceModel>
例子2
把例子1的服务端终结点添加一个address属性
<endpoint address="Service1" binding="basicHttpBinding" contract="WcfServiceLibrary6.IService1" />
客户端还是引用 http://localhost:8733/
生成xml,发现地址多出了一个Service1

例子3
把例子1的服务端终结点添加一个address属性
<endpoint address="http://localhost:22222/" binding="basicHttpBinding" contract="WcfServiceLibrary6.IService1" />
客户端引用依然是 http://localhost:8733/
生成xml,生成的地址变成了终结点的地址
    <system.serviceModel>

        <bindings>

            <basicHttpBinding>

                <binding name="BasicHttpBinding_IService1" />

            </basicHttpBinding>

        </bindings>

        <client>

            <endpoint address="http://localhost:22222/" binding="basicHttpBinding"

                bindingConfiguration="BasicHttpBinding_IService1" contract="ServiceReference1.IService1"

                name="BasicHttpBinding_IService1" />

        </client>

    </system.serviceModel>
例4
使用tcp部署服务端
  <system.serviceModel>

    <services>

      <service name="WcfServiceLibrary6.Service1" behaviorConfiguration="HelloServiceBehavior">

        <!--host这段可以测试时启动wcf测试客户端,运行后除了弹出测试客户端,也可以在浏览器中用此address访问-->

        <host>

          <baseAddresses>

            <add baseAddress = "net.tcp://localhost:8733/" />

          </baseAddresses>

        </host>

        <endpoint address="net.tcp://localhost:22222/" binding="netTcpBinding" contract="WcfServiceLibrary6.IService1" />

        <endpoint address="mex" binding="mexTcpBinding" contract="IMetadataExchange" />

      </service>

    </services>

    <!--元数据-->

    <behaviors>

      <serviceBehaviors >

        <behavior name="HelloServiceBehavior">

          <serviceMetadata />

        </behavior>

      </serviceBehaviors>

    </behaviors>

  </system.serviceModel>
客户端引用

生成
    <system.serviceModel>

        <bindings>

            <netTcpBinding>

                <binding name="NetTcpBinding_IService1" />

            </netTcpBinding>

        </bindings>

        <client>

            <endpoint address="net.tcp://localhost:22222/" binding="netTcpBinding"

                bindingConfiguration="NetTcpBinding_IService1" contract="ServiceReference1.IService1"

                name="NetTcpBinding_IService1">

                <identity>

                    <userPrincipalName value="XTZ-01805141702\Administrator" />

                </identity>

            </endpoint>

        </client>

    </system.serviceModel>
二、使用SvcUtil生成代理
假设有服务端配置
契约
    [ServiceContract]

    public interface IService1

    {

        [OperationContract]

        string GetData(int value);

    }
    public class Service1 : IService1

    {

        public string GetData(int value)

        {

            return string.Format("You entered: {0}", value);

        }

    }
服务端控制台
static void Main(string[] args)

        {

            Uri httpBaseAddress = new Uri("http://localhost:9001/");

            Uri tcpBaseAddress = new Uri("net.tcp://localhost:9002/");

            ServiceHost host = new ServiceHost(typeof(Service1), httpBaseAddress, tcpBaseAddress);

            ////启动行为

            ServiceMetadataBehavior smb = host.Description.Behaviors.Find<ServiceMetadataBehavior>();

            if (smb == null)

            {

                smb = new ServiceMetadataBehavior();

            }

            smb.HttpGetEnabled = true;

            host.Description.Behaviors.Add(smb);

            host.Open();

            Console.WriteLine("Service已经启动,按任意键终止服务!");

            Console.Read();

            host.Close();

        }
使用工具生成代理
在C盘 SvcUtil.exe 能搜索到此工具
把它拷贝到一个单独的文件夹,用cmd指令进入该目录。这里我考到了h盘的根目录下
SvcUtil http://localhost:9001 /out:proxy.cs

生成 二个文件 output.config和proxy.cs

output.config
<?xml version="1.0" encoding="utf-8"?>

<configuration>

    <system.serviceModel>

        <bindings>

            <basicHttpBinding>

                <binding name="BasicHttpBinding_IService1" />

            </basicHttpBinding>

            <netTcpBinding>

                <binding name="NetTcpBinding_IService1" />

            </netTcpBinding>

        </bindings>

        <client>

            <endpoint address="http://localhost:9001/" binding="basicHttpBinding"

                bindingConfiguration="BasicHttpBinding_IService1" contract="IService1"

                name="BasicHttpBinding_IService1" />

            <endpoint address="net.tcp://localhost:9002/" binding="netTcpBinding"

                bindingConfiguration="NetTcpBinding_IService1" contract="IService1"

                name="NetTcpBinding_IService1">

                <identity>

                    <userPrincipalName value="XTZ-01805141702\Administrator" />

                </identity>

            </endpoint>

        </client>

    </system.serviceModel>

</configuration>
proxy.cs
[System.CodeDom.Compiler.GeneratedCodeAttribute("System.ServiceModel", "4.0.0.0")]

[System.ServiceModel.ServiceContractAttribute(ConfigurationName="IService1")]

public interface IService1

{

    [System.ServiceModel.OperationContractAttribute(Action="http://tempuri.org/IService1/GetData", ReplyAction="http://tempuri.org/IService1/GetDataResponse")]

    string GetData(int value);

    [System.ServiceModel.OperationContractAttribute(Action="http://tempuri.org/IService1/GetData", ReplyAction="http://tempuri.org/IService1/GetDataResponse")]

    System.Threading.Tasks.Task<string> GetDataAsync(int value);

}

[System.CodeDom.Compiler.GeneratedCodeAttribute("System.ServiceModel", "4.0.0.0")]

public interface IService1Channel : IService1, System.ServiceModel.IClientChannel

{

}

[System.Diagnostics.DebuggerStepThroughAttribute()]

[System.CodeDom.Compiler.GeneratedCodeAttribute("System.ServiceModel", "4.0.0.0")]

public partial class Service1Client : System.ServiceModel.ClientBase<IService1>, IService1

{

    public Service1Client()

    {

    }

    public Service1Client(string endpointConfigurationName) :

            base(endpointConfigurationName)

    {

    }

    public Service1Client(string endpointConfigurationName, string remoteAddress) :

            base(endpointConfigurationName, remoteAddress)

    {

    }

    public Service1Client(string endpointConfigurationName, System.ServiceModel.EndpointAddress remoteAddress) :

            base(endpointConfigurationName, remoteAddress)

    {

    }

    public Service1Client(System.ServiceModel.Channels.Binding binding, System.ServiceModel.EndpointAddress remoteAddress) :

            base(binding, remoteAddress)

    {

    }

    public string GetData(int value)

    {

        return base.Channel.GetData(value);

    }

    public System.Threading.Tasks.Task<string> GetDataAsync(int value)

    {

        return base.Channel.GetDataAsync(value);

    }

}
config文件尽量自己手写,不用自动生成的,终结要有名字。
三 编写客户端
以下客户端的服务端应用的是 “标题二”下的契约和服务
(1)使用工具代理文件编程
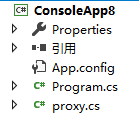
创建一个控制台,output.config文件的内容复制到控制台下的app.config,再把生成的代理文件复制到控制台下

Program.cs
    class Program

    {

        static void Main(string[] args)

        {

            Service1Client proxy = new Service1Client("BasicHttpBinding_IService1");//传入客户端终结点名称

            string str=proxy.GetData();

            proxy.Close();

            Console.Write(str);

            Console.ReadKey();

        }

    }
运行

(2)引用方式编程
客户端引用后的xml
<?xml version="1.0" encoding="utf-8" ?>

<configuration>

    <startup>

        <supportedRuntime version="v4.0" sku=".NETFramework,Version=v4.6" />

    </startup>

    <system.serviceModel>

        <bindings>

            <basicHttpBinding>

                <binding name="BasicHttpBinding_IService1" />

            </basicHttpBinding>

            <netTcpBinding>

                <binding name="NetTcpBinding_IService1" />

            </netTcpBinding>

        </bindings>

        <client>

            <endpoint address="http://localhost:9001/" binding="basicHttpBinding"

                bindingConfiguration="BasicHttpBinding_IService1" contract="ServiceReference1.IService1"

                name="BasicHttpBinding_IService1" />

            <endpoint address="net.tcp://localhost:9002/" binding="netTcpBinding"

                bindingConfiguration="NetTcpBinding_IService1" contract="ServiceReference1.IService1"

                name="NetTcpBinding_IService1">

                <identity>

                    <userPrincipalName value="XTZ-01805141702\Administrator" />

                </identity>

            </endpoint>

        </client>

    </system.serviceModel>

</configuration>
    class Program

    {

        static void Main(string[] args)

        {

            var client = new ServiceReference1.Service1Client("BasicHttpBinding_IService1");//使用http通讯

            //var client = new ServiceReference1.Service1Client("NetTcpBinding_IService1");//使用tcp通讯

            string str = client.GetData();

            client.Close();

            Console.Write(str);

            Console.ReadKey();

        }

    }
(2)WCF客户端调用的更多相关文章
- WCF初探-10:WCF客户端调用服务
创建WCF 服务客户端应用程序需要执行下列步骤: 获取服务终结点的服务协定.绑定以及地址信息 使用该信息创建 WCF 客户端 调用操作 关闭该 WCF 客户端对象 WCF客户端调用服务存在以下特点: ...
- Java与WCF交互(二):WCF客户端调用Java web service【转】
原文:http://www.cnblogs.com/downmoon/archive/2010/08/25/1807982.html 在上篇< Java与WCF交互(一):Java客户端调用WC ...
- WCF系列教程之WCF客户端调用服务
1.创建WCF客户端应用程序需要执行下列步骤 (1).获取服务终结点的服务协定.绑定以及地址信息 (2).使用该信息创建WCF客户端 (3).调用操作 (4).关闭WCF客户端对象 二.操作实例 1. ...
- 转载——Java与WCF交互(二):WCF客户端调用Java Web Service
在上篇< Java与WCF交互(一):Java客户端调用WCF服务>中,我介绍了自己如何使用axis2生成java客户端的悲惨经历.有同学问起使用什么协议,经初步验证,发现只有wsHttp ...
- WCF客户端调用服务器端错误:"服务器已拒绝客户端凭据"。
WCF客户端和服务器端不在同一台机器上时,客户端调用服务器端会报如下错误:"服务器已拒绝客户端凭据". 解决办法:在服务端配置文件与客户端配置文件中加入下面红色部分
- WCF 客户端调用服务操作的两种方法
本节的主要内容:1.通过代理类的方式调用服务操作.2.通过通道的方式调用服务操作.3.代码下载 一.通过代理类的方式调用服务操作(两种方式添加代理类) 1.手动编写代理类,如下: 客户端契约: usi ...
- 封装WCF客户端调用
在之前的博客中,我记录过如何利用SvcUtil.exe工具生成客户端的代理文件,然后调用的情形. 今天我要讲解的是利用代码直接对服务端进行调用.好处在于,一是不会生成那么大的引用文件,其次是可以方便控 ...
- WCF客户端调用并行最大同时只支持两个请求
做项目的时候发现 频繁调用WCF服务时 明明一次性发起了几十个请求 而在服务端记录的日志却显示出现了排队的迹象 并且都是最大并发数为2 在网上狂搜 大家给出来的解决方法都是增加web.config里面 ...
- WCF 客户端调用几种方式
http://www..com/html/blogs/20130413/2116.htm CSDN123 http://developer.51cto.com/art/200911/161465.ht ...
随机推荐
- 修改python新建文件时的模板
- Redis实现之链表
链表 链表提供了高效的节点重排能力,以及顺序性的节点访问顺序,并且可以通过增删节点来灵活地调整链表的长度.作为一种常用数据结构,链表内置在很多高级的编程语言里面,因为Redis使用的C语言并没有内置这 ...
- CART树 python小样例
决策树不断将数据切分成小数据集,直到所有目标变量完全相同,或者数据不能再切分为止,决策时是一种贪心算法,它要在给定的时间内做出最佳选择,但并不关心能否达到最优 树回归 优点:可以对复杂和非线性的数据建 ...
- 矩阵儿快速幂 - POJ 3233 矩阵力量系列
不要管上面的标题的bug 那是幂的意思,不是力量... POJ 3233 Matrix Power Series 描述 Given a n × n matrix A and a positive in ...
- 创建OpenStack的存储云
OPENSTACK内部 OpenStack是一个开源的云平台项目,是由NASA发起,Rackspace在2010作为一个项目进行主导.源代码是由OpenStack基金会管理并在准许Apache许可下发 ...
- 测试环境docker化—容器集群编排实践
本文来自网易云社区 作者:孙婷婷 背景 在前文<测试环境docker化-基于ndp部署模式的docker基础镜像制作>中已经详述了docker镜像制作及模块部署的过程,按照上述做法已可以搭 ...
- leetcode 【 Subsets II 】python 实现
题目: Given a collection of integers that might contain duplicates, S, return all possible subsets. No ...
- day05_06 continue语句、while循环
输入满3次跳出,然后留一句话 for i in range(3): username = input("Username:") password = input("Pas ...
- maven学习(八)——使用maven创建javaweb项目
构建JavaWeb项目 1.创建JavaWeb项目 1.使用mvn archetype:generate命令,如下所示: mvn archetype:generate -DgroupId=com.my ...
- RNQOJ Jam的计数法
题目:https://www.rqnoj.cn/problem/3 非递归做法:(严格递增 单调大于 不可等于 ) 做法:循环体 <1>操作字符串 str 从后往前找,k=1,如果s[w ...
