bash初始化文件详解
目录
本文的环境: Ubuntu 18.04 Server + Bash 4.4.20
bash启动时会执行一系列脚本, 具体要执行哪些启动文件, 这和bash的类型有关: 是否为交互式(interactive)的shell, 是否为登录式(login)的shell
1. 交互式(interactive)shell/非交互式(non-interactive)shell
1.1 如何启动一个交互式shell/非交互式shell
- 日常使用ssh登录的shell是交互式shell
- 图形化界面下打开的terminal也是交互式shell
- 通过
bash script.sh或./script.sh执行脚本时, 会创建一个子shell来执行此脚本, 此时的shell为非交互式的 - 通过ssh远程执行命令的为非交互式
1.2 如何判断是否为交互式shell
$-会输出set设置的一些选项, 输出结果结果中的i表示interactive(但实际上不能通过set设置是否为交互式)
case "$-" in

  *i*) echo 'This shell is interactive' ;;

  *) echo 'This shell is not interactive' ;;

esac
$ echo $-

himBHs

$ cat script.sh

echo "$-"

$ bash script.sh

hB
在非交互式shell不会设置PS1, 所以通过PS1是否有值判断也是可行的
if [ -z "$PS1" ]; then

  echo 'This shell is not interactive'

else

  echo 'This shell is interactive'

fi
2. 登录式(login)shell/非登录式(non-login)shell
2.1 如何启动一个登录式shell/非登录式shell
通过bash --login或su -l命令启动的为登录式shell
通过ssh连接的为登录式shell
通过bash命令启动的为非登录式shell
通过ssh远程执行命令的为非登录式shell
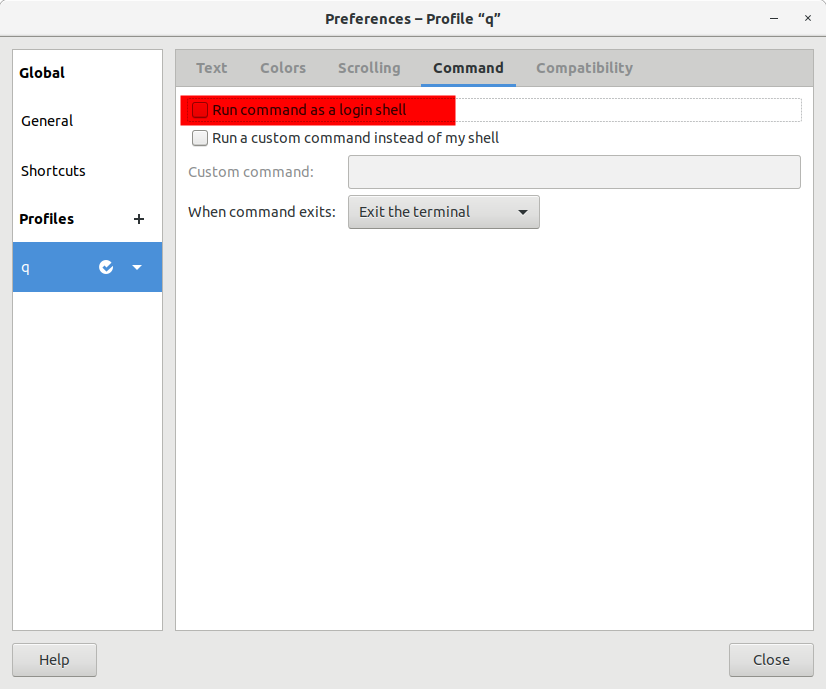
图形化界面下启动的"terminal"默认为非登录式的, 但是可以更改为登录式shell
2.2 如何判断是否为登录式shell
可通过shopt命令来查看是否为登录式shell, 也可以通过此命令来转换登录式/非登录式shell
$ shopt login_shell

login_shell    off
3. 启动文件
了解了什么是交互式/登录式shell之后, 我们来看下这2*2种情况下shell的初始化文件
3.1 测试方法
涉及到的文件主要有: /etc/profile, /etc/bash.bashrc, ~/.profile, ~/.bashrc, ~/.bash_logout
准备两个用户, 因为需要切换用户
将echo "$(date '+%H:%M:%S:%N') $(whoami) /etc/profile" >>/home/ba/log添加到上述五个文件的第一行(后三个文件第二个用户也要修改)
由于涉及到.bash_logout文件, 此文件是在退出bash的时候才执行, 如果只连接一次服务器, 推出后再登录看日志, 会把第二次登录的结果也带到日志中, 不太严谨
所以应该开两个窗口连上服务器, 第一个窗口执行tail -f /home/ba/log观察日志, 第二个窗口可以随意登录推出和执行命令
3.2 交互登录(interactive login) shell
交互登录式shell初始化的文件为:
- /etc/profile
- ~/.bash_profile, ~/.bash_login, and ~/.profile 这三个文件只会执行其中一个, 找到其中一个别的就不执行了, 优先级从前往后递减
- ~/.bash_logout
通过ssh的方式登录即可得到交互登录式shell
$ ssh ba@......

$ logout

# log

### /etc/profile文件中有 . /etc/bash.bashrc 的语句, 所以/etc/bash.bashrc也被执行了

### 同样, ~/.profile中也有 . ~/.bashrc 的语句

### 注意: 不同的发行版, 不同的shell, 默认情况下对于/etc/bash.bashrc可能会存在差异, 有些bash是通过~/.bashrc来执行 . /etc/bash.bashrc

13:35:47:304181923 ba /etc/profile

13:35:47:309532807 ba /etc/bash.bashrc

13:35:47:353487400 ba ~/.profile

13:35:47:358734199 ba ~/.bashrc

13:36:14:812344118 ba ~/.bash_logout
再来验证~/.bash_profile, ~/.bash_login, and ~/.profile这三个文件的优先级
$ ssh ba@......

$ vim .bash_profile

$ cat .bash_profile

echo "$(date '+%H:%M:%S:%N') $(whoami) ~/.bash_profile" >>/home/ba/log

$ logout

# log

### ~/.profile连带着~/.bashrc都没有了, 取而代之的是~/.bash_profile

13:53:07:178921031 ba /etc/profile

13:53:07:183184595 ba /etc/bash.bashrc

13:53:07:211623026 ba ~/.bash_profile

13:53:12:253835053 ba ~/.bash_logout
执行完成之后, 我删除了~/.bash_profile, 后续章节都不涉及~/.bash_profile
3.3 交互非登录(interactive non-login) shell
交互非登录式shell初始化的文件为:
- /etc/bash.bashrc
- ~/.bashrc
通过su命令切换用户即可得到交互非登录式shell
$ ssh ba@......

$ su root

$ echo $-

himBHs

$ shopt login_shell

login_shell     off

# log

14:04:53:515775025 root /etc/bash.bashrc

14:04:53:522999498 root ~/.bashrc
通过su切换用户后, 按下Tab键发现自动补全用不了, 是因为/etc/profile中有以下一段, 而自动补全与/etc/profile.d中的脚本有关, 将以下内容移动到/etc/bash.bashrc或~/.bashrc, 即可保证交互式shell可以完成自动补全
if [ -d /etc/profile.d ]; then

  for i in /etc/profile.d/*.sh; do

    if [ -r $i ]; then

      . $i

    fi

  done

  unset i

fi
3.4 非交互非登录(non-interactive non-login) shell
非交互非登录式shell初始化的文件为:
- 查找
$BASH_ENV变量并执行, 就像if [ -n "$BASH_ENV" ]; then . "$BASH_ENV"; fi一样
bash xxx.sh所创建用来执行脚本的子shell为非登录非交互式shell
$ ssh ba@......

$ cat script.sh

echo "$-"

echo "$BASH_ENV"

shopt login_shell

$ bash script.sh

hB

login_shell    	off

# log 无输出
设置$BASH_ENV变量
$ export BASH_ENV='~/.bashrc'

$ bash script.sh

hB

~/.bashrc

login_shell    	off

# log

13:57:00:355294304 ba ~/.bashrc
3.5 非交互登录(non-interactive login) shell
非交互登录式shell初始化的文件为:
- /etc/profile
- ~/.bash_profile, ~/.bash_login, and ~/.profile
- ~/.bash_logout
- 查找
$BASH_ENV变量并执行, 就像if [ -n "$BASH_ENV" ]; then . "$BASH_ENV"; fi一样
在bash xxx.sh的基础上加上--login选项可得到登录非交互式shell
$ ssh ba@......

$ bash --login script.sh

hB

login_shell    	on

# log

13:59:14:886387539 ba /etc/profile

13:59:14:894341293 ba ~/.profile

13:59:14:897853694 ba ~/.bashrc
虽然此处也是登录式shell, 为何没有/etc/bash.bashrc? 因为在/etc/profile中有如下一段, 只有在交互式shell才执行/etc/bash.bashrc
if [ "${PS1-}" ]; then

  ...

  . /etc/bash.bashrc

fi
再验证下$BASH_ENV. 注意, .bashrc输出了两次, 一次是.profile调用, 一次是$BASH_ENV的作用
$ export BASH_ENV='~/.bashrc'

$ bash --login script.sh

hB

~/.bashrc

login_shell    	on

# log

14:03:35:455306977 ba /etc/profile

14:03:35:461542280 ba ~/.profile

14:03:35:465203982 ba ~/.bashrc

14:03:35:469716368 ba ~/.bashrc
4. 参考
bash初始化文件详解的更多相关文章
- 【转】linux中inittab文件详解
原文网址:http://www.2cto.com/os/201108/98426.html linux中inittab文件详解 init的进程号是1(ps -aux | less),从这一点就能看出, ...
- web.xml文件详解
web.xml文件详解 Table of Contents 1 listener. filter.servlet 加载顺序 2 web.xml文件详解 3 相应元素配置 1 listener. f ...
- jni.h头文件详解二
作者:左少华 博客:http://blog.csdn.net/shaohuazuo/article/details/42932813 转载请注明出处:http://blog.csdn.net/shao ...
- Linux - CentOS6.5服务器搭建与初始化配置详解(上)
1.新建一个虚拟机 选择典型 单机下一步 p.MsoNormal,li.MsoNormal,div.MsoNormal { margin: 0cm 0cm 0.0001pt; text-align: ...
- 【转】 jni.h头文件详解(二)
原文网址:http://blog.csdn.net/shaohuazuo/article/details/42932813 作者:左少华 博客:http://blog.csdn.net/shaohua ...
- Linux - CentOS6.5服务器搭建与初始化配置详解(下)
传送带:Linux - CentOS6.5服务器搭建与初始化配置详解(上) 继续接着上面的安装,安装完后会出现下面界面 点击reboot重启 重启后可以看到下面的tty终端界面 因为这就是最小化安装 ...
- PE文件详解(六)
这篇文章转载自小甲鱼的PE文件详解系列原文传送门 之前简单提了一下节表和数据目录表,那么他们有什么区别? 其实这些东西都是人为规定的,一个数据在文件中或者在内存中的位置基本是固定的,通过数据目录表进行 ...
- PE文件详解(三)
本文转自小甲鱼的PE文件详解系列传送门 PE文件到内存的映射 在执行一个PE文件的时候,windows 并不在一开始就将整个文件读入内存的,二十采用与内存映射文件类似的机制. 也就是说,windows ...
- /etc/inittab文件详解
/etc/inittab由/sbin/init程序解析调用,用于系统初始化,/sbin/init可参考源码busybox中init.c的实现方式. 原址如下: http://leejia.blog.5 ...
随机推荐
- Ubuntu16桌面版编译OpenCV4的java库和so库
欢迎访问我的GitHub https://github.com/zq2599/blog_demos 内容:所有原创文章分类汇总及配套源码,涉及Java.Docker.Kubernetes.DevOPS ...
- Golang 记录
Golang 笔记 1. hello Golang 新建项目,推荐GoLand工具 GOPATH目录:D:\go\awesomeProject 三个标准目录:bin,pkg,src MAIN目录:D: ...
- 【经验总结】CodeBlocks使用mingw64
CodeBlocks使用 标签:c++ 一.安装并配置mingw-w64 使用中发现CB默认的编译器版本过低,c++11的一些东西无法使用,比如string中的stoi函数,因此尝试安装新版本的编译器 ...
- deepin20搜狗输入法使用
放大打字框 打出中文语句符号
- gin中的SecureJSON 防止 json 劫持
使用 SecureJSON 防止 json 劫持.如果给定的结构是数组值或map,则默认预置 "while(1)," 到响应体. package main import ( &qu ...
- 手把手教你用Strace诊断问题
手把手教你用Strace诊断问题 发表于2015-10-16 早些年,如果你知道有个 strace 命令,就很牛了,而现在大家基本都知道 strace 了,如果你遇到性能问题求助别人,十有八九会建议你 ...
- gcc 11.2 在线升级
环境:centos 7 1.准备开发环境 $ yum groupinstall "Development Tools" $ yum install glibc-static lib ...
- MySQL 5.7.19 简易安装、卸载教程
前言:传统的 exe 文件安装的MySQL,安装后特别难卸载,而且一旦处理不好,就容易出错,想再安装别的版本也不容易.因为这种方式的安装,虽然是不断的下一步,但是卸载的时候需要处理很多,在本文最后,有 ...
- Java.lang.Math类详解
Math类位于Java.lang包中,包含用于执行基本数学运算的方法!Math类的所有执行方法都是静态方法,可以直接使用类名.方法名调用,如:Math.round() 常用的方法:Math.round ...
- C语言之清空缓存区
感谢大佬:https://blog.csdn.net/qq_26768741/article/details/50933598 在C语言中,我们常常需要去清空缓存区,对于缓存区清空的重要性,接下来我们 ...