AJP协议总结与分析
Tomcat服务器通过Connector连接器组件与客户程序建立连接,Connector组件负责接收客户的请求,以及把Tomcat服务器的响应结果发送给客户。默认情况下,Tomcat在server.xml中配置了两种连接器:
<!-- Define a non-SSL Coyote HTTP/1.1
Connector on port 8080 -->
<Connector port="8080"
maxThreads="150"
minSpareThreads="25"
maxSpareThreads="75"
enableLookups="false"
redirectPort="8443"
acceptCount="100"
debug="0"
connectionTimeout="20000"
disableUploadTimeout="true" />
<!-- Define a Coyote/JK2 AJP 1.3
Connector on port 8009 -->
<Connector port="8009"
enableLookups="false"
redirectPort="8443" debug="0"
protocol="AJP/1.3" />
第一个连接器监听8080端口,负责建立HTTP连接。在通过浏览器访问Tomcat服务器的Web应用时,使用的就是这个
http://blog.sina.com.cn/s/blog_6870d1e00100mv64.html
一般Tomcat默认的SSL端口号是8443,但是对于SSL标准端口号是443,这样在访问网页的时候,直接使用https而不需要输入端口号就可以访问,如https://ip/
想要修改端口号,需要修改Tomcat的server.xml文件:
1.non-SSL HTTP/1.1 Connector定义的地方,一般如下:
<Connector port="80" maxHttpHeaderSize="8192"
maxThreads="500" minSpareThreads="25" maxSpareThreads="75"
enableLookups="false" redirectPort="443" acceptCount="100"
connectionTimeout="20000" disableUploadTimeout="true" />
将其中的redirectPort端口号改为:443
2.SSL HTTP/1.1 Connector定义的地方,修改端口号为:443,如下:
<Connector
port="443" maxHttpHeaderSize="8192"
maxThreads="150" minSpareThreads="25"
maxSpareThreads="75"
enableLookups="false"
disableUploadTimeout="true"
acceptCount="100" scheme="https"
secure="true"
clientAuth="false" sslProtocol="TLS"
keystoreFile="conf/tomcat.keystore"
keystorePass="123456" />
3.AJP 1.3 Connector定义的地方,修改redirectPort为443,如下:
<Connector port="8009"
enableLookups="false" redirectPort="443" protocol="AJP/1.3" />
重新启动Tomcat就可以了。到这一步可以形成访问方式 https://ip/
4、强制https访问
在tomcat\conf\web.xml中的</welcome-file-list>后面加上这样一段:
<login-config>
<!-- Authorization setting for SSL -->
<auth-method>CLIENT-CERT</auth-method>
<realm-name>Client Cert Users-only Area</realm-name>
</login-config>
<security-constraint>
<!-- Authorization setting for SSL -->
<web-resource-collection >
<web-resource-name >SSL</web-resource-name>
<url-pattern>/*</url-pattern>
</web-resource-collection>
<user-data-constraint>
<transport-guarantee>CONFIDENTIAL</transport-guarantee>
</user-data-constraint>
</security-constraint>
注意:(如果对方使用的机器端口被占用)
需要切换端口来转换数据:iptables -t nat -A PREROUTING -p tcp --dport 80 -j REDIRECT --to-port 8080
AJP(Apache JServ Protocol)是定向包协议。因为性能原因,使用二进制格式来传输可读性文本。WEB服务器通过TCP连接和SERVLET容器连接。
(格式显示不好,本文已放附件中)
AJP协议是定向包(面向包)协议,采用二进制形式代替文本形式,以提高性能。Web Server一般维持和Web Container的多个TCP Connecions,即TCP连接池,多个request/respons循环重用同一个Connection。但是当Connection被分配(Assigned)到某个请求时,该请求完成之前,其他请求不得使用该连接。
Tcp Connection 具有两种状态:
Boolean: 一个字节,1 = true, 0 = false。
|
包方向
|
0
|
1
|
2
|
3
|
4…(n+3)
|
|
Server->Container
|
0x12
|
0x34
|
数据长度(n)
|
数据(payload)
|
|
|
Container->Server
|
A
|
B
|
数据长度(n)
|
数据(payload)
|
|
|
方向
|
code
|
包类型
|
描述
|
|
Server->Container
|
2
|
Forward Request |
Begin the request-processing cycle with the following data。 |
|
7
|
Shutdown
|
The web server asks the container to shut itself down |
|
|
8
|
Ping
|
The web server asks the container to take control (secure login phase). |
|
|
10
|
Cping
|
The web server asks the container to respond quickly with a CPong |
|
|
none
|
Data
|
Size (2 bytes) and corresponding body data. |
|
|
Container->Server
|
3
|
Send Body Chunk
|
Send a chunk of the body from the servlet container to the web server |
|
4
|
Send Headers
|
Send the response headers from the servlet container to the web server |
|
|
5
|
End Response
|
Marks the end of the response
|
|
|
6
|
Get Body Chunk
|
Get further data from the request if it hasn't all been transferred yet |
|
|
9
|
CPong Reply
|
The reply to a CPing request
|
|
AJP13_FORWARD_REQUEST :=
prefix_code (byte) 0x02 = JK_AJP13_FORWARD_REQUEST
method (byte)
protocol (string)
req_uri (string)
remote_addr (string)
remote_host (string)
server_name (string)
server_port (integer)
is_ssl (boolean)
num_headers (integer)
request_headers *(req_header_name req_header_value) attributes *(attribut_name attribute_value)
request_terminator (byte) OxFF |
|
req_header_name :=
sc_req_header_name | (string) [see below for how this is parsed] |
|
sc_req_header_name := 0xA0xx (integer) req_header_value := (string)
|
|
attribute_name := sc_a_name | (sc_a_req_attribute string) attribute_value := (string)
|
(1) prefix_code 所有的Forward Request包都是0x02.
|
Command Name |
code
|
POST
|
4
|
|
OPTIONS
|
1
|
PUT
|
5
|
|
GET
|
2
|
DELETE
|
6
|
|
HEAD
|
3
|
TRACE
|
7
|
(3) protocol, req_uri, remote_addr, remote_host, server_name, server_port, is_ssl: 每个请求包都有这几个字段,格式都是 长度+字符串值+\0结束符。
|
请求头
|
Code 值 |
Code 名称 |
|
accept |
0xA001
|
SC_REQ_ACCEPT
|
|
accept-charset
|
0xA002
|
SC_REQ_ACCEPT_CHARSET
|
|
accept-encoding
|
0xA003
|
SC_REQ_ACCEPT_ENCODING
|
|
accept-language
|
0xA004
|
SC_REQ_ACCEPT_LANGUAGE
|
|
authorization
|
0xA005
|
SC_REQ_AUTHORIZATION
|
|
connection
|
0xA006
|
SC_REQ_CONNECTION
|
|
content-type
|
0xA007
|
SC_REQ_CONTENT_TYPE
|
|
content-length
|
0xA008
|
SC_REQ_CONTENT_LENGTH
|
|
cookie
|
0xA009
|
SC_REQ_COOKIE
|
|
cookie2
|
0xA00A
|
SC_REQ_COOKIE2
|
|
host
|
0xA00B
|
SC_REQ_HOST 0xA00C |
|
pragma
|
0xA00C
|
SC_REQ_PRAGMA
|
|
referer
|
0xA00D
|
SC_REQ_REFERER
|
|
user-agent
|
0xA00E
|
SC_REQ_USER_AGENT
|
|
AJP13_SEND_HEADERS :=
prefix_code 4
http_status_code (integer)
http_status_msg (string)
num_headers (integer)
response_headers *(res_header_name header_value) res_header_name :=
sc_res_header_name | (string) [see below for how this is parsed]
sc_res_header_name := 0xA0 (byte) header_value := (string)
AJP13_SEND_BODY_CHUNK :=
prefix_code 3
chunk_length (integer)
chunk *(byte) AJP13_END_RESPONSE :=
prefix_code 5
reuse (boolean)
AJP13_GET_BODY_CHUNK :=
prefix_code 6
requested_length (integer)
|
|
请求头
|
Code 值 |
Code 名称 |
|
Content-Type
|
0xA001
|
SC_RESP_CONTENT_TYPE
|
|
Content-Language
|
0xA002
|
SC_RESP_CONTENT_LANGUAGE
|
|
Content-Length
|
0xA003
|
SC_RESP_CONTENT_LENGTH
|
|
Date
|
0xA004
|
SC_RESP_DATE
|
|
Last-Modified
|
0xA005
|
SC_RESP_LAST_MODIFIED
|
|
Location
|
0xA006
|
SC_RESP_LOCATION
|
|
Set-Cookie
|
0xA007
|
SC_RESP_SET_COOKIE
|
|
Set-Cookie2
|
0xA008
|
SC_RESP_SET_COOKIE2
|
|
Servlet-Engine
|
0xA009
|
SC_RESP_SERVLET_ENGINE
|
|
Status
|
0xA00A
|
SC_RESP_STATUS
|
|
WWW-Authenticate
|
0xA00B
|
SC_RESP_WWW_AUTHENTICATE
|

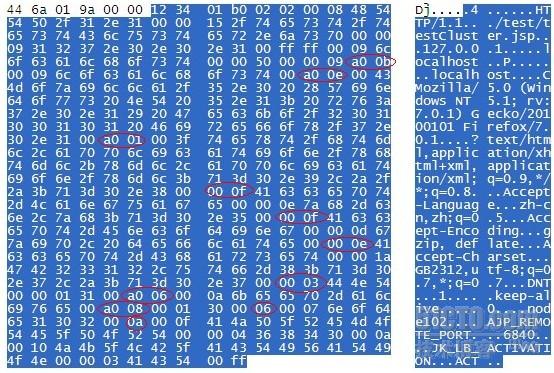
响应头数据包:

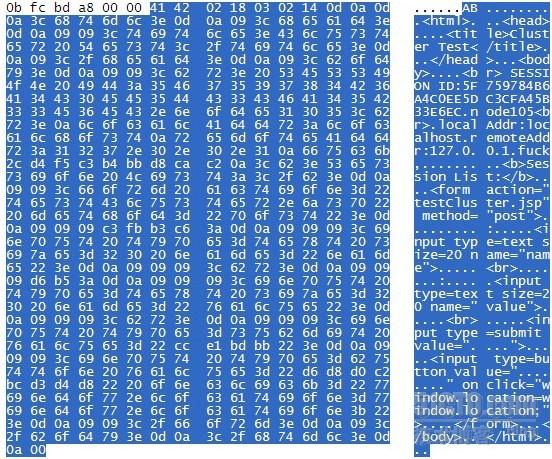
响应正文数据包:


http://guojuanjun.blog.51cto.com/277646/688559/
AJP协议总结与分析的更多相关文章
- 网络协议图形化分析工具EtherApe
网络协议图形化分析工具EtherApe 在对网络数据分析的时候,渗透测试人员往往只关心数据流向以及协议类型,而不关心具体数据包的内容.因为这样可以快速找到网络的关键节点或者重要的协议类型. Kal ...
- 协议解析Bug分析
协议解析Bug分析 源自邮件协议RPC(远程过程调用)处理的Request请求数据包的bug. 一.Bug描写叙述 腾讯收购的Foxmailclient能够作为outlookclient ...
- http协议请求流程分析
http协议请求流程分析 用户输入URL(地址链接)(http://www.baidu.com:80/tools.html)客户端获取到端口及主机名后,客户端利用DNS解析域名,首先客户端的浏览器会先 ...
- Ripple 20:Treck TCP/IP协议漏洞技术分析
本文由“合天智汇”公众号首发,作者:b1ngo Ripple 20:Treck TCP/IP协议漏洞技术分析 Ripple20是一系列影响数亿台设备的0day(19个),是JSOF研究实验室在Trec ...
- 六:分布式事务一致性协议paxos的分析
最近研究paxos算法,看了许多相关的文章,概念还是很模糊,觉得还是没有掌握paxos算法的精髓,所以花了3天时间分析了libpaxos3的所有代码,此代码可以从https://bitbucket.o ...
- PPTP协议握手流程分析
一 PPTP概述 PPTP(Point to Point Tunneling Protocol),即点对点隧道协议.该协议是在PPP协议的基础上开发的一种新的增强型安全协议,支持多协议虚拟专用网,可 ...
- ARP 协议抓包分析
ARP(Address Resolution Protocol)- 地址解析分析 ARP 协议是根据IP地址获取物理地址的一个TCP/IP协议. 当PC1 想与 PC2 进行通信时,需要同时知道PC2 ...
- 网络协议抓包分析——TCP传输控制协议(连接建立、释放)
前言 TCP协议为数据提供可靠的端到端的传输,处理数据的顺序和错误恢复,保证数据能够到达其应到达的地方.TCP协议是面向连接的,在两台主机使用TCP协议进行通信之前,会先建立一个TCP连接(三次握手) ...
- 网络协议抓包分析——IP互联网协议
前言 IP协议是位于OSI模型的第三层协议,其主要目的就是使得网络间可以相互通信.在这一层上运行的协议不止IP协议,但是使用最为广泛的就是互联网协议. 什么是IP数据报 TCP/IP协议定义了一个在因 ...
随机推荐
- 1 起步-Pro Git---VCS比较、git基本原理、git配置
本地版本控制系统 集中化的版本控制系统 诸如 CVS,Subversion 以及 Perforce 等,都有一个单一的集中管理的服务器,保存所有文件的修订版本,而协同工作的人们都通过客户端连到这台服务 ...
- MYSQL 查看当前用户与数据库版本
问题一: 查看当前用户 select user(); 问题二: 查看数据库版本 select version();
- PHP设计模式之装饰器模式
装饰器模式:如果已有对象的部分内容或功能性发生改变,但是不需要修改原始对象的结构或不使用继承,动态的扩展一个对象的功能,则应该使用装饰器模式.简单点说:就是我们不应该去修改已有的类,而是通过创建另外一 ...
- 关于网络协议和socket编程基本概念
TCP协议可以说已经是IT人耳熟能详的协议,最近在学习socket网络编程时后重新温习一下这个协议,针对一些问题做了一些总结,很多理解可能还不是很准确. 1. 协议是什么?所谓的各种网络协议无非是一种 ...
- Delphi与字符编码(实战篇)(MultiByteToWideChar会返回转换后的宽字符串长度)
本文目标: 了解Delphi的字符串类型 字符编码的检测与转换 简体繁体转换 0. 导言 看完“.Net与字符编码(理论篇)”,我们明白了字符是自然语言中的最小单位,在存储和传输的过程中可以使用三种编 ...
- winform,wpf全屏 还显示任务栏的解决方法
原文:winform,wpf全屏 还显示任务栏的解决方法 以wpf为例: 全屏代码: this.Topmost = true; this.WindowStyle = System.Windows.Wi ...
- windows2003 64位注册码 序列号 激活码
Windows 2003 R2 64bit Enterprise VOL Edition 企业版 MR78C-GF2CY-KC864-DTG74-VMT73 VPT7T-77D38-KWVW2-2G3 ...
- Linux下的sudo及其配置文件/etc/sudoers的详细配置说明
http://www.osedu.net/article/linux/2011-01-03/178.html Linux下的sudo及其配置文件/etc/sudoers的详细配置说明 1.sudo介绍 ...
- Linux开发环境配置
配置JDK: tar -xzvf jdk-7u71-linux-x64.tar.gz rm -f jdk-7u71-linux-x64.tar.gz 测试:java -version 配置Grad ...
- Median of Two Sorted 求两个有序数组的中位数
中位数是把一个数的集合划分为两部分,每部分包含的数字个数相同,并且一个集合中的元素均大于另一个集合中的元素. 因此,我们考虑在一个任意的位置,将数组A划分成两部分.i表示划分数组A的位置,如果数组A包 ...
