Spring MVC 为控制器添加通知与处理异常
与Spring AOP一样,Spring MVC也能够给控制器加入通知,它主要涉及4个注解:
•@ControllerAdvice,主要作用于类,用以标识全局性的控制器的拦截器,它将应用于对应的控制器。
•@InitBinder,是一个允许构建POJO参数的方法,允许在构造控制器参数的时候,加入一定的自定义控制。
•@ExceptionHandler,通过它可以注册一个控制器异常,使用当控制器发生注册异常时,就会跳转到该方法上。
•@ModelAttribute,是一种针对于数据模型的注解,它先于控制器方法运行,当标注方法返回对象时,它会保存到数据模型中。
代码清单16-19:控制器通知
package com.ssm.chapter15.controller.advice;

//标识控制器通知,并且指定对应的包

import org.springframework.beans.propertyeditors.CustomDateEditor;

import org.springframework.ui.Model;

import org.springframework.web.bind.WebDataBinder;

import org.springframework.web.bind.annotation.ControllerAdvice;

import org.springframework.web.bind.annotation.ExceptionHandler;

import org.springframework.web.bind.annotation.InitBinder;

import org.springframework.web.bind.annotation.ModelAttribute;

import java.text.SimpleDateFormat;

import java.util.Date;

@ControllerAdvice(basePackages = {"com.ssm.chapter15.controller.advice"})

public class CommonControllerAdvice {

    //定义HTTP对应参数处理规则

    @InitBinder

    public void initBinder(WebDataBinder binder) {

        //针对日期类型的格式化,其中CustomDateEditor是客户自定义编辑器

        // 它的boolean参数表示是否允许为空

        binder.registerCustomEditor(Date.class, new CustomDateEditor(new SimpleDateFormat("yyyy-MM-dd HH:mm:ss"), false));

    }

    //处理数据模型,如果返回对象,则该对象会保存在

    @ModelAttribute

    public void populateModel(Model model) {

        model.addAttribute("projectName", "chapter15");

    }

    //异常处理,使得被拦截的控制器方法发生异常时,都能用相同的视图响应

    @ExceptionHandler(Exception.class)

    public String exception() {

        return "exception";

    }

}
代码清单16-20:测试控制器通知
package com.ssm.chapter15.controller.advice;

import org.apache.http.client.utils.DateUtils;

import org.springframework.format.annotation.NumberFormat;

import org.springframework.stereotype.Controller;

import org.springframework.ui.Model;

import org.springframework.web.bind.annotation.RequestMapping;

import org.springframework.web.bind.annotation.ResponseBody;

import java.math.BigDecimal;

import java.util.Date;

import java.util.HashMap;

import java.util.Map;

@Controller

@RequestMapping("/advice")

public class MyAdviceController {

    /**

     * http://localhost:8081/advice/test.do?date=2017-06-23%2018:12:00&amount=123,456.78

     * @param date  日期,在@initBinder 绑定的方法有注册格式

     * @param model 数据模型,@ModelAttribute方法会先于请求方法运行

     * @return map

     */

    @RequestMapping("/test")

    @ResponseBody

    public Map<String, Object> testAdvice(Date date, @NumberFormat(pattern = "##,###.00") BigDecimal amount, Model model) {

        Map<String, Object> map = new HashMap<String, Object>();

        //由于@ModelAttribute注解的通知会在控制器方法前运行,所以这样也会取到数据

        map.put("project_name", model.asMap().get("projectName"));

        // map.put("date", DateUtils.format(date, "yyyy-MM-dd"));

        map.put("date", DateUtils.formatDate(date, "yyyy-MM-dd"));

        map.put("amount", amount);

        return map;

    }

    /**

     * 测试异常.

     */

    @RequestMapping("/exception")

    public void exception() {

        throw new RuntimeException("测试异常跳转");

    }

}
控制器(注解@Controller)也可以使用@Init-Binder、@ExceptionHandler、@ModelAttribute。注意,它只对于当前控制器有效
代码清单16-21:测试@ModelAttribute
package com.ssm.chapter15.controller;

import com.ssm.chapter15.pojo.Role;

import org.springframework.beans.factory.annotation.Autowired;

import org.springframework.stereotype.Controller;

import org.springframework.web.bind.annotation.ModelAttribute;

import org.springframework.web.bind.annotation.RequestMapping;

import org.springframework.web.bind.annotation.RequestParam;

import org.springframework.web.bind.annotation.ResponseBody;

@Controller

@RequestMapping(value = "/role2")

public class Role2Controller {

    // @Autowired

    // private RoleService roleService = null;

    /**

     * 在进入控制器方法前运行,先从数据库中查询角色,然后以键role保存角色对象到数据模型

     *

     * @param id 角色编号

     * @return 角色

     */

    @ModelAttribute("role")

    public Role initRole(@RequestParam(value = "id", required = false) Long id) {

        //判断id是否为空

        if (id == null || id < 1) {

            return null;

        }

        // Role role = roleService.getRole(id);

        Role role = new Role(id, "射手", "远程物理输出");

        return role;

    }

    /**

     * http://localhost:8081/role2/getRoleFromModelAttribute.do?id=1

     *

     * @param role 从数据模型中取出的角色对象

     * @return 角色对象

     * @ModelAttribute 注解从数据模型中取出数据

     */

    @RequestMapping(value = "getRoleFromModelAttribute")

    @ResponseBody

    public Role getRoleFromModelAttribute(@ModelAttribute("role") Role role) {

        return role;

    }

}
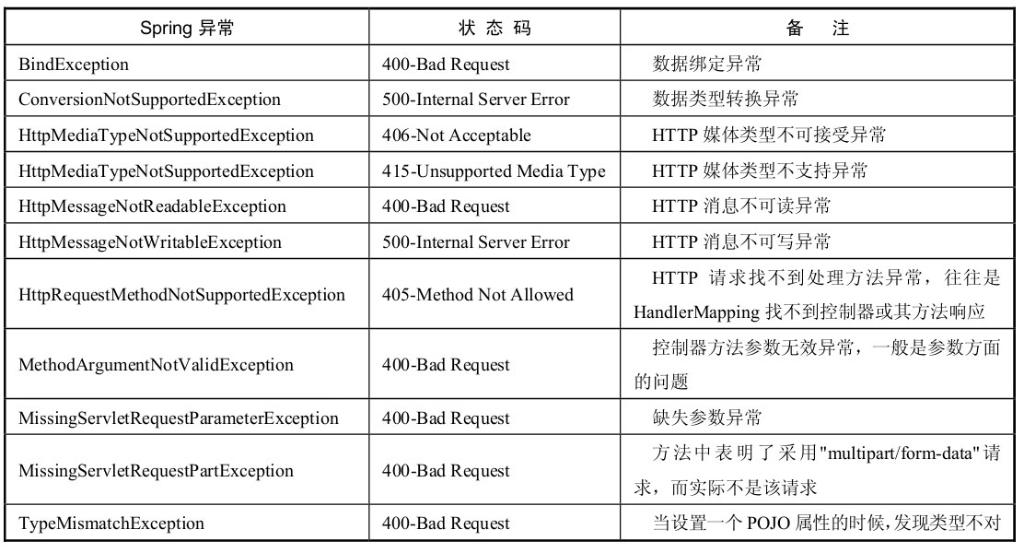

表16-2中只列举了一些异常映射码,而实际上会更多,关于它的定义可以看源码的枚举类org.springframework.http.HttpStatus
代码清单16-22:自定义异常
package com.ssm.chapter15.exception;

//新增Spring MVC的异常映射,code代表异常映射码,而reason则代表异常原因

import org.springframework.http.HttpStatus;

import org.springframework.web.bind.annotation.ResponseStatus;

@ResponseStatus(code = HttpStatus.NOT_FOUND, reason = "找不到角色信息异常!!")

public class RoleException extends RuntimeException {

    private static final long serialVersionUID = 5040949196309781680L;

}
通过注解@ResponseStatus的配置code可以映射SpringMVC的异常码,而通过配置reason可以了解配置产生异常的原因。既然定义了异常,那么我们可能就需要使用异常。在大部分情况下,可以使用Java所提供的try...catch...finally语句处理异常。Spring MVC也提供了处理异常的方式。
代码清单16-23:使用RoleException异常
package com.ssm.chapter15.controller;

import com.ssm.chapter15.exception.RoleException;

import com.ssm.chapter15.pojo.Role;

import org.springframework.stereotype.Controller;

import org.springframework.web.bind.annotation.*;

@Controller

@RequestMapping(value = "/roleE")

public class RoleExceptionController {

    /**

     * http://localhost:8081/roleE/notFound.do?id=1

     *

     * @param id

     * @return

     */

    @RequestMapping("notFound")

    @ResponseBody

    public Role notFound(Long id) {

        // Role role = roleService.getRole(id);

        Role role = new Role(id, "射手", "远程物理输出");

        role = null;

        //找不到角色信息抛出RoleException

        if (role == null) {

            throw new RoleException();

        }

        return role;

    }

    //当前控制器发生RoleException异常时,进入该方法

    @ExceptionHandler(RoleException.class)

    public String HandleRoleException(RoleException e) {

        //返回指定的页面,避免不友好

        return "exception";

    }

}
Spring MVC 为控制器添加通知与处理异常的更多相关文章
- Spring MVC(三)--控制器接受普通请求参数
Spring MVC中控制器接受参数的类方式有以下几种: 普通参数:只要保证前端参数名称和传入控制器的参数名称一致即可,适合参数较少的情况: pojo类型:如果前端传的是一个pojo对象,只要保证参数 ...
- Spring MVC(八)--控制器接受简单列表参数
有些场景下需要向后台传递一个数组,比如批量删除传多个ID的情况,可以使用数组传递,数组中的ID元素为简单类型,即基本类型. 现在我的测试场景是:要从数据库中查询minId<id<maxId ...
- Spring MVC(五)--控制器通过注解@RequestParam接受参数
上一篇中提到,当前后端命名规则不一致时,需要通过注解@RequestParam接受参数,这个注解是作用在参数上.下面通过实例说明,场景如下: 在页面输入两个参数,控制器通过注解接受,并将接受到的数据渲 ...
- Spring MVC(四)--控制器接受pojo参数
以pojo的方式传递参数适用于参数较多的情况,或者是传递对象的这种情况,比如要创建一个用户,用户有十多个属性,此时就可以通过用户的pojo对象来传参数,需要注意的是前端各字段的名称和pojo对应的属性 ...
- Spring MVC(九)--控制器接受对象列表参数
前一篇文章介绍是传递一个参数列表,列表中的元素为基本类型,其实有时候需要传递多个同一类型的对象,测试也可以使用列表,只是列表中的元素为对象类型. 我模拟的场景是:通过页面按钮触发传递参数的请求,为了简 ...
- [Spring MVC] 取控制器返回的ModelAndView/Map/Model/Request的对象
${key }页面可取, <input value="${key}"> 或者<%=request.getParameter("key")%&g ...
- Spring MVC controller控制器映射无法访问问题!!!
月 26, 2019 2:47:58 上午 org.apache.coyote.AbstractProtocol start信息: Starting ProtocolHandler ["aj ...
- Spring MVC前端控制器不拦截静态资源配置
- 如何在Spring MVC Test中避免”Circular view path” 异常
1. 问题的现象 比如在webConfig中定义了一个viewResolver public class WebConfig extends WebMvcConfigurerAdapter { //配 ...
随机推荐
- django项目部署服务器后无法发送邮箱 错误信息:Connection unexpectedly closed
使用配置: python 3.7 + django 2.2.1 发送邮件模块 : from django.core.mail import send_mail 服务器:Centos7 阿里云轻 ...
- 多线程编程threading
操作系统能够调度和切换的最小单元实际上是线程.对于IO操作来说,多线程和多进程性能差别不大.有两种方法可以进行多线程编程. 1.使用多线程编程的两种方法 (1)直接实例化一个Thread对象 from ...
- simple模式下rabbitmq的代码
simple模式代码 package RabbitMQ import ( "fmt" "github.com/streadway/amqp" "log ...
- Oracle substr() 字符截取函数
1.substr函数格式 (俗称:字符截取函数) 格式1: substr(string string, int a, int b); 格式2:substr(string string, int a ...
- centos6.5下安装docker的过程办法
转载:https://www.cnblogs.com/tymagic/p/10794477.html 在看了网上N多复制粘贴的文章,又尝试无效后,我把我最终成功的办法发出来,希望能帮到拼命干环境的你. ...
- linux ps命令查看最消耗CPU、内存的进程
1.CPU占用最多的前10个进程: ps auxw|head -1;ps auxw|sort -rn -k3|head -10 2.内存消耗最多的前10个进程 ps auxw|head -1;ps a ...
- kubefuse 让Kubernetes 资源成为fuse 文件系统
kubefuse 是基于fuse 开发的文件系统,我们可以像访问文件系统一样访问Kubernetes 资源,使用python开发 支持以下特性: 可以使用方便的linux tools: ls. vim ...
- 「雅礼集训 2018 Day2」农民
传送门 Description 「搞 OI 不如种田.」 小 D 在家种了一棵二叉树,第 ii 个结点的权值为 \(a_i\). 小 D 为自己种的树买了肥料,每天给树施肥. 可是几天后,小 D 却 ...
- vue列表拖拽排序功能实现
1.实现目标:目标是输入一个数组,生成一个列表:通过拖拽排序,拖拽结束后输出一个经过排序的数组. 2.实现思路: 2.1是使用HTML5的drag功能来实现,每次拖拽时直接操作Dom节点排序,拖拽结束 ...
- Python——graphviz及pydotplus安装步骤
Python——graphviz及pydotplus安装步骤 一.安装Graphviz 网站:http://www.graphviz.org/download/ 下载msi文件 直接安装,完成之后添加 ...