伤透了心的pytorch的cuda容器版
公司GPU的机器版本本比较低,找了好多不同的镜像都不行,
自己从anaconda开始制作也没有搞定(因为公司机器不可以直接上网),
哎,官网只有使用最新的NVIDIA驱动,安装起来才顺利。
最后,找到一个暂时可用的镜像:
https://linux.ctolib.com/anibali-docker-pytorch.html
其间遇到两个问题:
1, 安装全没出错,但torch.cuda.is_available()为False,这表示torch还是不能使用GPU。
2,在跑例程时,显示RuntimeError: CUDA error: out of memory,这表示运行的时候使用CUDA_VISIBLE_DEVICES限制一下使用的GPU。
PyTorch Docker image
Ubuntu + PyTorch + CUDA (optional)
Requirements
In order to use this image you must have Docker Engine installed. Instructions for setting up Docker Engine are available on the Docker website.
CUDA requirements
If you have a CUDA-compatible NVIDIA graphics card, you can use a CUDA-enabled version of the PyTorch image to enable hardware acceleration. I have only tested this in Ubuntu Linux.
Firstly, ensure that you install the appropriate NVIDIA drivers and libraries. If you are running Ubuntu, you can install proprietary NVIDIA drivers from the PPA and CUDA from the NVIDIA website.
You will also need to install nvidia-docker2 to enable GPU device access within Docker containers. This can be found at NVIDIA/nvidia-docker.
Prebuilt images
Pre-built images are available on Docker Hub under the name anibali/pytorch. For example, you can pull the CUDA 10.0 version with:
$ docker pull anibali/pytorch:cuda-10.0
The table below lists software versions for each of the currently supported Docker image tags available for anibali/pytorch.
| Image tag | CUDA | PyTorch |
|---|---|---|
no-cuda |
None | 1.0.0 |
cuda-10.0 |
10.0 | 1.0.0 |
cuda-9.0 |
9.0 | 1.0.0 |
cuda-8.0 |
8.0 | 1.0.0 |
The following images are also available, but are deprecated.
| Image tag | CUDA | PyTorch |
|---|---|---|
cuda-9.2 |
9.2 | 0.4.1 |
cuda-9.1 |
9.1 | 0.4.0 |
cuda-7.5 |
7.5 | 0.3.0 |
Usage
Running PyTorch scripts
It is possible to run PyTorch programs inside a container using the python3 command. For example, if you are within a directory containing some PyTorch project with entrypoint main.py, you could run it with the following command:
docker run --rm -it --init \
  --runtime=nvidia \
  --ipc=host \
  --user="$(id -u):$(id -g)" \
  --volume="$PWD:/app" \
  -e NVIDIA_VISIBLE_DEVICES=0 \
  anibali/pytorch python3 main.py
Here's a description of the Docker command-line options shown above:
--runtime=nvidia: Required if using CUDA, optional otherwise. Passes the graphics card from the host to the container.--ipc=host: Required if using multiprocessing, as explained at https://github.com/pytorch/pytorch#docker-image.--user="$(id -u):$(id -g)": Sets the user inside the container to match your user and group ID. Optional, but is useful for writing files with correct ownership.--volume="$PWD:/app": Mounts the current working directory into the container. The default working directory inside the container is/app. Optional.-e NVIDIA_VISIBLE_DEVICES=0: Sets an environment variable to restrict which graphics cards are seen by programs running inside the container. Set toallto enable all cards. Optional, defaults to all.
You may wish to consider using Docker Compose to make running containers with many options easier. At the time of writing, only version 2.3 of Docker Compose configuration files supports the runtimeoption.
Running graphical applications
If you are running on a Linux host, you can get code running inside the Docker container to display graphics using the host X server (this allows you to use OpenCV's imshow, for example). Here we describe a quick-and-dirty (but INSECURE) way of doing this. For a more comprehensive guide on GUIs and Docker check out http://wiki.ros.org/docker/Tutorials/GUI.
On the host run:
sudo xhost +local:root
You can revoke these access permissions later with sudo xhost -local:root. Now when you run a container make sure you add the options -e "DISPLAY" and --volume="/tmp/.X11-unix:/tmp/.X11-unix:rw". This will provide the container with your X11 socket for communication and your display ID. Here's an example:
docker run --rm -it --init \
  --runtime=nvidia \
  -e "DISPLAY" --volume="/tmp/.X11-unix:/tmp/.X11-unix:rw" \
  anibali/pytorch python3 -c "import tkinter; tkinter.Tk().mainloop()"
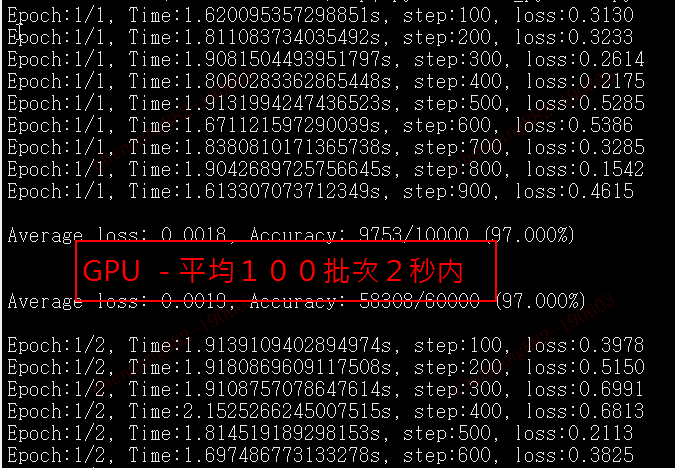
十倍的时间差距:

伤透了心的pytorch的cuda容器版的更多相关文章
- 安装graphlab伤透了心,终于搞定了
为了方便研究各种机器学习算法,我想用graphlab来辅助我对后续算法的研究.所以我的目标就是安装graphlab到我的windows笔记本中.而基于python的graphlab的安装最好是采用如下 ...
- pytorch查看CUDA支持情况,只需要三行代码,另附Cuda runtime error (48) : no kernel image is available for execution处理办法
import torch import torchvision print(torch.cuda.is_available()) 上面的命令只是检测CUDA是否安装正确并能被Pytorch检测到,并没 ...
- ubuntu 18.04安装pytorch、cuda、cudnn等
版权声明:本文为博主原创文章,欢迎转载,并请注明出处.联系方式:460356155@qq.com ubuntu 16.04用了1年多了,18.04版已经发布也半年了,与时俱进,重装Linux系统,这里 ...
- pytorch中CUDA类型的转换
import torch import numpy as np device = torch.device("cuda:0" if torch.cuda.is_available( ...
- pytorch 中序列化容器nn.Sequential
按下图顺序搭建以及执行
- '"千"第一周学习情况记录
一周过去了,今天将我这一周的学习内容和主要感想记录与此和大家共同分享,一起进步.我将自己的学习计划命名为"千",因为我喜欢这个字,希望能用此来鼓舞自己不断前进.时间总是很快的,这一 ...
- 可视化工具solo show-----Prefuse自带例子GraphView讲解
2014.10.15日以来的一个月,挤破了头.跑断了腿.伤透了心.吃够了全国最大餐饮连锁店——沙县小吃.其中酸甜苦辣,绝不是三言两语能够说得清道的明的.校招的兄弟姐妹们,你们懂得…… 体会最深的一句话 ...
- 一文读懂UGC:互联网上的生态秘密
转载自近乎: UGC(User- Generated Content)用户原创生产内容,它是相对于PGC(Professionally-produced Content)专业生产内容的一种内容来源,简 ...
- 【未完成0.0】Noip2012提高组day2 解题报告
第一次写一套题的解题报告,感觉会比较长.(更新中Loading....):) 题目: 第一题:同余方程 描述 求关于x的同余方程ax ≡ 1 (mod b)的最小正整数解. 格式 输入格式 输入只有一 ...
随机推荐
- git worktree 目录修复
三种方式挨个尝试,1不行用2 2不行用3 1.拉取阶段失败 git worktree add -f -B xxx_branch ./xxx_branch origin/xxx_branch 强制拉取 ...
- 最常见的Java面试题及答案汇总(五)
Java Web 64. jsp 和 servlet 有什么区别? jsp经编译后就变成了Servlet.(JSP的本质就是Servlet,JVM只能识别java的类,不能识别JSP的代码,Web容器 ...
- [ARM-Linux开发]linux dmesg命令参数及用法详解(linux显示开机信息命令)
功能说明:显示开机信息.语 法:dmesg [-cn][-s <缓冲区大小>]补充说明:kernel会将开机信息存储在ring buffer中.您若是开机时来不及查看信息,可利用dmesg ...
- sk-learn 选择正确的估算器
选择正确的估算器 解决机器学习问题最困难的部分通常是为工作找到正确的估算器. 不同的估计器更适合于不同类型的数据和不同的问题. 下面的流程图旨在为用户提供一些关于如何处理有关哪些估算器尝试数据的问题的 ...
- cannot access org.springframework.core.io.InputStreamSouce
cannot access org.springframework.core.io.InputStreamSouce错误,把mian路径下main.iml文件备份一下,然后删除该文件,报错就会消失,但 ...
- 通过Fastdfs进行文件上传服务(文件和图片的统一处理)
1.文件上传简单流程分析图: 2.Fastdfs介绍: Fastdfs由两个角色组成: Tracker(集群):调度(帮你找到有空闲的Storage) Storage(集群):文件存储(帮你保存文件或 ...
- Django-09-cookie和session
1. 简介 <1> cookie不属于http协议范围,由于http协议无法保持状态,但实际情况,我们却又需要“保持状态”,因此cookie就是在这样一个场景下诞生. cookie的工作原 ...
- DRF框架(六)——三大认证组件之认证组件、权限组件
drf认证组件 用户信息表 from django.db import models from django.contrib.auth.models import AbstractUser class ...
- 转!!DBCP2 配置详解说明
转自:https://www.cnblogs.com/diyunpeng/p/6980098.html 由于commons-dbcp所用的连接池出现版本升级,因此commons-dbcp2中的数据库池 ...
- ECharts折线图堆叠设置为不堆叠的方法
下图是ECharts折线图堆叠的官方源码,设置折线图不堆叠只需要将每一个stack的值设置为不一样的名称或者将stack属性删除即可. option = { title: { text: '折线图堆叠 ...