AspNetCore网关集成Swagger访问使用IdentityServer保护的webapi项目
创建webapi项目
创建四个webapi项目,两个处理业务,一个网关,一个验证中心。四个项目对应的端口如下,
ApiGateway:1999
IdentityServer:16690
Services.Api1:2108
Services.Api2:2343

添加Swagger支持
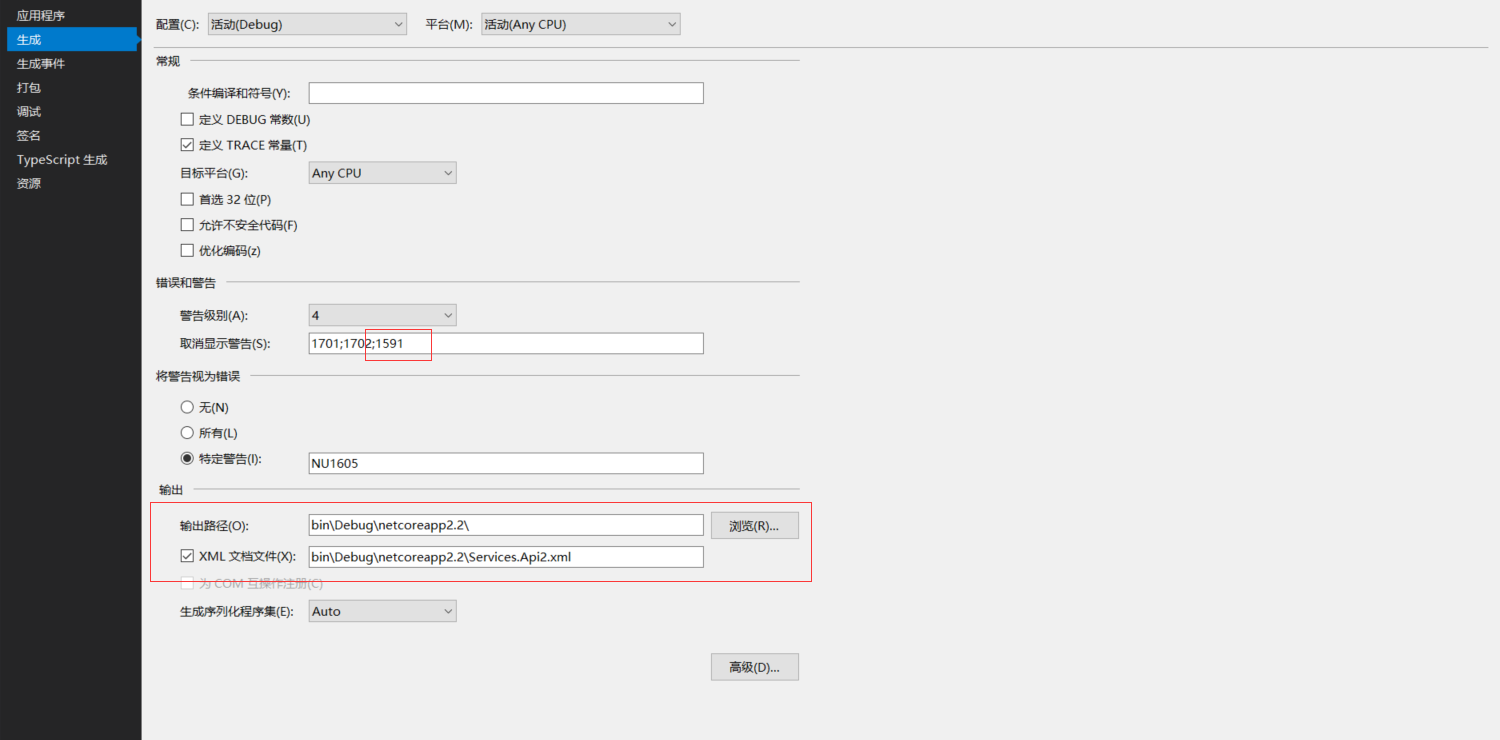
在两个业务项目中分别引用Swashbuckle.AspNetCore,目前是最新版本是4.0.1。在项目属性面板,设置输出xml文档,swagger可以读取xml注释生成json文件,在swagger ui页面中显示。但是选择输出xml文档后,对于没有xml注释的类和方法会显示警告,可以在项目属性面板中【错误和警告】选项,取消显示警告中添加1591,这样就可以不显示缺少xml注释的警告了。对于强迫症的你暂时可以平复一下了,当然,真的强迫症的话,肯定会全部加上xml注释的。(¬_¬)瞄
Startup.ConfigureServices
public void ConfigureServices(IServiceCollection services)

        {

           services.AddMvc().SetCompatibilityVersion(CompatibilityVersion.Version_2_2);

            services.AddSwaggerGen(options =>

            {

                //SwaggerDoc的第一个参数要与Configure中SwaggerEndPoint中的版本名称一致

                //既可以使用版本号,也可以使用自定义名称

                options.SwaggerDoc("ServiceApiTwo", new Info

                {

                    Title = "Services.Api #two",

                    Version = "v1",

                    Description = "服务api #two",

                    License = new License

                    {

                        Name = "APL2.0",

                        Url = "https://opensource.org/licenses/Apache-2.0"

                    },

                    Contact = new Contact

                    {

                        Name = "原来是李",

                        Url = "https://www.cnblogs.com/falltakeman"

                    }

                });

                var xmlFile = $"{Assembly.GetExecutingAssembly().GetName().Name}.xml";

                var xmlPath = Path.Combine(AppDomain.CurrentDomain.BaseDirectory, xmlFile);

                options.IncludeXmlComments(xmlPath);

            });

        }
Startup.Configure
public void Configure(IApplicationBuilder app, IHostingEnvironment env)

        {

            if (env.IsDevelopment())

            {

                app.UseDeveloperExceptionPage();

                app.UseSwagger(c=>

                {

                    c.RouteTemplate = "{documentName}/swagger.json";

                });

                app.UseSwaggerUI(u =>

                {

                    u.SwaggerEndpoint("/ServiceApiTwo/swagger.json", "ServiceApiTwo");

                    u.DocumentTitle = "Service Api #2 文档";

                });

            }

            app.UseMvc();

        }
配置好启动项目看看。

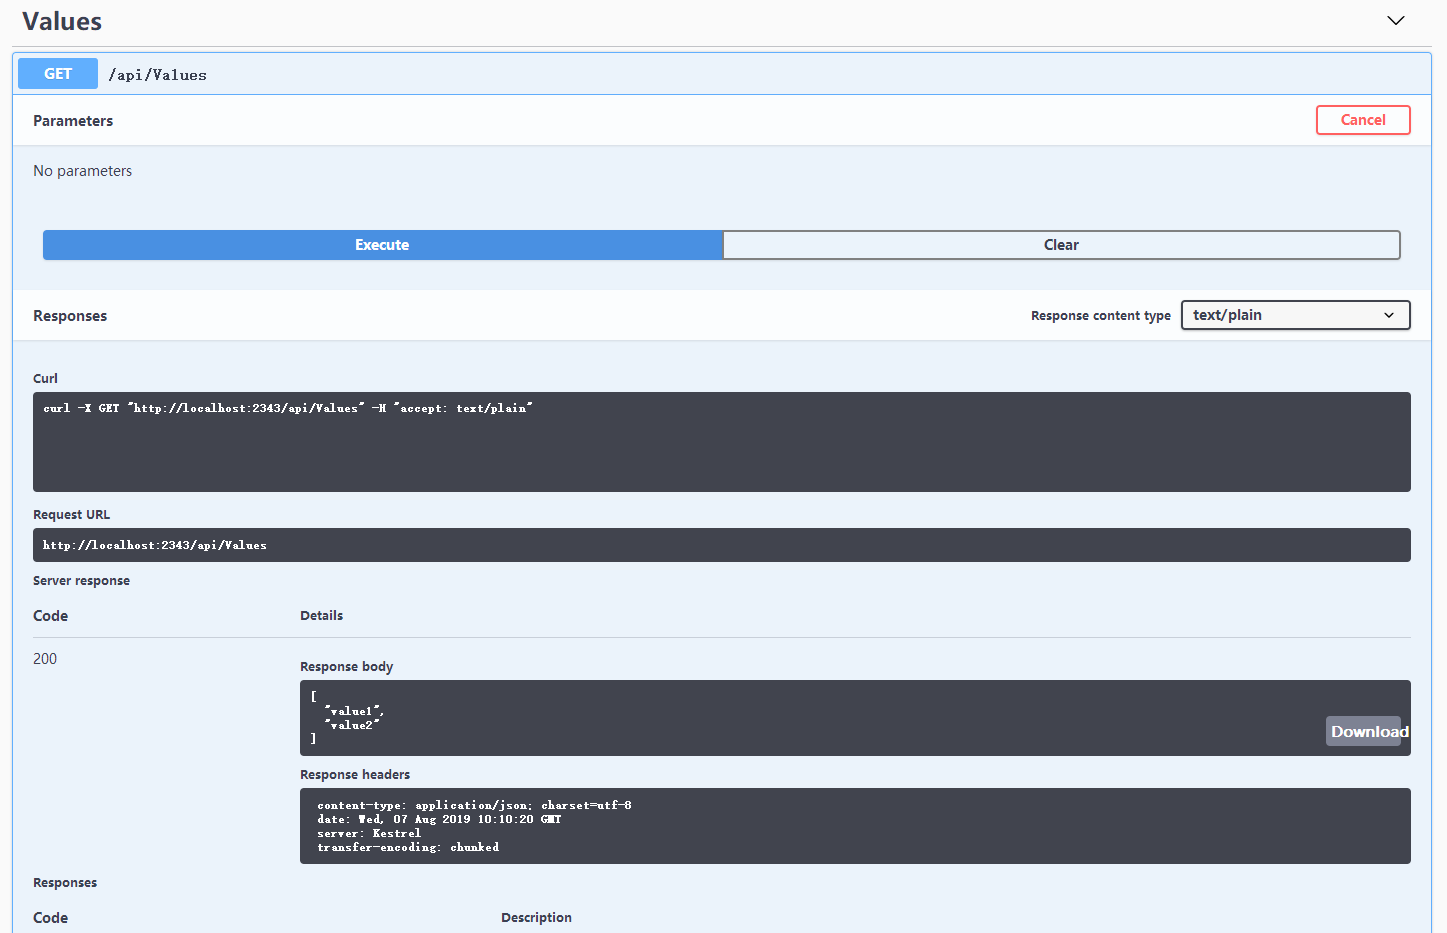
通过swagger发起请求,响应正常。
配置网关项目
使用目前比较流行的开源网关服务Ocelot,APIGateway项目添加引用Ocelot、Ocelot.Provider.Consul、Ocelot.Provider.Polly、Ocelot.Cache.CacheManager,目前用到的版本是13.5.2。要在网关中统一查看各个服务的swagger文档,还需引用Swash.AspNetCore。Consul的配置先不说了。
在项目根路径下添加OcelotConfig.json配置文件。处理正常的路由转发外,要在网关swagger页面访问业务api,还需要配置swagger路由转发。
{

  "GlobalConfiguration": {

    //外部访问路径

    "BaseUrl": "http://localhost:1999",

    //限速配置

    "RateLimitOptions": {

      //白名单

      "ClientWhitelist": [],

      "EnableRateLimiting": true,

      //限制时间段,例如1s,5m,1h,1d

      "Period": "1s",

      //等待重试等待的时间间隔(秒)

      "PeriodTimespan": ,

      //限制

      "Limit": ,

      //自定义消息

      "QuotaExceededMessage": "单位时间内请求次数超过限制。",

      "HttpStatusCode":

    },

    //服务发现配置

    "ServiceDiscoveryProvider": {

      "Host": "localhost",

      "Port": ,

      "Type": "PollConsul",

      "PollingInterval":

    },

    //熔断配置

    "QoSOptions": {

      "ExceptionsAllowedBeforeBreaking": ,

      "DurationOfBreak": ,

      //超时值(毫秒)

      "TimeoutValue":

    }

  },

  "ReRoutes": [

    // Api#one项目配置

    {

      "UpstreamPathTemplate": "/gateway/one/{url}", //上游路径模板

      "UpstreamHttpMethod": [ "Get", "Post", "Put", "Delete" ], //上游HTTP请求方法

      "DownstreamPathTemplate": "/api/{url}", //下游路径模板

      "DownstreamScheme": "http", //下游协议 https/http

      "ServiceName": "ServiceApiOne", //服务名称(结合服务发现使用)

      "UseServiceDiscovery": true, //启用服务发现

      "LoadBalancer": "RoundRobin", //负载均衡算法:RoundRobin-轮询;LeastConnection-最少连接数(最空闲的服务器);NoLoadBalancer-总是发送往第一个请求或者服务发现

      //下游主机与端口,允许配置多个

      "DownstreamHostAndPorts": [

        //{

        //  "Host": "ip",

        //  "Port": 80

        //},

        {

          "Host": "localhost",

          "Port":

        }

      ],

      //熔断配置,在请求下游服务时使用断路

      "QoSOptions": {

        "ExceptionsAllowedBeforeBreaking": ,

        "DurationOfBreak": ,

        "TimeoutValue":

      },

      //权限配置

      //"AuthenticationOptions": {

      //  "AuthenticationProviderKey": "Bearer",

      //  "AllowedScopes": []

      //}

    },

    // Api#two项目配置

    {

      "UpstreamPathTemplate": "/gateway/two/{url}",

      "UpstreamHttpMethod": [ "Get", "Post", "Put", "Delete" ],

      "DownstreamPathTemplate": "/api/{url}",

      "DownstreamScheme": "http",

      "ServiceName": "ServiceApiTwo",

      "UseServiceDiscovery": true,

      "LoadBalancer": "RoundRobin",

      "DownstreamHostAndPorts": [

        //{

        //  "Host": "ip",

        //  "Port": 80

        //},

        {

          "Host": "localhost",

          "Port":

        }

      ],

      "QoSOptions": {

        "ExceptionsAllowedBeforeBreaking": ,

        "DurationOfBreak": ,

        "TimeoutValue":

      },

      //"AuthenticationOptions": {

      //  "AuthenticationProviderKey": "Bearer",

      //  "AllowedScopes": []

      //}

    },

    //swagger api2配置

    {

      "UpstreamPathTemplate": "/ServiceApiTwo/swagger.json",

      "UpstreamHttpMethod": [ "Get", "Post", "Put", "Delete" ],

      "DownstreamPathTemplate": "/ServiceApiTwo/swagger.json",

      "DownstreamScheme": "http",

      "DownstreamHostAndPorts": [

        {

          "Host": "localhost",

          "Port":

        }

      ]

    },

    //swagger api1多版本配置v1.0

    {

      "UpstreamPathTemplate": "/ServiceApiOne/1.0/swagger.json",

      "UpstreamHttpMethod": [ "Get", "Post", "Put", "Delete" ],

      "DownstreamPathTemplate": "/ServiceApiOne/1.0/swagger.json",

      "DownstreamScheme": "http",

      "DownstreamHostAndPorts": [

        {

          "Host": "localhost",

          "Port":

        }

      ]

    },

    //swagger api1多版本配置v2.0

    {

      "UpstreamPathTemplate": "/ServiceApiOne/2.0/swagger.json",

      "UpstreamHttpMethod": [ "Get", "Post", "Put", "Delete" ],

      "DownstreamPathTemplate": "/ServiceApiOne/2.0/swagger.json",

      "DownstreamScheme": "http",

      "DownstreamHostAndPorts": [

        {

          "Host": "localhost",

          "Port":

        }

      ]

    }

  ]

}
Startup.ConfigureServices注册swagger和Ocelot网关服务,ConfigureServices中的swagger配置和业务api中一样,
services.AddOcelot(Configuration)

                .AddConsul()

                .AddCacheManager(c => c.WithDictionaryHandle())

                .AddPolly();

services.AddSwaggerGen(options =>

            {

                options.SwaggerDoc(Configuration["Swagger:Name"], new Info

                {

                    Title = Configuration["Swagger:Title"],

                    Version = Configuration["Swagger:Version"],

                    Description = Configuration["Swagger:Description"],

                    License = new License

                    {

                        Name = Configuration["Swagger:License:Name"],

                        Url = Configuration["Swagger:License:Url"]

                    },

                    Contact = new Contact

                    {

                        Name = Configuration["Swagger:Contact:Name"],

                        Email = Configuration["Swagger:Contact:Email"],

                        Url = Configuration["Swagger:Contact:Url"]

                    }

                });

            });
Startup.Configure中,我是使用了配置文件,将业务api的swagger节点写在了配置文件中。
public void Configure(IApplicationBuilder app, IHostingEnvironment env)

        {

            if (env.IsDevelopment())

            {

                app.UseDeveloperExceptionPage();

                // 配置文件中的SwaggerName为业务api中是SwaggerEndPoint名称,有版本号的带上版本号

                var apis = Configuration["SwaggerApis:SwaggerName"].Split(';').ToList();

                app.UseSwagger();

                app.UseSwaggerUI(options=>

                {

                    //显示注册到网关的api接口

                    apis.ForEach(key =>

                    {

                        options.SwaggerEndpoint($"/{key}/swagger.json", key);

                    });

                    options.DocumentTitle = "api网关";

                });

            }

            else

            {

                app.UseExceptionHandler("/Home/Error");

            }

            app.UseStaticFiles();

            app.UseCookiePolicy();

            app.UseMvc(routes =>

            {

                routes.MapRoute(

                    name: "default",

                    template: "{controller=Home}/{action=Index}/{id?}");

            });

            app.UseOcelot().Wait(); // 使用Ocelot网关中间件

        }
修改ApiGateway项目Program.cs将配置文件添加进来。
public static IWebHostBuilder CreateWebHostBuilder(string[] args) =>

            WebHost.CreateDefaultBuilder(args)

            .ConfigureAppConfiguration((hostingContext,config)=>

            {

                var env = hostingContext.HostingEnvironment;

                //根据环境变量加载不同的json配置

                config.AddJsonFile($"appsettings.{env.EnvironmentName}.json", optional: true, reloadOnChange: true)

                .AddJsonFile("OcelotConfig.json")//网关配置

                .AddEnvironmentVariables();//环境变量

            })

            .ConfigureLogging((hostingContext,logging)=>

            {

                logging.AddConfiguration(hostingContext.Configuration.GetSection("Logging"));

                logging.AddConsole();

                //添加调试日志

                logging.AddDebug();

            })

            .UseStartup<Startup>();
网关配置了,swagger也配置了,启动业务api和网关服务看看效果。

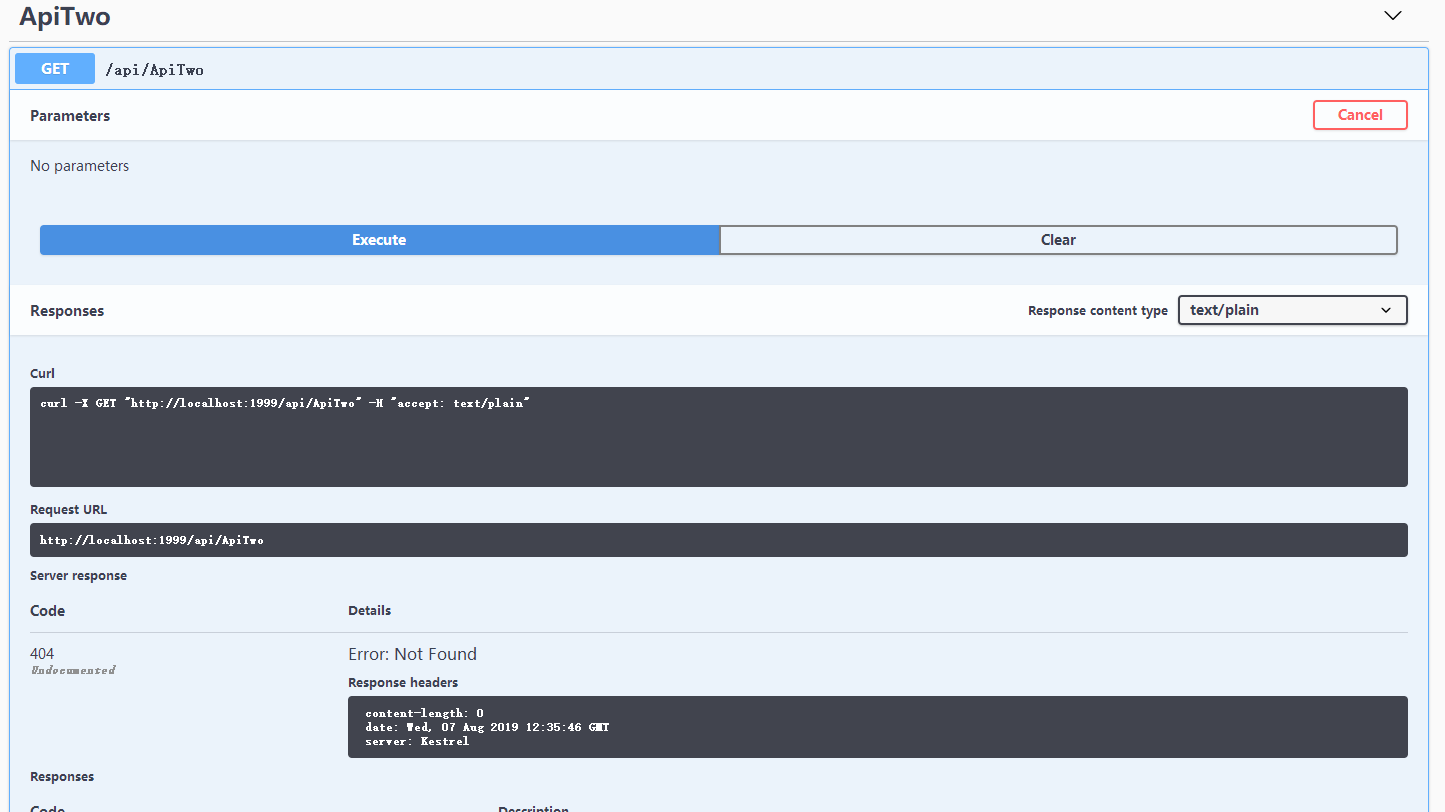
两个业务api的swagger文档都可以正常查看。发请求看一下,结果响应404,仔细看一下,请求的服务地址是网关服务的地址,而不是业务api的地址,难道是Ocelot网关路由配置错了?使用Postman发一个GET请求看看,localhost:1999/gateway/two/values,网关转发到localhost:2343/api/values,响应正常。
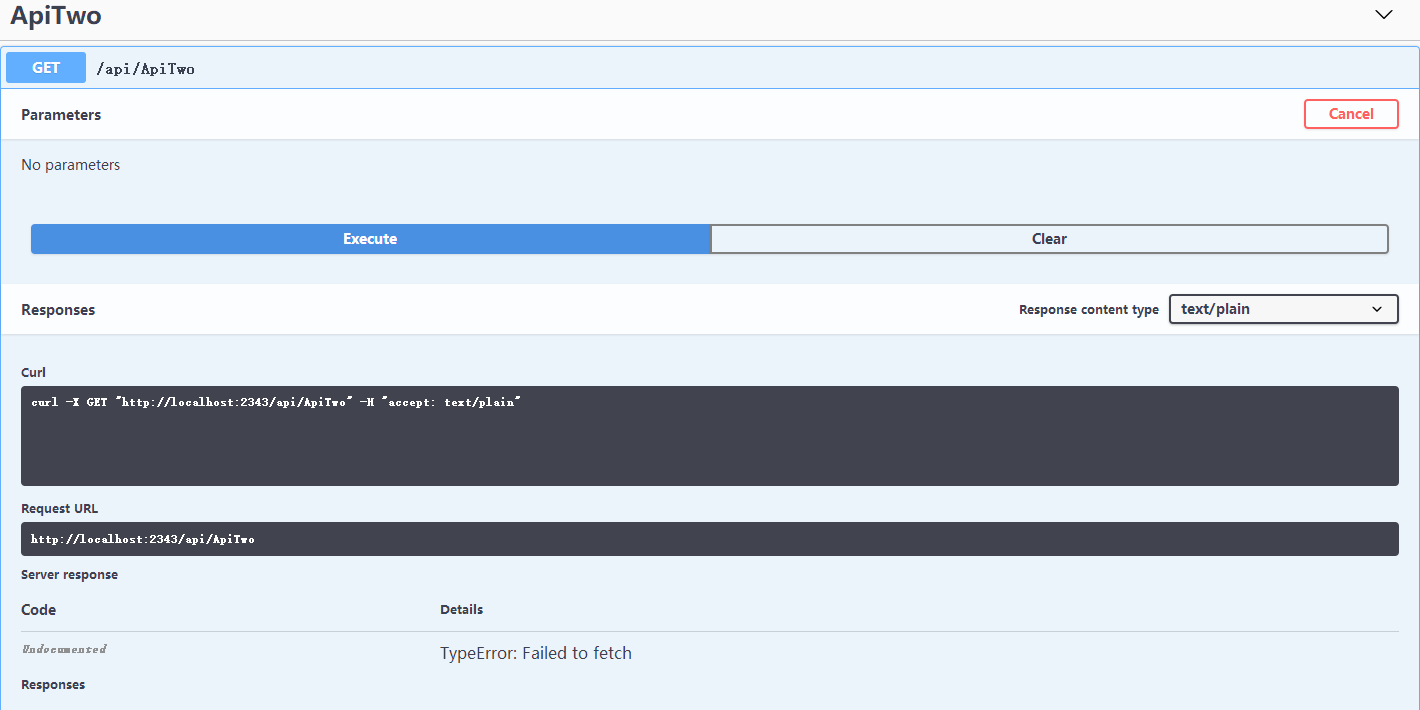
看swashbuckle文档这一段,将业务api中Configure加上这一段后再次通过网关发起请求,结果出现TypeError。既然出错了,打开浏览器调试工具看一下就明白了,Failed to load http://localhost:2343/api/ApiTwo: No 'Access-Control-Allow-Origin' header is present on the requested resource. Origin 'http://localhost:1999' is therefore not allowed access.
网关请求业务api跨域了,要让业务api允许来自网关的请求,需要设置业务api跨域请求政策。加上下面的配置后,网关请求正常了。
修改Startup.Configure
public void Configure(IApplicationBuilder app, IHostingEnvironment env)

        {

            if (env.IsDevelopment())

            {

                app.UseDeveloperExceptionPage();

                app.UseSwagger(c=>

                {

                    //处理网关通过swagger访问

                    c.PreSerializeFilters.Add((swaggerDoc, httpReq) => swaggerDoc.Host = httpReq.Host.Value);

                    c.RouteTemplate = "{documentName}/swagger.json";

                });

                app.UseSwaggerUI(u =>

                {

                    u.SwaggerEndpoint("/ServiceApiTwo/swagger.json", "ServiceApiTwo");

                    u.DocumentTitle = "Service Api #2 文档";

                });

            }

            // 允许网关访问

            app.UseCors(options =>

            {

                options.WithOrigins("http://localhost:1999")

                .AllowAnyHeader()

                .AllowAnyMethod();

            });

            app.UseMvc();

        }
使用IdentityServer4保护webapi
先前已经创建IdentityServer项目,添加引用IdentityServer4.AspNetIdentity(2.5.0)、IdentityServer4.EntityFramework(2.5.0)。新建一个类IdentityServerConfig,里面定义四个方法GetApiResources、GetIdentityResources、GetClients、GetTestUsers,具体代码就不贴了,看一下Startup。生产环境的话,当然要用数据库,这里不讨论IdentityServer4的使用。
public void ConfigureServices(IServiceCollection services)

        {

            services.AddMvc().SetCompatibilityVersion(CompatibilityVersion.Version_2_2);

            services.AddIdentityServer()

                .AddDeveloperSigningCredential()

                .AddInMemoryPersistedGrants()

                .AddTestUsers(IdentityServerConfig.GetTestUsers())

                .AddInMemoryIdentityResources(IdentityServerConfig.GetIdentityResources())

                .AddInMemoryApiResources(IdentityServerConfig.GetApiResources())

                .AddInMemoryClients(IdentityServerConfig.GetClients(Configuration));

        }

        // This method gets called by the runtime. Use this method to configure the HTTP request pipeline.

        public void Configure(IApplicationBuilder app, IHostingEnvironment env)

        {

            if (env.IsDevelopment())

            {

                app.UseDeveloperExceptionPage();

            }

            app.UseIdentityServer();

            app.UseMvc();

        }
将网关和两个api项目对应的ApiResources和Clients分别为api-gateway、service-api-one、service-api-two,两个api客户端AllowedScope为自己,网关的AllowedScope为自己和两个api客户端。在需要保护的三个项目中添加引用IdentityServer4.AccessTokenValidation(2.7.0),修改Startup的ConfigureServices,添加如下代码。
//使用IdentityServer4

            services.AddAuthentication(IdentityServerAuthenticationDefaults.AuthenticationScheme)

                .AddIdentityServerAuthentication(options =>

                {

                    options.ApiName = "service-api-two";

                    options.Authority = "http://localhost:16690"; // IdentityServer验证服务

                    options.RequireHttpsMetadata = false;

                    options.EnableCaching = true;

                });
Startup.Configure中添加app.UseAuthentication();
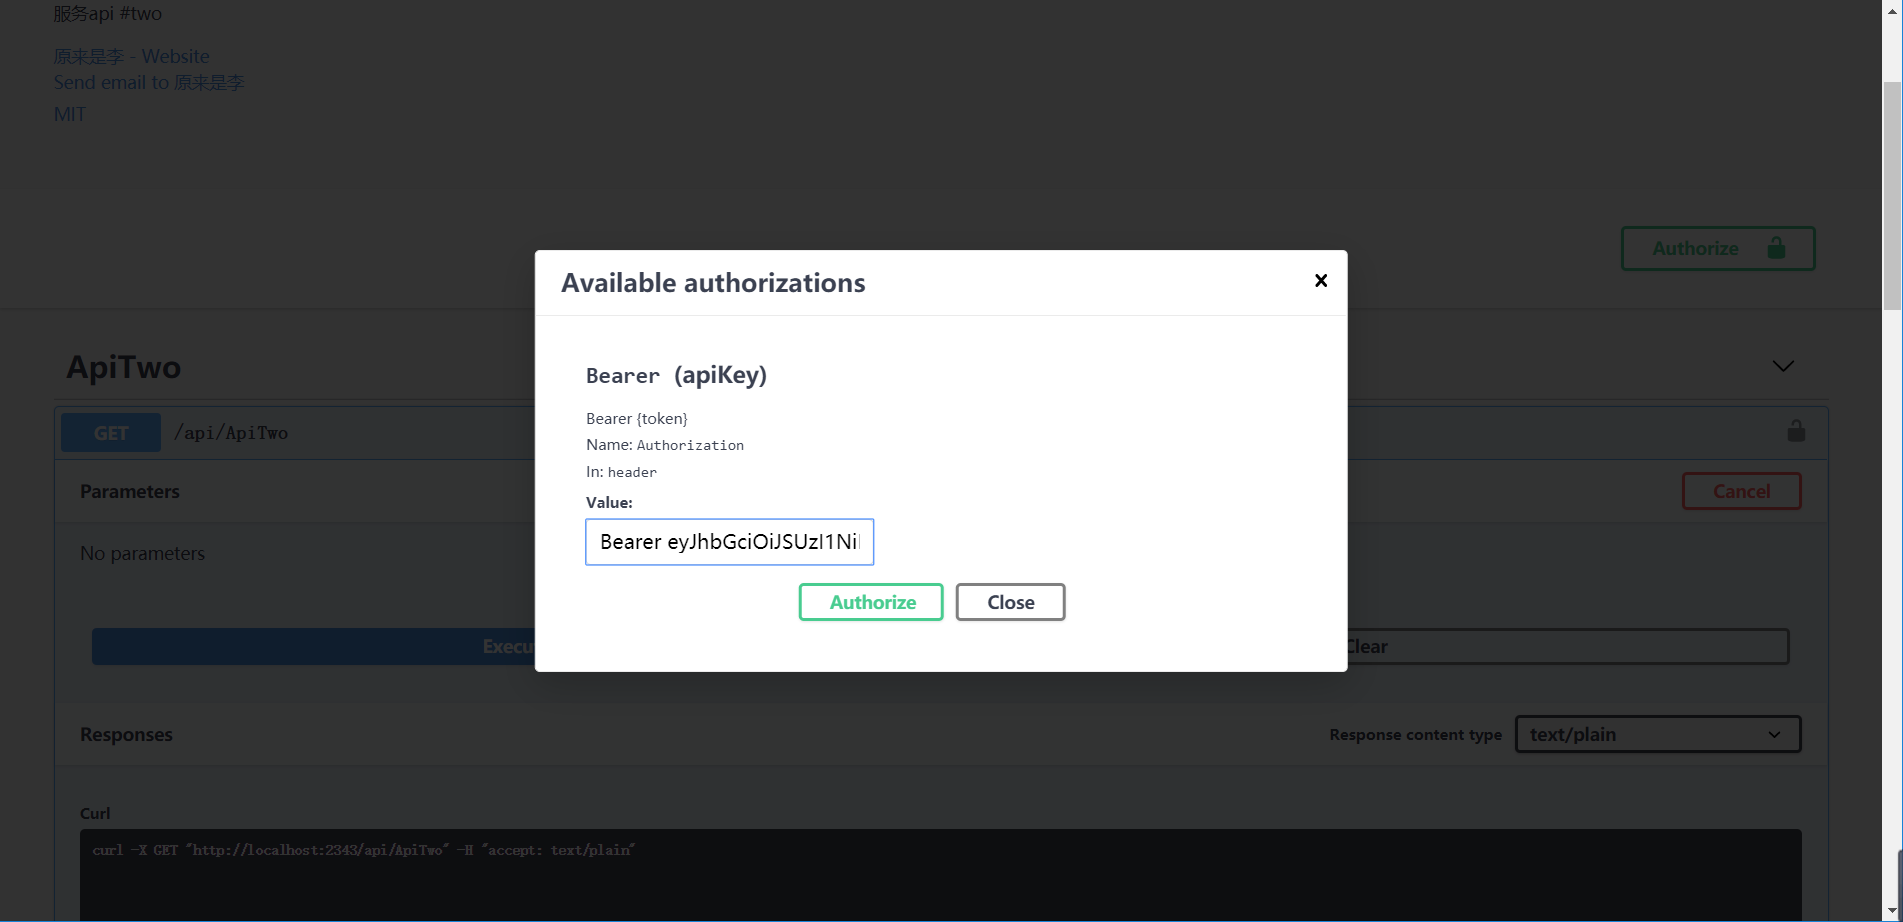
要在swagger中访问需要验证的api,需要在swagger配置中添加安全验证。
services.AddSwaggerGen(options =>

            {

                //SwaggerDoc的第一个参数要与Configure中SwaggerEndPoint中的版本名称一致

                //既可以使用版本号,也可以使用自定义名称

                options.SwaggerDoc("ServiceApiTwo", new Info

                {

                    Title = "Services.Api #two",

                    Version = "v1",

                    Description = "服务api #two",

                    License = new License

                    {

                        Name = "MIT",

                        Url = "https://mit-license.org/"

                    },

                    Contact = new Contact

                    {

                        Name = "原来是李",

                        Url = "http://www.cnblogs.com/falltakeman"

                    }

                });

                var xmlFile = $"{Assembly.GetExecutingAssembly().GetName().Name}.xml";

                var xmlPath = Path.Combine(AppDomain.CurrentDomain.BaseDirectory, xmlFile);

                options.IncludeXmlComments(xmlPath);

                // swagger访问需要验证的api

                options.AddSecurityDefinition("Bearer", new ApiKeyScheme

                {

                    In = "header",

                    Name = "Authorization",

                    Type = "apiKey",

                    Description = "Bearer {token}"

                });

                options.AddSecurityRequirement(new Dictionary<string, IEnumerable<string>>

                {

                    {

                        "Bearer",

                        Enumerable.Empty<string>()

                    }

                });

            });
在api控制器中,在需要保护的api上添加[Authorize]特性,没有授权的情况下访问受限api会报401错误。
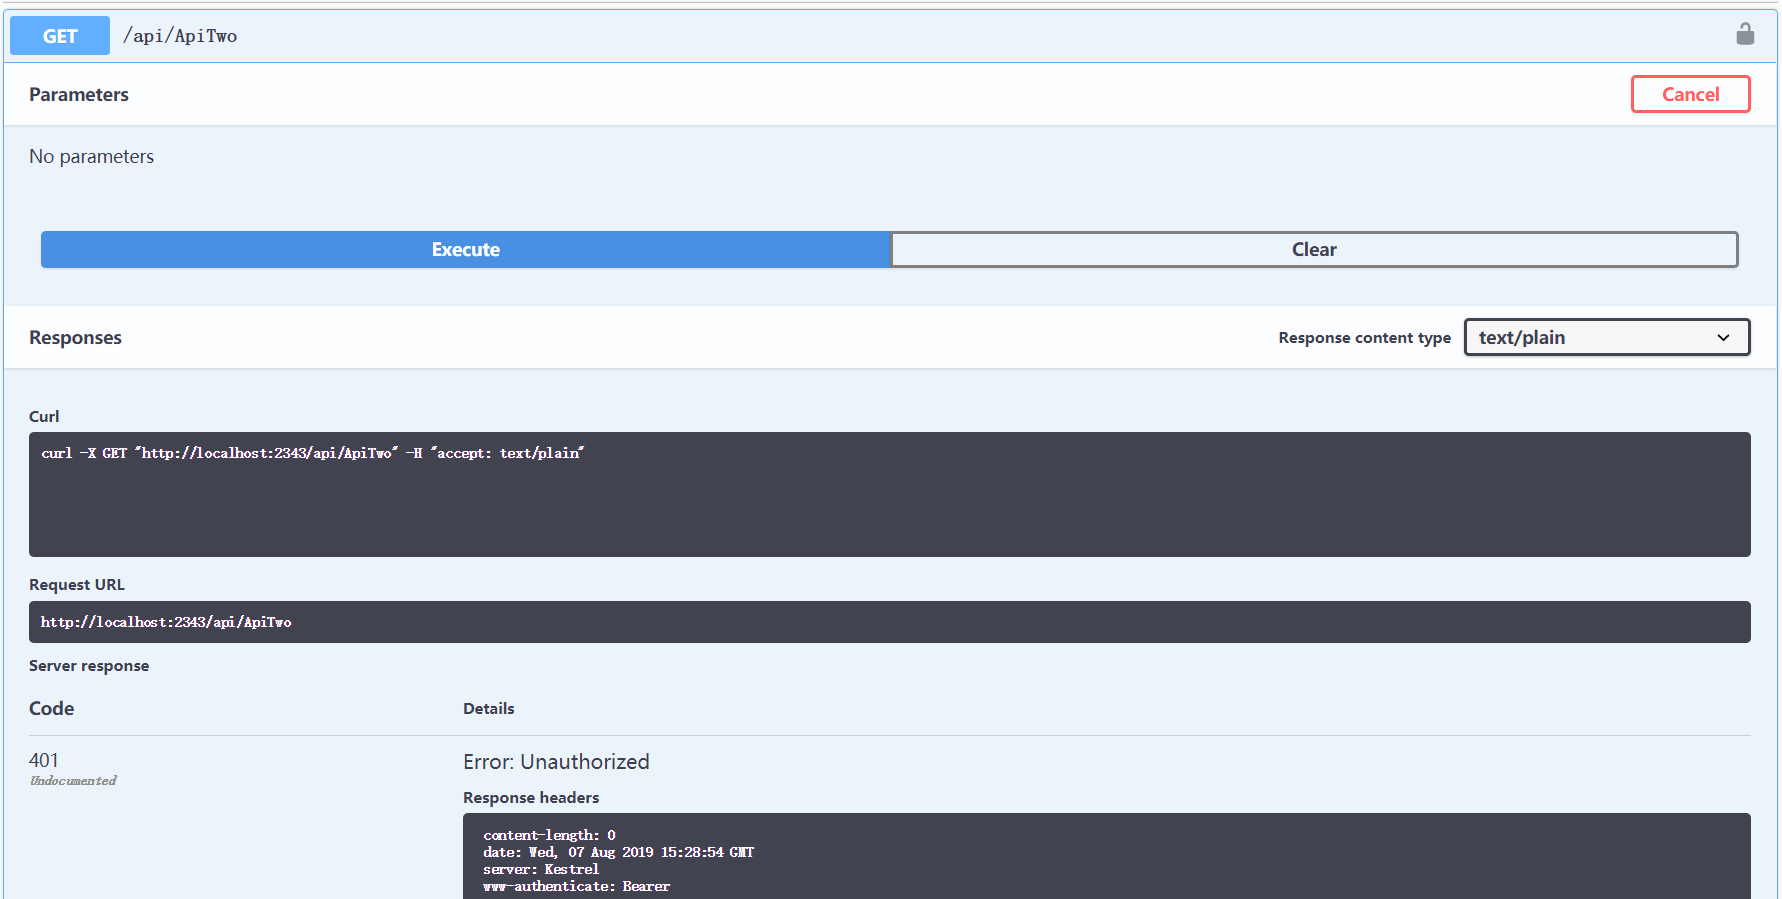
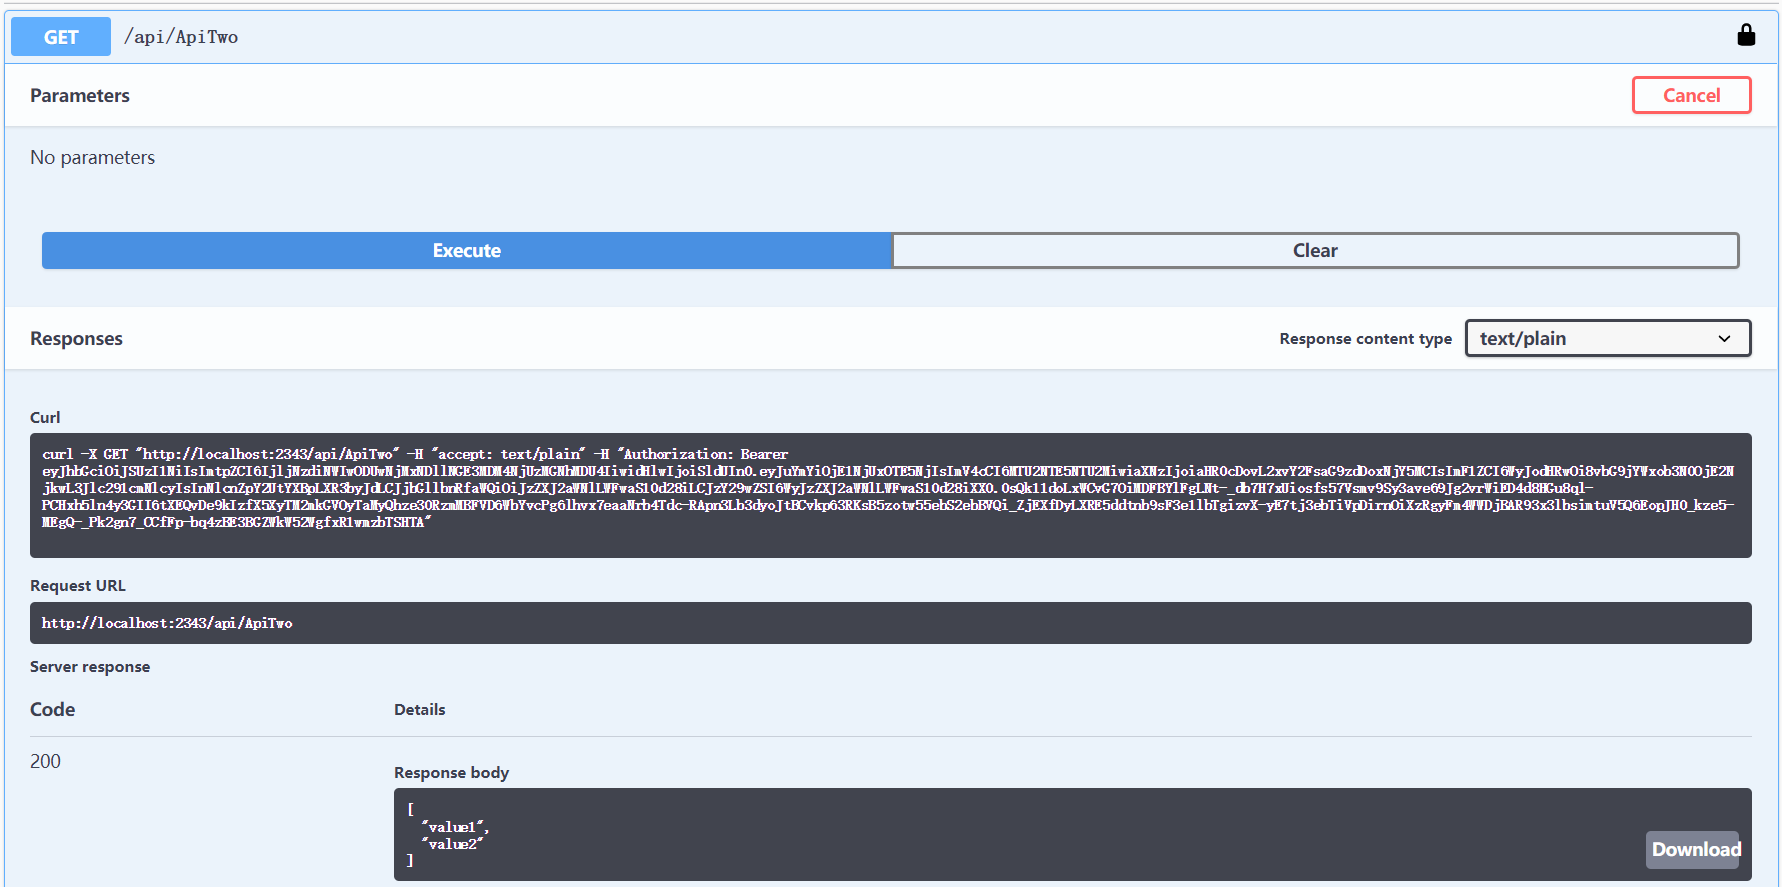
使用postman获取token,在swagger中填写token,再次发起请求,响应正常。

在ApiGateway的Startup.ConfigureServices添加Authentication,在Services.AddSwaggerGen添加相应代码,启动项目在app.UseOcelot().Wait()抛出异常:Scheme already exists: BearerIdentityServerAuthenticationJwt. 最终使用了下面的方式。在ApiGateway项目中通过swagger也可以访问业务api了。
Action<IdentityServerAuthenticationOptions> isaOpt = option =>

            {

                option.Authority = Configuration["IdentityService:Uri"];

                option.RequireHttpsMetadata = Convert.ToBoolean(Configuration["IdentityService:UseHttps"]);

                option.ApiName = Configuration["IdentityService:ApiName"];

                option.ApiSecret = Configuration["IdentityService:ApiSecret"];

                option.SupportedTokens = SupportedTokens.Both;

            };

            services.AddAuthentication().AddIdentityServerAuthentication(Configuration["IdentityService:DefaultScheme"], isaOpt);
但是配置中的IdentityService:DefaultScheme不可以是"Bearer",试验配置的是"IdentityBearer",不知为何不可以是"Bearer",不知道有没有懂这个的可以指点一二。
the end...
AspNetCore网关集成Swagger访问使用IdentityServer保护的webapi项目的更多相关文章
- 网关集成Swagger出现404错误
原因是忘了在需要生成api的类上加入注解 @EnableSwagger2Doc
- .netcore简单集成swagger
为什么要集成Swagger 在前后端分离比较普遍的当下,当后端开发完接口后,还需把接口的信息.参数说明.返回参数等信息编写好提供给调用者.对于对外开放接口需提供说明文档是必不可少的.但是对于内部开发, ...
- 【大道至简】NetCore3.1快速开发框架一:集成Swagger
在上一章节中,我们创建了基本的框架结构:https://www.cnblogs.com/fuyu-blog/p/12217647.html 下面我们测试接口和集成Swagger接口文档 一.接口测试 ...
- 微服务之十四如何在 Ocelot 网关中配置多实例 Swagger 访问
一.介绍 当我们开发基于微服务的应用程序的时候,有一个环节总是跳不过去的,那就是要创建 WebApi,然后,我们的应用程序基于 WebApi 接口去访问.在没有 Swagger 以前,我们开发好了 W ...
- 【从零开始搭建自己的.NET Core Api框架】(一)创建项目并集成swagger:1.1 创建
系列目录 一. 创建项目并集成swagger 1.1 创建 1.2 完善 二. 搭建项目整体架构 三. 集成轻量级ORM框架——SqlSugar 3.1 搭建环境 3.2 实战篇:利用SqlSuga ...
- Asp.Net Core集成Swagger
工作中一个公司会有很多个项目,项目之间的交互经常需要编写 API 来实现,但是编写文档是一件繁琐耗时的工作,并且随着 API 的迭代,每次都需要去更新维护接口文档,很多时候由于忘记或者人员交替的愿意造 ...
- ASP.NET Core3.1使用IdentityServer4中间件系列随笔(二):创建API项目,配置IdentityServer保护API资源
配套源码:https://gitee.com/jardeng/IdentitySolution 接上一篇<ASP.NET Core3.1使用IdentityServer4中间件系列随笔(一):搭 ...
- asp.net core 集成swagger ui
什么是Swagger? 说swagger 之前,我们先说一下OpenApi 规范. OpenApi 是一种和语言无关的用于描述RESTAPIs 接口功能的一种规范,对RESTAPIs 接口的描述包括: ...
- EF 数据库连接字符串-集成安全性访问 SQL Server
使用 Windows 集成安全性访问 SQL Server 如果您的应用程序运行在基于 Windows 的 Intranet 上,则也许可以将 Windows 集成身份验证用于数据库访问.集成安全性使 ...
随机推荐
- 38861cba61c66739c1452c3a71e39852.ttf net::ERR_ABORTED 404 (Not Found)
error: http://localhost:63342/clappr-dev/js/38861cba61c66739c1452c3a71e39852.ttf net::ERR_ABORTED 40 ...
- 集成了SSM框架的系统怎么做测试?
1.首先在测试文件夹下新建一个测试基类BaseTest BaseTest中的代码如下: package wbl_ssm_blog.mapper; import org.junit.Test; impo ...
- solr 使用
Solr安装 1:安装 Tomcat,解压缩即可. 2:解压 solr. 3:把 solr 下的dist目录solr-4.10.3.war部署到 Tomcat\webapps下(去掉版本号). 4:启 ...
- pm升级到最新版本、指定版本
npm 升级到最新版本 //linux下 npm install -g npm npm升级到指定版本 //比如升级到5.6.0 npm install -g npm@5.6.0
- Unity内存优化之视频讲解
视频为中文讲解,mp4格式,大小3.05GB 目录 扫码时备注或说明中留下邮箱 付款后如未回复请至https://shop135452397.taobao.com/ 联系店主
- 关于H5项目开发中TS(或JS)文件按照顺序编译成一个文件的记录
由于js的执行特性,多个js文件合成一个文件或者进行多个js文件加载时,时需要按照指定的顺序进行的,否则会出现报错的情况. 我们看一下目前几个主流H5引擎的做法. 白鹭的做法 当前版本的做法 在tsc ...
- WebGL第一步
什么是WebGL? WebGL使用了GLSL ES(OpenGL ES)着色器语言,通过配合调用js相关的绘制接口来实现3D效果. 采用页面中的<canvas>元素来定义绘图区域,canv ...
- IDEA 加载maven工程时
IDEA首次加载maven文件时,会无法编译,需要更新maven版本才行. 此处选择“add as maven project”. 然后点击maven对话框中的同步按钮,若仍无法更新,需要删除原有配置 ...
- 软件定义网络基础---REST API概述
一:什么是REST API REST API是北向接口的主流设计方式 API是应用程序编程接口,是预先定义好的函数,可以供应用程序或开发人员访问调用 年 Roy Thomas Fielding 的博士 ...
- html5画界面常用标签整理
0.顶部一张banner图片横铺 .tl-header{ width: 100%; height: auto; } <section class="tl-header"> ...