Python安装cx_Oracle与操作数据测试小结
这里简单总结一下Python操作Oracle数据库这方面的相关知识。只是简单的整理一下之前的实验和笔记。这里的测试服务器为CentOS Linux release 7.5. 个人实验、测试、采集数据的一台机器。
1:安装cx_Oracle
这里简单介绍一下cx_Oracle,下面一段内容摘自cx_Oracle的作者(Anthony Tuininga )的一篇博文,详情参考https://www.oracle.com/technetwork/cn/topics/tuininga-cx-oracle-086962-zhs.html
cx_Oracle是一个Python 扩展模块,通过使用所有数据库访问模块通用的数据库 API来实现 Oracle 数据库的查询和更新。为使用一些专为 Oracle 设计的特性,还加入了多个通用数据库 API 的扩展。cx_Oracle 的开发历时十多年,涵盖了大多数需要在 Python 中访问 Oracle 的客户的需求。2008 年 12 月,一个新的主要版本解决了早期版本的众多限制,并增添了对 Python 3.0 和 Oracle 新推出的一些特性的支持。
cx_Oracle的官方文档:https://cx-oracle.readthedocs.io/en/latest/# 官方文档从架构、特征方面介绍了cx_Oracle,简单摘录如下所示:
Architecture
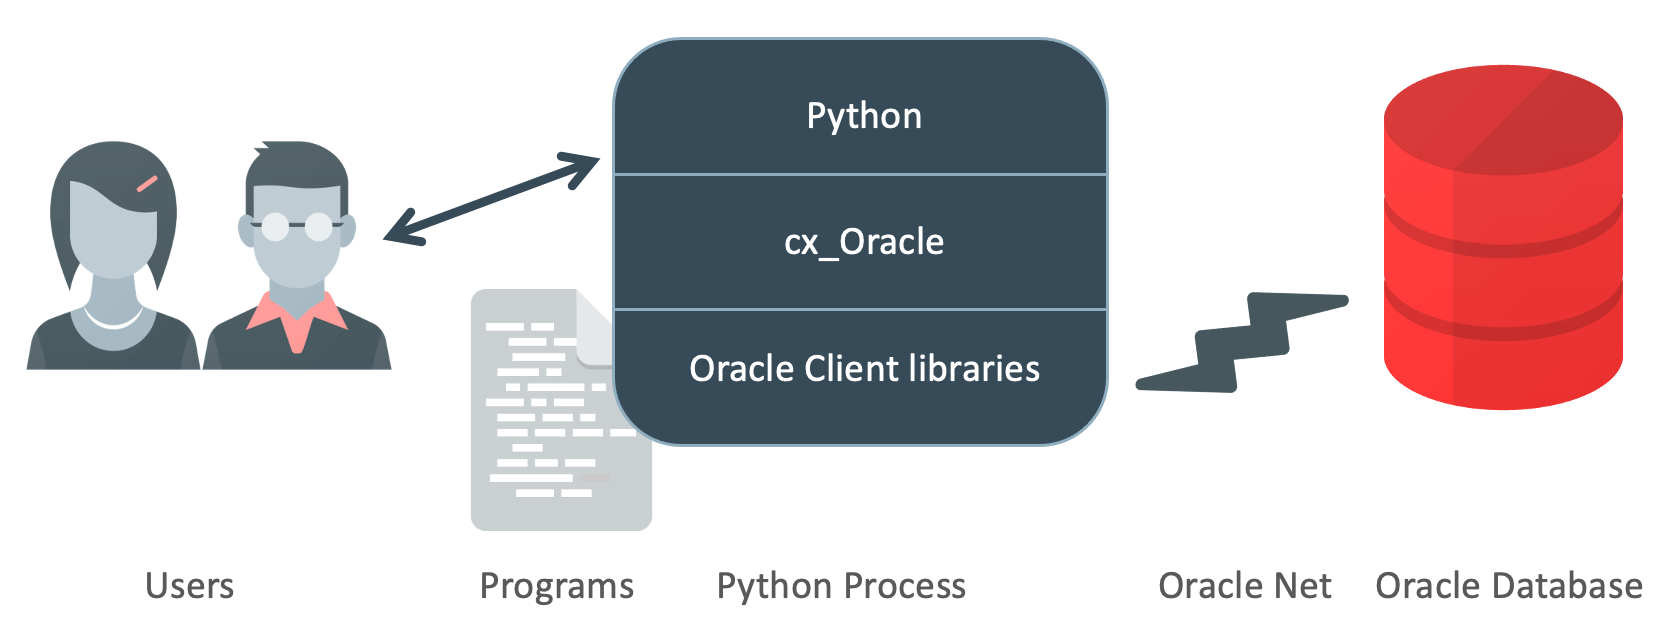
Python programs call cx_Oracle functions. Internally cx_Oracle dynamically loads Oracle Client libraries to access Oracle Database.

Fig. 1 cx_Oracle Architecture
cx_Oracle is typically installed from PyPI using pip. The Oracle Client libraries need to be installed separately. The libraries can be obtained from an installation of Oracle Instant Client, from a full Oracle Client installation, or even from an Oracle Database installation (if Python is running on the same machine as the database).
Features
The cx_Oracle feature highlights are:
- Easily installed from PyPI
- Support for Python 2 and 3, and for multiple Oracle Database versions
- Execution of SQL and PL/SQL statements
- Extensive Oracle data type support, including large objects (CLOB and BLOB) and binding of SQL objects
- Connection management, including connection pooling
- Oracle Database High Availability features
- Full use of Oracle Network Service infrastructure, including encrypted network traffic and security features
A complete list of supported features can be seen here.
下面介绍安装cx_Oracle,cx_Oracle组件有多种安装方式,实在想不出不用pip安装的理由,因为它实在太简单、方便了!
pip install cx_Oracle

[root@db-server ~]# pip install cx_Oracle
Collecting cx_Oracle
  Downloading https://files.pythonhosted.org/packages/ff/95/6c50d13da95de3e438e7d333dbd7b0946a0981c778e8153c73061b018a33/cx_Oracle-7.2.3-cp36-cp36m-manylinux1_x86_64.whl (731kB)
     |████████████████████████████████| 737kB 295kB/s
Installing collected packages: cx-Oracle
Successfully installed cx-Oracle-7.2.3
安装成功后,测试验证
[root@db-server ~]# python
Python 3.6.6 (default, Sep 20 2019, 08:20:38)
[GCC 4.8.5 20150623 (Red Hat 4.8.5-39)] on linux
Type "help", "copyright", "credits" or "license" for more information.
>>> import cx_Oracle
>>>
2:安装Oracle客户端
这里我们打算安装Oracle Instant Client,可以去下面官方网址选择正确的、所需的版本。本次实验,我选择了instantclient-basic-linux.x64-11.2.0.4.0.zip
https://www.oracle.com/database/technologies/instant-client/downloads.html
https://www.oracle.com/database/technologies/instant-client/linux-x86-64-downloads.html
这里下载的Oracle Instant Client Zip,安装过程简单如下:
1:解压安装包文件到指定目录
 mkdir -p /opt/oracle
 cd /opt/oracle/
 mv instantclient-basic-linux.x64-11.2.0.4.0.zip  /opt/oracle/
 unzip instantclient-basic-linux.x64-11.2.0.4.0.zip
2:在操作系统安装libaio package,否则有可能在运行python脚本时遇到错误提示“ImportError: libaio.so.1: cannot open shared object file: No such file or directory”
yum install libaio
注意:这个不是必须的,有些情况下会遇到这个错误。
3:将Instant Client永久添加到运行时链接路径
 sudo sh -c "echo /opt/oracle/instantclient_11_2  > /etc/ld.so.conf.d/oracle-instantclient.conf"
 sudo  ldconfig #
或者将环境变量LD_LIBRARY_PATH设置为Instant Client版本的相应目录。
# echo $LD_LIBRARY_PATH
/usr/local/hadoop/lib/native

在/etc/profile中加入
export LD_LIBRARY_PATH=/opt/oracle/instantclient_11_2:$LD_LIBRARY_PATH

# source /etc/profile
# echo $LD_LIBRARY_PATH
/opt/oracle/instantclient_11_2:/usr/local/hadoop/lib/native

mkdir -p /opt/oracle/instantclient_11_2/network/admin
其它平台的安装(或者RPM安装), 官方文档https://oracle.github.io/odpi/doc/installation.html#linux 有详细介绍,这里就不画蛇添足。 RPM的安装也很简单,如下所示
#rpm -ivh oracle-instantclient19.3-basic-19.3.0.0.0-1.x86_64.rpm
Preparing...                ########################################### [100%]
   1:oracle-instantclient19.########################################### [100%]
需要注意的是,安装是必须版本一致:cx_Oracle、Oracle Client、Python最好一致,否则就会出现很多问题,例如下面这些(学习、测试中遇到的错误)
- 1:cx_Oracle 报错:cx_Oracle.DatabaseError: DPI-1050: Oracle Client library must be at version 11.2
- 2:cx_Oracle.DatabaseError: DPI-1047: Cannot locate a 64-bit Oracle Client library: "/lib64/libc.so.6: version `GLIBC_2.14' not found (required by /usr/lib/oracle/19.3/client64/lib/libclntsh.so)". See https://oracle.github.io/odpi/doc/installation.html#linux for help
ORACLE的连接方式
cx_Oracle连接ORACLE数据库的连接字符串(Connection Strings)有多种方式,下面简单整理一下:
首先,我们可以看看cx_Oracle.connect这个函数的参数如下:
cx_Oracle.connect(user=None, password=None, dsn=None, mode=cx_Oracle.DEFAULT_AUTH, handle=0, pool=None, threaded=False, events=False, cclass=None, purity=cx_Oracle.ATTR_PURITY_DEFAULT, newpassword=None, encoding=None, nencoding=None, edition=None, appcontext=[], tag=None, matchanytag=None, shardingkey=[], supershardingkey=[])
参数看起来相当多,眼花缭乱的。不过没有关系,其实你用到的不多,很多参数基本上可以选择性忽略。比较常用的基本上有下面几个:
user 用户名
password 密码
dsn dsn
encoding 编码
Easy Connect Syntax for Connection Strings
dbhost.example.com是机器名,也可以数据库服务器IP地址,orclpdb1是service names, 注意,这种方式不能使用早期的SID
import cx_Oracle

# Obtain password string from a user prompt or environment variable
userpwd = ". . ."

connection = cx_Oracle.connect(username, userpwd, "dbhost.example.com/orclpdb1", encoding="UTF-8")
如果数据库不是默认的端口号,那么需要在连接字符串中指定端口号,如下所示:
connection = cx_Oracle.connect(username, userpwd, "dbhost.example.com:1984/orclpdb1",
        encoding="UTF-8")
Oracle Net Connect Descriptor Strings
介绍这种连接字符串方式前,我们必须先了解一下函数makedns,它的功能是创建一个dns对象, 如下所示:
cx_Oracle.makedns
( host
, port
, sid=None
, service_name=None
, region=None
, sharding_key=None
, super_sharding_key=None)

dsn = cx_Oracle.makedsn("dbhost.example.com", 1521, service_name="orclpdb1")
connection = cx_Oracle.connect(username, userpwd, dsn, encoding="UTF-8")
另外,你也可以用创建类似的连接描述符字符串,如下所示:
dsn = """(DESCRIPTION=
             (FAILOVER=on)
             (ADDRESS_LIST=
               (ADDRESS=(PROTOCOL=tcp)(HOST=sales1-svr)(PORT=1521))
               (ADDRESS=(PROTOCOL=tcp)(HOST=sales2-svr)(PORT=1521)))
             (CONNECT_DATA=(SERVICE_NAME=sales.example.com)))"""

connection = cx_Oracle.connect(username, userpwd, dsn, encoding="UTF-8")
Net Service Names for Connection Strings
这种连接字符串方式就不用多介绍了,基本上学习ORACLE的入门的时候,就已经了解了这方面的知识点
MyDB =
  (DESCRIPTION =
    (ADDRESS = (PROTOCOL = TCP)(HOST = xxxxx)(PORT = 1521))
    (CONNECT_DATA =
      (SERVER = DEDICATED)
      (SERVICE_NAME = orclpdb1)
    )
  )

connection = cx_Oracle.connect(username, userpwd, "MyDB", encoding="UTF-8")
JDBC and Oracle SQL Developer Connection Strings
cx_Oracle连接字符串语法与Java JDBC和通用Oracle SQL Developer语法不同,一般JDBC的连接字符串如下:
jdbc:oracle:thin:@hostname:port/service_name、
cx_Oracle的方式如下:
connection = cx_Oracle.connect("hr", userpwd, "dbhost.example.com:1521/orclpdb1", encoding="UTF-8")
用户名/密码@Oracle服务器IP/Oracle的SERVICE_NAME")
db_conn=cx_Oracle.connect('test/test123456@10.20.57.24/GSP')
ORACLE的基本操作
下面简单介绍一下使用cx_Oracle操作数据库的一些简单例子
ORACLE的查询
简单查询
import cx_Oracle

db_conn=cx_Oracle.connect('test/test123456@10.20.57.24/gsp.localdomain')
db_cursor=db_conn.cursor()

sql_cmd='SELECT * FROM TEST.TEST'

db_cursor.execute(sql_cmd)

for row in  db_cursor:
    print(row)

db_cursor.close()
db_conn.close()
注意事项:SQL语句里面不能加上分号(;)这类结束符,否则就会报 ORA-00911: invalid character错误:
如果上面SQL脚本里面多了一个分号,就会出现下面错误:
sql_cmd='SELECT * FROM TEST.TEST;'

[root@MyDB python]# python orace_select.py
Traceback (most recent call last):
  File "orace_select.py", line 8, in <module>
    db_cursor.execute(sql_cmd)
cx_Oracle.DatabaseError: ORA-00911: invalid character
带参数查询
import cx_Oracle

db_conn=cx_Oracle.connect("test", "test123456", "10.20.57.24/gsp.localdomain",encoding="UTF-8")
db_cursor=db_conn.cursor()

sql_cmd='SELECT * FROM TEST WHERE ID=:ID'
sql_p_id={'ID':100}

db_cursor.execute(sql_cmd,sql_p_id)

for row in  db_cursor:
    print(row)

db_cursor.close()
db_conn.close()
如果要获取多行记录,可以使用fetchall函数。不用使用
import cx_Oracle

db_conn=cx_Oracle.connect("test", "test123456", "10.20.57.24/gsp.localdomain",encoding="UTF-8")
db_cursor=db_conn.cursor()

sql_cmd='SELECT * FROM TEST WHERE ID=:ID'
sql_p_id={'ID':100}

db_cursor.execute(sql_cmd,sql_p_id)

db_records= db_cursor.fetchall()
print(db_records)

db_cursor.close()
db_conn.close()
ORACLE的DML
其实对于INSERT、DELETE、UPDATE的操作,基本上差不很多。下面简单简单举了一个UPDATE例子,没有从细节和分类(UPDATE、INSERT、DELETE)展开。
#-*- coding: utf-8 -*-
import cx_Oracle

db_conn=cx_Oracle.connect("test", "test123456", "10.20.57.24/gsp.localdomain",encoding="UTF-8")
db_cursor = db_conn.cursor()

sql_cmd = 'INSERT INTO TEST.TEST(OWNER,OBJECT_ID,OBJECT_NAME)' \
          'VALUES(:OWNER, :OBJECT_ID, :OBJECT_NAME)'

db_cursor.execute(sql_cmd, ('TEST', 1, 'KERRY1'))
db_cursor.execute(sql_cmd, ('TEST', 2, 'KERRY2'))

db_conn.commit()

db_cursor.close()
db_conn.close()
注意,如果是插入多行记录,你使用execute就会报如下错误:
cx_Oracle.NotSupportedError: Python value of type tuple not supported.
#-*- coding: utf-8 -*-
import cx_Oracle

db_conn=cx_Oracle.connect("test", "test123456", "10.20.57.24/gsp.localdomain",encoding="UTF-8")
db_cursor = db_conn.cursor()

sql_cmd = 'INSERT INTO TEST.TEST(OWNER,OBJECT_ID,OBJECT_NAME)' \
          'VALUES(:1, :2, :3)'

insert_record=[('TEST', 1, 'KERRY1'),('TEST', 2, 'KERRY2'),('TEST', 3, 'KERRY3')]
db_cursor.bindarraysize =3
db_cursor.setinputsizes(30,int, 30)
#db_cursor.execute(sql_cmd, ('TEST', 1, 'KERRY1'))
#db_cursor.execute(sql_cmd, ('TEST', 2, 'KERRY2'))
db_cursor.execute(sql_cmd, insert_record)

db_conn.commit()

db_cursor.close()
db_conn.close()
正确的做法是使用executemany:
#-*- coding: utf-8 -*-
import cx_Oracle

db_conn=cx_Oracle.connect("test", "test123456", "10.20.57.24/gsp.localdomain",encoding="UTF-8")
db_cursor = db_conn.cursor()

sql_cmd = 'INSERT INTO TEST.TEST(OWNER,OBJECT_ID,OBJECT_NAME)' \
          'VALUES(:1, :2, :3)'

insert_record=[('TEST', 1, 'KERRY1'),('TEST', 2, 'KERRY2'),('TEST', 3, 'KERRY3')]
db_cursor.bindarraysize =3
db_cursor.setinputsizes(30,int, 30)
db_cursor.executemany(sql_cmd, insert_record)

db_conn.commit()

db_cursor.close()
db_conn.close()
个人在总结的时候,发现官方文档https://cx-oracle.readthedocs.io/en/latest/user_guide/sql_execution.html里面的例子实在是太详细了,这里完全没有必要画蛇添足。
参考资料:
https://cx-oracle.readthedocs.io/en/latest/index.html
https://github.com/oracle/python-cx_Oracle/tree/master/samples
https://blogs.oracle.com/oraclemagazine/perform-basic-crud-operations-using-cx-oracle-part-1
https://www.oracle.com/technetwork/articles/dsl/prez-python-queries-101587.html
Python安装cx_Oracle与操作数据测试小结的更多相关文章
- Python 安装cx_Oracle模块
1.Python安装cx_Oracle模块需要安装Oracle,并在环境变量中添加Oracle的路径. 2.没有安装Oracle的需要下载一个oci.dll的文件,并把文件的路径添加到path中. 如 ...
- Python使用cx_Oracle模块操作Oracle数据库--通过sql语句和存储操作
https://www.jb51.net/article/125160.htm?utm_medium=referral Python使用cx_Oracle调用Oracle存储过程的方法示例 http ...
- python 安装cx_Oracle模块, MySQLdb模块, Tornado
一,想访问远程Oracle数据库,本地又不想安装几百兆的Oracle Client(也木有root权限),安装python的cx_Oralce 模块需要依赖Oracle Instant Client ...
- python安装与pip操作
python安装 1, 下载并解压Python-3.6.2.tar.xz 2,tar xvJf Python-3.6.2.tar.xz 2./configure --prefix=/usr/local ...
- Python 安装cx_Oracle模块折腾笔记
kali linux/ubuntu下安装: 不得不说安装这个模块很蛋疼,决定做个记录. sudo apt install build-essential unzip python-dev libaio ...
- python 文件和路径操作函数小结
1: os.listdir(path) //path为目录 功能相当于在path目录下执行dir命令,返回为list类型 print os.listdir('..') 2: os.path.walk( ...
- 安装cx_Oracle 6
首先声明,本文是在Linux 环境下进行安装.不涉及Windows 版安装. 一. 了解cx_Oracle 安装要求 要python 通过cx_Oracle 6 操作Oracle 数据库,以下几个条件 ...
- aix5下安装python和cx_Oracle
之前写了一个 linux下安装python和cx_Oracle 这次其实差不多. 1.解压安装包: Python-2.5.4.tar.bz2 cx_Oracle-5.0.4.tar.gz 2.安装py ...
- CentOS安装Python模块cx_Oracle
在线安装 $ wget https://bootstrap.pypa.io/get-pip.py$ python get-pip.py$ pip -V #查看pip版本 或者将网页中的代码复制到get ...
随机推荐
- LeetCode正则表达式匹配
题目描述 给你一个字符串 s 和一个字符规律 p,请你来实现一个支持 '.' 和 '*' 的正则表达式匹配. '.' 匹配任意单个字符 '*' 匹配零个或多个前面的那一个元素 所谓匹配,是要涵盖 整个 ...
- git一步步上传自己的项目至github,及仓库更新
一.使用git上传项目到github 首先登陆github账号,选择新建一个库,填写项目名称,描述 创建完成之后,跳转到下面的页面,下面红框中的网址要记住,在后面上传代码的时候需要使用 接下来,我们需 ...
- 基于 HTML5 的工控物联网的隧道监控实战
前言 监控隧道内的车道堵塞情况.隧道内的车祸现场,在隧道中显示当前车祸位置并在隧道口给与提示等等功能都是非常有必要的.这个隧道 Demo 的主要内容包括:照明.风机.车道指示灯.交通信号灯.情报板.消 ...
- jsonp与cors跨域解析
1.浏览器的同源安全策略 没错,就是这家伙干的,浏览器只允许请求当前域的资源,而对其他域的资源表示不信任.那怎么才算跨域呢? 请求协议http,https的不同 域domain的不同 端口port的不 ...
- 从源码角度看JedisPoolConfig参数配置
做一个积极的人 编码.改bug.提升自己 我有一个乐园,面向编程,春暖花开! 你好,JedisPoolConfig Java中使用Jedis作为连接Redis的工具.在使用Jedis的也可以配置Jed ...
- 从.NET CORE2.2升级到3.0过程及遇到的一些问题
RoadFlow工作流引擎从.NET Core2.2升级到3.0遇到了一些问题及解决方式这里记录一下. 1.DLL项目框架从2.2选择到3.0,这个没什么好说的,没有问题.重点的WEB层的一些变化. ...
- django html母版
08.12自我总结 django母版 一.母版写的格式 在需要导入的地方写 {% block 名字定义 %} {% endblock %} 二.导入模板 {% extends 'FUCK.html' ...
- java位运算,逻辑运算符
位运算逻辑运算符包括: 与(&),非(~),或(|),异或(^). &: 条件1&条件2 ,只有条件1和条件2都满足, 整个表达式才为真true, 只要有1个为false ...
- Java自动化测试框架-03 - TestNG之Test Group篇 - 我们一起组团打怪升级(详细教程)
简介 其实这篇文章的group宏哥在上一篇中就提到过,但是就是举例一笔带过的,因此今天专门有一篇文章来讲解Group的相关知识.希望大家茅塞顿开 ,有着更进一步认识和了解测试组. 一.Test Gro ...
- Java编程思想——第17章 容器深入研究 读书笔记(三)
七.队列 排队,先进先出. 除并发应用外Queue只有两个实现:LinkedList,PriorityQueue.他们的差异在于排序而非性能. 一些常用方法: 继承自Collection的方法: ad ...
