vuejs之vue和springboot后端进行通信
一、新建一个vue项目,建立好后的相关文件
查看一下新建好的vue项目的结构:
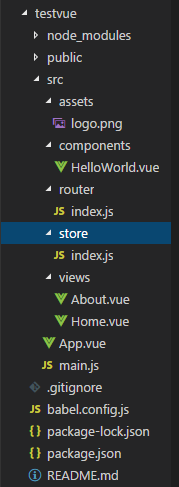
当前各个文件中的内容:
App.vue:主入口
<template>

  <div id="app">

    <div id="nav">

      <router-link to="/">Home</router-link> |

      <router-link to="/about">About</router-link>

    </div>

    <router-view/>

  </div>

</template>

<style>

#app {

  font-family: Avenir, Helvetica, Arial, sans-serif;

  -webkit-font-smoothing: antialiased;

  -moz-osx-font-smoothing: grayscale;

  text-align: center;

  color: #2c3e50;

}

#nav {

  padding: 30px;

}

#nav a {

  font-weight: bold;

  color: #2c3e50;

}

#nav a.router-link-exact-active {

  color: #42b983;

}

</style>
main.js:Vue.config.productionTip用于切换是生产环境还是开发环境。这里创建Vue对象的时候同时关联上了App.vue中的id名为app的div标签。引入路由router的js文件以及存储数据的store。
import Vue from 'vue'

import App from './App.vue'

import router from './router'

import store from './store'

Vue.config.productionTip = false

new Vue({

  router,

  store,

  render: h => h(App)

}).$mount('#app')
router/index.js:这里定义路由对应的模板。有两种方式,一种是在开头先引入,例如Home.vue。另一种是先不引入,之后在component中引入。
import Vue from 'vue'

import VueRouter from 'vue-router'

import Home from '../views/Home.vue'

Vue.use(VueRouter)

const routes = [

  {

    path: '/',

    name: 'Home',

    component: Home

  },

  {

    path: '/about',

    name: 'About',

    // route level code-splitting

    // this generates a separate chunk (about.[hash].js) for this route

    // which is lazy-loaded when the route is visited.

    component: () => import(/* webpackChunkName: "about" */ '../views/About.vue')

  }

]

const router = new VueRouter({

  mode: 'history',

  base: process.env.BASE_URL,

  routes

})

export default router
store/index.js
import Vue from 'vue'

import Vuex from 'vuex'

Vue.use(Vuex)

export default new Vuex.Store({

  state: {

  },

  mutations: {

  },

  actions: {

  },

  modules: {

  }

})
views/About.vue
<template>

  <div class="about">

    <h1>This is an about page</h1>

  </div>

</template>
views/Home.vue:这里面可以将component中的vue文件进行引入。
<template>

  <div class="home">

    <img alt="Vue logo" src="../assets/logo.png">

    <HelloWorld msg="Welcome to Your Vue.js App"/>

  </div>

</template>

<script>

// @ is an alias to /src

import HelloWorld from '@/components/HelloWorld.vue'

export default {

  name: 'Home',

  components: {

    HelloWorld

  }

}

</script>
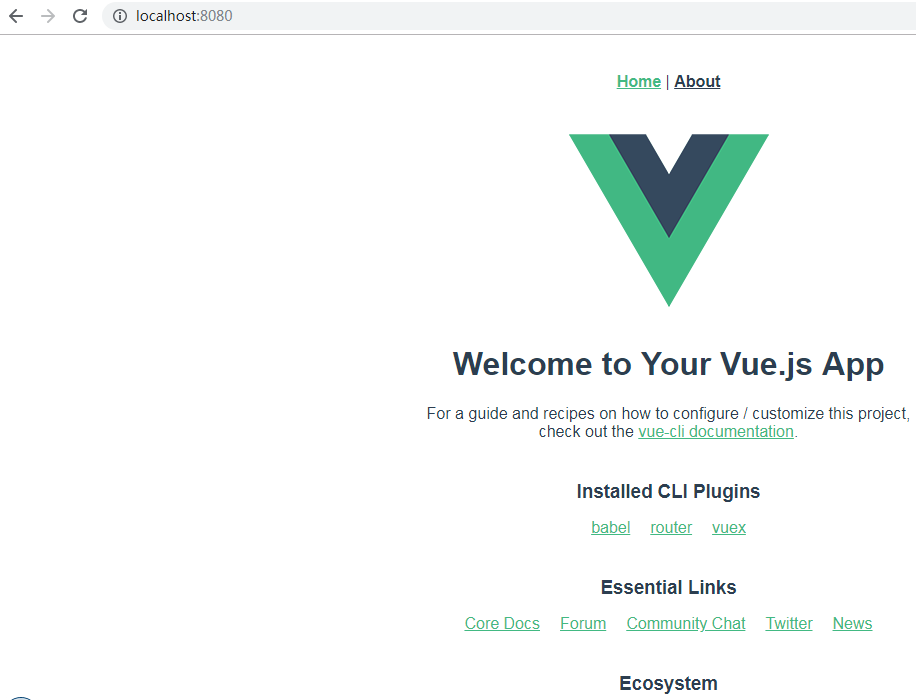
当前效果是:
点击About:
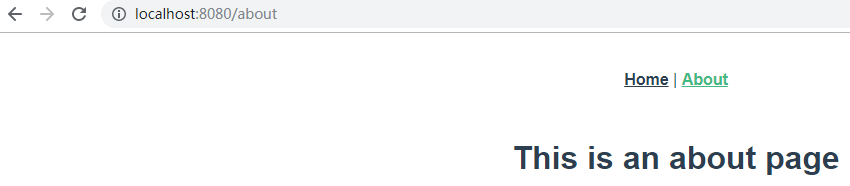
就将内容切换到了About.vue。
二、自己定义页面并进行路由
在views下新建一个Test.vue
<template>

  <!--只允许有一个根节点-->

  <div class="test">

    <table>

      <tr>

        <td>编号</td>

        <td>姓名</td>

        <td>年龄</td>

        <td>性别</td>

        <td>邮箱</td>

        <td>爱好</td>

        <td>自我介绍</td>

      </tr>

      <tr v-for="(item, index) in users"

          :key="index">

        <td>{{item.id}}</td>

        <td>{{item.username}}</td>

        <td>{{item.age}} </td>

        <td>{{item.gender}}</td>

        <td>{{item.email}}</td>

        <td>{{item.hobby}}</td>

        <td>{{item.introduce}}</td>

      </tr>

    </table>

  </div>

</template>

<script>

export default {

  name: "Book",

  data () {

    return {

      msg: "hello world",

      users: {},

    }

  },

  created () {

    const that = this;

    axios.get('http://localhost:8181/user/findAll/')

      .then(function (response) {

        console.log(response);

        that.users = response.data;

      })

  }

}

</script>

<style scoped>

</style>
在router/index.js中
import Vue from 'vue'

import VueRouter from 'vue-router'

import Home from '../views/Home.vue'

import Test from '../views/Test.vue'

Vue.use(VueRouter)

const routes = [

  {

    path: '/test',

    name: 'Test',

    component: Test,

  },

  {

    path: '/',

    name: 'Home',

    component: Home

  },

  {

    path: '/about',

    name: 'About',

    // route level code-splitting

    // this generates a separate chunk (about.[hash].js) for this route

    // which is lazy-loaded when the route is visited.

    component: () => import(/* webpackChunkName: "about" */ '../views/About.vue')

  }

]

const router = new VueRouter({

  mode: 'history',

  base: process.env.BASE_URL,

  routes

})

export default router
在App.vue中
<template>

  <div id="app">

    <div id="nav">

      <router-link to="/">Home</router-link> |

      <router-link to="/about">About</router-link> |

      <router-link to="/test">Test</router-link>

    </div>

    <router-view/>

  </div>

</template>

<style>

#app {

  font-family: Avenir, Helvetica, Arial, sans-serif;

  -webkit-font-smoothing: antialiased;

  -moz-osx-font-smoothing: grayscale;

  text-align: center;

  color: #2c3e50;

}

#nav {

  padding: 30px;

}

#nav a {

  font-weight: bold;

  color: #2c3e50;

}

#nav a.router-link-exact-active {

  color: #42b983;

}

</style>
三、新建一个springboot项目,勾选上lombok、web、jpa、mysql
(1)配置连接数据库以及jpa相关:后盾使用8181端口,前端使用8080端口。
spring:

  datasource:

    url: jdbc:mysql://localhost:3306/test

    username: root

    password: 123456

    driver-class-name: com.mysql.jdbc.Driver

  jpa:

    #控制台显示SQL

    show-sql: true

    properties:

     hibernate:

      format_sql: true

server:

  port: 8181
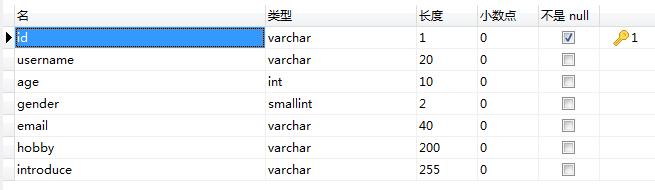
(2)数据库相关设计
(3) 新建一个entity包用于存放实体类、一个repository包用于存放jpa类,一个config包用于存放后端和前端跨域交互配置,一个controller。
User.java
package com.gong.springbootvue.entity;

import lombok.Data;

import javax.persistence.Entity;

import javax.persistence.Id;

@Entity

@Data

public class User {

    @Id

    private Integer id;

    private String username;

    private Integer age;

    private Integer gender;

    private String email;

    private String hobby;

    private String introduce;

}
Entity用于标识是一个实体类,Data用于自动生成getter和setter等方法,Id用于标识主键。
UserRepository.java
package com.gong.springbootvue.repository;

import com.gong.springbootvue.entity.User;

import org.springframework.data.jpa.repository.JpaRepository;

public interface UserRepository  extends JpaRepository<User,Integer> {

}
继承了JpaRepository之后就会有相应的增删改查方法了,不需要自己写,第一个泛型是实体类类型,第二个泛型是主键类型。
UserController.java
package com.gong.springbootvue.controller;

import com.gong.springbootvue.entity.User;

import com.gong.springbootvue.repository.UserRepository;

import org.springframework.beans.factory.annotation.Autowired;

import org.springframework.stereotype.Controller;

import org.springframework.web.bind.annotation.RequestMapping;

import org.springframework.web.bind.annotation.ResponseBody;

import java.util.List;

@Controller

@RequestMapping("/user")

public class UserController {

    @Autowired

    UserRepository userRepository;

    @ResponseBody

    @RequestMapping("/findAll")

    public List<User> getAll(){

        return userRepository.findAll();

    }

}
VueConfig.java
package com.gong.springbootvue.config;

import org.springframework.context.annotation.Configuration;

import org.springframework.web.servlet.config.annotation.CorsRegistry;

import org.springframework.web.servlet.config.annotation.WebMvcConfigurer;

@Configuration

public class VueConfig implements WebMvcConfigurer{

    @Override

    public void addCorsMappings(CorsRegistry registry) {

        registry.addMapping("/**")

                .allowedOrigins("*")

                .allowedMethods("GET","HEAD","POST","PUT","DELETE","OPTIONS")

                .allowCredentials(true)

                .maxAge(3600)

                .allowedHeaders("*");

    }

}
四、分别启动后端服务和前端服务
先看下后端是否能正确运行:

再看下前端:
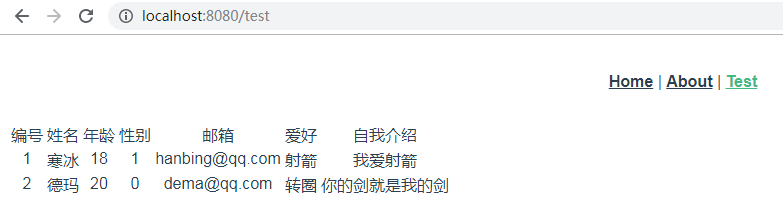
说明前端与后端交互成功。
总结:
后端中要配置与前端不同的端口,同时定义一个配置类用于配置与Vue进行交互。
前端使用axios发送请求获取后端传过来的json格式的数据,相关数据可以赋给data中的数据。使用created()方法在刷新页面时就发送请求。
vuejs之vue和springboot后端进行通信的更多相关文章
- 一套基于SpringBoot+Vue+Shiro 前后端分离 开发的代码生成器
一.前言 最近花了一个月时间完成了一套基于Spring Boot+Vue+Shiro前后端分离的代码生成器,目前项目代码已基本完成 止步传统CRUD,进阶代码优化: 该项目可根据数据库字段动态生成 c ...
- SpringBoot+Jpa+SpringSecurity+Redis+Vue的前后端分离开源系统
项目简介: eladmin基于 Spring Boot 2.1.0 . Jpa. Spring Security.redis.Vue的前后端分离的后台管理系统,项目采用分模块开发方式, 权限控制采用 ...
- Flask & Vue 构建前后端分离的应用
Flask & Vue 构建前后端分离的应用 最近在使用 Flask 制作基于 HTML5 的桌面应用,前面写过<用 Python 构建 web 应用>,借助于完善的 Flask ...
- vuejs学习——vue+vuex+vue-router项目搭建(三)
前言 vuejs学习——vue+vuex+vue-router项目搭建(一) vuejs学习——vue+vuex+vue-router项目搭建(二) 为什么用vuex:组件之间的作用域独立,而组件之间 ...
- 后端访问sso后,如何返回前端vue页面(后端redirect跳转,vue代理,axios带参)
由于项目要加上公司的sso,出现的一系列问题,找到解决办法,在此记录一下.可能并不适合其他项目,给个参考. 前提: 前端是vue.js,后端springboot sso配置需要增加公司自己的maven ...
- WebSocket的使用(基于VUE与SpringBoot)
WebSocket 是 HTML5 开始提供的一种在单个 TCP 连接上进行全双工通讯的协议.WebSocket 使得客户端和服务器之间的数据交换变得更加简单,允许服务端主动向客户端推送数据.在 We ...
- Vue + axios + SpringBoot 2实现导出Excel
Vue + axios + SpringBoot 2实现导出Excel 1. 前端js代码-发送Http请求 /** * 文件下载 * @param url 下载地址 * @param fileNam ...
- 基于Vue、Springboot网站实现第三方登录之QQ登录,以及邮件发送
基于Vue.Springboot实现第三方登录之QQ登录 前言 一.前提(准备) 二.QQ登录实现 1.前端 2.后端 1.application.yml 和工具类QQHttpClient 2.QQL ...
- 【转】vue父子组件之间的通信
vue父子组件之间的通信 在vue组件通信中其中最常见通信方式就是父子组件之中的通性,而父子组件的设定方式在不同情况下又各有不同.最常见的就是父组件为控制组件子组件为视图组件.父组件传递数据给子组件使 ...
随机推荐
- vscode中nodejs智能提示
简单粗暴,直接在项目中,运行npm install --save-dev @types/node命令,然后就ok了.
- Python使用requests爬取一个网页并保存
#导入 requests模块import requests #设置请求头,让网站监测是浏览器 headers = { 'user-agent': 'Mozilla/5.0 (Windows NT 6. ...
- DP-Fibonacci
善于发现 DP 中的 Fibonacci 我们在做 DP 题时 , 会发现有一些题 类似于找规律的题 ,观察测试样例 , 要对数据敏感 , 比如输入 2 输出 1 , 输入 3 就输出 2 …… ...
- python的requests用法详解
Requests是一个Python语言写的http相关设置或者请求的一个库 安装:pip install Requests或者pip3 install requests 使用的时候要import re ...
- HTTP图解笔记(六)—— 第6章 HTTP首部
前言 为啥第一章直接跳到第六章呢,因为...博主当初看书的时候挑着看..只看了第一章和第六章┗( ▔, ▔ )┛ HTTP图解对于不熟悉HTTP的小伙伴来说是很好的书籍,建议入手! 一. HTTP报文 ...
- Git基础知识 —— 获取Git仓库
前言 官方提供了两种获取Git仓库的方法,第一种是在本地现有项目目录下导入所有文件到Git中,第二种就是从Git仓库中clone项目到本地 这里就不说Git的安装了哈,有需要的小伙伴可以查看该博文:h ...
- DataFrame数据合并
一.join 作用:默认情况下,他是把行索引相同的数据合并到一起注意:以左为准,没有的部分用NaN补全 例子 import pandas as pd import numpy as np df1 = ...
- Excel.Application class
https://docs.microsoft.com/en-us/javascript/api/excel/excel.application?view=office-js Represents th ...
- SpringBoot中对SpringMVC的自动配置
https://docs.spring.io/spring-boot/docs/1.5.10.RELEASE/reference/htmlsingle/#boot-features-developin ...
- jmeter使用—正则表达式提取器
当我们测试接口的时候,有些请求参数是需要从上个接口返回获取的数据,这样的话我们就需要用到关联了.今天我们使用的关联是正则表达式提取器来进行获取需要关联的数据. 下面来具体说明正则表达式提取器的使用方法 ...