Hibernate:对象关系映射(一对一,一对多,多对一,多对多)
如需转载,请说明出处:http://www.cnblogs.com/gudu1/p/6895610.html
Hibernate通过关系映射来表示数据库中表与表之间的关系,关系映射可以通过两种方式:配置文件映射和注解映射,本文主要讲解配置文件映射。
关系映射:
1.单向关联关系,表示只有一方维护关系,而另一方并不知道有这种关系,在解除和删除关联关系的时候也要在有外键方进行,否则会抛出异常,因为有外键的约束。
2.双向关联关系。双方都维护关系,无论在哪一方解除和删除关联关系,Hibernate都能够获知,都能够正确的进行操作。
关系映射中,即使你在类中添加了属性(即相关联的类对象),通过配置inverse属性,也可以设置它是否维护关系,默认为true,可以设置为false表示不维护
一:单向关联
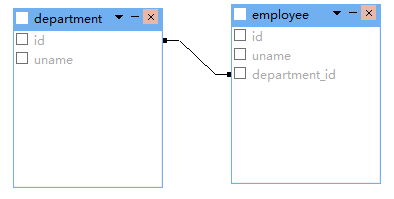
单向多对一:
单向(many-to-one)是最常见的单向关联关系:
<class name="Department" table="department">

        <id name="id" column="id">

            <generator class="native"/>

        </id>

        <property name="uname" column="uname" type="string" length="20"></property>

</class>

 <class name="Employee" table="employee">

        <id name="id" column="id">

            <generator class="native"/>

        </id>

        <property name="uname" type="string" length="20" column="uname"></property>

        <many-to-one name="department" class="Department" column="department_id"></many-to-one>

</class>
下面是对应数据库表

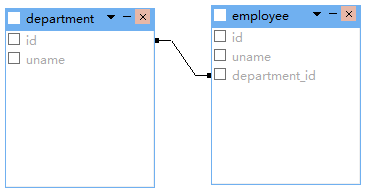
单向一对多:
基于外键关联的单向一对多关联是一种很少见的情况,不推荐使用它。
<class name="Department" table="department">

        <id name="id" column="id">

            <generator class="native"/>

        </id>

        <property name="uname" column="uname" type="string" length="20"></property>

        <set name="employeeSet">

            <key column="employee_id"></key>

            <one-to-many class="Employee" />

        </set>

</class>

<class name="Employee" table="employee">

        <id name="id" column="id">

            <generator class="native"/>

        </id>

        <property name="uname" type="string" length="20" column="uname"></property>

</class>
下面是对应数据库表,可以看出跟上面是一样的

单向一对一:
基于外键关联的单向一对一关联和单向多对一关联几乎是一样的。唯一的不同就是单向一对一关联中的外键字段具有唯一性约束(unique)。
<class name="Department" table="department">

        <id name="id" column="id">

            <generator class="native"/>

        </id>

        <property name="uname" column="uname" type="string" length="20"></property>

</class>

<class name="Employee" table="employee">

        <id name="id" column="id">

            <generator class="native"/>

        </id>

        <property name="uname" type="string" length="20" column="uname"></property>

        <many-to-one name="department" column="department_id" class="Department" unique="true"></many-to-one>

</class>
看图好像和(一对多|多对一)结构一样,确实是一样的,你可以插几条数据试一下,因为是一对一关系,有可能会出错的哦!

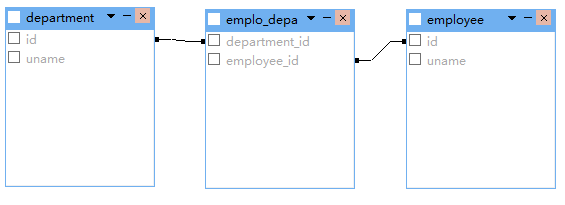
二:使用连接表单向关联
单向一对多:
基于连接表的单向一对多关联 应该优先被采用。请注意,通过指定unique="true",我们可以把多样性从多对多改变为一对多。
<class name="Department" table="department">

        <id name="id" column="id">

            <generator class="native"/>

        </id>

        <property name="uname" column="uname" type="string" length="20"></property>

        <set name="employeeSet" table="empl_depa">

            <key column="department_id"></key>

            <many-to-many column="employee_id" class="Employee" unique="true"></many-to-many>

        </set>

</class>

<class name="Employee" table="employee">

        <id name="id" column="id">

            <generator class="native"/>

        </id>

        <property name="uname" type="string" length="20" column="uname"></property>

</class>

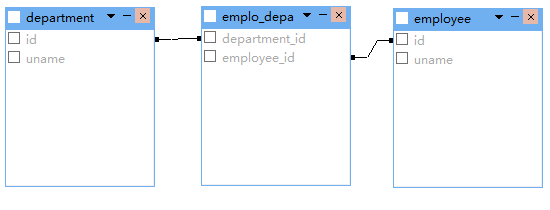
单向多对一:
基于连接表的单向多对一关联在关联关系可选的情况下应用也很普遍。
<class name="Employee" table="employee">

        <id name="id" column="id">

            <generator class="native"/>

        </id>

        <property name="uname" type="string" length="20" column="uname"></property>

        <join table="emplo_depa">

            <key column="employee_id"></key>

            <many-to-one name="department" class="Department" column="department_id"></many-to-one>

        </join>

</class>

<class name="Department" table="department">

        <id name="id" column="id">

            <generator class="native"/>

        </id>

        <property name="uname" column="uname" type="string" length="20"></property>

</class>

单向一对一:
基于连接表的单向一对一关联也是可行的,但非常少见。
<class name="Department" table="department">

        <id name="id" column="id">

            <generator class="native"/>

        </id>

        <property name="uname" column="uname" type="string" length="20"></property>

</class>

<class name="Employee" table="employee">

        <id name="id" column="id">

            <generator class="native"/>

        </id>

        <property name="uname" type="string" length="20" column="uname"></property>

        <join table="emplo_depa">

            <key column="employee_id"></key>

            <many-to-one name="department" class="Department" column="department_id" unique="true"></many-to-one>

        </join>

</class>

单向多对多:
<class name="Department" table="department">

        <id name="id" column="id">

            <generator class="native"/>

        </id>

        <property name="uname" column="uname" type="string" length="20"></property>

        <set name="employeeSet" table="emplo_depa">

            <key column="department_id"></key>

            <many-to-many class="Employee" column="employee_id"></many-to-many>

        </set>

</class>

<class name="Employee" table="employee">

        <id name="id" column="id">

            <generator class="native"/>

        </id>

        <property name="uname" type="string" length="20" column="uname"></property>

</class>
三:双向关联
一对一双向关联
<class name="Department" table="department">

        <id name="id" column="id">

            <generator class="native"/>

        </id>

        <property name="uname" column="uname" type="string" length="20"></property>

        <one-to-one name="employee" class="Employee" property-ref="department"></one-to-one>

</class>

<class name="Employee" table="employee">

        <id name="id" column="id">

            <generator class="native"/>

        </id>

        <property name="uname" type="string" length="20" column="uname"></property>

        <many-to-one name="department" class="Department" unique="true"></many-to-one>

</class>
一对多双向关联
<class name="Department" table="department">

        <id name="id" column="id">

            <generator class="native"/>

        </id>

        <property name="uname" column="uname" type="string" length="20"></property>

        <set name="employeeSet">

            <key column="department_id"></key>

            <one-to-many class="Employee" />

        </set>

</class>

<class name="Employee" table="employee">

        <id name="id" column="id">

            <generator class="native"/>

        </id>

        <property name="uname" type="string" length="20" column="uname"></property>

        <many-to-one name="department" class="Department" column="department_id"></many-to-one>

</class>
双向多对一关联把上面权限反转一下就好,这里就不贴代码了。
四:使用连接表双向关联
一对一双向关联
<class name="Department" table="department">

        <id name="id" column="id">

            <generator class="native"/>

        </id>

        <property name="uname" column="uname" type="string" length="20"></property>

        <join table="emplo_depa" inverse="true" optional="true">

            <key column="department_id" unique="true"></key>

            <many-to-one name="employee" unique="true" column="employee_id"></many-to-one>

        </join>

</class>

<class name="Employee" table="employee">

        <id name="id" column="id">

            <generator class="native"/>

        </id>

        <property name="uname" type="string" length="20" column="uname"></property>

        <join table="emplo_depa" optional="true">

            <key column="employee_id" unique="true"></key>

            <many-to-one name="department" unique="true" column="department_id"></many-to-one>

        </join>

</class>
多对多双向关联
<class name="Department" table="department">

        <id name="id" column="id">

            <generator class="native"/>

        </id>

        <property name="uname" column="uname" type="string" length="20"></property>

        <set name="employeeSet" table="emplo_depa" inverse="true">

            <key column="department_id"></key>

            <many-to-many class="Employee" column="employee_id" ></many-to-many>

        </set>

</class>

<class name="Employee" table="employee">

        <id name="id" column="id">

            <generator class="native"/>

        </id>

        <property name="uname" type="string" length="20" column="uname"></property>

        <set name="departmentSet" table="emplo_depa">

            <key column="employee_id"></key>

            <many-to-many class="Department" column="department_id"></many-to-many>

        </set>

</class>

一对多双向关联
<class name="Department" table="department">

        <id name="id" column="id">

            <generator class="native"/>

        </id>

        <property name="uname" column="uname" type="string" length="20"></property>

        <set name="employeeSet" inverse="true" table="emplo_depa">

            <key column="department_id"></key>

            <many-to-many unique="true" class="Employee" column="employee_id"></many-to-many>

        </set>

</class>

<class name="Employee" table="employee">

        <id name="id" column="id">

            <generator class="native"/>

        </id>

        <property name="uname" type="string" length="20" column="uname"></property>

        <join table="emplo_depa">

            <key column="employee_id"></key>

            <many-to-one name="department" column="department_id" class="Department"></many-to-one>

        </join>

</class>

除此之外,还有更多映射配置(继承映射,组件映射),本篇就不写那么多了,希望读者能够查阅文件学习。每天一小步,人生一大步。
Hibernate:对象关系映射(一对一,一对多,多对一,多对多)的更多相关文章
- Hibernate 对象关系映射文件
简介: POJO 类和关系型数据库之间的映射可以用一个 XML 文档来定义 通过 POJO 类的数据库映射文件,Hibernate 可以理解持久化类和数据表之间的对应关系,也可以理解持久化类属性与数据 ...
- hibernate对象关系映射( 一对一,一对多,多对一,多对多的单向,双向映射 ——)
对象之间的关系: 关系映射之间的关系只的是对象之间的关系,并不指数据库表的关系(外键关系)这儿解决的问题是当对象之间的关系之一时,数据库表该如何映射,编程上如何对待. 一对一(主键关联,和单向的外键关 ...
- hibernate对象关系实现(一)一对多
hibernate是对jdk一个封装工具,实现对象和数据库之间数据映射.使用时涉及到四个问题:a.对象之间的关系在类中的体现:b,对象关系对应的数据库中表之间体现:c.实现a,b在hibernate的 ...
- hibernate对象关系映射的配置
一对一主键关联单双向 <?xml version="1.0" encoding="UTF-8"?> <!DOCTYPE hibernate-m ...
- Hibernate -- 对象关系映射基础
- Hibernate学习笔记三:对象关系映射(一对一,一对多,多对一,多对多)
如需转载,请说明出处:http://www.cnblogs.com/gudu1/p/6895610.html Hibernate通过关系映射来表示数据库中表与表之间的关系,关系映射可以通过两种方式:配 ...
- MyBatis加强(1)~myBatis对象关系映射(多对一关系、一对多关系)、延迟/懒加载
一.myBatis对象关系映射(多对一关系.一对多关系) 1.多对一关系: ---例子:多个员工同属于一个部门. (1)myBatis发送 额外SQL: ■ 案例:员工表通过 dept_id 关联 部 ...
- Hibernate (开源对象关系映射框架)
一.基本介绍1.它对JDBC进行了非常轻量级的对象封装,它将POJO与数据库表建立映射关系,是一个全自动的orm(对象关系映射)框架,hibernate可以自动生成SQL语句,自动执行: Hibern ...
- Hibernate映射--基本类映射和对象关系映射(转)
原文地址:http://blog.csdn.net/lovesummerforever/article/details/20901011 尊重原创,请访问原网址 回想一些我们在没有学习ssh的时候 ...
随机推荐
- Spring Boot源码(八):Spring AOP源码
关于spring aop的应用参见:Spring AOP-基于@AspectJ风格 spring在初始化容器时就会生成代理对象: 关于创建bean的源码参见:Spring Boot源码(六):Bean ...
- PTA Deque (C语言)
A "deque" is a data structure consisting of a list of items, on which the following operat ...
- 在写论文的参考文献时,有的段落空格很大,有的段落则正常,原因及解决方法(wps)
下图是一段原始的参考文献,可以看出第一行的空格很大: 原因: 当一个词占不下时,自动将单词移动到下一行,但是这一行又有很多字符,因此这时,软件会将空闲的位置用空白字符填满.第一行有两个空白字符,因此将 ...
- bootstrap234的ie兼容选择
如果你需要兼容IE8甚至是IE7和IE6,那么只能选择Bootstrap2,虽然它自身在IE6的效果也并不完美.如果需要兼容IE678的话用2.如果需要高版本的浏览器,并且移动端优先的话,那么用boo ...
- 【NLP】暑假课作业1 - 中文分词(前向匹配算法实现)
作业任务: 使用98年人民日报语料库进行中文分词训练及测试. 作业输入: 98年人民日报语料库(1998-01-105-带音.txt),用80%的数据作为训练集,20%的数据作为验证集. 运行环境: ...
- Linux内核镜像文件格式与生成过程(转)
<Linux内核镜像格式> Linux内核有多种格式的镜像,包括vmlinux.Image.zImage.bzImage.uImage.xipImage.bootpImage等. ➤k ...
- H5_0024:对于事先无法确定css大小的情况,可以通过JS动态修改
$(function(){ function Heights(){ var WinH = $(window).height(); ...
- Pikachu-Sql Inject(SQL注入)
在owasp发布的top10排行榜里,注入漏洞一直是危害排名第一的漏洞,其中注入漏洞里面首当其冲的就是数据库注入漏洞.一个严重的SQL注入漏洞,可能会直接导致一家公司破产!SQL注入漏洞主要形成的原因 ...
- P6070 [RC-02] GCD [杜教筛,莫比乌斯反演]
没啥好说的,杜教筛板子题. \[\sum_{i=1}^{N} \sum_{j=1}^{N}\sum_{p=1}^{\lfloor \frac{N}{j} \rfloor}\sum_{q=1}^{\lf ...
- LeetCode 160. 相交链表 (找出两个链表的公共结点)
题目链接:https://leetcode-cn.com/problems/intersection-of-two-linked-lists/ 编写一个程序,找到两个单链表相交的起始节点. 如下面的两 ...