点亮LED灯_STM32第一课
基本原理
初始化Hal库
HAL_Init();
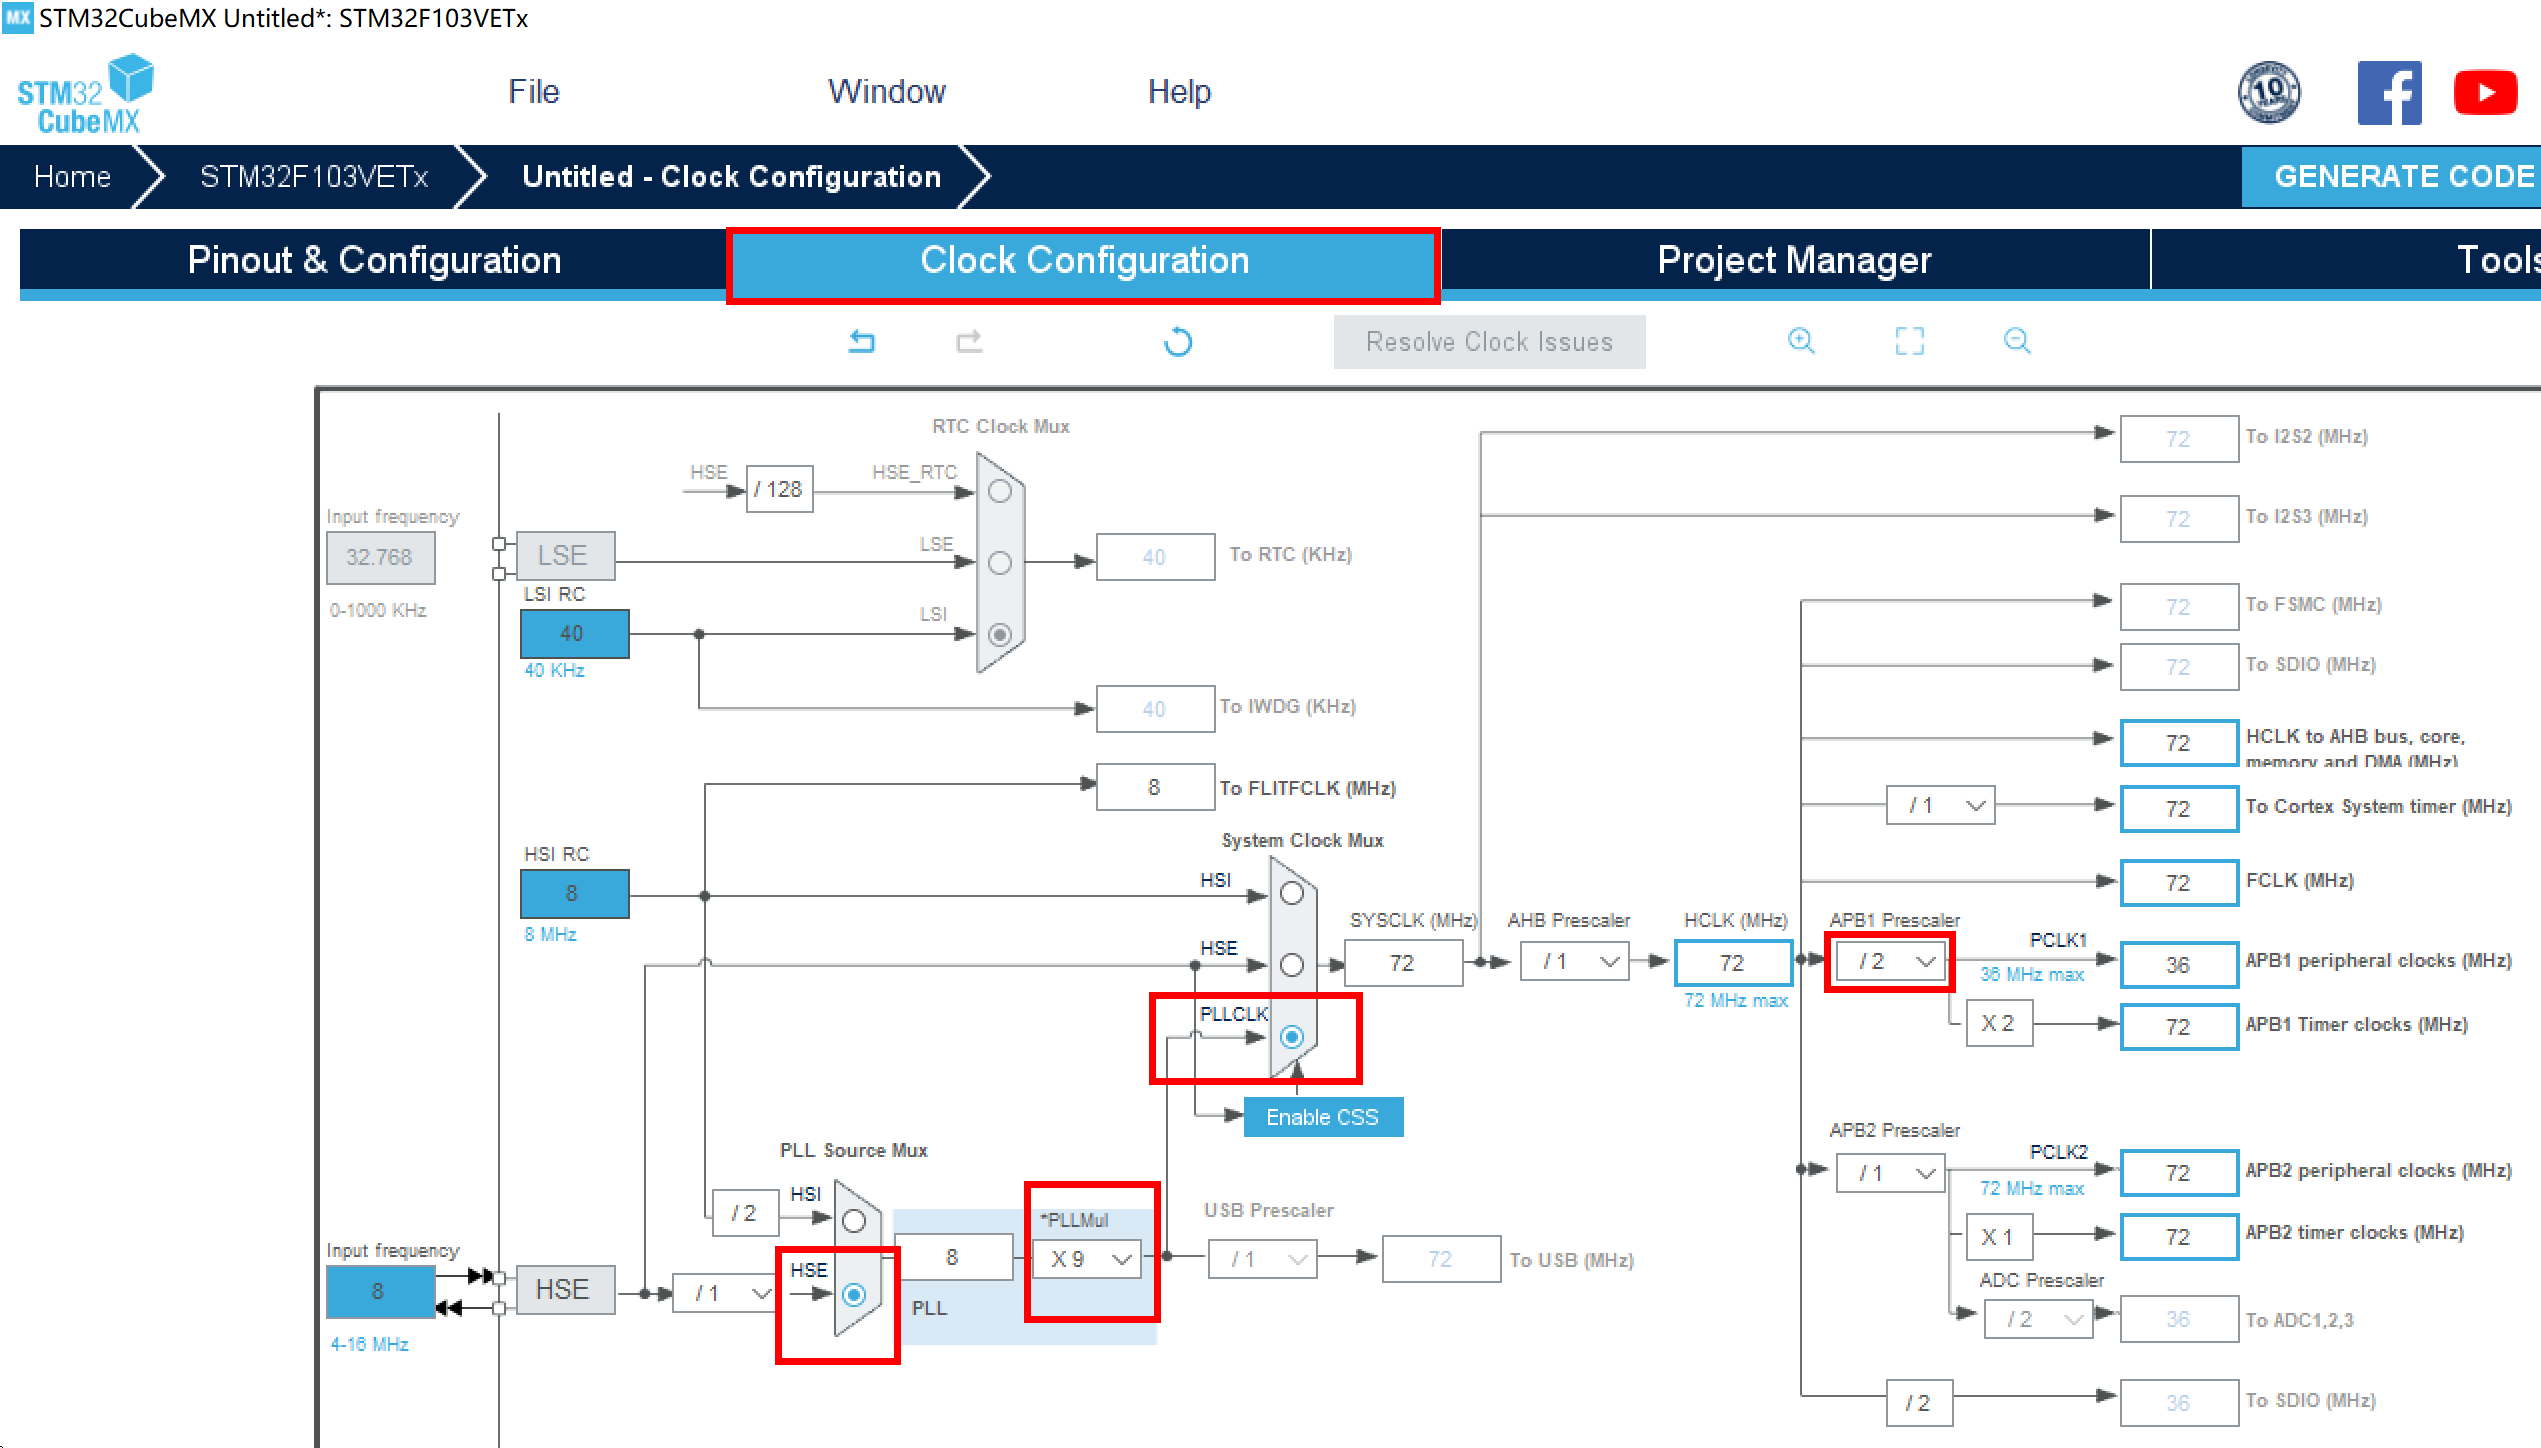
系统时钟
SystemClock_Config();
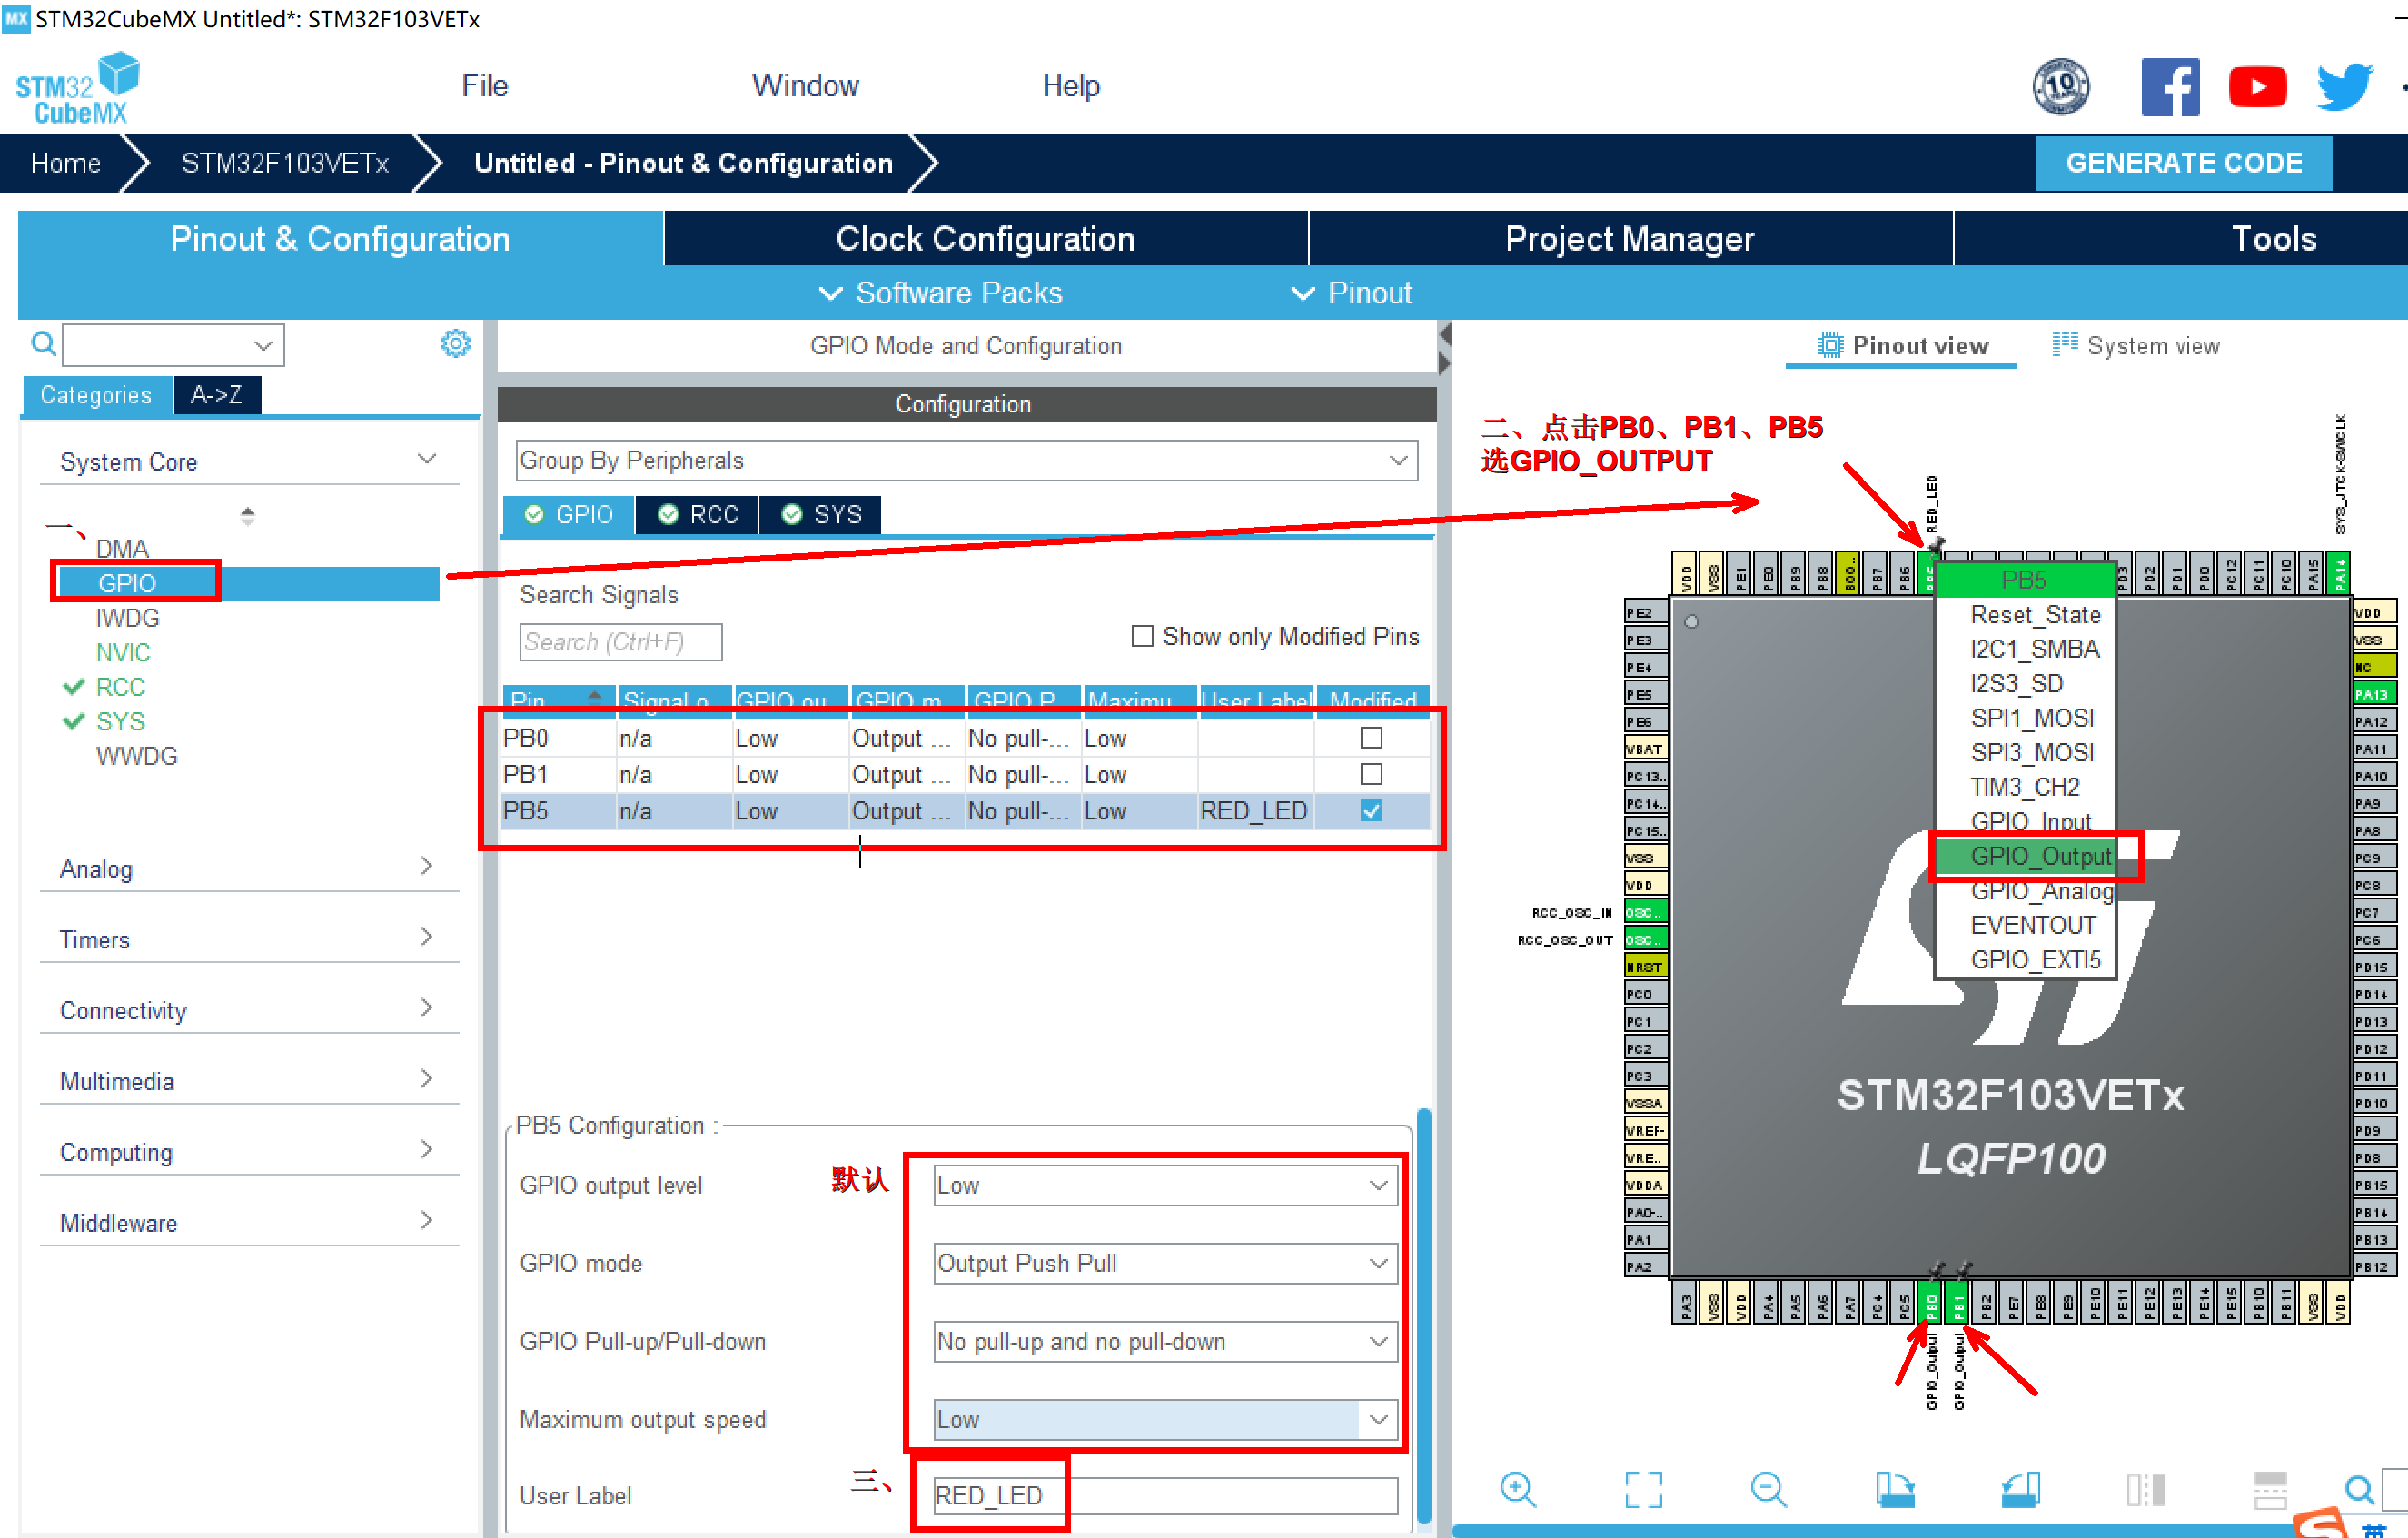
GPIOB初始化:GPIOB模式为推挽输出,GPIO引脚为Pin_5、0、1代表红绿蓝LED,既不上拉也不下拉电阻,低速
HAL_GPIO_Init(GPIOB, &GPIO_InitStruct);
控制GPIO输出:引脚GPIOB,5号0号1号,低电平点亮
HAL_GPIO_WritePin(RED_GPIO_Port, RED_Pin, LED_ON);
以下是详细文件
main.c
#include "main.h"

#include "gpio.h"

void SystemClock_Config(void);

void Error_Handler(void);

int main(void) {

    HAL_Init();

    SystemClock_Config();

    MX_GPIO_Init();

    while (1) {

        //设置GPIOB中红绿蓝Led的亮灭

        HAL_GPIO_WritePin(RED_GPIO_Port, RED_Pin, LED_ON);

        HAL_Delay(1000);

        HAL_GPIO_WritePin(RED_GPIO_Port, RED_Pin, LED_OFF);

        HAL_GPIO_WritePin(GREEN_GPIO_Port, GREEN_Pin, LED_ON);

        HAL_Delay(1000);

        HAL_GPIO_WritePin(GREEN_GPIO_Port, GREEN_Pin, LED_OFF);

        HAL_GPIO_WritePin(BLUE_GPIO_Port, BLUE_Pin, LED_ON);

        HAL_Delay(1000);

        HAL_GPIO_WritePin(BLUE_GPIO_Port, BLUE_Pin, LED_OFF);

    }

}

/**

  * @brief System Clock Configuration

  * @retval None

  */

void SystemClock_Config(void) {

    RCC_OscInitTypeDef RCC_OscInitStruct = {0};

    RCC_ClkInitTypeDef RCC_ClkInitStruct = {0};

    /** Initializes the RCC Oscillators according to the specified parameters

    * in the RCC_OscInitTypeDef structure.

    */

    RCC_OscInitStruct.OscillatorType = RCC_OSCILLATORTYPE_HSE;

    RCC_OscInitStruct.HSEState = RCC_HSE_ON;

    RCC_OscInitStruct.HSEPredivValue = RCC_HSE_PREDIV_DIV1;

    RCC_OscInitStruct.HSIState = RCC_HSI_ON;

    RCC_OscInitStruct.PLL.PLLState = RCC_PLL_ON;

    RCC_OscInitStruct.PLL.PLLSource = RCC_PLLSOURCE_HSE;

    RCC_OscInitStruct.PLL.PLLMUL = RCC_PLL_MUL9;

    if (HAL_RCC_OscConfig(&RCC_OscInitStruct) != HAL_OK) {

        Error_Handler();

    }

    /** Initializes the CPU, AHB and APB buses clocks

    */

    RCC_ClkInitStruct.ClockType = RCC_CLOCKTYPE_HCLK | RCC_CLOCKTYPE_SYSCLK

                                  | RCC_CLOCKTYPE_PCLK1 | RCC_CLOCKTYPE_PCLK2;

    RCC_ClkInitStruct.SYSCLKSource = RCC_SYSCLKSOURCE_PLLCLK;

    RCC_ClkInitStruct.AHBCLKDivider = RCC_SYSCLK_DIV1;

    RCC_ClkInitStruct.APB1CLKDivider = RCC_HCLK_DIV2;

    RCC_ClkInitStruct.APB2CLKDivider = RCC_HCLK_DIV1;

    if (HAL_RCC_ClockConfig(&RCC_ClkInitStruct, FLASH_LATENCY_2) != HAL_OK) {

        Error_Handler();

    }

}

/**

  * @brief  This function is executed in case of error occurrence.

  * @retval None

  */

void Error_Handler(void) {

    /* USER CODE BEGIN Error_Handler_Debug */

    /* User can add his own implementation to report the HAL error return state */

    __disable_irq();

    while (1) {

    }

    /* USER CODE END Error_Handler_Debug */

}

#ifdef  USE_FULL_ASSERT

/**

  * @brief  Reports the name of the source file and the source line number

  *         where the assert_param error has occurred.

  * @param  file: pointer to the source file name

  * @param  line: assert_param error line source number

  * @retval None

  */

void assert_failed(uint8_t *file, uint32_t line)

{

  /* USER CODE BEGIN 6 */

  /* User can add his own implementation to report the file name and line number,

     ex: printf("Wrong parameters value: file %s on line %d\r\n", file, line) */

  /* USER CODE END 6 */

}

#endif /* USE_FULL_ASSERT */
main.h
#ifndef __MAIN_H

#define __MAIN_H

#ifdef __cplusplus

extern "C" {

#endif

#include "stm32f1xx_hal.h"

#define GREEN_Pin       GPIO_PIN_0

#define GREEN_GPIO_Port GPIOB

#define BLUE_Pin        GPIO_PIN_1

#define BLUE_GPIO_Port  GPIOB

#define RED_Pin         GPIO_PIN_5

#define RED_GPIO_Port   GPIOB

#define LED_ON          GPIO_PIN_RESET

#define LED_OFF         GPIO_PIN_SET

#ifdef __cplusplus

}

#endif

#endif /* __MAIN_H */
gpio.c
#include "gpio.h"

void MX_GPIO_Init(void) {

    GPIO_InitTypeDef GPIO_InitStruct = {0};

    /* GPIO Ports Clock Enable */

    __HAL_RCC_GPIOB_CLK_ENABLE();

    __HAL_RCC_GPIOA_CLK_ENABLE();

    /*Configure GPIO pins : PBPin PBPin PBPin */

    GPIO_InitStruct.Pin = GREEN_Pin | BLUE_Pin | RED_Pin;

    GPIO_InitStruct.Mode = GPIO_MODE_OUTPUT_PP;

    GPIO_InitStruct.Pull = GPIO_NOPULL;

    GPIO_InitStruct.Speed = GPIO_SPEED_FREQ_LOW;

    HAL_GPIO_Init(GPIOB, &GPIO_InitStruct);

}
gpio.h
#ifndef __GPIO_H__

#define __GPIO_H__

#ifdef __cplusplus

extern "C" {

#endif

#include "main.h"

void MX_GPIO_Init(void);

#ifdef __cplusplus

}

#endif

#endif /*__ GPIO_H__ */
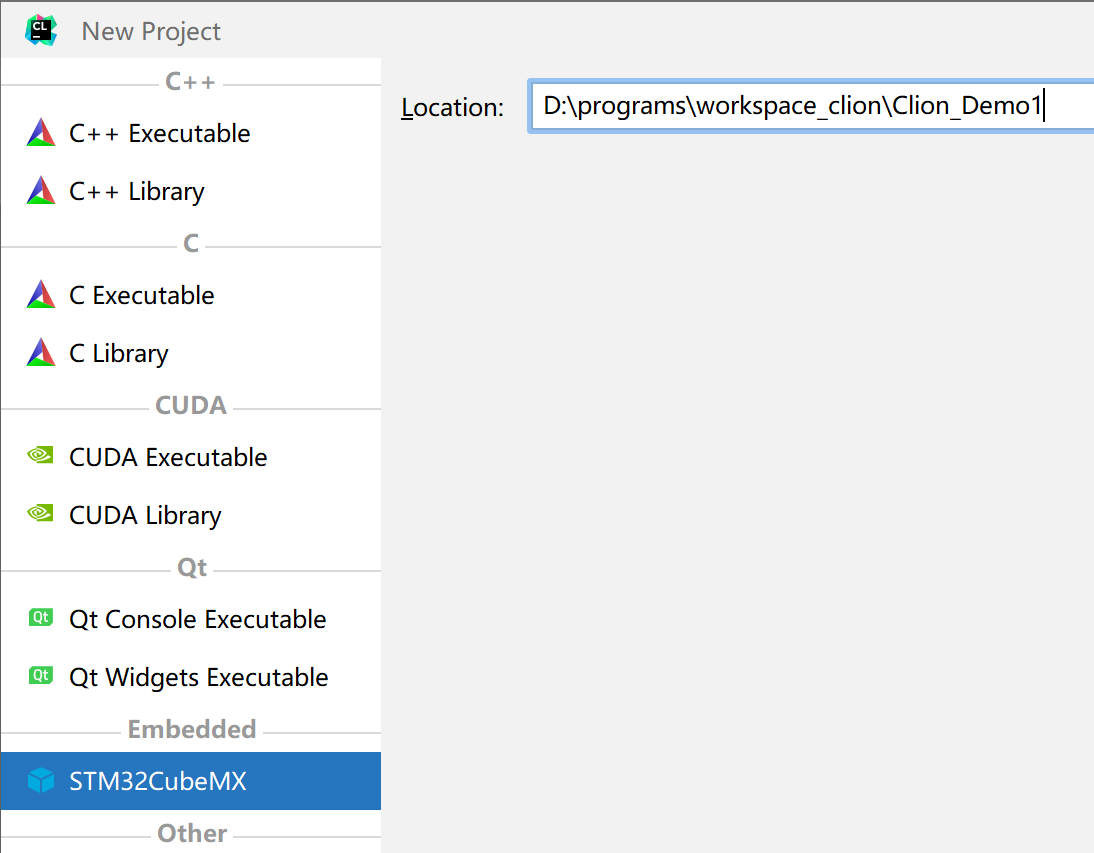
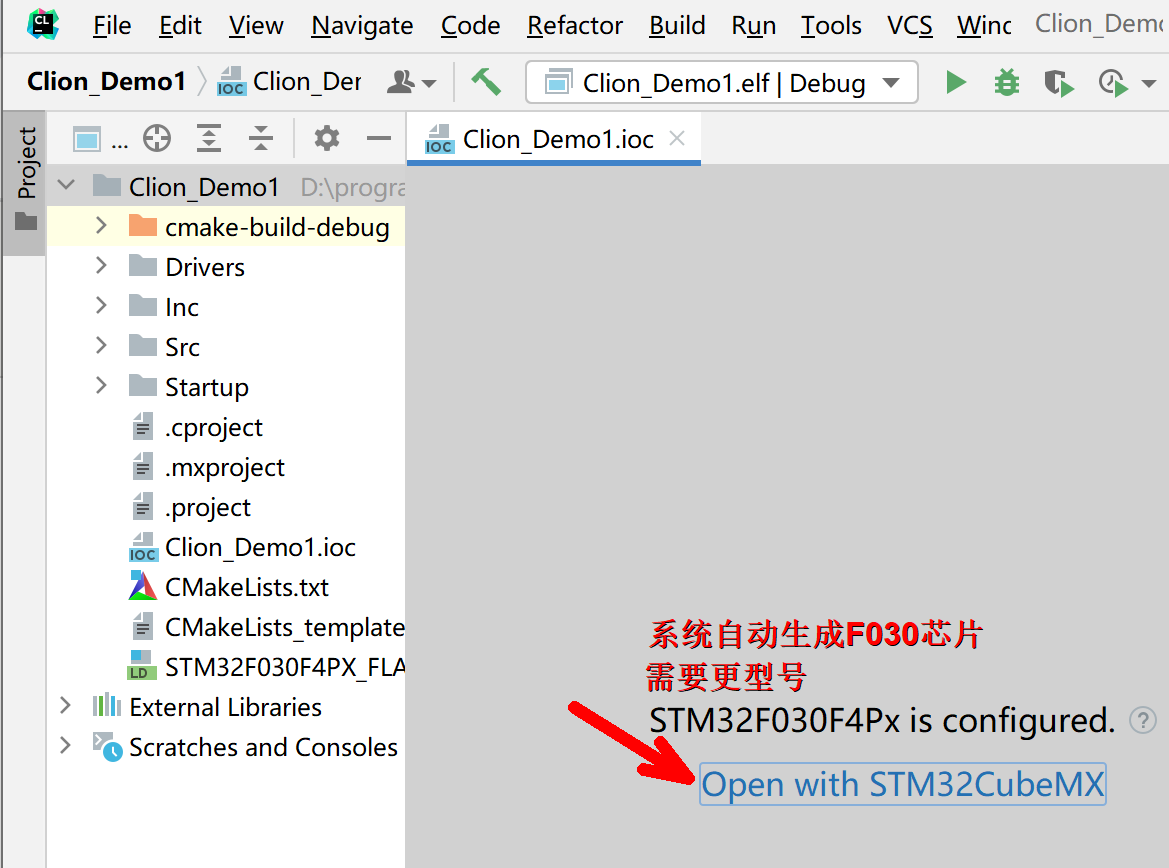
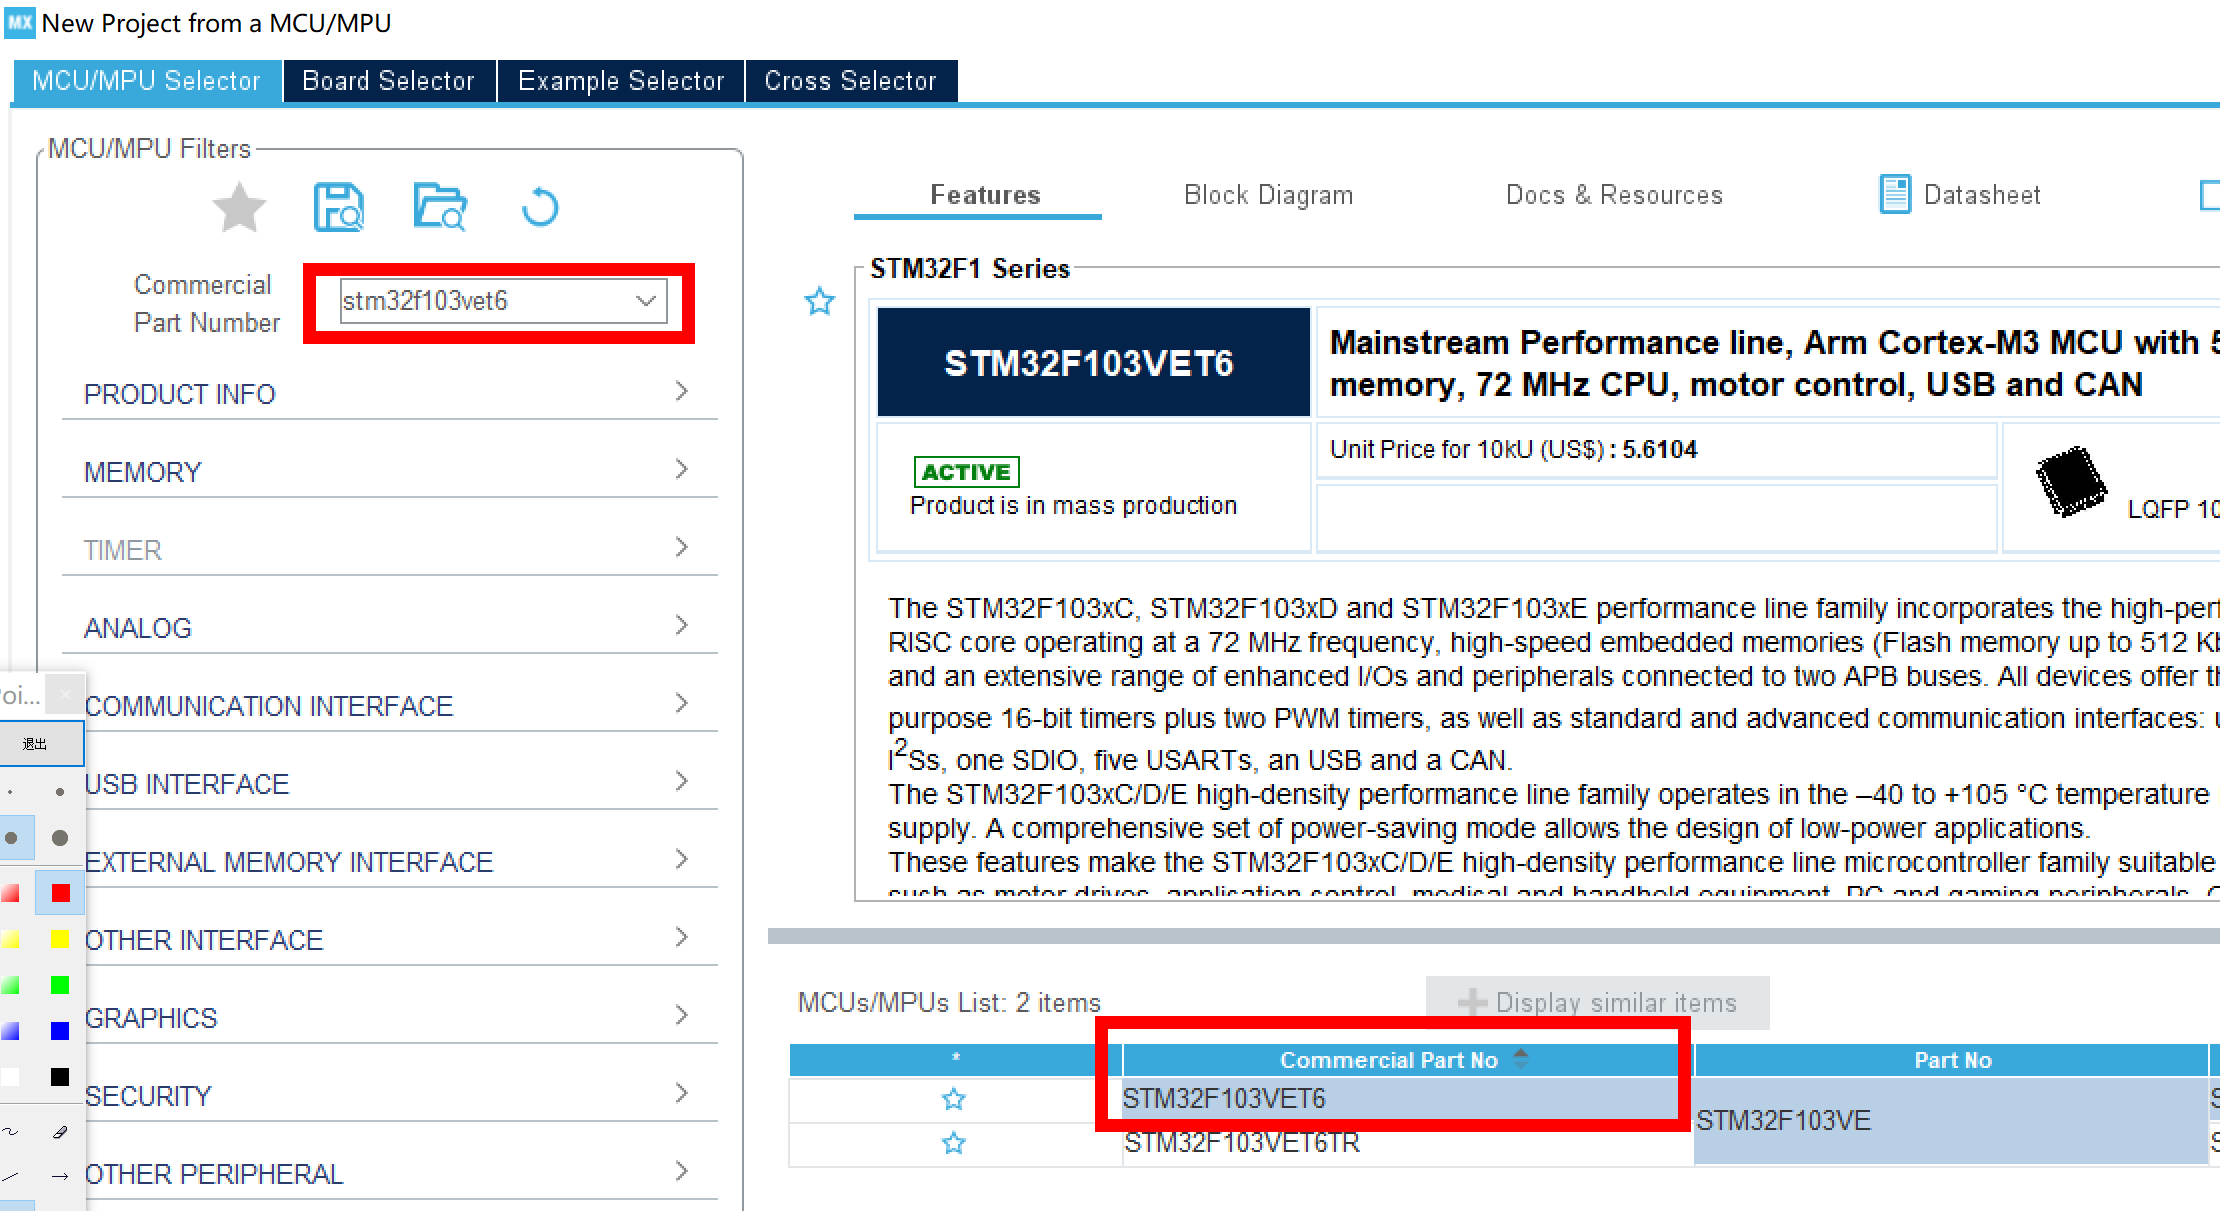
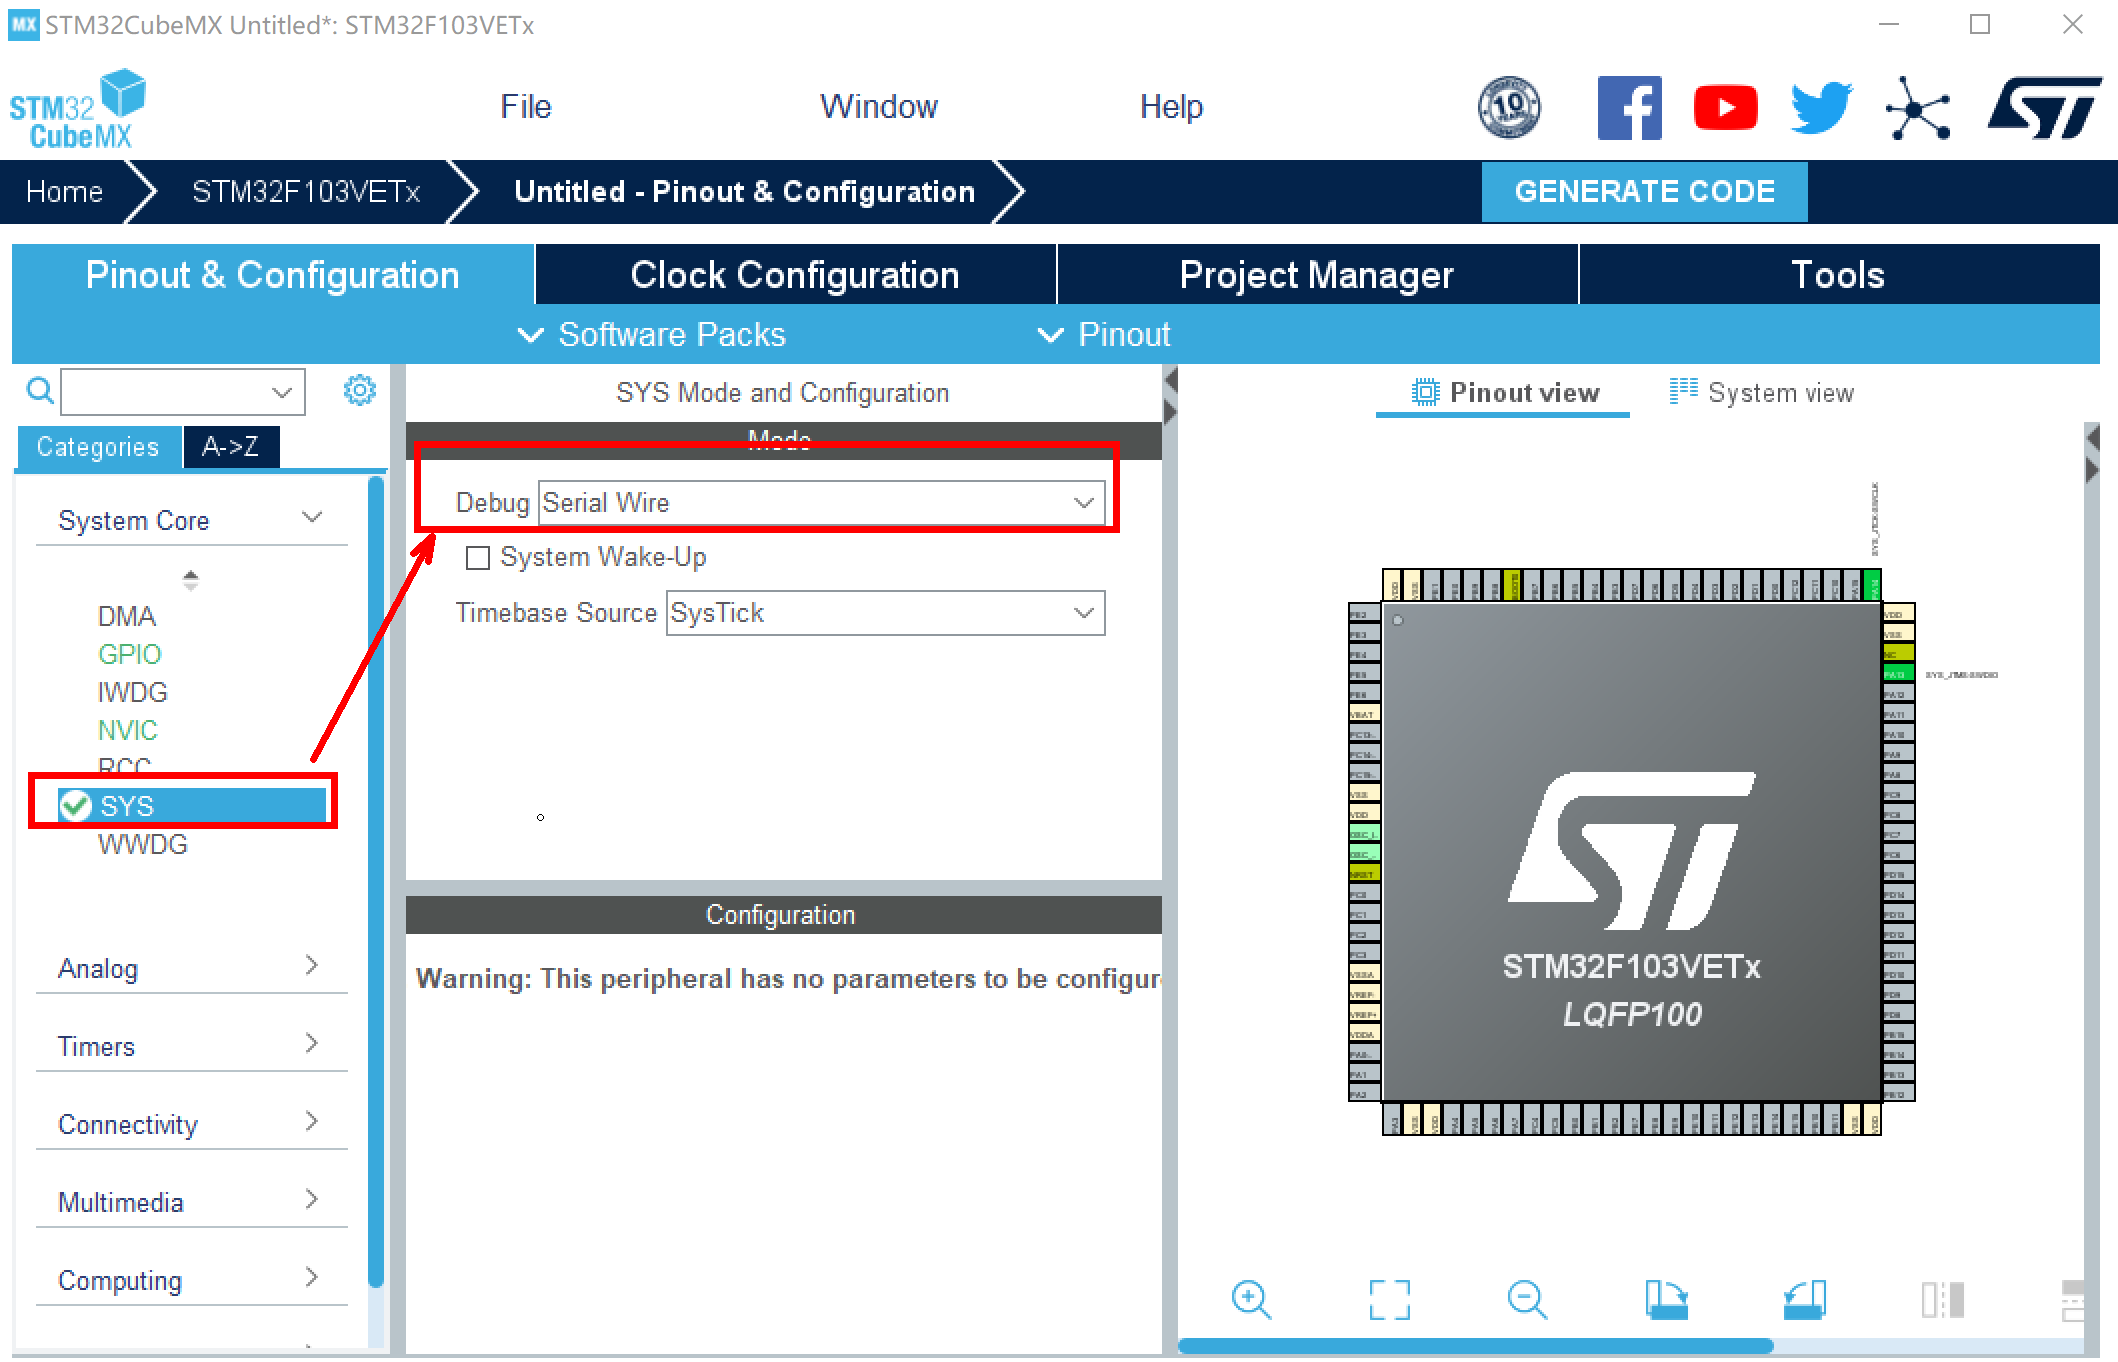
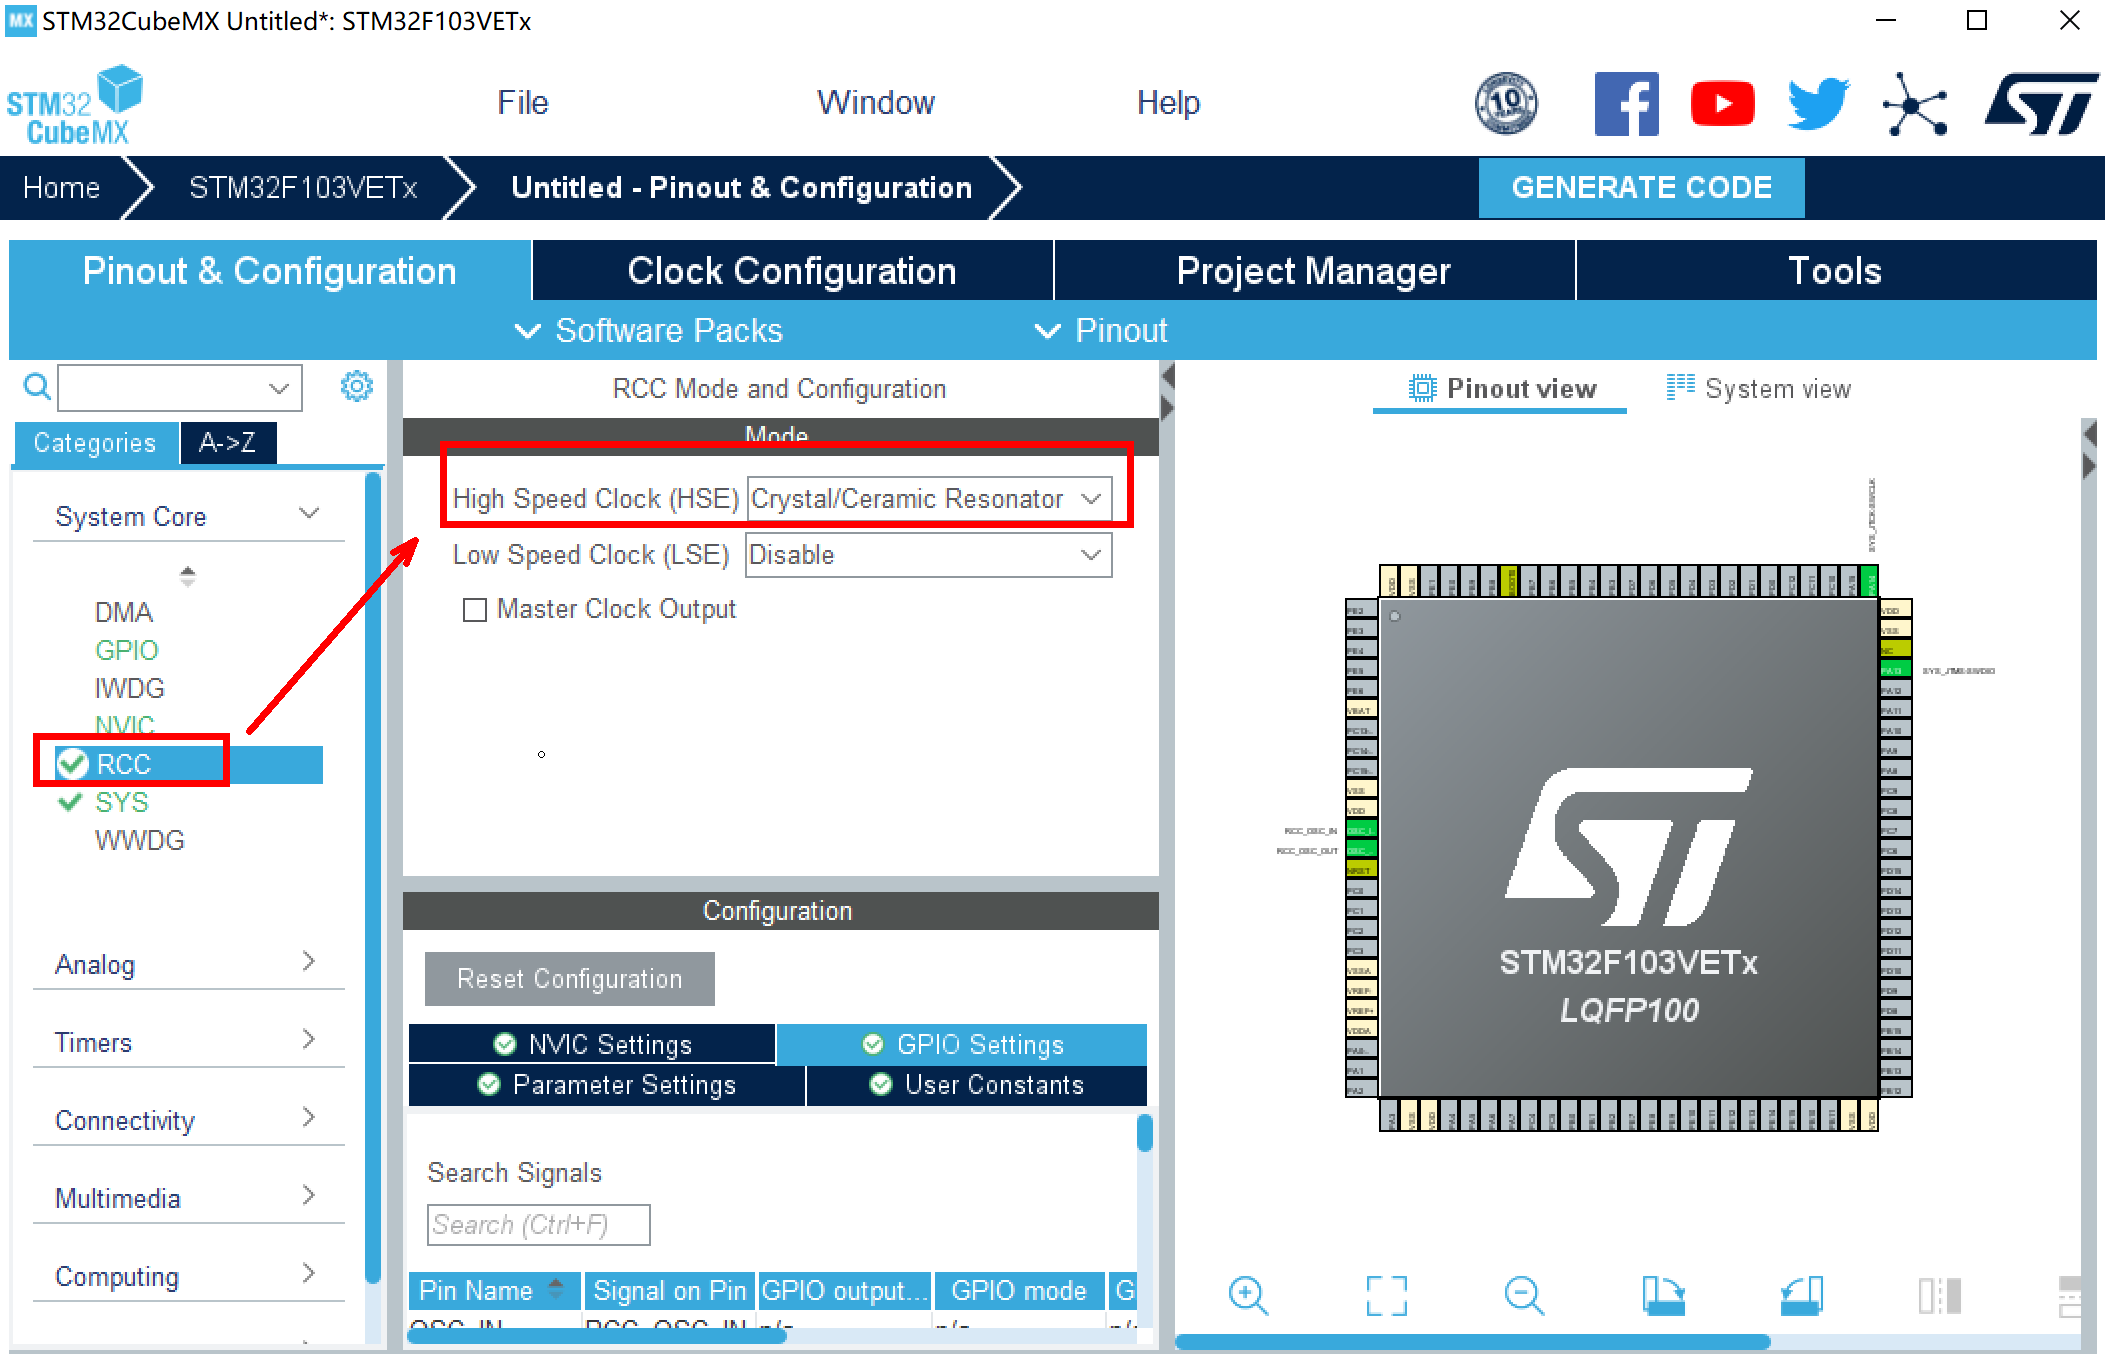
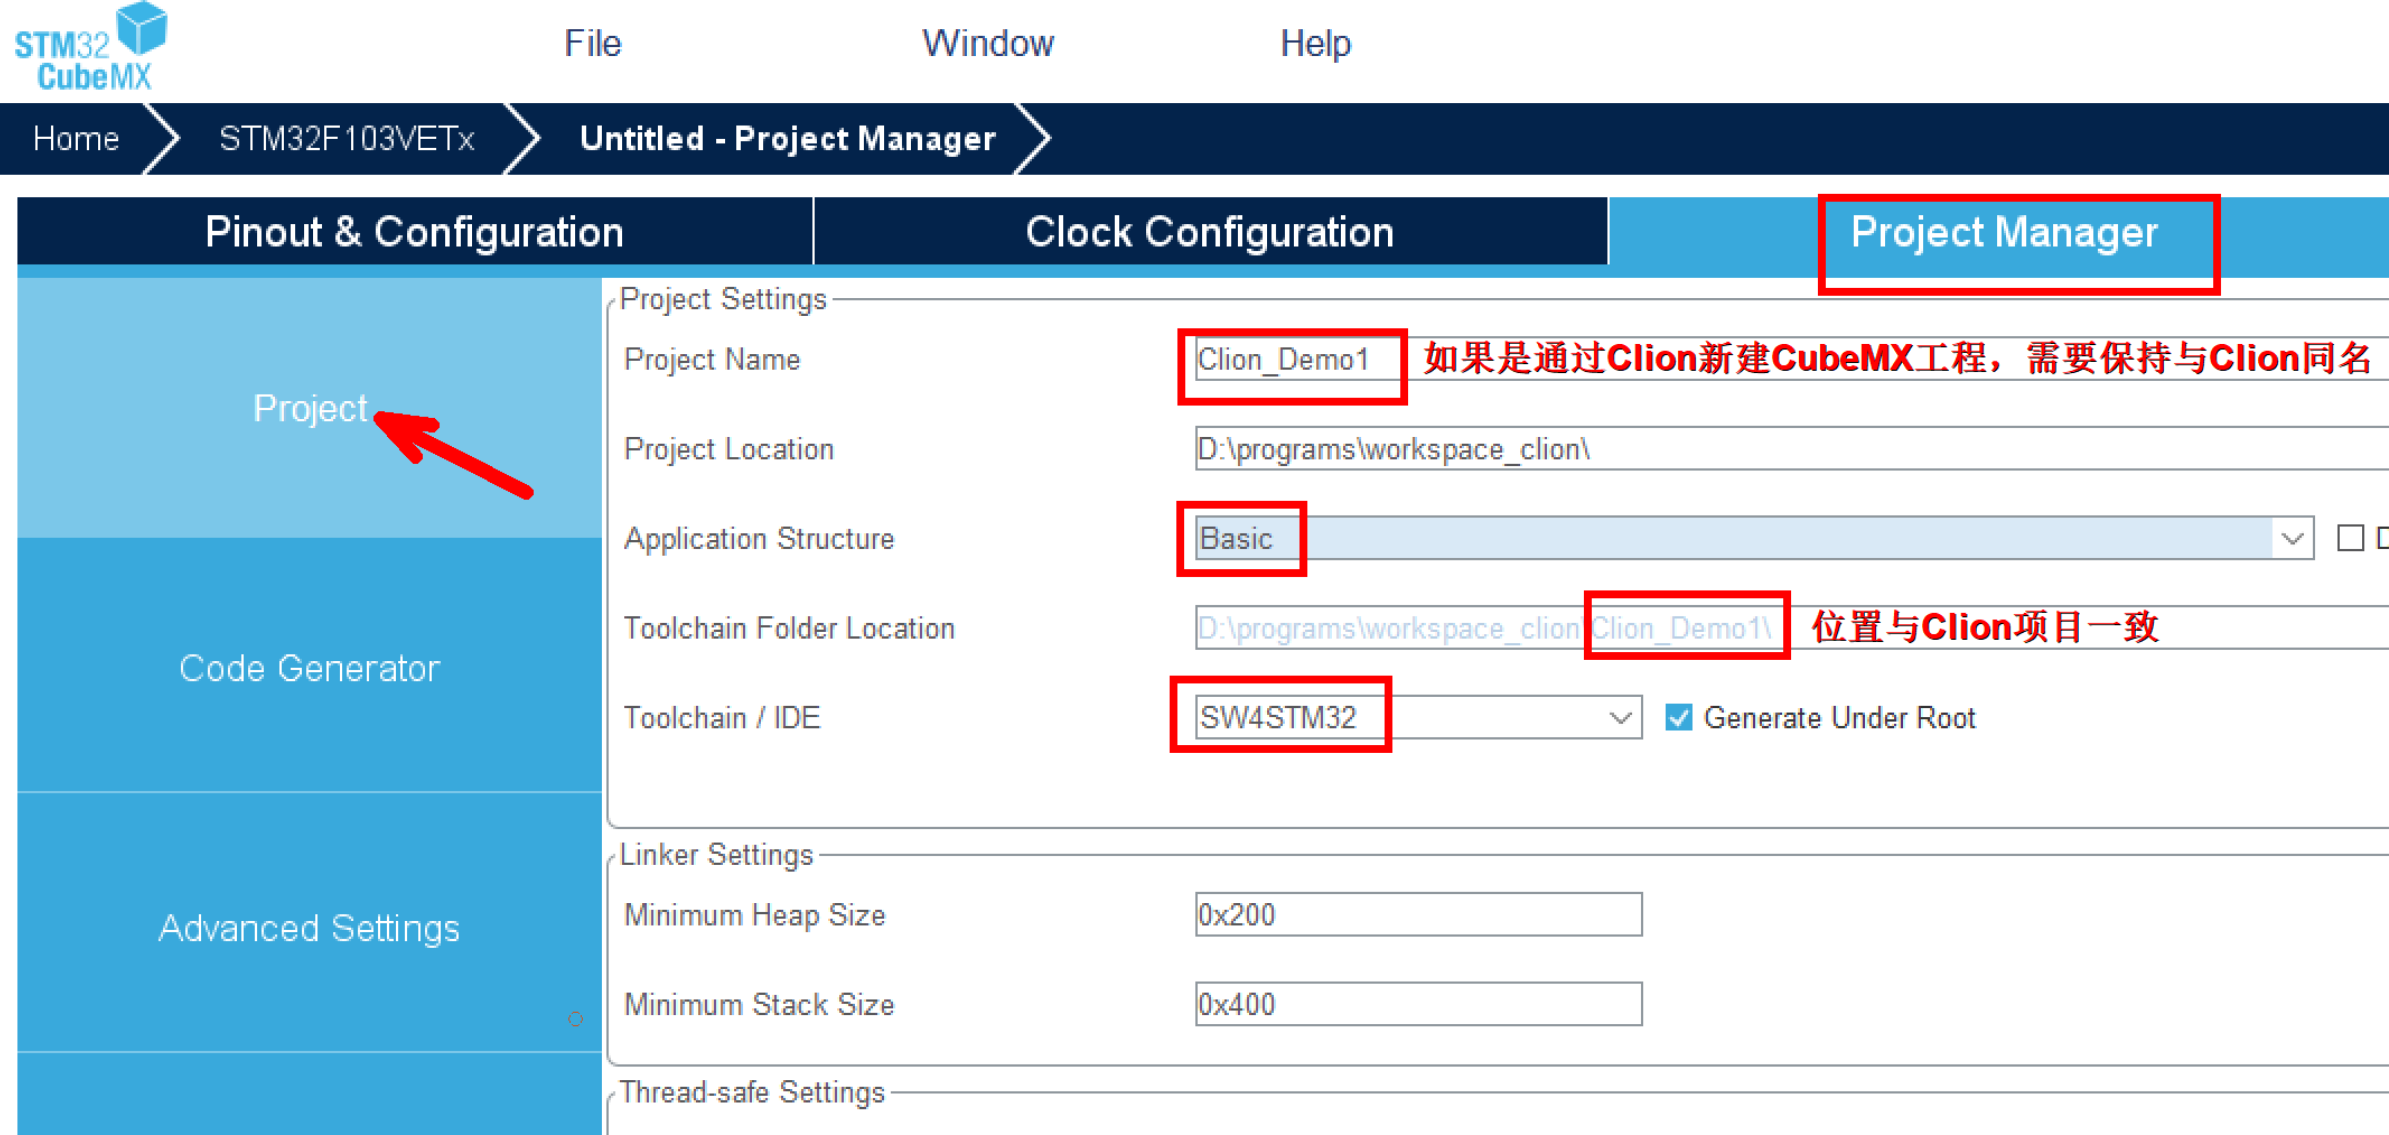
配置过程

点亮LED灯_STM32第一课的更多相关文章
- 第二章之S5PV210在BL1中点亮LED灯
1,u-boot中第一个入口在./arch/arm/cpu/armv7/start.S 翻到153行:如下图 前面都是进行一些基本设置,不用管. cpu_init_cp15设置协处理器, cpu_in ...
- 第7章 使用寄存器点亮LED灯
第7章 使用寄存器点亮LED灯 全套200集视频教程和1000页PDF教程请到秉火论坛下载:www.firebbs.cn 野火视频教程优酷观看网址:http://i.youku.com/fir ...
- 第7章 使用寄存器点亮LED灯—零死角玩转STM32-F429系列
第7章 使用寄存器点亮LED灯 全套200集视频教程和1000页PDF教程请到秉火论坛下载:www.firebbs.cn 野火视频教程优酷观看网址:http://i.youku.com/fir ...
- 字符型设备驱动程序-first-printf以及点亮LED灯(三)
根据 字符型设备驱动程序-first-printf以及点亮LED灯(二) 学习 修改函数 中的printf 为 printk. #include <linux/module.h> /* ...
- JZ2440开发板:用按键点亮LED灯(学习笔记)
本文是对韦东山嵌入式第一期学习的记录之一,如有您需要查找的信息,可以继续往下阅读. 想要用按键点亮LED灯,就需要知道按键和LED灯的相关信息,这样才可以进行之后的操作.阅读JZ2440的原理图,可以 ...
- 树莓派点亮LED灯需要几行代码?3行。小孩子都能学会
目录 点亮LED灯 硬件连接 代码 闪烁的LED灯 呼吸灯 其他 点亮LED灯 硬件连接 找一个LED灯,连接如上图,注意长短引脚,经过这些年的狂轰乱炸,大家对于这个应该不漠视,毕竟Arduino都进 ...
- C语言版——点亮LED灯,深入到栈
在上一篇进行了汇编语言的编写之后,我们采用C语言来编写程序,毕竟C语言才是我们使用最多的语言. 仅仅是点亮LED灯显然太过于简单,我们需要分析最后的反汇编,了解函数调用栈,深入C语言骨髓去分析代码,并 ...
- 30个物联网传感器小实验:三行代码点亮LED灯
30个物联网传感器小实验:三行代码点亮LED灯 三行代码点亮LED灯 LED灯闪烁 LED灯调亮度 LED淡入淡出 不写一行代码点亮LED灯 全彩RGB灯 面包板 30个物联网传感器小实验:三行代码点 ...
- Raspberry PI 系列 —— 裸机点亮LED灯
Raspberry PI 系列 -- 裸机点亮LED灯 背景 近期刚买了Raspberry PI B+,配置执行了官方提供的Raspbian系统,折腾了一周Linux系统,感觉没啥意思,于是就试着想了 ...
- STM32F4 阿波罗寄存器点亮LED灯
学习步骤: 使用寄存器点亮LED灯,需要进行如下的步骤,LED灯属于外设部分,首先需要开启外设的时钟使能,然后LED灯是PB1口,(芯片是正点原子的阿波罗),接着定义GPIOB口的输出模式,为上拉.推 ...
随机推荐
- Shell 更多结构化命令(流程控制)
更多的结构化命令 上一章里,你看到了如何通过检查命令的输出和变量的值来改变 shell 脚本程序的流程.本章会继续介绍能够控制 shell 脚本流程的结构化命令.你会了解如何重复一些过程和命令,也就是 ...
- C#基于数据库链接增删改查
一.创建一个winfrom窗体 1.创建项目 2.创建一个链接数据的类 3.封装数据库的实体类(查询和增加) 在对数据操作时必须引用连个数据库using using System.Data; usin ...
- 2.5基本算法之搜索 156:LETTERS
#include<iostream>#include<cstdio>using namespace std;char a[21][21];bool b[26]; int X[4 ...
- Spring Boot中开启Spring Security
Spring Boot中开启Spring Security Spring Security是一款基于Spring的安全框架,主要包含认证和授权两大安全模块,和另外一款流行的安全框架Apache Shi ...
- 09 Hive安装与操作
一.安装Hive 下载解压重命名权限 配置环境变量 修改Hive配置文件 修改/usr/local/hive/conf下的hive-site.xml 1 2 3 4 5 6 7 8 9 10 11 1 ...
- docker安装nginx挂载启动
docker pull nginx 命令安装 查找 Docker Hub 上的 nginx 镜像: docker search nginx 这里我们拉取官方的镜像 docker pull nginx ...
- bitmap_find_next_zero_area_off函数
备注:
- MySql创建表遇到的问题
SQL语句如下: CREATE TABLE IF NOT EXISTS `student`{ `id` INT(4) NOT NULL COMMENT '学号', `name` VARCHAR(30) ...
- windows系统错误代码
0 操作成功完成. 1 功能错误. 2 系统找不到指定的文件. 3 系统找不到指定的路径. 4 系统无法打开文件. 5 拒绝访问. 6 句柄无效. 7 存储控制块被损坏. ...
- C/C++ 数据结构循环队列的实现
#include <iostream> #include <Windows.h> using namespace std; #define MAXSIZE 6 typedef ...
