第二十五节:scrapy爬虫识别验证码(四)手绘验证码识别
一、介绍
今天主要介绍的是微博客户端在登录时出现的四宫格手绘验证码,不多说直接看看验证码长成什么样。

二、思路
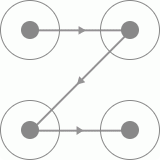
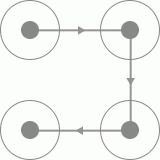
1、由于微博上的手绘验证码只有四个宫格,且每个宫格之间都有有向线段连接,所以我们可以判断四个宫格不同方向的验证码一共有24种,
我们将四个宫格进行标号,得到的结果如下:

则我们可以排列出24种不同的手绘方向的验证码,分别为一下24种
| 1234 | 2134 | 3124 | 4321 |
| 1243 | 2143 | 3142 | 4312 |
| 1342 | 2314 | 3214 | 4123 |
| 1324 | 2341 | 3241 | 4132 |
| 1423 | 2413 | 3412 | 4213 |
| 1432 | 2431 | 3421 | 4231 |
2、我们通过获取到微博客户端的24种手绘验证码后需要进行模板匹配,这样通过全图匹配的方式进行滑动。
三、代码实现
1、首先是要通过微博移动端(https://passport.weibo.cn/signin/login)批量获取手绘验证码,但是这个验证码不一定出现,
只有在账号存在风险或者频繁登录的时候才会出现。获取手绘验证码的代码如下:
注意:需要将模拟浏览器所以元素(用户名框,密码框)加载完了才能发送用户名和密码,否则报错
 1 # -*- coding:utf-8 -*-

 2 import time

 3 from io import BytesIO

 4 from PIL import Image

 5 from selenium import webdriver

 6 from selenium.webdriver.common.by import By

 7 from selenium.common.exceptions import TimeoutException

 8 from selenium.webdriver.support.ui import WebDriverWait

 9 from selenium.webdriver.support import expected_conditions as EC

10

11

12 class CrackWeiboSlide():

13     def __init__(self):

14         self.url = "https://passport.weibo.cn/signin/login?entry=mweibo&r=https://m.weibo.cn/"

15         self.browser = webdriver.Chrome(r"D:\chromedriver.exe")

16         self.browser.maximize_window()

17         self.wait = WebDriverWait(self.browser,5)

18

19

20     def __del__(self):

21         self.browser.close()

22

23     def open(self):

24         # 打开模拟浏览器

25         self.browser.get(self.url)

26         # 获取用户名元素

27         username = self.wait.until(EC.presence_of_element_located((By.XPATH,'//*[@id="loginName"]')))

28         # 获取密码框元素

29         password = self.wait.until(EC.presence_of_element_located((By.XPATH,'//*[@id="loginPassword"]')))

30         # 获取登录按钮元素

31         submit = self.wait.until(EC.element_to_be_clickable((By.XPATH,'//*[@id="loginAction"]')))

32         # 提交数据并登录

33         username.send_keys("15612345678")

34         password.send_keys("xxxxxxxxxxxx")

35         submit.click()

36

37

38     def get_image(self,name = "captcha.png"):

39         try:

40             # 获取验证码图片元素

41             img = self.wait.until(EC.presence_of_element_located((By.CLASS_NAME,"patt-shadow")))

42             time.sleep(1)

43             # 获取验证码图片所在的位置

44             location = img.location

45             # 获取验证码图片的大小

46             size = img.size

47             top = location["y"]  # 上

48             bottom = location["y"] + size["height"]  # 下

49             left = location["x"]  # 左

50             right = location["x"] + size["width"]  # 右

51             print("验证码的位置:", left, top, right, bottom)

52             # 将当前窗口进行截屏

53             screenshot = self.browser.get_screenshot_as_png()

54             # 读取截图

55             screenshot = Image.open(BytesIO(screenshot))

56             # 剪切九宫格图片验证码

57             captcha = screenshot.crop((left, top, right, bottom))

58             # 将剪切的九宫格验证码保存到指定位置

59             captcha.save(name)

60             print("微博登录验证码保存完成!!!")

61             return captcha

62         except TimeoutException:

63             print("没有出现验证码!!")

64             # 回调打开模拟浏览器函数

65             self.open()

66

67

68     def main(self):

69         count = 1

70         while True:

71             # 调用打开模拟浏览器函数

72             self.open()

73             # 调用获取验证码图片函数

74             self.get_image(str(count) + ".png")

75             count += 1

76

77

78 if __name__ == '__main__':

79     crack = CrackWeiboSlide()

80     crack.main()
批量获取手绘验证码
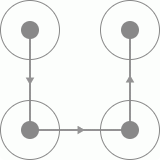
得到的24种手绘验证码,同时需要对这些手绘验证码根据上边的编号进行命名


上图就是我们需要的模板,接下来我们进行遍历模板匹配即可
2、模板匹配
通过遍历手绘验证码模板进行匹配
  1 import os

  2 import time

  3 from io import BytesIO

  4 from PIL import Image

  5 from selenium import webdriver

  6 from selenium.webdriver import ActionChains

  7 from selenium.webdriver.common.by import By

  8 from selenium.common.exceptions import TimeoutException

  9 from selenium.webdriver.support.ui import WebDriverWait

 10 from selenium.webdriver.support import expected_conditions as EC

 11

 12 class CrackWeiboSlide():

 13     def __init__(self):

 14         self.url = "https://passport.weibo.cn/signin/login?entry=mweibo&r=https://m.weibo.cn/"

 15         self.browser = webdriver.Chrome(r"D:\chromedriver.exe")

 16         self.browser.maximize_window()

 17         self.wait = WebDriverWait(self.browser,5)

 18

 19

 20     def __del__(self):

 21         self.browser.close()

 22

 23     def open(self):

 24         # 打开模拟浏览器

 25         self.browser.get(self.url)

 26         # 获取用户名元素

 27         username = self.wait.until(EC.presence_of_element_located((By.XPATH,'//*[@id="loginName"]')))

 28         # 获取密码框元素

 29         password = self.wait.until(EC.presence_of_element_located((By.XPATH,'//*[@id="loginPassword"]')))

 30         # 获取登录按钮元素

 31         submit = self.wait.until(EC.element_to_be_clickable((By.XPATH,'//*[@id="loginAction"]')))

 32         # 提交数据并登录

 33         username.send_keys("15612345678")

 34         password.send_keys("xxxxxxxxxxxx")

 35         submit.click()

 36

 37

 38     def get_image(self,name = "captcha.png"):

 39         try:

 40             # 获取验证码图片元素

 41             img = self.wait.until(EC.presence_of_element_located((By.CLASS_NAME,"patt-shadow")))

 42             time.sleep(1)

 43

 44             # 获取验证码图片所在的位置

 45             location = img.location

 46

 47             # 获取验证码图片的大小

 48             size = img.size

 49             top = location["y"]                      # 上

 50             bottom = location["y"] + size["height"]  # 下

 51             left = location["x"]                     # 左

 52             right = location["x"] + size["width"]    # 右

 53             print("验证码的位置:", left, top, right, bottom)

 54

 55             # 将当前窗口进行截屏

 56             screenshot = self.browser.get_screenshot_as_png()

 57

 58             # 读取截图

 59             screenshot = Image.open(BytesIO(screenshot))

 60

 61             # 剪切九宫格图片验证码

 62             captcha = screenshot.crop((left, top, right, bottom))

 63

 64             # 将剪切的九宫格验证码保存到指定位置

 65             captcha.save(name)

 66             print("微博登录验证码保存完成!!!")

 67

 68             # 返回微博移动端的验证码图片

 69             return captcha

 70         except TimeoutException:

 71             print("没有出现验证码!!")

 72

 73             # 回调打开模拟浏览器函数

 74             self.open()

 75

 76     def is_pixel_equal(self,image,template,i,j):

 77

 78         # 取出两张图片的像素点

 79         pixel1 = image.load()[i,j]              # 移动客户端获取的验证码

 80         pixel2 = template.load()[i,j]           # 模板文件里的验证码

 81         threshold = 20                          # 阈值

 82         pix_r = abs(pixel1[0] - pixel2[0])      # R

 83         pix_g = abs(pixel1[1] - pixel2[1])      # G

 84         pix_b = abs(pixel1[2] - pixel2[2])      # B

 85         if (pix_r< threshold) and (pix_g< threshold ) and (pix_b< threshold) :

 86             return True

 87         else:

 88             return False

 89

 90     def same_image(self,image,template):

 91         """

 92         :param image: 微博移动端获取的验证码图片

 93         :param template: 通过模板文件获取的验证码图片

 94         """

 95         threshold = 0.99            # 相似度阈值

 96         count = 0

 97         # 遍历微博移动端获取的验证码图片的宽度和高度

 98         for i in range(image.width):

 99             for j in range(image.height):

100

101                 # 判断两张图片的像素是否相等

102                 if self.is_pixel_equal(image,template,i,j):

103                     count += 1

104         result = float(count)/(image.width*image.height)

105         if result >threshold:

106             print("匹配成功!!!")

107             return True

108         else:

109             return False

110

111

112     def detect_image(self,image):

113         # 遍历手绘验证码模板文件内的所有验证码图片

114         for template_name in os.listdir(r"D:\photo\templates"):

115             print("正在匹配",template_name)

116

117             # 打开验证码图片

118             template = Image.open(r"D:\photo\templates\{}".format(template_name))

119

120             if self.same_image(image,template):

121                 # 返回这张图片的顺序,如4—>3—>1—>2

122                 numbers = [int(number) for number in list(template_name.split(".")[0])]

123                 print("按照顺序进行拖动",numbers)

124                 return numbers

125

126     def move(self,numbers):

127         # 获得四个按点

128         circles = self.browser.find_element_by_css_selector('.patt-wrap .patt-circ')

129         dx = dy = 0

130         # 由于是四个宫格,所以需要循环四次

131         for index in range(4):

132             circle = circles[numbers[index] - 1]

133             # 如果是第一次循环

134             if index == 0:

135                 # 点击第一个点

136                 action = ActionChains(self.browser).move_to_element_with_offset(circle,circle.size["width"]/2,circle.size['height']/2)

137                 action.click_and_hold().perform()

138             else:

139                 # 小幅度移动次数

140                 times = 30

141                 # 拖动

142                 for i in range(times):

143                     ActionChains(self.browser).move_by_offset(dx/times,dy/times).perform()

144                     time.sleep(1/times)

145

146                 # 如果是最后一次循环

147                 if index == 3:

148                     # 松开鼠标

149                     ActionChains(self.browser).release().perform()

150                 else:

151                     # 计算下一次偏移

152                     dx = circles[numbers[index + 1] - 1].location['x'] - circle.location['x']

153                     dy = circles[numbers[index + 1] - 1].location['y'] - circle.location['y']

154

155

156     def main(self):

157         # 调用打开模拟浏览器函数

158         self.open()

159         image = self.get_image("captcha.png")   # 微博移动端的验证码图片

160         numbers = self.detect_image(image)

161         self.move(numbers)

162         time.sleep(10)

163         print('识别结束')

164

165

166 if __name__ == '__main__':

167     crack = CrackWeiboSlide()

168     crack.main()
匹配验证识别
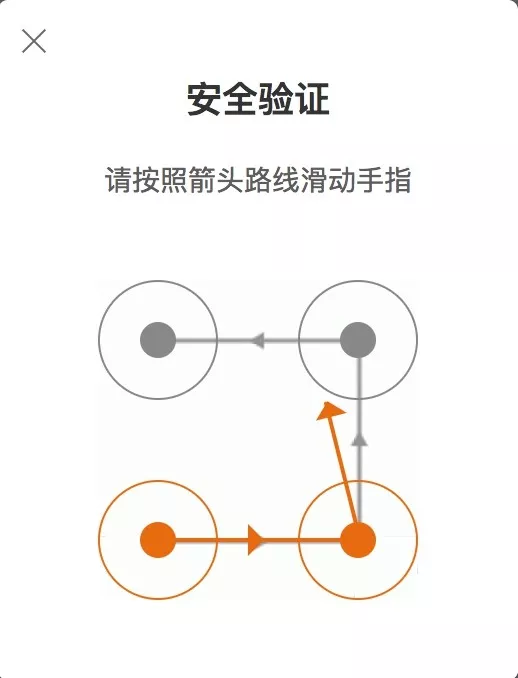
四、识别结果
通过循环四次后绘出四条方向,最终得到效果图
第二十五节:scrapy爬虫识别验证码(四)手绘验证码识别的更多相关文章
- centos lamp/lnmp阶段复习 以后搬迁discuz论坛不需要重新安装,只需修改配置文件即可 安装wordpress 安装phpmyadmin 定时备份mysql两种方法 第二十五节课
centos lamp/lnmp阶段复习 以后搬迁discuz论坛不需要重新安装,只需修改配置文件即可 安装wordpress 安装phpmyadmin 定时备份mysql两种方法 第二十五节 ...
- 风炫安全WEB安全学习第二十五节课 利用XSS键盘记录
风炫安全WEB安全学习第二十五节课 利用XSS键盘记录 XSS键盘记录 同源策略是浏览器的一个安全功能,不同源的客户端脚本在没有明确授权的情况下,不能读写对方资源.所以xyz.com下的js脚本采用a ...
- 第二十三节:scrapy爬虫识别验证码(二)图片验证码识别
图片验证码基本上是有数字和字母或者数字或者字母组成的字符串,然后通过一些干扰线的绘制而形成图片验证码. 例如:知网的注册就有图片验证码 首先我们需要获取验证码图片,通过开发者工具我们可以得到验证码ur ...
- python自动化开发-[第二十五天]-scrapy进阶与flask使用
今日内容概要 1.cookie操作 2.pipeline 3.中间件 4.扩展 5.自定义命令 6.scrapy-redis 7.flask使用 - 路由系统 - 视图 - 模版 - message( ...
- 【php增删改查实例】第二十五节 - 在main.php中显示头像
在用户成功上传头像以后,用户登录系统,应该能够看到自己的头像,本节演示如何在这个地方: 添加用户头像. 1.用DIV做: border-radius:50% background:url(xxx.jp ...
- [ExtJS5学习笔记]第二十五节 利用window.open()函数实现ExtJS5的登陆页面跳转
本文地址:http://blog.csdn.net/sushengmiyan/article/details/40427543 mvvm方式实现登陆的博客:http://blog.csdn.net/s ...
- 第二十五节:Java语言基础-面向对象基础
面向对象 面向过程的代表主要是C语言,面向对象是相对面向过程而言,Java是面向对象的编程语言,面向过程是通过函数体现,面向过程主要是功能行为. 而对于面向对象而言,将功能封装到对象,所以面向对象是基 ...
- php第二十五节课
详情删除 <!DOCTYPE html PUBLIC "-//W3C//DTD XHTML 1.0 Transitional//EN" "http://www.w3 ...
- 第十五节、OpenCV学习(四)图像平滑与滤波
图像的平滑与滤波 平滑滤波是低频增强的空间域滤波技术,是图像模糊.消除噪声. 一.2D滤波器cv2.filter2D() 对于2D图像可以进行低通或者高通滤波操作,低通滤波(LPF)有利于去噪声,模糊 ...
- 第三百三十五节,web爬虫讲解2—Scrapy框架爬虫—豆瓣登录与利用打码接口实现自动识别验证码
第三百三十五节,web爬虫讲解2—Scrapy框架爬虫—豆瓣登录与利用打码接口实现自动识别验证码 打码接口文件 # -*- coding: cp936 -*- import sys import os ...
随机推荐
- Typora Markdown 安装包
下载地址: 链接:https://pan.baidu.com/s/1wy0Ik95AjM5WjSC3nzOzqA 提取码:f26j 复制这段内容后打开百度网盘手机App,操作更方便哦 已更新至最新版0 ...
- (二)JPA 连接工厂、主键生成策略、DDL自动更新
(一)JPA的快速入门 2.JPA连接工厂 通过之前的 代码 实现已经清楚的发现了整个的JPA实现步骤,但是这个步骤似乎有一些繁琐了,毕竟最终所关心的一定是EntityManager对象实例,而要想获 ...
- 使用调度器apscheduler实现py文件不停连接MySQL数据库
背景说明: 使用内网负载均衡添加后端主机,该主机安装有nginx,其配置文件代理内网的MySQL数据库地址 (数据库是主备形式的,重启的话会都重启) 需要测试两个目标: (采用不停往MySQL里写数据 ...
- 6.监控elasticsearch集群---放弃采用(获取不到数据),建议看另一篇文章:监控elasticsearch
prometheus监控es,同样采用exporter的方案. 项目地址: elasticsearch_exporter:https://github.com/justwatchcom/elastic ...
- .NET6 使用 AutoFac (解析)
一.Net 6环境下的.net core项目里如何使用Autofac实现依赖注入. 通常的,我们把其他服务注入到Controller时,使用.net core自带的依赖注入即可,但是如果我们要实现自定 ...
- [笔记] 兰道定理 Landau's Theorem
兰道定理的内容: 一个竞赛图强连通的充要条件是:把它的所有顶点按照入度d从小到大排序,对于任意\(k\in [0,n-1]\)都不满足\(\sum_{i=0}^k d_i=\binom{k+1}{2} ...
- css事件穿透
代码: pointer-events: none; 解义:你可以看的到第一个元素,但是你看不到下面的元素着,点击第一个元素会穿透触发到第二个元素的元素
- 条件期望:Conditional Expectation 举例详解之入门之入门之草履虫都说听懂了
我知道有很多人理解不了 "条件期望" (Conditional Expectation) 这个东西,有的时候没看清把随机变量看成事件,把 \(\sigma\)-algebra 看成 ...
- 如何在服务器上部署WebDeploy
之前项目中网站发布都是手工拷贝文件,特别麻烦,看到好多用webdeploy一键部署网站到IIS服务器,我也学习了一下. 第一步,打开服务器管理器 打开方式是开始菜单=>管理工具=>服务器管 ...
- Vu3.x如何给v-for循环出来的输入框绑定v-mode的值,以及实现父子组件传值、双向绑定
观前须知:本人演示使用的input是自己手敲的,如果使用的是element-ui等表单组建的input框请选择性参考,不保证我的方法对你们也完全有效. 父组件代码: 这里我的MiniInput是以组件 ...