Android 开发之自定义Dialog及UI的实现
我们在开发中,经常会自定义Dialog,因为原生的AlertDialog无法满足我们的需求,这个时候就需要自定义Dialog,那么如何自定义呢,其实不难,就是有点繁琐而已。也就是自定义一个UI的xml文件,然后用setContentView方法来自定义设置。最近开发做了个小例子,特此分享记录出来给大家。
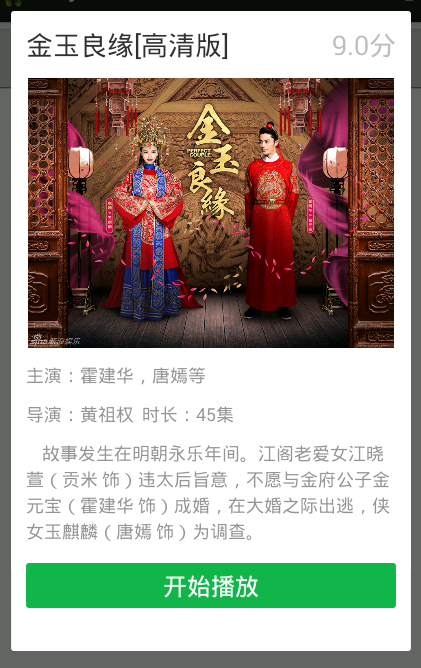
Dialog效果如下:
创建对话框类实现如下:
import android.app.Dialog;

import android.content.Context;

import android.util.DisplayMetrics;

import android.view.Gravity;

import android.view.LayoutInflater;

import android.view.View;

import android.view.Window;

import android.view.WindowManager;

import android.view.View.OnClickListener;

import android.widget.ImageView;

import android.widget.TextView;

public class DialogUitl {

    private static Dialog watchMovieDialog;

    public static Dialog showWatchMovieDialog(Context context) {

        if(watchMovieDialog == null){

            watchMovieDialog = new Dialog(context, R.style.watchMovieDialog);

            View dialogView = LayoutInflater.from(context).inflate(R.layout.dialog_watch_movie, null);

            watchMovieDialog.setCanceledOnTouchOutside(false);

            watchMovieDialog.setContentView(dialogView);

            Window dialogWindow = watchMovieDialog.getWindow();

            WindowManager.LayoutParams lp = dialogWindow.getAttributes();

            dialogWindow.setGravity(Gravity.CENTER_VERTICAL | Gravity.CENTER_HORIZONTAL);

            DisplayMetrics metrics = context.getApplicationContext().getResources().getDisplayMetrics();

            lp.width = metrics.widthPixels * 5 / 6;

            lp.height = metrics.heightPixels *  4/5;

            dialogWindow.setAttributes(lp);

            dialogWindow.setBackgroundDrawable(context.getResources().getDrawable(R.drawable.dlg_movie_bg));

            //dialogWindow.setBackgroundDrawableResource(R.drawable.dlg_movie_bg);

            watchMovieDialog.setCancelable(true);

            String title = "金玉良缘[高清版]";

            String score = "9.0分";

            String director = "黄祖权";

            String actor = "霍建华,唐嫣等";

            int   imageId = R.drawable.movie_img;

            String duration = "45集";

            String introduce = "    故事发生在明朝永乐年间。江阁老爱女江晓萱(贡米 饰)违太后旨意,不愿与金府公子金元宝(霍建华 饰)成婚,在大婚之际出逃,侠女玉麒麟(唐嫣 饰)为调查。";

            ((TextView)dialogView.findViewById(R.id.title)).setText(title);

            ((TextView)dialogView.findViewById(R.id.score)).setText(score);

            ((TextView)dialogView.findViewById(R.id.redirectContent)).setText(director);

            ((TextView)dialogView.findViewById(R.id.roleContent)).setText(actor);

            ((TextView)dialogView.findViewById(R.id.duration)).setText(duration);

            ((TextView)dialogView.findViewById(R.id.introduce)).setText(introduce);

            ((ImageView)dialogView.findViewById(R.id.ivImage)).setImageResource(imageId);

        }

        return watchMovieDialog;

    }

}
对应的UI的xml文件实现如下:
<?xml version="1.0" encoding="utf-8"?>

<LinearLayout xmlns:android="http://schemas.android.com/apk/res/android"

    android:id="@+id/dialog"

    android:layout_width="fill_parent"

    android:layout_height="wrap_content"

    android:orientation="vertical"

    >

    <RelativeLayout

        android:layout_width="fill_parent"

        android:layout_height="wrap_content"

        android:layout_margin="10dip"

         >

        <TextView

            android:id="@+id/title"

            android:layout_width="wrap_content"

            android:layout_height="wrap_content"

            android:layout_alignParentLeft="true"

            android:layout_alignParentTop="true"

            android:textSize="18sp"

            android:text="" />

        <TextView

            android:id="@+id/score"

            android:layout_width="wrap_content"

            android:layout_height="wrap_content"

            android:layout_alignParentRight="true"

            android:layout_alignParentTop="true"

            android:textColor="@color/color_bebebe"

            android:textSize="18sp"

            android:text="" />

    </RelativeLayout>

    <ImageView

        android:id="@+id/ivImage"

        android:layout_marginLeft="10dip"

        android:layout_marginRight="10dip"

        android:layout_marginBottom="10dip"

        android:layout_width="fill_parent"

        android:layout_height="180dp"

        android:src="@drawable/movie_img" />

    <LinearLayout

        android:layout_width="fill_parent"

        android:layout_height="wrap_content"

        android:layout_marginLeft="10dip"

        android:layout_marginRight="10dip"

        android:layout_marginBottom="10dip"

        android:orientation="vertical"

        android:background="@color/white"

         >

        <LinearLayout

            android:layout_width="fill_parent"

            android:layout_height="wrap_content"

            android:orientation="horizontal"

            android:layout_marginBottom="10dip" >

            <TextView

                android:id="@+id/role"

                android:layout_width="wrap_content"

                android:layout_height="wrap_content"

                android:text="主演:"

                 android:textColor="@color/color_959595"

                android:textSize="12sp" />

            <TextView

                android:id="@+id/roleContent"

                android:layout_width="wrap_content"

                android:layout_height="wrap_content"

                android:text=""

                 android:textColor="@color/color_959595"

                android:textSize="12sp" />

        </LinearLayout>

        <LinearLayout

            android:layout_width="fill_parent"

            android:layout_height="wrap_content"

            android:orientation="horizontal" >

            <TextView

                android:id="@+id/redirect"

                android:layout_width="wrap_content"

                android:layout_height="wrap_content"

                android:singleLine="true"

                android:text="导演:"

                android:textColor="@color/color_959595"

                android:textSize="12sp" />

            <TextView

                android:id="@+id/redirectContent"

                android:layout_width="wrap_content"

                android:layout_height="wrap_content"

                android:singleLine="false"

                android:text=""

                android:textColor="@color/color_959595"

                android:textSize="12sp" />

            <TextView

                android:id="@+id/redirect"

                android:layout_width="wrap_content"

                android:layout_height="wrap_content"

                android:singleLine="true"

                android:text="  时长:"

                android:textColor="@color/color_959595"

                android:textSize="12sp" />

            <TextView

                android:id="@+id/duration"

                android:layout_width="wrap_content"

                android:layout_height="wrap_content"

                android:singleLine="false"

                android:text=""

                android:textColor="@color/color_959595"

                android:textSize="12sp" />

        </LinearLayout>

    </LinearLayout>

    <TextView

                android:id="@+id/introduce"

                android:layout_width="fill_parent"

                android:layout_height="wrap_content"

                android:layout_marginLeft="10dip"

                android:layout_marginRight="10dip"

                android:layout_marginBottom="10dip"

                android:singleLine="false"

                android:text=""

                android:textColor="@color/color_959595"

                android:lineSpacingExtra="3dp"

                android:textSize="12sp" />

    <LinearLayout

            android:layout_width="fill_parent"

            android:layout_height="wrap_content"

            android:layout_marginLeft="10dip"

            android:layout_marginRight="10dip"

            android:layout_marginBottom="10dip"

            android:gravity="center"

            android:orientation="horizontal"

            >

                <TextView

                    android:id="@+id/playing"

                    android:layout_width="wrap_content"

                    android:layout_height="wrap_content"

                    android:layout_weight="1"

                    android:layout_gravity="center"

                    android:background="@drawable/btn_install_selector"

                    android:gravity="center"

                    android:text="开始播放"

                    android:textColor="@color/white"

                    android:textSize="16sp"

                    android:clickable="true"/>

        </LinearLayout>

</LinearLayout>
对话框底部的绿色Button的Style 实现(btn_install_selector.xml):
<?xml version="1.0" encoding="utf-8"?>

<selector xmlns:android="http://schemas.android.com/apk/res/android">

    <item android:state_pressed="true" android:drawable="@drawable/btn_install_bg"/>

    <item android:state_enabled="false" android:drawable="@drawable/btn_sending_bg"/>

    <item android:drawable="@drawable/btn_install_normall"/>

</selector>
最后调用Dialog方法如下:
在你需要弹出对话框的地方 调用以下代码即可:
DialogUitl.showWatchMovieDialog(this).show();
Android 开发之自定义Dialog及UI的实现的更多相关文章
- Android开发之自定义Dialog简单实现
本文着重研究了自定义对话框,通过一下步骤即可清晰的理解原理,通过更改界面设置和style类型,可以应用在各种各样适合自己的App中. 首先来看一下效果图: 首先是activity的界面 点击了上述图片 ...
- Android中制作自定义dialog对话框的实例
http://www.jb51.net/article/83319.htm 这篇文章主要介绍了Android中制作自定义dialog对话框的实例分享,安卓自带的Dialog显然不够用,因而我们要继 ...
- [Android] Android开发优化之——对界面UI的优化(2)
在Android应用开发过程中,屏幕上控件的布局代码和程序的逻辑代码通常是分开的.界面的布局代码是放在一个独立的xml文件中的,这个文件里面是树型组织的,控制着页面的布局.通常,在这个页面中会用到很多 ...
- [Android] Android开发优化之——对界面UI的优化(1)
在Android应用开发过程中,屏幕上控件的布局代码和程序的逻辑代码通常是分开的.界面的布局代码是放在一个独立的xml文件中的,这个文件里面是树型组织的,控制着页面的布局.通常,在这个页面中会用到很多 ...
- android开发之自定义组件
android开发之自定义组件 一:自定义组件: 我认为,自定义组件就是android给我们提供的的一个空白的可以编辑的图片,它帮助我们实现的我们想要的界面,也就是通过自定义组件我们可以把我们要登入的 ...
- Android单个按钮自定义Dialog
代码改变世界 Android单个按钮自定义Dialog dialog_layout.xml <?xml version="1.0" encoding="utf-8& ...
- Android开发之自定义的ListView(UITableViewController)
Android开发中的ListView, 顾名方法思义,就是表视图.表示图在iOS开发中就是TableView.两者虽然名称不一样,但是其使用方法,使用场景以及该控件的功能都极为相似,都是用来展示大量 ...
- Android开发之自定义组件和接口回调
说到自定义控件不得不提的就是接口回调,在Android开发中接口回调用的还是蛮多的.在这篇博客开始的时候呢,我想聊一下iOS的自定义控件.在iOS中自定义控件的思路是继承自UIView, 在UIVie ...
- Android学习笔记_52_全面了解Android开发规范:性能及UI优化
一.Android编码规范 1.java代码中不出现中文,最多注释中可以出现中文 2.局部变量命名.静态成员变量命名 只能包含字母,单词首字母出第一个外,都为大写,其他字母都为小写 3.常量命名 只能 ...
随机推荐
- 【POJ 1988】 Cube Stacking (带权并查集)
Cube Stacking Description Farmer John and Betsy are playing a game with N (1 <= N <= 30,000)id ...
- 李洪强iOS开发Swift篇—04_运算符
李洪强iOS开发Swift篇—04_运算符 一.运算符 1.Swift所支持的部分运算符有以下一些 赋值运算符:= 复合赋值运算符:+=.-= 算术运算符:+.-.*./ 求余运算符:% 自增.自减运 ...
- [wikioi]线段覆盖 2
http://wikioi.com/problem/3027/ # 有个小错误调了半天,最终发现sort(line, line+N)错了,后面那个是exclusive的,所以要line+N+1.# 按 ...
- vlc
源码下载地址:http://download.videolan.org/pub/videolan/vlc/ 编译依赖: sudo apt-get install liblua5.2-dev sudo ...
- VirtualBox虚拟机中启用usb3.0却无法显示u盘的解决方法
主机系统为win7 64位,由于工作需要,安装了Virtualbox 5.18虚拟机,virtaulbox中安装了win7 32系统.以为下启用usb 3.0的步骤: 1.宿主机要支持 usb 3.0 ...
- NOI2005维护数列
1500: [NOI2005]维修数列 Time Limit: 10 Sec Memory Limit: 64 MBSubmit: 6263 Solved: 1879[Submit][Status ...
- 判斷作業系統為 64bit 或 32bit z
有時我們在開發Windows 桌面應用程式時,會發生一些弔詭的事情,作業系統位元數就是一個蠻重要的小細節,若您寫的應用程式在Windows 的32bit 作業系統上可以完美的運行,但不見得在64bit ...
- HDOJ/HDU 2163 Palindromes(判断回文串~)
Problem Description Write a program to determine whether a word is a palindrome. A palindrome is a s ...
- 多IDC数据分布--MySQL多机房部署 - 学习笔记 - 51CTO技术博客
多IDC数据分布--MySQL多机房部署 - 学习笔记 - 51CTO技术博客 多IDC数据分布--MySQL多机房部署
- poj 1193 内存分配
好麻烦的模拟题,一次性过了就好!!!不过用了两天哦.. 小伙伴们慢慢做哦. #include <iostream> #include <list> #include <q ...