Linux command line exercises for NGS data processing
The purpose of this tutorial is to introduce students to the frequently used tools for NGS analysis as well as giving experience in writing one-liners. Copy the required files to your current directory, change directory (cd) to thelinuxTutorial folder, and do all the processing inside:
[uzi@quince-srv2 ~/]$ cp -r /home/opt/MScBioinformatics/linuxTutorial .

[uzi@quince-srv2 ~/]$ cd linuxTutorial

[uzi@quince-srv2 ~/linuxTutorial]$
I have deliberately chosen Awk in the exercises as it is a language in itself and is used more often to manipulate NGS data as compared to the other command line tools such as grep, sed, perl etc. Furthermore, having a command on awkwill make it easier to understand advanced tutorials such as Illumina Amplicons Processing Workflow.
In Linux, we use a shell that is a program that takes your commands from the keyboard and gives them to the operating system. Most Linux systems utilize Bourne Again SHell (bash), but there are several additional shell programs on a typical Linux system such as ksh, tcsh, and zsh. To see which shell you are using, type
[uzi@quince-srv2 ~/linuxTutorial]$ echo $SHELL

/bin/bash
To see where you are in the file system:
[uzi@quince-srv2 ~/linuxTutorial]$ pwd

/home/uzi/linuxTutorial
List the files in the current directory:
[uzi@quince-srv2 ~/linuxTutorial]$ ls

data
Now try different commands from the sheet given below:
Linux Commands Cheat Sheet
File System
ls— list items in current directoryls -l— list items in current directory and show in long format to see perimissions, size, and modification datels -a— list all items in current directory, including hidden filesls -F— list all items in current directory and show directories with a slash and executables with a starls dir— list all items in directory dircd dir— change directory to dircd ..— go up one directorycd /— go to the root directorycd ~— go to to your home directorycd -— go to the last directory you were just inpwd— show present working directorymkdir dir— make directory dirrm file— remove filerm -r dir— remove directory dir recursivelycp file1 file2— copy file1 to file2cp -r dir1 dir2— copy directory dir1 to dir2 recursivelymv file1 file2— move (rename) file1 to file2ln -s file link— create symbolic link to filetouch file— create or update filecat file— output the contents of fileless file— view file with page navigationhead file— output the first 10 lines of filetail file— output the last 10 lines of filetail -f file— output the contents of file as it grows, starting with the last 10 linesvim file— edit filealias name 'command'— create an alias for a commandSystem
shutdown— shut down machinereboot— restart machinedate— show the current date and timewhoami— who you are logged in asfinger user— display information about userman command— show the manual for commanddf— show disk usagedu— show directory space usagefree— show memory and swap usagewhereis app— show possible locations of appwhich app— show which app will be run by defaultProcess Management
ps— display your currently active processestop— display all running processeskill pid— kill process id pidkill -9 pid— force kill process id pidPermissions
ls -l— list items in current directory and show permissionschmod ugo file— change permissions of file to ugo - u is the user's permissions, g is the group's permissions, and o is everyone else's permissions. The values of u, g, and o can be any number between 0 and 7.7— full permissions6— read and write only5— read and execute only4— read only3— write and execute only2— write only1— execute only0— no permissionschmod 600 file— you can read and write - good for fileschmod 700 file— you can read, write, and execute - good for scriptschmod 644 file— you can read and write, and everyone else can only read - good for web pageschmod 755 file— you can read, write, and execute, and everyone else can read and execute - good for programs that you want to shareNetworking
wget file— download a filecurl file— download a filescp user@host:file dir— secure copy a file from remote server to the dir directory on your machinescp file user@host:dir— secure copy a file from your machine to the dir directory on a remote serverscp -r user@host:dir dir— secure copy the directory dir from remote server to the directory dir on your machinessh user@host— connect to host as userssh -p port user@host— connect to host on port as userssh-copy-id user@host— add your key to host for user to enable a keyed or passwordless loginping host— ping host and output resultswhois domain— get information for domaindig domain— get DNS information for domaindig -x host— reverse lookup hostlsof -i tcp:1337— list all processes running on port 1337Searching
grep pattern files— search for pattern in filesgrep -r pattern dir— search recursively for pattern in dirgrep -rn pattern dir— search recursively for pattern in dir and show the line number foundgrep -r pattern dir --include='*.ext— search recursively for pattern in dir and only search in files with .ext extensioncommand | grep pattern— search for pattern in the output of commandfind file— find all instances of file in real systemlocate file— find all instances of file using indexed database built from the updatedb command. Much faster than findsed -i 's/day/night/g' file— find all occurrences of day in a file and replace them with night - s means substitude and g means global - sed also supports regular expressionsCompression
tar cf file.tar files— create a tar named file.tar containing filestar xf file.tar— extract the files from file.tartar czf file.tar.gz files— create a tar with Gzip compressiontar xzf file.tar.gz— extract a tar using Gzipgzip file— compresses file and renames it to file.gzgzip -d file.gz— decompresses file.gz back to fileShortcuts
ctrl+a— move cursor to beginning of linectrl+f— move cursor to end of linealt+f— move cursor forward 1 wordalt+b— move cursor backward 1 word
Reference: http://cheatsheetworld.com/programming/unix-linux-cheat-sheet/
Exercise 1: Extracting reads from a FASTA file based on supplied IDs
Awk is a programming language which allows easy manipulation of structured data and is mostly used for pattern scanning and processing. It searches one or more files to see if they contain lines that match with the specified patterns and then perform associated actions. The basic syntax is:
awk '/pattern1/ {Actions}

     /pattern2/ {Actions}' file
The working of Awk is as follows
Awkreads the input files one line at a time.- For each line, it matches with given pattern in the given order, if matches performs the corresponding action.
- If no pattern matches, no action will be performed.
- In the above syntax, either search pattern or action are optional, But not both.
- If the search pattern is not given, then
Awkperforms the given actions for each line of the input. - If the action is not given, print all that lines that matches with the given patterns which is the default action.
- Empty braces with out any action does nothing. It wont perform default printing operation.
- Each statement in Actions should be delimited by semicolon.
Say you have data.tsv with the following contents:
$ cat data/test.tsv

blah_C1	ACTGTCTGTCACTGTGTTGTGATGTTGTGTGTG

blah_C2	ACTTTATATATT

blah_C3	ACTTATATATATATA

blah_C4	ACTTATATATATATA

blah_C5	ACTTTATATATT
By default Awk prints every line from the file.
$ awk '{print;}' data/test.tsv

blah_C1	ACTGTCTGTCACTGTGTTGTGATGTTGTGTGTG

blah_C2	ACTTTATATATT

blah_C3	ACTTATATATATATA

blah_C4	ACTTATATATATATA

blah_C5	ACTTTATATATT
We print the line which matches the pattern blah_C3
$ awk '/blah_C3/' data/test.tsv

blah_C3	ACTTATATATATATA
Awk has number of builtin variables. For each record i.e line, it splits the record delimited by whitespace character by default and stores it in the $n variables. If the line has 5 words, it will be stored in $1, $2, $3, $4 and $5.$0 represents the whole line. NF is a builtin variable which represents the total number of fields in a record.
$ awk '{print $1","$2;}' data/test.tsv

blah_C1,ACTGTCTGTCACTGTGTTGTGATGTTGTGTGTG

blah_C2,ACTTTATATATT

blah_C3,ACTTATATATATATA

blah_C4,ACTTATATATATATA

blah_C5,ACTTTATATATT

$ awk '{print $1","$NF;}' data/test.tsv

blah_C1,ACTGTCTGTCACTGTGTTGTGATGTTGTGTGTG

blah_C2,ACTTTATATATT

blah_C3,ACTTATATATATATA

blah_C4,ACTTATATATATATA

blah_C5,ACTTTATATATT
Awk has two important patterns which are specified by the keyword called BEGIN and END. The syntax is as follows:
BEGIN { Actions before reading the file}

{Actions for everyline in the file}

END { Actions after reading the file }
For example,
$ awk 'BEGIN{print "Header,Sequence"}{print $1","$2;}END{print "-------"}' data/test.tsv

Header,Sequence

blah_C1,ACTGTCTGTCACTGTGTTGTGATGTTGTGTGTG

blah_C2,ACTTTATATATT

blah_C3,ACTTATATATATATA

blah_C4,ACTTATATATATATA

blah_C5,ACTTTATATATT

-------
We can also use the concept of a conditional operator in print statement of the form print CONDITION ? PRINT_IF_TRUE_TEXT : PRINT_IF_FALSE_TEXT. For example, in the code below, we identify sequences with lengths > 14:
$ awk '{print (length($2)>14) ? $0">14" : $0"<=14";}' data/test.tsv

blah_C1	ACTGTCTGTCACTGTGTTGTGATGTTGTGTGTG>14

blah_C2	ACTTTATATATT<=14

blah_C3	ACTTATATATATATA>14

blah_C4	ACTTATATATATATA>14

blah_C5	ACTTTATATATT<=14
We can also use 1 after the last block {} to print everything (1 is a shorthand notation for {print $0} which becomes {print} as without any argument print will print $0 by default), and within this block, we can change $0, for example to assign the first field to $0 for third line (NR==3), we can use:
$ awk 'NR==3{$0=$1}1' data/test.tsv

blah_C1	ACTGTCTGTCACTGTGTTGTGATGTTGTGTGTG

blah_C2	ACTTTATATATT

blah_C3

blah_C4	ACTTATATATATATA

blah_C5	ACTTTATATATT
You can have as many blocks as you want and they will be executed on each line in the order they appear, for example, if we want to print $1 three times (here we are using printf instead of print as the former doesn't put end-of-line character),
$ awk '{printf $1"\t"}{printf $1"\t"}{print $1}' data/test.tsv

blah_C1	blah_C1	blah_C1

blah_C2	blah_C2	blah_C2

blah_C3	blah_C3	blah_C3

blah_C4	blah_C4	blah_C4

blah_C5	blah_C5	blah_C5
Although, we can also skip executing later blocks for a given line by using next keyword:
$ awk '{printf $1"\t"}NR==3{print "";next}{print $1}' data/test.tsv

blah_C1	blah_C1

blah_C2	blah_C2

blah_C3

blah_C4	blah_C4

blah_C5	blah_C5

$ awk 'NR==3{print "";next}{printf $1"\t"}{print $1}' data/test.tsv

blah_C1	blah_C1

blah_C2	blah_C2

blah_C4	blah_C4

blah_C5	blah_C5
You can also use getline to load the contents of another file in addition to the one you are reading, for example, in the statement given below, the while loop will load each line from test.tsv into k until no more lines are to be read:
$ awk 'BEGIN{while((getline k <"data/test.tsv")>0) print "BEGIN:"k}{print}' data/test.tsv

BEGIN:blah_C1	ACTGTCTGTCACTGTGTTGTGATGTTGTGTGTG

BEGIN:blah_C2	ACTTTATATATT

BEGIN:blah_C3	ACTTATATATATATA

BEGIN:blah_C4	ACTTATATATATATA

BEGIN:blah_C5	ACTTTATATATT

blah_C1	ACTGTCTGTCACTGTGTTGTGATGTTGTGTGTG

blah_C2	ACTTTATATATT

blah_C3	ACTTATATATATATA

blah_C4	ACTTATATATATATA

blah_C5	ACTTTATATATT
You can also store data in the memory with the syntax VARIABLE_NAME[KEY]=VALUE which you can later use through for (INDEX in VARIABLE_NAME) command:
$ awk '{i[$1]=1}END{for (j in i) print j"<="i[j]}' data/test.tsv

blah_C1<=1

blah_C2<=1

blah_C3<=1

blah_C4<=1

blah_C5<=1
Given all that you have learned so far, we are going to extract reads from a FASTA file based on IDs supplied in a file. Say, we are given a FASTA file with following contents:
[uzi@quince-srv2 ~/linuxTutorial]$ cat data/test.fa

>blah_C1

ACTGTCTGTC

ACTGTGTTGTG

ATGTTGTGTGTG

>blah_C2

ACTTTATATATT

>blah_C3

ACTTATATATATATA

>blah_C4

ACTTATATATATATA

>blah_C5

ACTTTATATATT
and an IDs file:
[uzi@quince-srv2 ~/linuxTutorial]$ cat data/IDs.txt

blah_C4

blah_C5
After looking at the file, it is immediately clear that the sequences may span multiple lines (for example, for blah_C1). If we want to match an ID, we can first linearize the file by using the conditional operator as discussed above to have the delimited information of each sequence in one line, and then make logic to perform further functionality on each line later. Our logic is that for lines that contain header information /^>/ we can do something differently, and for other lines we use printf to remove new line character:
[uzi@quince-srv2 ~/linuxTutorial]$ awk '{printf /^>/ ? $0 : $0}' data/test.fa

>blah_C1ACTGTCTGTCACTGTGTTGTGATGTTGTGTGTG>blah_C2ACTTTATATATT>blah_C3ACTTATATATATATA>blah_C4ACTTATATATATATA>blah_C5ACTTTATATATT
We can then put each sequence on a separate line and also put a tab character ("\t") between the header and the sequence:
[uzi@quince-srv2 ~/linuxTutorial]$ awk '{printf /^>/ ? "\n"$0 : $0}' data/test.fa

>blah_C1ACTGTCTGTCACTGTGTTGTGATGTTGTGTGTG

>blah_C2ACTTTATATATT

>blah_C3ACTTATATATATATA

>blah_C4ACTTATATATATATA

>blah_C5ACTTTATATATT[uzi@quince-srv2 ~/linuxTutorial]$ awk '{printf /^>/ ? "\n"$0"\t" : $0}' data/test.fa

>blah_C1	ACTGTCTGTCACTGTGTTGTGATGTTGTGTGTG

>blah_C2	ACTTTATATATT

>blah_C3	ACTTATATATATATA

>blah_C4	ACTTATATATATATA

>blah_C5	ACTTTATATATT
We can then use NR==1 block to stop printing a new line character before the first header (as you can see there is an empty space) and use next to ignore the later block:
[uzi@quince-srv2 ~/linuxTutorial]$ awk 'NR==1{printf $0"\t";next}{printf /^>/ ? "\n"$0"\t" : $0}' data/test.fa

>blah_C1	ACTGTCTGTCACTGTGTTGTGATGTTGTGTGTG

>blah_C2	ACTTTATATATT

>blah_C3	ACTTATATATATATA

>blah_C4	ACTTATATATATATA

>blah_C5	ACTTTATATATT
We can then pipe this stream to another awk statement using "\t" as a delimeter (which you can specify using -F) and use gsub to remove > from the start of each line since our IDs file doesn't contain that character:
[uzi@quince-srv2 ~/linuxTutorial]$ awk 'NR==1{printf $0"\t";next}{printf /^>/ ? "\n"$0"\t" : $0}' data/test.fa |  awk -F"\t" '{gsub("^>","",$0);print $0}'

blah_C1	ACTGTCTGTCACTGTGTTGTGATGTTGTGTGTG

blah_C2	ACTTTATATATT

blah_C3	ACTTATATATATATA

blah_C4	ACTTATATATATATA

blah_C5	ACTTTATATATT
Now we load the IDs.txt file in the BEGIN block, store the IDs in the memory, and in the stream if the first field ($1) matches the ID stored in the memory, we output the formatted record:
[uzi@quince-srv2 ~/linuxTutorial/data]$ awk 'NR==1{printf $0"\t";next}{printf /^>/ ? "\n"$0"\t" : $0}' data/test.fa | awk -F"\t" 'BEGIN{while((getline k < "data/IDs.txt")>0)i[k]=1}{gsub("^>","",$0); if(i[$1]){print ">"$1"\n"$2}}'

>blah_C4

ACTTATATATATATA

>blah_C5

ACTTTATATATT
With Bioawk it is much simpler as you don't have to linearize the FASTA file as the record boundaries are the complete sequence boundaries and not lines:
[uzi@quince-srv2 ~/linuxTutorial/data]$ bioawk -cfastx 'BEGIN{while((getline k <"data/IDs.txt")>0)i[k]=1}{if(i[$name])print ">"$name"\n"$seq}' data/test.fa

>blah_C4

ACTTATATATATATA

>blah_C5

ACTTTATATATT
-c, with the field names as follows (you can use the column pairs alternatively):
bed: $1:$chrom $2:$start $3:$end $4:$name $5:$score $6:$strand $7:$thickstart $8:$thickend $9:$rgb $10:$blockcount $11:$blocksizes $12:$blockstarts

sam: $1:$qname $2:$flag $3:$rname $4:$pos $5:$mapq $6:$cigar $7:$rnext $8:$pnext $9:$tlen $10:$seq $11:$qual

vcf: $1:$chrom $2:$pos $3:$id $4:$ref $5:$alt $6:$qual $7:$filter $8:$info

gff: $1:$seqname $2:$source $3:$feature $4:$start $5:$end $6:$score $7:$filter $8:$strand $9:$group $10:$attribute

fastx: $1:$name $2:$seq $3:$qual $4:$comment
Exercise 2: Alignment Statistics for Metagenomics/Population Genomics
For this exercise we will use a C. Difficile Ribotype 078 reference database that comprises of 61 contigs. Even though it is a single genome for which we have obtained the samples, the workflow given below remains similar for the metagenomic samples when you have complete genomes instead of contigs in the reference database (and so I use the nomenclature: genomes/contigs). Before we analyze our samples, we can do some quality control checks on our raw sequences using FastQC. Running the following command will generate a M120_S2_L001_R1_001_fastqc folder with an html page fastqc_report.html inside. You can load it up in your browser to assess your data through graphs and summary tables.
[uzi@quince-srv2 ~/linuxTutorial]$ fastqc data/M120_*R1*.fastq

Started analysis of M120_S2_L001_R1_001.fastq

Approx 5% complete for M120_S2_L001_R1_001.fastq

Approx 10% complete for M120_S2_L001_R1_001.fastq

Approx 15% complete for M120_S2_L001_R1_001.fastq

Approx 20% complete for M120_S2_L001_R1_001.fastq

Approx 25% complete for M120_S2_L001_R1_001.fastq

Approx 30% complete for M120_S2_L001_R1_001.fastq

Approx 35% complete for M120_S2_L001_R1_001.fastq

Approx 40% complete for M120_S2_L001_R1_001.fastq

Approx 45% complete for M120_S2_L001_R1_001.fastq

Approx 50% complete for M120_S2_L001_R1_001.fastq

Approx 55% complete for M120_S2_L001_R1_001.fastq

Approx 60% complete for M120_S2_L001_R1_001.fastq

Approx 65% complete for M120_S2_L001_R1_001.fastq

Approx 70% complete for M120_S2_L001_R1_001.fastq

Approx 75% complete for M120_S2_L001_R1_001.fastq

Approx 80% complete for M120_S2_L001_R1_001.fastq

Approx 85% complete for M120_S2_L001_R1_001.fastq

Approx 90% complete for M120_S2_L001_R1_001.fastq

Approx 95% complete for M120_S2_L001_R1_001.fastq

Approx 100% complete for M120_S2_L001_R1_001.fastq

Analysis complete for M120_S2_L001_R1_001.fastq

[uzi@quince-srv2 ~/linuxTutorial]$
For example, here is the file generated for the above M120_S2_L001_R1_001.fastq file:
Alternatively, you can also try my Shell utilities for QC as well as Shell wrappers for EMBOSS utilities.
Next we index our reference database file. Indexing speeds up alignment, allowing the aligner to quickly find short, near-exact matches to use as seeds for subsequent full-alignments.
[uzi@quince-srv2 ~/linuxTutorial/data]$ bwa index Cdiff078.fa
Use BWA-MEM to align paired-end sequences. Briefly, the algorithm works by seeding alignments with maximal exact matches (MEMs) and then extending seeds with the affine-gap Smith-Waterman algorithm (SW). From BWA doc, it is suggested that for 70bp or longer Illumina, 454, Ion Torrent and Sanger reads, assembly contigs and BAC sequences, BWA-MEM is usually the preferred algorithm. For short sequences, BWA-backtrack may be better. BWA-SW may have better sensitivity when alignment gaps are frequent.
[uzi@quince-srv2 ~/linuxTutorial]$ bwa mem data/Cdiff078.fa data/M120_*R1*.fastq data/M120_*R2*.fastq > aln-pe.sam
We have generated a sam file (aln-pe.sam) which consist of two types of lines: headers and alignments. Headers begin with @, and provide meta-data regarding the entire alignment file. Alignments begin with any character except @, and describe a single alignment of a sequence read against the reference genome. Note that each read in a FASTQ file may align to multiple regions within a reference genome, and an individual read can therefore result in multiple alignments. In the SAM format, each of these alignments is reported on a separate line. Also, each alignment has 11 mandatory fields, followed by a variable number of optional fields. Each of the fields is described in the table below:
| Col | Field | Description |
| 1 | QNAME | Query template/pair NAME |
| 2 | FLAG | bitwise FLAG |
| 3 | RNAME | Reference sequence NAME |
| 4 | POS | 1-based leftmost POSition/coordinate of clipped sequence |
| 5 | MAPQ | MAPping Quality (Phred-scaled) |
| 6 | CIAGR | extended CIGAR string |
| 7 | MRNM | Mate Reference sequence NaMe (‘=’ if same as RNAME) |
| 8 | MPOS | 1-based Mate POSistion |
| 9 | TLEN | inferred Template LENgth (insert size) |
| 10 | SEQ | query SEQuence on the same strand as the reference |
| 11 | QUAL | query QUALity (ASCII-33 gives the Phred base quality) |
| 12+ | OPT | variable OPTional fields in the format TAG:VTYPE:VALUE |
where FLAG is defined as:
| Flag | Chr | Description |
| 0x0001 | p | the read is paired in sequencing |
| 0x0002 | P | the read is mapped in a proper pair |
| 0x0004 | u | the query sequence itself is unmapped |
| 0x0008 | U | the mate is unmapped |
| 0x0010 | r | strand of the query (1 for reverse) |
| 0x0020 | R | strand of the mate |
| 0x0040 | 1 | the read is the first read in a pair |
| 0x0080 | 2 | the read is the second read in a pair |
| 0x0100 | s | the alignment is not primary |
| 0x0200 | f | the read fails platform/vendor quality checks |
| 0x0400 | d | the read is either a PCR or an optical duplicate |
Since the flags are given in decimal representation in the SAM file, you can use this link to check which flag is set. We are going to use SAMTools which provides various tools for manipulating alignments in the SAM/BAM format. The SAM (Sequence Alignment/Map) format (BAM is just the binary form of SAM) is currently the de facto standard for storing large nucleotide sequence alignments. If you are dealing with high-throughput metagenomic whole-genome shotgun sequencing data, you will have to deal with SAM/BAM files. See what SAMtools have to offer:
We can then use a program SAMstat to get statistics on our aln-pe.sam file:
[uzi@quince-srv2 ~/linuxTutorial]$ samstat aln-pe.sam
Running the above code will generate a aln-pe.sam.samstat.html file which you can open in your browser (be patient, it takes a bit of time to load). Plots such as "Reads Length Distributions" and "Base Quality Distributions" may be of interest to you:
Now we convert SAM file to the binary BAM file
[uzi@quince-srv2 ~/linuxTutorial]$ samtools view -h -b -S aln-pe.sam > aln-pe.bam
Extract only those sequences that were mapped against the reference database. Use -F 4 switch.
[uzi@quince-srv2 ~/linuxTutorial]$ samtools view -b -F 4 aln-pe.bam > aln-pe.mapped.bam
Generate a file lengths.genome that contains two entries per row: genome identifier and the corresponding genome length:
[uzi@quince-srv2 ~/linuxTutorial]$ samtools view -H aln-pe.mapped.bam | perl -ne 'if ($_ =~ m/^\@SQ/) { print $_ }' | perl -ne 'if ($_ =~ m/SN:(.+)\s+LN:(\d+)/) { print $1, "\t", $2, "\n"}' > lengths.genome

[uzi@quince-srv2 ~/linuxTutorial]$ cat lengths.genome

Cdiff078_C01	9165

Cdiff078_C02	93786

Cdiff078_C03	752

Cdiff078_C04	5361

Cdiff078_C05	70058

Cdiff078_C06	23538

Cdiff078_C07	98418

Cdiff078_C08	361074

Cdiff078_C09	45183

Cdiff078_C10	141523

Cdiff078_C11	21992

Cdiff078_C12	2353

Cdiff078_C13	133975

Cdiff078_C14	3374

Cdiff078_C15	9744

Cdiff078_C16	25480

Cdiff078_C17	293596

Cdiff078_C18	7057

Cdiff078_C19	73989

Cdiff078_C20	248092

Cdiff078_C21	41937

Cdiff078_C22	65693

Cdiff078_C23	21321

Cdiff078_C24	440055

Cdiff078_C25	210910

Cdiff078_C26	164162

Cdiff078_C27	22782

Cdiff078_C28	201701

Cdiff078_C29	13447

Cdiff078_C30	101704

Cdiff078_C31	146436

Cdiff078_C32	61153

Cdiff078_C33	59640

Cdiff078_C34	193273

Cdiff078_C35	18395

Cdiff078_C36	25573

Cdiff078_C37	61616

Cdiff078_C38	4117

Cdiff078_C39	110461

Cdiff078_C40	125351

Cdiff078_C41	38508

Cdiff078_C42	113221

Cdiff078_C43	500

Cdiff078_C44	547

Cdiff078_C45	613

Cdiff078_C46	649

Cdiff078_C47	666

Cdiff078_C48	783

Cdiff078_C49	872

Cdiff078_C50	872

Cdiff078_C51	879

Cdiff078_C52	921

Cdiff078_C53	955

Cdiff078_C54	1217

Cdiff078_C55	1337

Cdiff078_C56	1445

Cdiff078_C57	2081

Cdiff078_C58	2098

Cdiff078_C59	2512

Cdiff078_C60	2800

Cdiff078_C61	4372

[uzi@quince-srv2 ~/linuxTutorial]$
Sort BAM file. Many of the downstream analysis programs that use BAM files actually require a sorted BAM file. -m specifies the maximum memory to use, and can be changed to fit your system.
[uzi@quince-srv2 ~/linuxTutorial]$ samtools sort -m 1000000000 aln-pe.mapped.bam aln-pe.mapped.sorted
We will now use bedtools. It is a very useful suite of programs for working with SAM/BAM, BED, VCF and GFF files, files that you will encouter many times doing NGS analysis. -ibam switch takes indexed bam file that we generated earlier, -d reports the depth at each genome position with 1-based coordinates, and -g is used to provide the genome lengths file we generated earlier. The coverage flags are explained pictorially from genomecov man page:
Reference: http://bedtools.readthedocs.org/en/latest/_images/genomecov-glyph.png
[uzi@quince-srv2 ~/linuxTutorial]$ bedtools genomecov -ibam aln-pe.mapped.sorted.bam -d -g lengths.genome > aln-pe.mapped.bam.perbase.cov
Look at the first few entries in the file generated above. First column is genome identifier, second column is position on genome, and third column is coverage.
[uzi@quince-srv2 ~/linuxTutorial]$ head aln-pe.mapped.bam.perbase.cov

Cdiff078_C01	1	41

Cdiff078_C01	2	41

Cdiff078_C01	3	42

Cdiff078_C01	4	42

Cdiff078_C01	5	42

Cdiff078_C01	6	44

Cdiff078_C01	7	44

Cdiff078_C01	8	44

Cdiff078_C01	9	44

Cdiff078_C01	10	44

[uzi@quince-srv2 ~/linuxTutorial]$
Now we will count only those positions where we have >0 coverage.
[uzi@quince-srv2 ~/linuxTutorial]$ awk -F"\t" '$3>0{print $1}' aln-pe.mapped.bam.perbase.cov | sort | uniq -c > aln-pe.mapped.bam.perbase.count
To see what we have done, use the cat command
[uzi@quince-srv2 ~/linuxTutorial]$ cat aln-pe.mapped.bam.perbase.count

   9165 Cdiff078_C01

  93786 Cdiff078_C02

    752 Cdiff078_C03

   5361 Cdiff078_C04

  70058 Cdiff078_C05

  23538 Cdiff078_C06

  98418 Cdiff078_C07

 333224 Cdiff078_C08

  44803 Cdiff078_C09

 141523 Cdiff078_C10

  21969 Cdiff078_C11

   2292 Cdiff078_C12

 133974 Cdiff078_C13

   1762 Cdiff078_C14

     50 Cdiff078_C15

  10232 Cdiff078_C16

 293440 Cdiff078_C17

   7057 Cdiff078_C18

  73989 Cdiff078_C19

 248092 Cdiff078_C20

  41937 Cdiff078_C21

  65447 Cdiff078_C22

  21321 Cdiff078_C23

 439123 Cdiff078_C24

 210910 Cdiff078_C25

 164162 Cdiff078_C26

  22782 Cdiff078_C27

 201701 Cdiff078_C28

  13447 Cdiff078_C29

  98510 Cdiff078_C30

 146261 Cdiff078_C31

  61153 Cdiff078_C32

  44523 Cdiff078_C33

 193180 Cdiff078_C34

  18395 Cdiff078_C35

  25573 Cdiff078_C36

  61616 Cdiff078_C37

   4117 Cdiff078_C38

  62897 Cdiff078_C39

 125351 Cdiff078_C40

  38508 Cdiff078_C41

 113221 Cdiff078_C42

    442 Cdiff078_C43

    649 Cdiff078_C46

    663 Cdiff078_C47

    766 Cdiff078_C48

    580 Cdiff078_C51

   1110 Cdiff078_C54

   1445 Cdiff078_C56

   2512 Cdiff078_C59

   2800 Cdiff078_C60

[uzi@quince-srv2 ~/linuxTutorial]$
We will now use the above file with lengths.genome to calculate the proportions of genomes/contigs covered using the following one-liner. It reads lengths.genome line by line, assigns the genome identifier to myArray[0], it's length tomyArray[1]. It then searches the identifier in aln-pe.mapped.bam.perbase.count, extracts the base count, and uses bc to calculate the proportions.
[uzi@quince-srv2 ~/linuxTutorial]$ while IFS=$'\t' read -r -a myArray; do echo -e "${myArray[0]},$( echo "scale=5;0"$(awk -v pattern="${myArray[0]}" '$2==pattern{print $1}' aln-pe.mapped.bam.perbase.count)"/"${myArray[1]} | bc ) "; done < lengths.genome > aln-pe.mapped.bam.genomeproportion

[uzi@quince-srv2 ~/linuxTutorial]$ cat aln-pe.mapped.bam.genomeproportion

Cdiff078_C01,1.00000

Cdiff078_C02,1.00000

Cdiff078_C03,1.00000

Cdiff078_C04,1.00000

Cdiff078_C05,1.00000

Cdiff078_C06,1.00000

Cdiff078_C07,1.00000

Cdiff078_C08,.92286

Cdiff078_C09,.99158

Cdiff078_C10,1.00000

Cdiff078_C11,.99895

Cdiff078_C12,.97407

Cdiff078_C13,.99999

Cdiff078_C14,.52222

Cdiff078_C15,.00513

Cdiff078_C16,.40156

Cdiff078_C17,.99946

Cdiff078_C18,1.00000

Cdiff078_C19,1.00000

Cdiff078_C20,1.00000

Cdiff078_C21,1.00000

Cdiff078_C22,.99625

Cdiff078_C23,1.00000

Cdiff078_C24,.99788

Cdiff078_C25,1.00000

Cdiff078_C26,1.00000

Cdiff078_C27,1.00000

Cdiff078_C28,1.00000

Cdiff078_C29,1.00000

Cdiff078_C30,.96859

Cdiff078_C31,.99880

Cdiff078_C32,1.00000

Cdiff078_C33,.74652

Cdiff078_C34,.99951

Cdiff078_C35,1.00000

Cdiff078_C36,1.00000

Cdiff078_C37,1.00000

Cdiff078_C38,1.00000

Cdiff078_C39,.56940

Cdiff078_C40,1.00000

Cdiff078_C41,1.00000

Cdiff078_C42,1.00000

Cdiff078_C43,.88400

Cdiff078_C44,0

Cdiff078_C45,0

Cdiff078_C46,1.00000

Cdiff078_C47,.99549

Cdiff078_C48,.97828

Cdiff078_C49,0

Cdiff078_C50,0

Cdiff078_C51,.65984

Cdiff078_C52,0

Cdiff078_C53,0

Cdiff078_C54,.91207

Cdiff078_C55,0

Cdiff078_C56,1.00000

Cdiff078_C57,0

Cdiff078_C58,0

Cdiff078_C59,1.00000

Cdiff078_C60,1.00000

Cdiff078_C61,0
We have a total of 61 genomes/contigs in the reference database. To see how many genomes/contigs we recovered, we will use the following one-liner:
[uzi@quince-srv2 ~/linuxTutorial]$ awk -F "," '{sum+=$NF} END{print "Total genomes covered:"sum}' aln-pe.mapped.bam.genomeproportion

Total genomes covered:47.5224
We also need genome/contig coverage, which we can calculate as:
[uzi@quince-srv2 ~/linuxTutorial]$ bedtools genomecov -ibam aln-pe.mapped.sorted.bam -g lengths.genome | awk -F"\t" '!/^genome/{l[$1]=l[$1]+($2 *$3);r[$1]=$4} END {for (i in l){print i","(l[i]/r[i])}}' > aln-pe.mapped.bam.genomecoverage

[uzi@quince-srv2 ~/linuxTutorial]$ cat aln-pe.mapped.bam.genomecoverage

Cdiff078_C10,61.5467

Cdiff078_C11,68.9158

Cdiff078_C12,79.7875

Cdiff078_C13,61.2645

Cdiff078_C14,57.3438

Cdiff078_C15,0.0812808

Cdiff078_C16,23.5227

Cdiff078_C17,57.358

Cdiff078_C30,59.3333

Cdiff078_C18,55.5597

Cdiff078_C31,62.147

Cdiff078_C19,56.3139

Cdiff078_C32,66.0493

Cdiff078_C33,48.8165

Cdiff078_C34,65.7106

Cdiff078_C35,62.7728

Cdiff078_C36,62.7535

Cdiff078_C37,67.2169

Cdiff078_C51,1.05916

Cdiff078_C38,61.9871

Cdiff078_C39,37.3289

Cdiff078_C54,6.46754

Cdiff078_C56,815.224

Cdiff078_C59,801.998

Cdiff078_C01,67.3333

Cdiff078_C02,67.4621

Cdiff078_C03,103.848

Cdiff078_C04,65.4128

Cdiff078_C05,66.1244

Cdiff078_C06,66.239

Cdiff078_C07,76.0081

Cdiff078_C20,55.6661

Cdiff078_C08,60.4236

Cdiff078_C21,56.2321

Cdiff078_C09,76.9986

Cdiff078_C22,56.8815

Cdiff078_C23,53.2772

Cdiff078_C24,56.9991

Cdiff078_C25,57.4446

Cdiff078_C26,59.296

Cdiff078_C40,66.0074

Cdiff078_C27,59.4391

Cdiff078_C41,67.5941

Cdiff078_C28,59.8319

Cdiff078_C42,69.4415

Cdiff078_C29,60.961

Cdiff078_C43,4.812

Cdiff078_C46,29.3837

Cdiff078_C60,62.1336

Cdiff078_C47,7.95946

Cdiff078_C48,15.3436

[uzi@quince-srv2 ~/linuxTutorial]$
Sort the original bam file
[uzi@quince-srv2 ~/linuxTutorial]$ samtools sort -m 1000000000 aln-pe.bam aln-pe.sorted
Now we will check alignment statistics using the Picard tools. Note that the awk statement given below is used to transpose the original table and you can do without it.
[uzi@quince-srv2 ~/linuxTutorial]$ java -jar $(which CollectAlignmentSummaryMetrics.jar) INPUT=aln-pe.sorted.bam OUTPUT=aln-pe.sorted.alignment_stats.txt REFERENCE_SEQUENCE=data/Cdiff078.fa

[uzi@quince-srv2 ~/linuxTutorial]$ grep -vi -e "^#" -e "^$" aln-pe.sorted.alignment_stats.txt | awk -F"\t" '{ for (i=1; i<=NF; i++)  {a[NR,i] = $i}}NF>p{p=NF}END{for(j=1;j<=p;j++){str=a[1,j];for(i=2; i<=NR; i++){str=str"\t"a[i,j];} print str}}'

CATEGORY			FIRST_OF_PAIR	SECOND_OF_PAIR	PAIR

TOTAL_READS			425271		425038		850309

PF_READS			425271		425038		850309

PCT_PF_READS			1		1		1

PF_NOISE_READS			0		0		0

PF_READS_ALIGNED		407011		405258		812269

PCT_PF_READS_ALIGNED		0.957063	0.953463	0.955263

PF_ALIGNED_BASES		119451610	118113100	237564710

PF_HQ_ALIGNED_READS		401018		399295		800313

PF_HQ_ALIGNED_BASES		118606615	117274833	235881448

PF_HQ_ALIGNED_Q20_BASES		116971078	111640501	228611579

PF_HQ_MEDIAN_MISMATCHES		0		0		0

PF_MISMATCH_RATE		0.002359	0.007186	0.004759

PF_HQ_ERROR_RATE		0.002269	0.007065	0.004653

PF_INDEL_RATE			0.000124	0.00013		0.000127

MEAN_READ_LENGTH		299.093366	298.832657	298.963048

READS_ALIGNED_IN_PAIRS		404714		404545		809259

PCT_READS_ALIGNED_IN_PAIRS	0.994356	0.998241	0.996294

BAD_CYCLES			0		0		0

STRAND_BALANCE			0.500072	0.500484	0.500278

PCT_CHIMERAS			0.014823	0.014668	0.014746

PCT_ADAPTER			0.000285	0.000261	0.000273

SAMPLE

LIBRARY

READ_GROUP

[uzi@quince-srv2 ~/linuxTutorial]$
The detailed description of these summary metrics are given here. From this link, PF_MISMATCH_RATE, PF_HQ_ERROR_RATE, and PF_INDEL_RATE are of interest to us. As can be seen, the error rates are quite low and we can proceed with the analysis. Next we would like to calculate GC bias. For this purpose, we will index aln-pe.mapped.sorted.bam file.
[uzi@quince-srv2 ~/linuxTutorial]$ samtools index aln-pe.mapped.sorted.bam

[uzi@quince-srv2 ~/linuxTutorial]$ for i in $(samtools view -H aln-pe.mapped.sorted.bam | awk -F"\t" '/@SQ/{gsub("^SN:","",$2);print $2}'

);do samtools view -b aln-pe.mapped.sorted.bam $i > aln-pe.mapped.sorted.$i.bam; java -Xmx2g -jar $(which CollectGcBiasMetrics.jar) R=data/Cdiff078.fa I=aln-pe.mapped.sorted.$i.bam O=aln-pe.mapped.sorted.${i}_GCBias.txt CHART=aln-pe.mapped.sorted.${i}_GCBias.pdf ASSUME_SORTED=true; done
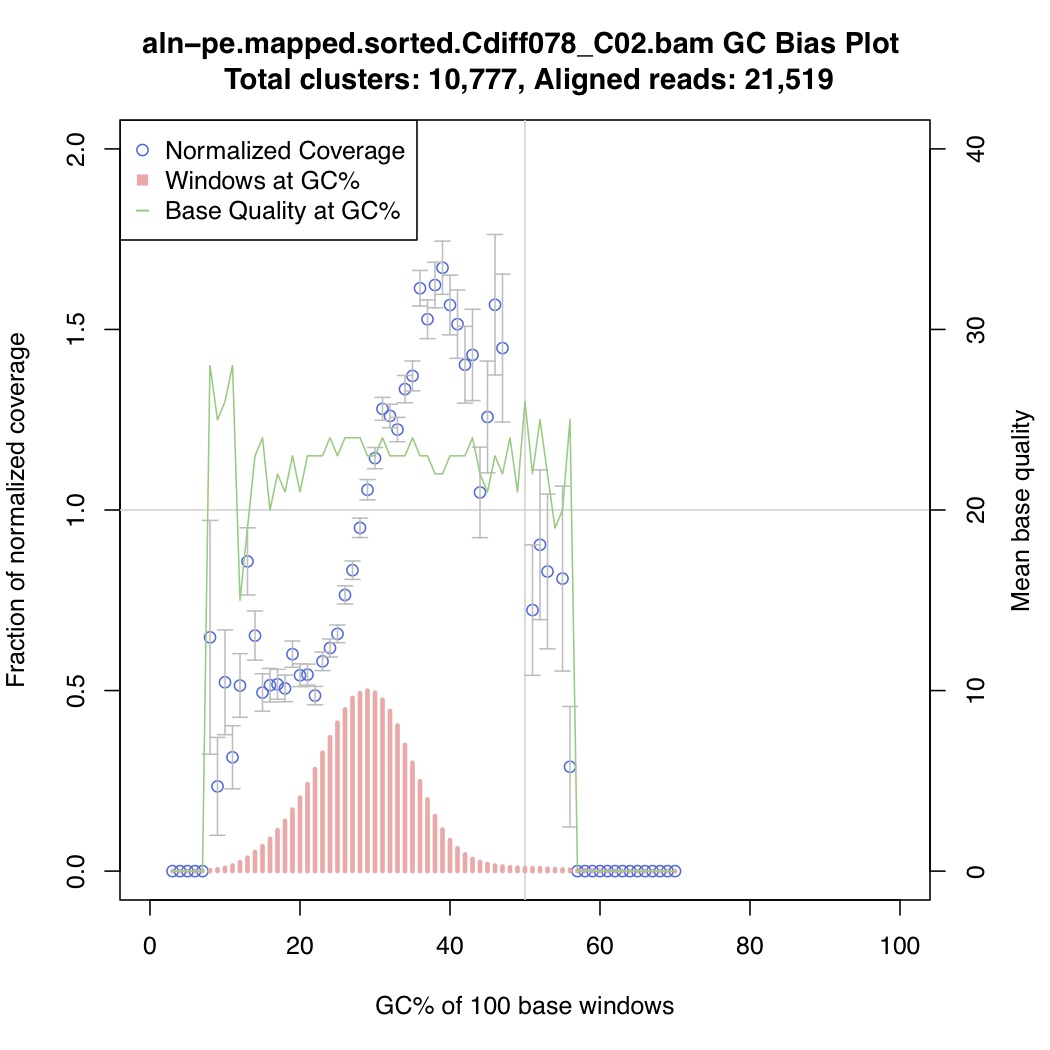
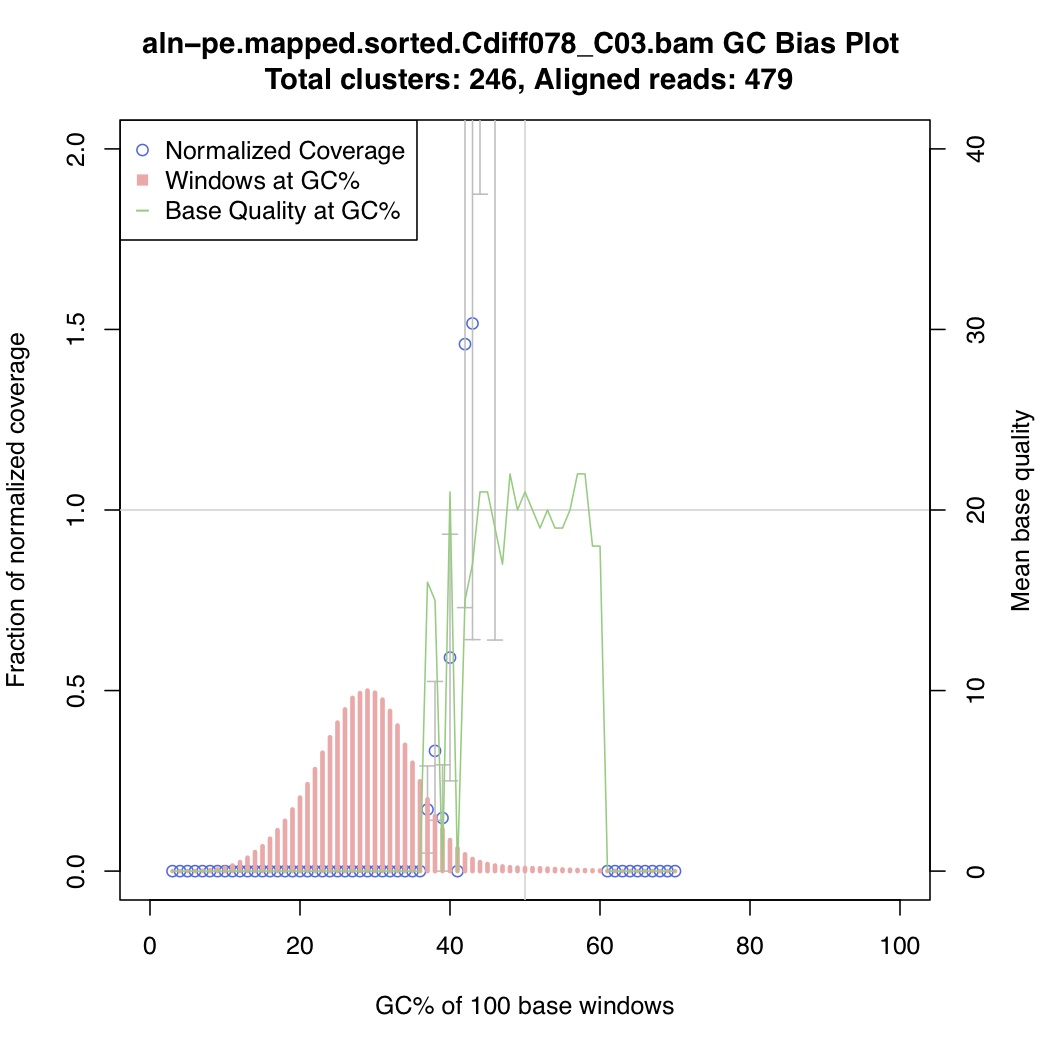
In the above one-liner, CollectGcBiasMetrics.jar will generate a GC bias plot for each contig, and will look like these: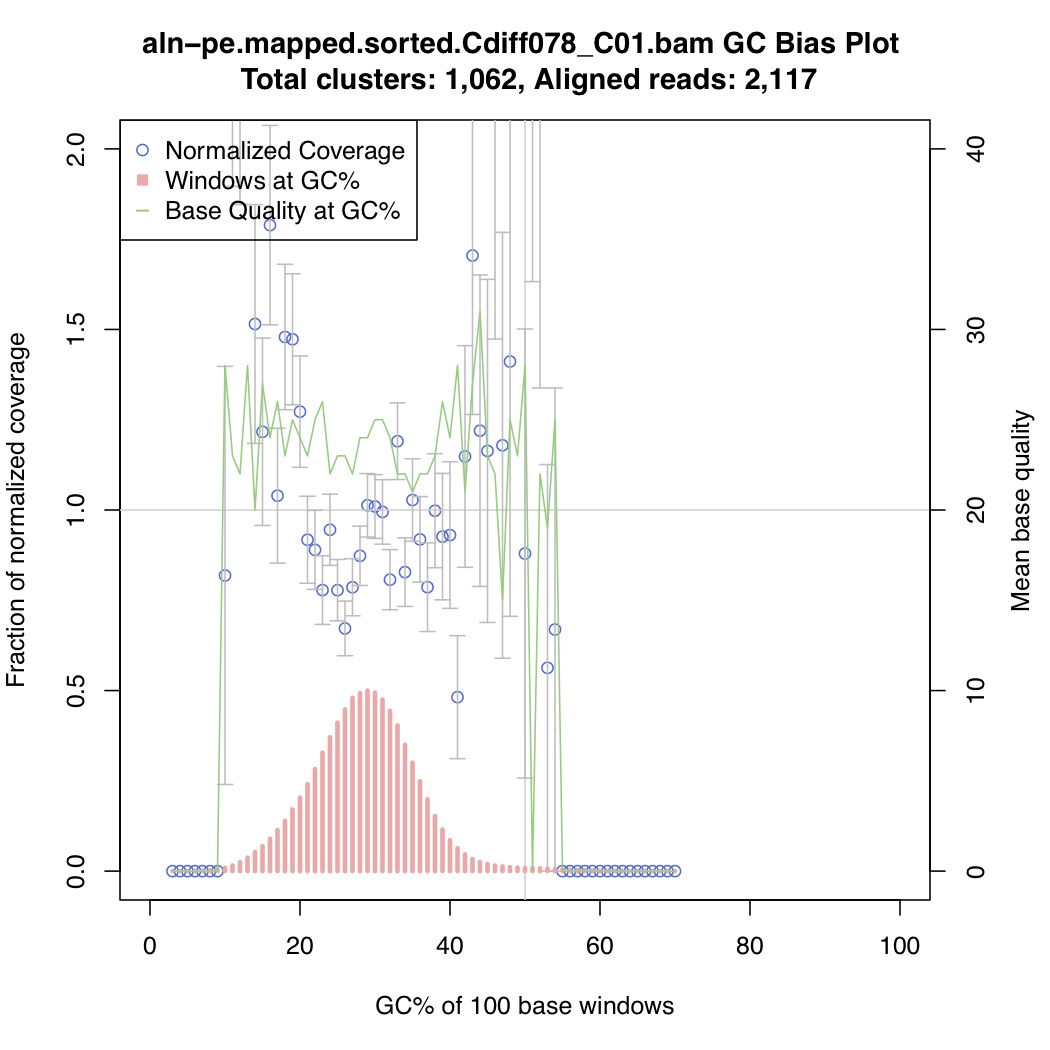
Now collate all the txt files together:
[uzi@quince-srv2 ~/linuxTutorial]$ for i in $(ls *_GCBias.txt); do awk -v k="$i" '!/^#/ && !/^$/ && !/^GC/ && !/?/{print k"\t"$1"\t"$5}' $i; done | perl -ane '$r{$F[0].":".$F[1]}=$F[2];unless($F[0]~~@s){push @s,$F[0];}unless($F[1]~~@m){push @m,$F[1];}END{print "Contigs\t".join("\t",@s)."\n";for($i=0;$i<@m;$i++){print $m[$i];for($j=0;$j<@s;$j++){(not defined $r{$s[$j].":".$m[$i]})?print "\t".0:print"\t".$r{$s[$j].":".$m[$i]};}print "\n";}}' | sed '1s/aln-pe\.mapped\.sorted\.//g;1s/_GCBias\.txt//g' > aln-pe.mapped.sorted.bam.gcbias
GENERATEtable.sh script. If the data stream is of the form [Contig]\t[Feature]\t[Value], then you can pipe the stream to GENERATEtable.sh to obtain a Contig X Feature table:
$ cat test.tsv

contig1	F1	12.2

contig1	F2	34.2

contig1	F3	45.2

contig2	F2	56.3

contig2	F3	56.2

contig3	F1	45.4

contig3	F2	56.3

contig4	F1	23.5

contig5	F1	24.5

$ cat GENERATEtable.sh

#!/bin/bash

less <&0| \

	perl -ane '$r{$F[0].":".$F[1]}=$F[2];

		unless($F[0]~~@s){

			push @s,$F[0];}

		unless($F[1]~~@m){

			push @m,$F[1];}

	END{

	print "Contigs\t".join("\t",@s)."\n";

	for($i=0;$i<@m;$i++){

		print $m[$i];

		for($j=0;$j<@s;$j++){

			(not defined $r{$s[$j].":".$m[$i]})?print "\t".0:print"\t".$r{$s[$j].":".$m[$i]};}

		print "\n";}}'

$ cat test.tsv | ./GENERATEtable.sh

Contigs	contig1	contig2	contig3	contig4	contig5

F1	12.2	0	45.4	23.5	24.5

F2	34.2	56.3	56.3	0	0

F3	45.2	56.2	0	0	0
Now take a look at the generated table:
[uzi@quince-srv2 ~/linuxTutorial]$ head aln-pe.mapped.sorted.bam.gcbias

Contigs	Cdiff078_C01	Cdiff078_C02	Cdiff078_C03	Cdiff078_C04	Cdiff078_C05	Cdiff078_C06	Cdiff078_C07	Cdiff078_C08	Cdiff078_C09	Cdiff078_C10	Cdiff078_C11	Cdiff078_C12	Cdiff078_C13	Cdiff078_C14	Cdiff078_C15	Cdiff078_C16	Cdiff078_C17	Cdiff078_C18	Cdiff078_C19	Cdiff078_C20	Cdiff078_C21	Cdiff078_C22	Cdiff078_C23	Cdiff078_C24	Cdiff078_C25	Cdiff078_C26	Cdiff078_C27	Cdiff078_C28	Cdiff078_C29	Cdiff078_C30	Cdiff078_C31	Cdiff078_C32	Cdiff078_C33	Cdiff078_C34	Cdiff078_C35	Cdiff078_C36	Cdiff078_C37	Cdiff078_C38	Cdiff078_C39	Cdiff078_C40	Cdiff078_C41	Cdiff078_C42	Cdiff078_C43	Cdiff078_C46	Cdiff078_C47	Cdiff078_C48	Cdiff078_C51	Cdiff078_C54	Cdiff078_C56	Cdiff078_C59	Cdiff078_C60

3	0	0	0	0	0	0	0	0	0	0	0	0	0	0	0	0

4	0	0	0	0	0	0	0	0	0	0	0	0	19.855622	0	113.514035	0	0	0	0	0	0	0	0	0	0	0	0	0	0	0

5	0	0	0	0	0	0	0	0	0	5.94012	0	0	9.265957	0	21.189287	0	0	1.013634	0	0	0	0	0	0	0	0	0	0	21.79477	0	0	0	0	0	0	0	0	0	0	0	0	0	0	0	0

6	0	0	0	0	0	0	0	0	0	2.099257	0	0	8.004623	17.472841	0	0	4.059842	0.50366	0	0	1.011679	0	0	3.954422	0	15.404681	0	4.36693	0	1.355168	0	0	0	0	0	0	0	0	0	0

7	0	0	0	0	1.898603	0	0	0	5.621592	3.322151	0	0	1.063016	0	0	0	0.395449	0	0	1.454454	11.850605	1.167889	0	2.616454	0.919685	0.229238	0	0.554199	0	0	2.647623	1.10446	0	0.699548	5.625801	0	3.721214	0	1.484725	0	0	0	0	0	0	0	0	0	23.930557

8	0	0.647487	0	0	5.277073	0	1.787893	0	4.918962	1.302196	5.292116	0	0.73865	2.481033	0	0	0.488503	0	0	1.796704	8.023401	0.270507	0	2.181692	1.27811	1.168119	0	1.625944	0	0	1.672486	1.534896	0.32406	4.34351	0	0.738781	0	0.917049	0	0	0.646285	0	0	0	0	0

9	0	0.2347	0	0	1.275217	0	0.465283	0.362786	3.35627	0.457715	2.237992	0	1.725467	4.796381	0	0	0.885359	0	0.719303	1.9538	3.673656	0.915163	1.311588	1.97216	0.494173	1.283086	0	0.909904	0	0.080909	1.131649	2.225468	0	0.352394	1.259544	0	1.071169	13.719311	1.329643	0.540768	0.765043	0.562234	0	0	0	0	0	0	0	0	8.036611

10	0.818789	0.522956	0	0	1.092856	0.491785	0.512673	0.769493	1.150524	0.794326	2.959123	0	1.437926	1.849716	0	0	0.713225	0.63983	0.739728	1.748817	2.30876	1.411724	0.674416	1.696827	1.355215	1.504252	0.187891	1.361078	0	0.582441	0.997528	2.288661	0	1.147602	0	1.42304	1.223984	4.409023	0.569749	0.463436	0.393384	0.321222	0	0	0	0	0	0	0	0

11	2.714431	0.315217	0	0	0.724603	0.494047	0.247215	0.885474	1.083578	0.904377	2.378187	0	1.954739	0	0	0.50476	0.713456	0	1.226165	1.513891	1.138604	2.795913	1.355035	1.755064	1.697555	1.208937	0.566266	1.204967	0	0.927834	1.018818	1.456152	0	1.04366	0.260253	0.857751	0.848433	0.892897	0.335209	0.829905	0.755116	0	0	0	0	0	0	0	0	2.490848
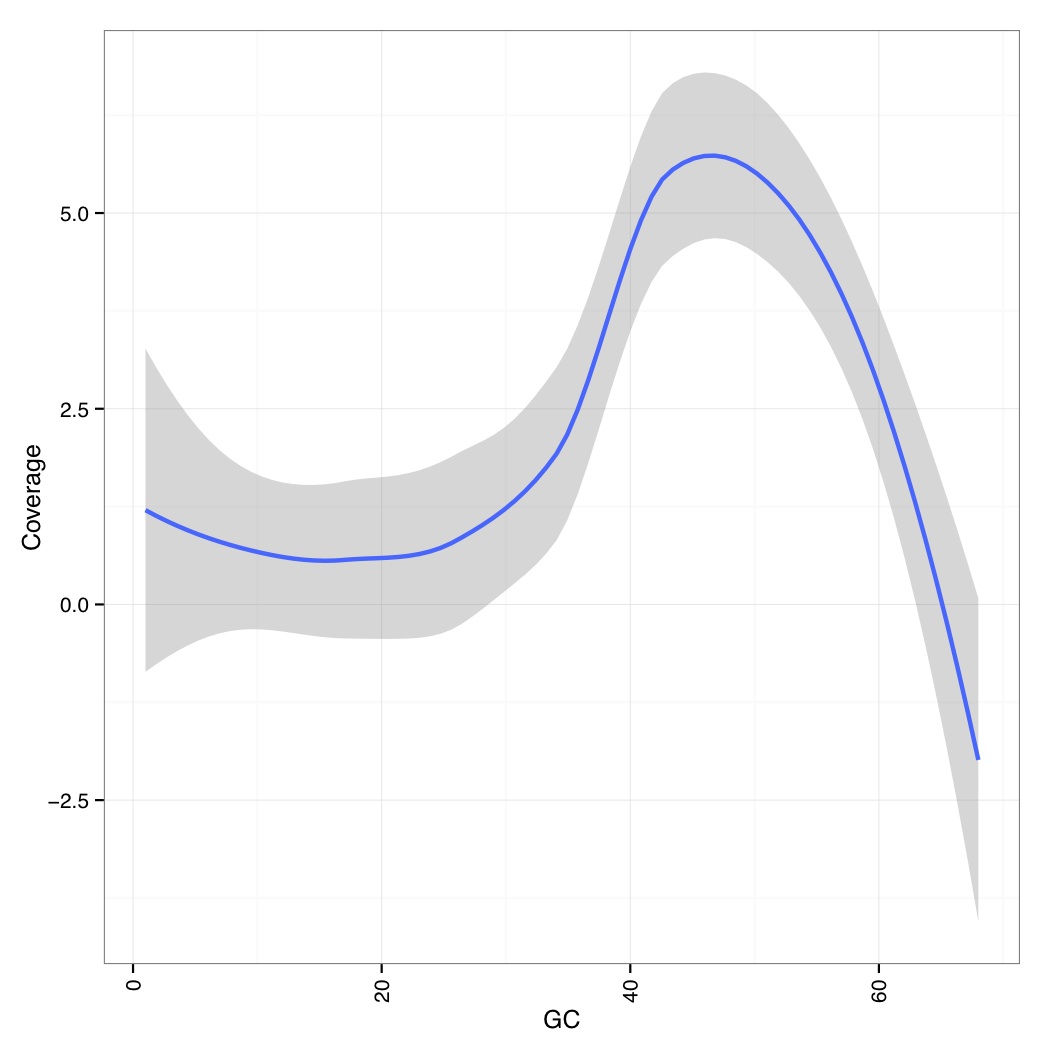
You can then use the following R code to generate a GC vs Coverage table which shows that at very GC, coverages go down (note that these are the smoothed values across all genomes/contigs):
library(ggplot2)

library(reshape)

data_table <- read.csv("aln-pe.mapped.sorted.bam.gcbias",header=TRUE,row.names=1,sep="\t")

df<-NULL

for(i in names(data_table)){

  tmp<-data.frame(rownames(data_table),data_table[,i],rep(i,dim(data_table)[1]))

  if(is.null(df)){df<-tmp}else{df<-rbind(df,tmp)}

}

names(df)<-c("GC","Coverage","Contigs")

df$GC<-as.numeric(df$GC)

p<-ggplot(df,aes(GC,Coverage,group=Contigs)) +

  geom_smooth(aes(group="dummy"),method = "loess", formula = y ~ x, size = 1)+

  theme_bw()+

  theme(axis.text.x=element_text(angle=90,hjust=1,vjust=0.5))+

pdf("aln-pe.mapped.sorted.bam.gcbias.pdf")

print(p)

dev.off()
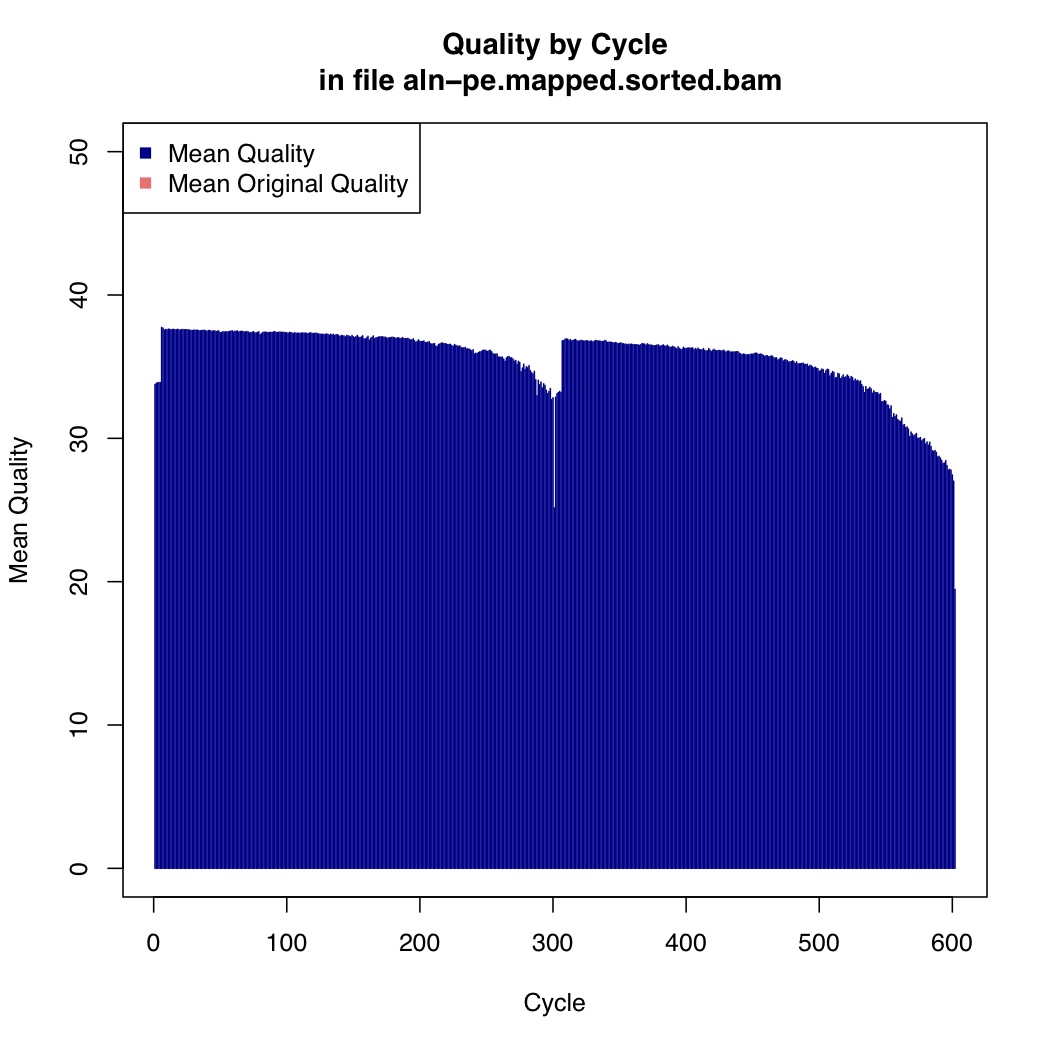
Now we calculate mean quality score by cycle
[uzi@quince-srv2 ~/linuxTutorial]$ java -Xmx2g -jar $(which MeanQualityByCycle.jar) INPUT=aln-pe.mapped.sorted.bam OUTPUT=aln-pe.mapped.sorted.mqc.txt CHART_OUTPUT=aln-pe.mapped.sorted.mqc.pdf
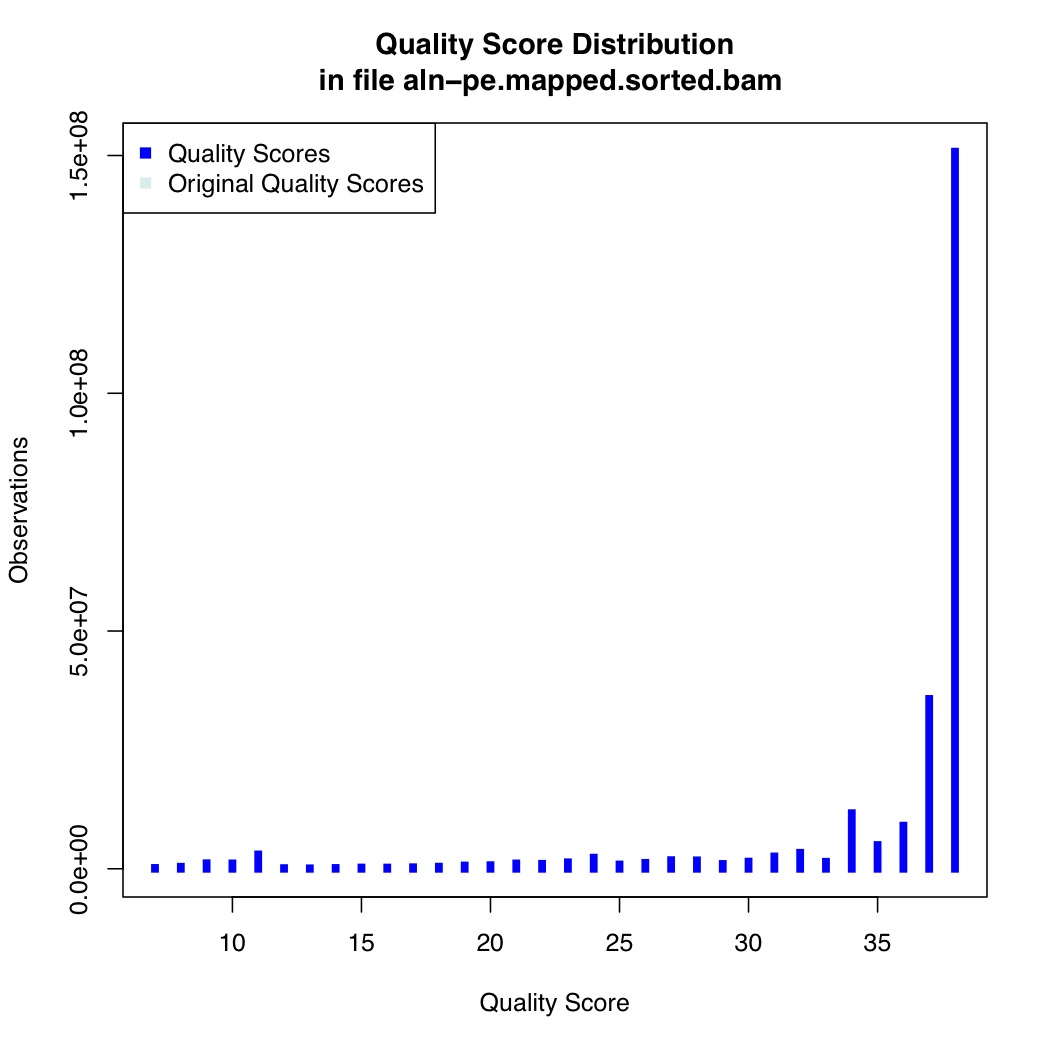
We also calculate quality score distribution
[uzi@quince-srv2 ~/linuxTutorial]$ java -Xmx2g -jar $(which QualityScoreDistribution.jar) INPUT=aln-pe.mapped.sorted.bam OUTPUT=aln-pe.mapped.sorted.qsd.txt CHART_OUTPUT=aln-pe.mapped.sorted.qsd.pdf
Another useful tool is Qualimap which offers Multi-sample BAM QC.
To use it, we need to generate input.txt file which contains listing of BAM files we want to compare. To save time, I am only considering 3 files:
[uzi@quince-srv2 ~/linuxTutorial]$ awk '{split($0,k,".");print k[4]"\t"$0}' <(ls *.sorted.Cdiff078_C4*.bam | head -3) > input.txt

[uzi@quince-srv2 ~/linuxTutorial]$ cat input.txt

Cdiff078_C40	aln-pe.mapped.sorted.Cdiff078_C40.bam

Cdiff078_C41	aln-pe.mapped.sorted.Cdiff078_C41.bam

Cdiff078_C42	aln-pe.mapped.sorted.Cdiff078_C42.bam

[uzi@quince-srv2 ~/linuxTutorial]$ qualimap multi-bamqc -d input.txt -r -outdir qualimap
This will generate a qualimap folder that will contain a multisampleBamQcReport.html file that you can load in your browser. Do check the "PCA" and "Insert Size Histogram" plot.
You can use samtools flagstat to get mapping statistics:
[uzi@quince-srv2 ~/linuxTutorial]$ samtools flagstat aln-pe.bam

850309 + 0 in total (QC-passed reads + QC-failed reads)

0 + 0 duplicates

812269 + 0 mapped (95.53%:-nan%)

850309 + 0 paired in sequencing

425271 + 0 read1

425038 + 0 read2

795935 + 0 properly paired (93.61%:-nan%)

809259 + 0 with itself and mate mapped

3010 + 0 singletons (0.35%:-nan%)

11922 + 0 with mate mapped to a different chr

8256 + 0 with mate mapped to a different chr (mapQ>=5)
With Bioawk, you can do amazing things:
Extracting unmapped reads without headers:
[uzi@quince-srv2 ~/linuxTutorial]$ bioawk -c sam 'and($flag,4)' aln-pe.sam | less

M01808:26:000000000-A6KTK:1:1101:10450:1106     77      *       0       0       *       *       0       0       TTAAAGTTAAACTTGTCATATTCATATCTGATTTTTCTACTAGATTCCTTTAAGTTATCCGAACATGAAGCAAGTAATTTATCCTTAATTAAATTATAGACTTTACTTTCTTTATCAGATAAATCTTTAGCTTTTCCAATACCAGATATAGTAGGAATAATTGCATAGTGGTCTGTAACTTTAGATGAATTAAAAATAGACTTAAAGTTTGATTCATTGATTTTAAAATCTTCTTCAAGTCCTTCTAATAATTCTTTCATAGTATTAACCATATCATTGGTTAAATACCTGCTATCCGTTC   CCCCCGGGGGGGGGGFGFGGGGGGGGGGGGGCEGGGGGFGGGGEFEEGGFEGGGDFFGFGGGFFFGGGGGGFFFGGGGFEFF<fee@cffgc@ffcefgfdfcggg<cfdfgcfgfgadgefafggfggfggggggg<efdgfa<fgffgfffdcefg9egfgffgcffeafgg@fdfggggggcfe=efgggggffffggge9@=egggffffefgggddfgffgg,edfgggggfggggfgggggdfgggggggdgggdfg7ffcffcgf?cc7cffffffaccefafgfa@e5@e8@) as:i:0="" xs:i:0="" m01808:26:000000000-a6ktk:1:1101:10450:1106="" 141="" *="" 0="" gatctcactaccttacaaagagagtcaaataaatattttgggtattcagcaaatgatactttaaatctagcacaaagtttgtatgaaaagaagctaatcacatatccaagcacggatagcaggtatttaaccactgatatggttaatactatgaaagaattattagaaggacttgaagaagattttaaaatcaatgaatcaaactttaagtctatttttaattcatctaaagttacagaccactatgcaattattcctactctatctggtattggaaaagctaaagatttatctgataa="" cccccgggfffggggfgg@dggggggggfgggggggfggggggggffcefgfffgcefgggggggggga@fgggd8ffgggggggfggg8ffgf8egggggggfgggggf,b@bc@cceggggggggggggff,efggdfgggg9ffgggggggggd,9efgggggf9="">EBFGGGC>FGGFBFGGGFDF,@DEEFCFGGGGGGGGCEF,?EGFGGGFDFGGFGGFDCDFFGFFDFFFBFBFFGFFGEFFAAFCEFFFFF5@09*2?EE@A*>@AEF5@):=>E;EB**9:495*     AS:i:0  XS:i:0

M01808:26:000000000-A6KTK:1:1101:10136:1113     77      *       0       0       *       *       0       0       CTATTGGAACAAGTGGGGAACTGCAGTCGCCTAACAGAGAATATATTCGTTATCGAATTACATTATCTACTCAAGACACCAGTAGAACTCCTAAACTTCTTGAAATACAACTACATGATATACCAAAACCTCCTTATGAGAGACTTGGATTTGCAAGACCAGTTGTGTTGGATACTAACGGGGCTTGGGAAGCAGTGTTAGAAAATGCCTTTGATATTGTAGTAACAAGTGAAGTAAATGGCGCTGATATTCTGGAGTTTAAACTGCCATTTCATGATTCCAAGCGAGAGACATTAGACA    CCCCCGGGGEGGF<fffeggffggggfegfgcggggafgffgggfgfcfgggggfgggggggggggggggggggggggggfgggggggggggfggg:< span="">
Extracting mapped reads with headers:
[uzi@quince-srv2 ~/linuxTutorial]$ bioawk -c sam -H '!and($flag,4)' aln-pe.sam | less

@SQ     SN:Cdiff078_C01 LN:9165

@SQ     SN:Cdiff078_C02 LN:93786

@SQ     SN:Cdiff078_C03 LN:752

@SQ     SN:Cdiff078_C04 LN:5361

@SQ     SN:Cdiff078_C05 LN:70058

@SQ     SN:Cdiff078_C06 LN:23538

@SQ     SN:Cdiff078_C07 LN:98418

@SQ     SN:Cdiff078_C08 LN:361074

@SQ     SN:Cdiff078_C09 LN:45183

@SQ     SN:Cdiff078_C10 LN:141523

@SQ     SN:Cdiff078_C11 LN:21992

@SQ     SN:Cdiff078_C12 LN:2353

@SQ     SN:Cdiff078_C13 LN:133975

@SQ     SN:Cdiff078_C14 LN:3374

@SQ     SN:Cdiff078_C15 LN:9744

@SQ     SN:Cdiff078_C16 LN:25480

:
Create FASTA from BAM (uses revcomp if FLAG & 16):
[uzi@quince-srv2 ~/linuxTutorial]$ samtools view aln-pe.bam | bioawk -c sam '{ s=$seq; if(and($flag, 16)) {s=revcomp($seq) } print ">"$qname"\n"s}' | less

>M01808:26:000000000-A6KTK:1:1101:19201:1002

NAAAAGAACTGGCAATTGAAAATAATATACCTGTATATCAACCAGTAAAGGCTAGAGATAAAGAATTTATAGATACAATTAAATCTTTAAATCCAGATGTAATAGTAGTTGTAGCTTTTGGACAGATACTTCCAAAAGGAATATTAGAGATTCCTAAGTTTGGATGTATAAATGTTCATGTTTCTTTACTTCCAAAATATAGAGGTGCGGCACCTATAAATTGGGTAATAATAAATGGTGAAGAAAAGACTGGTGTTACAACTATGTATATGGATGAAGGTCTAGATACTGGA

>M01808:26:000000000-A6KTK:1:1101:19201:1002

NCCAGTATCTAGACCTTCATCCATATACATAGTTGTAACACCAGTCTTTTCTTCACCATTTATTATTACCCAATTTATAGGTGCCGCACCTCTATATTTTGGAAGTAAAGAAACATGAACATTTATACATCCAAACTTAGGAATCTCTAATATTCCTTTTGGAAGTATCTGTCCAAAAGCTACAACTACTATTACATCTGGATTTAAAGATTTAATTGTATCTATAAATTCTTTATCTCTAGCCTTTACTGGTTGATATACAGGTATATTATTTTCAATTGCCAGTTCTTTTA

>M01808:26:000000000-A6KTK:1:1101:12506:1003

NAAAGATATTATTTTTAGCCCTGGTGTTGTACCTGCTGTTGCTATTTTAGTAAGAATATTAACTAATTCTAATGAAGGCGTGATAATTCAAAAGCCAGTGTATTACCCATTTGAAGCTAAGGTAAAGAGTAATAATAGGGAAGTTGTAAACAATCCTCTAATATATGAAAATGGGACTTATAGAATGGATTATGATGATTTGGAAGAAAAAGCTAAGTGTAGCAACAATAAAGTACTGATACTTTGTAGCCCTCACAATCCTGTTGGAAGAGTTTGGAGAGAAGATGAATTAAAAAAGGTT

>M01808:26:000000000-A6KTK:1:1101:12506:1003

NAGATTAAATGTTTTACTTGGAGCTATACATGTAACTATTTTATCCTTGTACTCTGGGCATAATGACTGTAAAGGAGTATGTTTAAATCCTTTTCTAATTAAATCAGAATGTATCTCATCAGCTATTATCCATAGGTCATATTTTTTACATATTTCTACAACCTTTTTTAATTCATCTTCTCTCCAAACTCTTCCAACAGGATTGTGAGGGCTACAAAGTATCAGTACTTTATTGTTGCTACACTTAGCTTTTTCTTCCAAATCATCATAATCCATTCTATAAGTCCCATTTTCATATATT

:
Get %GC content from reference FASTA file:
[uzi@quince-srv2 ~/linuxTutorial]$ bioawk -c fastx '{ print ">"$name; print gc($seq) }' data/Cdiff078.fa | less

>Cdiff078_C01

0.28096

>Cdiff078_C02

0.307669

>Cdiff078_C03

0.514628

>Cdiff078_C04

0.26898

>Cdiff078_C05

0.291059

>Cdiff078_C06

0.286006

>Cdiff078_C07

0.282794

>Cdiff078_C08

0.289484

:
Get the mean Phred quality score from a FASTQ file:
[uzi@quince-srv2 ~/linuxTutorial]$ bioawk -c fastx '{ print ">"$name; print meanqual($qual) }' data/M120_S2_L001_R1_001.fastq | less

>M01808:26:000000000-A6KTK:1:1101:19201:1002

37.3788

>M01808:26:000000000-A6KTK:1:1101:12506:1003

36.9867

>M01808:26:000000000-A6KTK:1:1101:19794:1003

37.1694

>M01808:26:000000000-A6KTK:1:1101:20543:1021

37.01

>M01808:26:000000000-A6KTK:1:1101:14616:1037

33.9133

>M01808:26:000000000-A6KTK:1:1101:10885:1044

35.9502

:
You want to see how many sequences are shorter (less than 1000bp?)
[uzi@quince-srv2 ~/linuxTutorial]$ bioawk -cfastx 'BEGIN{ s = 0} {if (length($seq) < 1000) s += 1} END {print "Shorter sequences", s}' data/Cdiff078.fa

Shorter sequences	12
You can count sequences very effectively with Bioawk, because NR now stores number of records:
[uzi@quince-srv2 ~/linuxTutorial]$ bioawk -cfastx 'END{print NR}' data/630_S4_L001_R1_001.fastq

329396
Further Reading
In the context of the exercises, it will be helpful if you could read through the following online tutorials, though it is not essential:
Bash tutorial (https://jack.logicalsystems.it/homepage/techinfo/Guida-Bash.txt)
Awk oneliners (http://www.pement.org/awk/awk1line.txt)
Sed oneliners (http://sed.sourceforge.net/sed1line.txt)
Perl oneliners (http://www.catonmat.net/download/perl1line.txt)
VI tutorial (http://www.nanocontact.cz/~trunec/education/unix/vi-tutor.txt)
You can also check my other one-liners specific to NGS data processing here:
Perl one-liners
Extracting information from GBK files
Bash one-liners for extracting enzyme information from annotated GBK files
Identifying duplicates in two FASTA files (awk)
Converting "Sample[TAB]Feature[TAB]Abundance" list to tab-delimited abundance table
Dereplicating Reads
Paired-end assembler
Subsampling FASTA and FASTQ files
Getting linkage information (reads that map to multiple contigs/genomes) from SAM files
Extracting subset of records from FASTA/FASTQ files based on exact/pattern matches of IDs
Spatial comparison of read qualities between different sequencing runs (Illumina paired-end reads)
Extracting 16S rRNA sequences from NCBI's locally installed nt database using blastdbcmd
Resolving NCBI Taxonomy using BioSQL
Generating abundance tables and trees from CREST and RDP classifiers
Linux command line exercises for NGS data processing的更多相关文章
- [笔记]The Linux command line
Notes on The Linux Command Line (by W. E. Shotts Jr.) edited by Gopher 感觉博客园是不是搞了什么CSS在里头--在博客园显示效果挺 ...
- Linux Command Line 解析
Linux Command Line 解析 0 处理模型 Linux kernel的启动包括很多组件的初始化和相关配置,这些配置参数一般是通过command line进行配置的.在进行后续分析之前,先 ...
- 5 Ways to Send Email From Linux Command Line
https://tecadmin.net/ways-to-send-email-from-linux-command-line/ We all know the importance of email ...
- 《The Linux Command Line》 读书笔记04 Linux用户以及权限相关命令
Linux用户以及权限相关命令 查看身份 id:Display user identity. 这个命令的输出会显示uid,gid和用户所属的组. uid即user ID,这是账户创建时被赋予的. gi ...
- 《The Linux Command Line》 读书笔记02 关于命令的命令
<The Linux Command Line> 读书笔记02 关于命令的命令 命令的四种类型 type type—Indicate how a command name is inter ...
- 《The Linux Command Line》 读书笔记01 基本命令介绍
<The Linux Command Line> 读书笔记01 基本命令介绍 1. What is the Shell? The Shell is a program that takes ...
- Linux Command Line Basics
Most of this note comes from the Beginning the Linux Command Line, Second Edition by Sander van Vugt ...
- 15 Examples To Master Linux Command Line History
When you are using Linux command line frequently, using the history effectively can be a major produ ...
- 10 Interesting Linux Command Line Tricks and Tips Worth Knowing
I passionately enjoy working with commands as they offer more control over a Linux system than GUIs( ...
随机推荐
- 五、Mosquitto 高级应用之权限管理
本文将讲解 Mosquitto 权限管理.如果还没有搭建 Mosquitto 服务的可以参考我的另外两篇文章<< 一.Mosquitto 介绍&安装>> << ...
- sdut2193救基友记3(三维)
http://acm.sdut.edu.cn/sdutoj/problem.php?action=showproblem&problemid=2193 救基友记3 Time Limit: 10 ...
- mysql数据库给别人访问权限
注:本操作是在WIN命令提示符下,phpMyAdmin同样适用. 用户:phplamp 用户数据库:phplampDB 1.新建用户. //登录MYSQL @>mysql -u root -p ...
- springmvc学习笔记一框架的理解
SpringMVC现在在很多公司都很流行,所以这个框架对我们来说,是很重要的. 首先我们对比mvc来分析springmvc这个框架是怎么设计,以及它的工作的流程. 首先来看mvc: 1. 用户发起r ...
- UNIX历史
一.Multics计划 1965年,AT&T贝尔电话实验室.通用电气公司.麻省理工学院MAC课题组一起联合开发一个称为Multics的新操作系统. Multics 系统的目标是要向大的用户团体 ...
- Lower Power with CPF(四)
CPF从Front-end到Back-end(RTL--GDSII)的整个流程: 1)Creating a CPF file:来在前端就建立lower power的规范. 2)检查CPF文件的正确性, ...
- suiyi
<?php namespace app\controllers; use Yii;use app\models\Device;use app\models\DeviceSearch;use ap ...
- EditPlus 4.3.2555 中文版已经发布
新的版本修复了之前版本出现的多行文本缩进调整的问题. 下载连接在页面左上角!
- vue 渲染页面的时候 出现闪烁问题的解决办法
在使用vue绑定数据的时候,渲染页面时会出现变量闪烁 <div id="h_cameraman" v-cloak> <public-nav> {{ msg ...
- linux常用命令:free 命令
free命令可以显示Linux系统中空闲的.已用的物理内存及swap内存,及被内核使用的buffer.在Linux系统监控的工具中,free命令是最经常使用的命令之一. 1.命令格式: free [参 ...