nagios - 环境搭建
㈠ 公共服务监控
㈡ 实现资源监控
㈢ 图形化MRTG
===============================
nagios-安装
安装前准备
创建用户和用户组
# groupadd -r nagios

# useradd -r -c "user for nagios" -s /bin/bash -g nagios nagios
需开启MTA服务。应该先安装完 http 服务再安装 nagios 。
安装nagios
# cd nagios-3.2
# ./configure --prefix=/opt/nagios --with-mail=/bin/mail --with-httpd-conf=/etc/httpd/conf.d --with-init-dir=/etc/rc.d/init.d
# make all
# make install
用来安装主程序,CGI 和HTML 文件
# make install-init
创建启动脚本
# make install-commandmode
配置目录权限
# make install-config
安装示例配置文件
# make install-web *①
安装示例配置文件;需要在配置的时候指定apache的安装目录。
|
① 执行后,报错。错误是,“没有对应的规则”。<nagios-3.2.3.tar.gz> # vi Makefile /^install-web #在这查看后是应该执行[# make install-webconf] |
安装后目录介绍
|
PREFIX/bin可执行程序所在目录 PREFIX/etc配置文件所在目录 PREFIX/sbin CGI 文件所在目录,即执行外部命令所需文件目录 PREFIX/share 网页文件所在目录 PREFIX/libexec 外部插件所在目录 PREFIX/var 日志文件、lock 等文件 PREFIX/var/archives 日志自动归档目录 PREFIX/var/rw 存放外部命令文件的目录 |
安装nagios插件
# cd nagios-plugins-1.5

# ./configure --prefix=/opt/nagios

# make

# make install

# cd nagios-cn-3.2

# ./configure

# make all

# make install
安装配置web服务
注意:nagios 在nagios-3.1.x 版本以后,配置web 监控界面时需要php 的支持。安装
# cd httpd-2.0.

# ./configure --prefix=/opt/apache2

# make

# make install

# cd php-5.3.

# ./configure --prefix=/opt/php --with-apxs2=/opt/apache2/bin/apxs

# make

# make install
配置
# vi /opt/nagios/conf/httpd.conf        (添加或修改)

User nagios

Group nagios

LoadModule php5_module modules/libphp5.so

DirectoryIndex index.html index.php

AddType application/x-httpd-php .php
为了安全,一般让nagios 的web 监控界面必须经过授权才能访问,这需要增加验证配置,于是修改httpd.conf,添加:
#Setting for nagios

ScriptAlias /nagios/cgi-bin “/opt/nagios/sbin”

    <Directory “/opt/nagios/sbin”>

        AuthType Basic

        Options ExecCGI

        AllowOverrideNone

        Order allow,deny

        Allow from all

        AuthName “Nagios Access”

        AuthUserFile /opt/nagios/etc/htpasswds        (名字比下边多个“s”)

        Require valid-user

    </Directory>

Alias /nagios “/opt/nagios/share”

    <Directory “/opt/nagios/share”>

        AuthType Basic

        Options None

        AllowOverride None

        Order allow,deny

        Allow from all

        AuthName “Nagios Managements”

        AuthUserFile /opt/nagios/etc/htpasswd

        Require valid-user

    </Directory>

附件中有自动生成的格式:

# SAMPLE CONFIG SNIPPETS FOR APACHE WEB SERVER

#

# This file contains examples of entries that need

# to be incorporated into your Apache web server

# configuration file.  Customize the paths, etc. as

# needed to fit your system.

ScriptAlias /nagios/cgi-bin "/usr/nagios/sbin"

<Directory "/usr/nagios/sbin">

#  SSLRequireSSL

   Options ExecCGI

   AllowOverride None

   Order allow,deny

   Allow from all

#  Order deny,allow

#  Deny from all

#  Allow from 127.0.0.1

   AuthName "Nagios Access"

   AuthType Basic

   AuthUserFile /usr/nagios/etc/htpasswd.users

   Require valid-user

</Directory>

Alias /nagios "/usr/nagios/share"

<Directory "/usr/nagios/share">

#  SSLRequireSSL

   Options None

   AllowOverride None

   Order allow,deny

   Allow from all

#  Order deny,allow

#  Deny from all

#  Allow from 127.0.0.1

   AuthName "Nagios Access"

   AuthType Basic

   AuthUserFile /usr/nagios/etc/htpasswd.users

   Require valid-user

</Directory>
创建apache 目录验证文件
# /opt/nagios/bin/htpasswd -c -s /opt/nagios/etc/htpasswd admin

# /opt/nagios/bin/htpasswd -c -s /opt/nagios/etc/htpasswds root

# chown -R nagios.nagios /opt/nagios
启动服务
# /usr/local/apache2/bin/apachectl start

# /etc/init.d/nagios start

# ps -ef
===============================
NRPE
上边的安装过程可以实现公共服务的监控。如果需要监控到远程主机的本地资源,就需要这里再进行nrpe的安装设置。
安装
check_nrpe 插件工作于 nagios server 端。安装 nrpe守护进程在被监控端(远程主机)。nagios server
执行 check_nrpe 插件,联系 nrpe 守护进程,获取远程主机的本地资源信息并反馈给nagios server。
|
nagios:中央红军5人工作小组。 check_nrpe:中央军委。 nrpe守护进程(NRPE):野战军指挥员。 |
nagios server 主机名:提示符 “# ”
远程主机(NRPE):提示符 “hhh# ”
服务端和客户端都执行:提示符“&# ”
hhh# vi /etc/services
| nrpe 5666/tcp # NRPE |
hhh# useradd -s /sbin/nologin nagios
&# cd /usr/src/nrpe-1.5
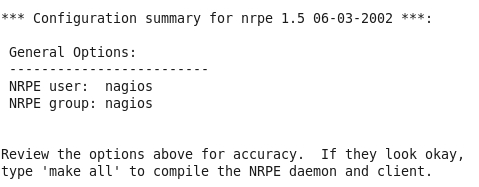
&# ./configure --prefix=/usr/local/nagios
这里指定 “--prefix” 不是必须的,这里完成的安装是手工完成的。编译后,目录里有个文件可以用来在被监控端管理 nrpe 服务:“init-script”。这里体现了自由软件是多么的自由啊。

上图最后一行显示,编译出的同时有守护进程和插件;server 端和 client 端都要执行一次编译安装。
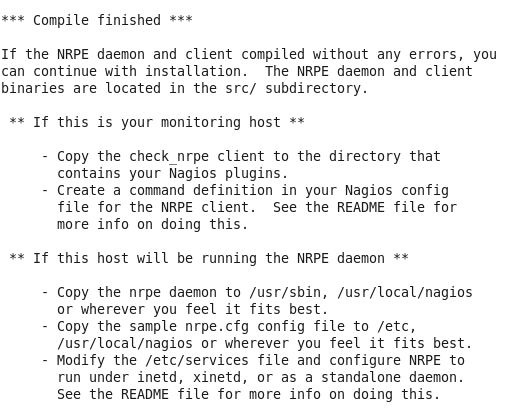
&# make all

上图显示编译得到服务端程序和客户端程序:nrpe check_nrpe。服务端采用服务托管(不是必然)。
托管方式有两种,任选其一;就是系统使用的是那一个。centos 6使用的是xined(这里默认)。
| * ①xinetd ②inetd |
*① hhh# vi /etc/xinet.d/nrpe

        # default: on
        # description: NRPE
        service nrpe
        {
                flags           = REUSE
                socket_type     = stream
                wait            = no
                user            = nagios
                server          = /usr/sbin/nrpe
                server_args     = -i /etc/nrpe.cfg
                log_on_failure  += USERID
                disable         = no
only_from = 192.168.0.180
# 192.168.0.180 是 nagios server 的 IP 地址。
}
*② hhh# vi /etc/inetd.conf (增加以下内容)
#nrpe stream tcp nowait <user> /usr/sbin/tcpd <nrpebin> -i <nrpecfg>
nrpe stream tcp nowait nagios /usr/sbin/nrpe -i /etc/nrpe.cfg
hhh# cp nrpe.cfg /etc/

hhh# cp src/nrpe /usr/sbin/

# cp src/check_nrpe /usr/local/nagios/libexec/

# chown nagios.nagios /usr/local/nagios/libexec/check_nrpe

hhh# nrpe -d /etc/nrpe.cfg        (测试服务进程是否可以正常启动;实际使用还是托管的好。)

hhh# netstat -nltp                        (随系统启动如果不想托管,这么个演示也就给出答案了。)

hhh# lsof -i:

hhh# vi /etc/nrpe.cfg            (这个文件还需要进一步配置才能得到想要的结果。略)
|
服务的启动停止 *① hhh# /etc/rc.d/init.d/xinetd restart | start | stop *② hhh# /etc/rc.d/init.d/xinetd restart | start | stop hhh# /usr/sbin/nrpe -d /etc/nrpe.cfg hhh# netstat -nltp | grep nrpe hhh# kill 4366 |
# vi /usr/local/nagios/etc/objects/command.cfg (添加以下内容)
define command{
        command_name    check_nrpe
        command_line    $USER1$/check_nrpe $HOSTADDRESS$ -c $ARG1$
        }
测试nrpe工作状态(本地测试和服务端测试)
hhh# ./check_nrpe localhost -p             (使用默认端口的话不用指定“-p ”)

# ./check_nrpe 192.168.0.180 -p
……………………………………………………
* 有些资料显示该插件使用时需要“-H”指定指定主机IP,这个就看该插件的语法了。
被监控端(远程主机)需要安装一次插件。
如果测试不成功,需要检查配置文件,是否配置正确。略
===============================
MRTG
|
MRTG安装配置启动 |
*******************
生成 nagios 性能状态图
# vi /usr/src/nagios-3.2/sample-config/mrtg.cfg

节选一段,可以跟下边要修改的地方做个对比。
# cp /usr/src/nagios-3.2/sample-config/mrtg.cfg /usr/local/mrtg /etc/mrtg/nagios.mrtg

# cat /etc/mrtg/nagios.mrtg >> /etc/mrtg/mrtg.cfg

# vi /usr/src/nagios-3.2/sample-config/mrtg.cfg.in

这个路径需要弄得合适。
# cp /usr/src/nagios-3.2/sample-config/mrtg.cfg.in /usr/local/mrtg /etc/mrtg/nagios.mrtg2

# cat /etc/mrtg/nagios.mrtg2 >> /etc/mrtg/mrtg.cfg

# vi /usr/local/apache2/conf.d/mrtg.conf

Alias /mrtg /usr/local/httpd/htdocs/mrtg_nagios

<Directory>

......
*******************
over !
nagios - 环境搭建的更多相关文章
- .NET Core系列 : 1、.NET Core 环境搭建和命令行CLI入门
2016年6月27日.NET Core & ASP.NET Core 1.0在Redhat峰会上正式发布,社区里涌现了很多文章,我也计划写个系列文章,原因是.NET Core的入门门槛相当高, ...
- Azure Service Fabric 开发环境搭建
微服务体系结构是一种将服务器应用程序构建为一组小型服务的方法,每个服务都按自己的进程运行,并通过 HTTP 和 WebSocket 等协议相互通信.每个微服务都在特定的界定上下文(每服务)中实现特定的 ...
- rnandroid环境搭建
react-native 环境搭建具体步骤这个大家已经玩烂了,这个主要是记录下来自己做win7系统遇到的坑 1.com.android.ddmlib.installexception 遇到这个问题,在 ...
- python开发环境搭建
虽然网上有很多python开发环境搭建的文章,不过重复造轮子还是要的,记录一下过程,方便自己以后配置,也方便正在学习中的同事配置他们的环境. 1.准备好安装包 1)上python官网下载python运 ...
- springMVC初探--环境搭建和第一个HelloWorld简单项目
注:此篇为学习springMVC时,做的笔记整理. MVC框架要做哪些事情? a,将url映射到java类,或者java类的方法上 b,封装用户提交的数据 c,处理请求->调用相关的业务处理—& ...
- 【定有惊喜】android程序员如何做自己的API接口?php与android的良好交互(附环境搭建),让前端数据动起来~
一.写在前面 web开发有前端和后端之分,其实android还是有前端和后端之分.android开发就相当于手机app的前端,一般都是php+android或者jsp+android开发.androi ...
- Nexus(一)环境搭建
昨天,成功搭建了自己的 Maven 环境(详见:Maven(一)环境搭建),今天就来研究和探讨下 Nexus 的搭建! 使用背景: 安装环境:Windows 10 -64位 JDK版本:1.7 Mav ...
- 「译」JUnit 5 系列:环境搭建
原文地址:http://blog.codefx.org/libraries/junit-5-setup/ 原文日期:15, Feb, 2016 译文首发:Linesh 的博客:环境搭建 我的 Gith ...
- appium+robotframework环境搭建
appium+robotframework环境搭建步骤(Windows系统的appium自动化测试,只适用于测试安卓机:ios机需要在mac搭建appium环境后测试) 搭建步骤,共分为3部分: 一. ...
随机推荐
- .NET 中什么样的类是可使用 await 异步等待的?
我们已经知道 Task 是可等待的,但是去看看 Task 类的实现,几乎找不到哪个基类.接口或者方法属性能够告诉我们与 await 相关. 而本文将探索什么样的类是可使用 await 异步等待的? D ...
- python笔记-6(import导入、time/datetime/random/os/sys模块)
一.了解模块导入的基本知识 此部分此处不展开细说import导入,仅写几个点目前的认知即可.其它内容待日后有深入理解了再来细说 1.import可以导入的两种不同的内容 1.1 *.py文件结尾的文件 ...
- 做Global Admin
globaladmin.4budget@nokia.com 10:22 https://ultima.int.net.nokia.com/eedb/Solutions/tools/ManageUser ...
- ballerina 学习二十九 数据库操作
ballerina 数据操作也是比较方便的,官方也我们提供了数据操作的抽象,但是我们还是依赖数据库驱动的. 数据库驱动还是jdbc模式的 项目准备 项目结构 ├── mysql_demo │ ├── ...
- stenciljs 学习四 组件装饰器
stenciljs 可以方便的构建交互式组件 支持以下装饰器 component prop watch state method element component 说明 component 包含ta ...
- BZOJ 1845三角形面积并
题目链接:http://www.lydsy.com:808/JudgeOnline/problem.php?id=1845 给定100个三角形,求三角形面积并. 戴神模板太可怕.直接调用函数秒掉.思路 ...
- ThinkPHP 更新 5.0.23 和 5.1.31
ThinkPHP 更新 5.0.23 和 5.1.31 FastAdmin 也跟着更新. V1.0.0.20181210_beta 修复 ThinkPHP5.0发布了一个重要安全更新,强烈建议更新 修 ...
- FastAdmin 开发时对数据库进行版本管理 (非 think-migration)
因为开必项目,暂时还不没用 think-migration,先用 脚本处理. 在导出 SQL 时将相关字段数据还原,比如 admin logitime updatetime token. 把 admi ...
- Linux & Oracle目录说明
/bin:存放着一百多个Linux下常用的命令.工具 /dev:存放着Linux下所有的设备文件! /home:用户主目录,每建一个用户,就会在这里新建一个与用户同名的目录,给该用户一个自己的空间 ...
- Python之包管理工具:distutils、setuptools、distribute、setup.py、easy_install、easy_install、pip
在安装Python包的过程中,经常涉及到distutils.setuptools.distribute.setup.py.easy_install.easy_install和pip等等. 介绍:htt ...
