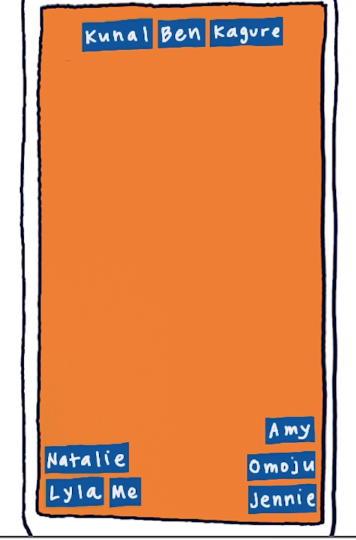
RelativeLayout.LayoutParams
通过id设置相对兄弟元素对齐。

<RelativeLayout

    xmlns:android="http://schemas.android.com/apk/res/android"

    android:layout_width="match_parent"

    android:layout_height="match_parent">

    <TextView

        android:id="@+id/lyla_text_view"

        android:layout_width="wrap_content"

        android:layout_height="wrap_content"

        android:layout_alignParentBottom="true"

        android:layout_alignParentLeft="true"

        android:textSize="24sp"

        android:text="Lyla" />

    <TextView

        android:id="@+id/me_text_view"

        android:layout_width="wrap_content"

        android:layout_height="wrap_content"

        android:layout_alignParentBottom="true"

        android:layout_toRightOf="@id/lyla_text_view"

        android:textSize="24sp"

        android:text="Me" />

    <TextView

        android:id="@+id/natalie_text_view"

        android:layout_width="wrap_content"

        android:layout_height="wrap_content"

        android:layout_above="@id/lyla_text_view"

        android:textSize="24sp"

        android:text="Natalie" />

    <TextView

        android:id="@+id/jennie_text_view"

        android:layout_width="wrap_content"

        android:layout_height="wrap_content"

        android:layout_alignParentBottom="true"

        android:layout_alignParentRight="true"

        android:textSize="24sp"

        android:text="Jennie" />

    <TextView

        android:id="@+id/omoju_text_view"

        android:layout_width="wrap_content"

        android:layout_height="wrap_content"

        android:layout_alignParentRight="true"

        android:layout_above="@id/jennie_text_view"

        android:textSize="24sp"

        android:text="Omoju" />

    <TextView

        android:id="@+id/amy_text_view"

        android:layout_width="wrap_content"

        android:layout_height="wrap_content"

        android:layout_alignParentBottom="true"

        android:layout_above="@id/omoju_text_view"

        android:layout_alignParentRight="true"

        android:textSize="24sp"

        android:text="Amy" />

    <TextView

        android:id="@+id/ben_text_view"

        android:layout_width="wrap_content"

        android:layout_height="wrap_content"

        android:layout_alignParentTop="true"

        android:layout_centerHorizontal="true"

        android:textSize="24sp"

        android:text="Ben" />

    <TextView

        android:id="@+id/kunal_text_view"

        android:layout_width="wrap_content"

        android:layout_height="wrap_content"

        android:layout_alignParentTop="true"

        android:layout_toLeftOf="@id/ben_text_view"

        android:textSize="24sp"

        android:text="Kunal" />

    <TextView

        android:id="@+id/kagure_text_view"

        android:layout_width="wrap_content"

        android:layout_height="wrap_content"

        android:layout_alignParentTop="true"

        android:layout_alignParentRight="true"

        android:layout_toRightOf="@id/ben_text_view"

        android:textSize="24sp"

        android:text="Kagure" />

</RelativeLayout>
相对兄弟节点(id)放置
XML属性 |
|
|---|---|
android:layout_above |
将此视图的下边缘定位在给定锚点视图ID上方。 |
android:layout_alignBaseline |
将此视图的基线定位在给定锚点视图ID的基线上。 |
android:layout_alignBottom |
使此视图的下边缘与给定锚点视图ID的下边缘匹配。 |
android:layout_alignEnd |
使此视图的结束边缘与给定锚点视图ID的结束边缘匹配。 |
android:layout_alignLeft |
使此视图的左边缘与给定锚点视图ID的左边缘匹配。 |
android:layout_alignParentBottom |
如果为true,则使此视图的下边缘与父级的下边缘匹配。 |
android:layout_alignParentEnd |
如果为true,则使此视图的结束边缘与父级的结束边缘匹配。 |
android:layout_alignParentLeft |
如果为true,则使此视图的左边缘与父窗口的左边缘匹配。 |
android:layout_alignParentRight |
如果为true,则使此视图的右边缘与父级的右边缘匹配。 |
android:layout_alignParentStart |
如果为true,则使此视图的起始边缘与父级的起始边缘匹配。 |
android:layout_alignParentTop |
如果为true,则使此视图的上边缘与父级的上边缘匹配。 |
android:layout_alignRight |
使此视图的右边缘与给定锚点视图ID的右边缘匹配。 |
android:layout_alignStart |
使此视图的起始边缘与给定锚点视图ID的起始边缘匹配。 |
android:layout_alignTop |
使此视图的上边缘与给定锚点视图ID的上边缘匹配。 |
android:layout_alignWithParentIfMissing |
如果设置为true,则在无法找到layout_toLeftOf,layout_toRightOf等的锚点时,父项将用作锚点。 |
android:layout_below |
将此视图的上边缘定位在给定锚点视图ID下方。 |
android:layout_centerHorizontal |
如果为true,则将此子项水平居中于其父级。 |
android:layout_centerInParent |
如果为true,则将此子项在其父级中水平和垂直居中。 |
android:layout_centerVertical |
如果为true,则将此子项垂直居中于其父项中。 |
android:layout_toEndOf |
将此视图的起始边缘定位到给定锚点视图ID的末尾。 |
android:layout_toLeftOf |
将此视图的右边缘定位在给定锚点视图ID的左侧。 |
android:layout_toRightOf |
将此视图的左边缘定位到给定锚点视图ID的右侧。 |
android:layout_toStartOf |
将此视图的结束边缘定位到给定锚点视图ID的开头。 |
RelativeLayout.LayoutParams的更多相关文章
- RelativeLayout.LayoutParams.addRule()方法
1.应用场景 在使用RelativeLayout布局的时候,通常在载入布局之前在相关的XML文件中进行静态设置即可.但是,在有些情况下,我们需要动态的设置布局 的属性,在不同条件下设置不同的布局排列方 ...
- Android 动态改变布局属性RelativeLayout.LayoutParams.addRule()
我们知道,在 RelativeLayout 布局中有很多特殊的属性,通常在载入布局之前,在相关的xml文件中进行静态设置即可. 但是,在有些情况下,我们需要动态设置布局的属性,在不同的条件下设置不同的 ...
- 代码中动态改变布局属性RelativeLayout.LayoutParams.addRule()
我们知道,在 RelativeLayout 布局中有很多特殊的属性,通常在载入布局之前,在相关的xml文件中进行静态设置即可. 但是,在有些情况下,我们需要动态设置布局的属性,在不同的条件下设置不同的 ...
- java.lang.ClassCastException: android.widget.RelativeLayout$LayoutParams cannot be cast to android.widget.AbsListView$LayoutParams
java.lang.ClassCastException: android.widget.RelativeLayout$LayoutParams cannot be cast to android.w ...
- java.lang.ClassCastException android.widget.RelativeLayout LayoutParams 异常
1.在xml布局文件如下所示: <RelativeLayout android:layout_width="match_parent" android:layout_heig ...
- 用代码设置 RelativeLayout.LayoutParams
1.注意 不能在RelativeLayout容器本身和他的子元素之间产生循环依赖,比如说,不能将RelativeLayout的高设置成为WRAP_CONTENT的时候将子元素的高设置成为 ALIGN_ ...
- Exception: java.lang.ClassCastException: android.widget.RelativeLayout$LayoutParams
RelativeLayout title_bg = (RelativeLayout)FTU_Bluetooth.this.findViewById(R.id.titlebar); LinearLayo ...
- 为什么relativelayout.layoutParams的width为-1
源码里看下就知道了.. -1不代表宽度,代表MATCH_PARENT常量的值public static final int FILL_PARENT = -1; public static final ...
- java写RelativeLayout 的属性
有时项目需要动态的调整一下布局,需要改变一些view的位置属性等等. 直接下代码 RelativeLayout.LayoutParams params=new RelativeLayout.Layou ...
随机推荐
- Python学习笔记(六)—— 条件判断
一.语法 if <条件判断1>: <执行1> elif <条件判断2>: <执行2> elif <条件判断3>: <执行3> e ...
- 图片标注工具LabelImg使用教程
1.进入labelImg-master文件夹,在空白处使用 “Shift+鼠标右键” ,选择在此处打开命令窗口,依次输入下面语句即可打开软件. pyrcc4 -o resources.py resou ...
- 【Linux】分割命令split
如果你有文件太大,导致一些携带式装置无法复制的问题,嘿嘿!找 split 就对了! 他可以帮你将一个大文件,依据文件大小或行数来分割,就可以将大文件分割成为小文件了! 快速又有效啊!真心不错- [ro ...
- Config程序配置文件操作实践进阶之ConfigurationSectionGroup
今天又进一步对System.Configuration下的ConfigurationSectionGroup类及相关的类与方法进行了研究.发现要构建多层次嵌套的XML标签 则必须用到Configura ...
- OpenCV 学习笔记 02 处理文件、摄像头和图形用户界面
在处理文件前需要引入OpenCV库,同时也引入unmpy库 import cv2 import numpy as np 1 基本的读写操作 1.1 图像文件的读写操作 1.1.1 图像文件的读取操作 ...
- 【转】标准C++类std::string的内存共享和Copy-On-Write技术
1. 概念 Scott Meyers在<More Effective C++>中举了个例子,不知你是否还记得?在你还在上学的时候,你的父母要你不要看电视,而去复习功 ...
- CListCtrl行高问题最终解决方法
原文链接: http://blog.csdn.net/benny5609/article/details/1967078 解决方案: 1. 设置List Control的属性 Owen Draw Fi ...
- 开关电源9v,1A
- postman 定义并使用全局变量
第一步:找到并打开右上角的设置图案 第二步,点击“Global” 按钮 第三步.如图所示,定义全局变量,然后点击“save”即可 第四步:如何使用全局变量,只需要 {{ key }} 即可,如图所示 ...
- 如何在Android Studio中添加注释模板信息?
如何在Android Studio中添加注释模板信息? 在开发程序的时候,我们一般都会给文件自动添加上一些关于文件的注释信息,比如开发者的名字,开发的时间,开发者的联系方式等等.那么在android ...
