config相关操作(转)
转自:http://www.cnblogs.com/kissdodog/archive/2013/04/16/3025315.html,这是一个专题,感觉比较好,有空可以看与一下
System.ConfigurationManager类用于对配置文件的读取。其具有的成员如下:
一、AppSettings
AppSetting是最简单的配置节,读写非常简单。
| 名称 | 说明 |
| AppSettings | 获取当前应用程序默认配置的 AppSettingsSection 数据 |
| ConnectionStrings | 获取当前应用程序默认配置的 ConnectionStringsSection 数据 |

<?xml version="1.0" encoding="utf-8" ?>

<configuration>

  <appSettings>

    <add key="DB" value="Access" />

  </appSettings>

  <connectionStrings>

    <add name="connstr" connectionString="Provider=Microsoft.Jet.OLEDB.4.0;Data Source=F:\C#Code\DBOperation\ykjj.mdb"/>

  </connectionStrings>

</configuration>
示例:
    class Program

    {

        static void Main(string[] args)

        {

            string strAppSettings = System.Configuration.ConfigurationManager.AppSettings["DB"];  //通过属性索引获取值

            Console.WriteLine(strAppSettings);

            string strConnection = System.Configuration.ConfigurationManager.ConnectionStrings["connstr"].ToString();

            Console.WriteLine(strConnection);

            Console.ReadKey();

        }

    }

对于以上这一个appSettings与connectionStrings都是由ConfigurationManager提供的两个属性来读取的。通常大多数的配置信息都可以放在appSettings里。但是如果你觉得不够用了,你还可以使用自定义配置信息。
二、自定义配置节
1、自带Handler
关于自定义配置节,Configuration提供了很多Handler类来供你选择使用。甚至如果你觉得不够,还可以自定义处理Handler。
先来学下使用怎么使用三个简单的Handler:
- System.Configuration.NameValueSectionHandler
- System.Configuration.DictionarySectionHandler
- System.Configuration.SingleTagSectionHandler
配置文件代码示例:
<?xml version="1.0" encoding="utf-8" ?>

<configuration>

  <configSections>

    <section name="Person" type="System.Configuration.NameValueSectionHandler"/> <!--以NameValue键值/对的形式返回配置节中的信息-->

    <section name="Man" type="System.Configuration.DictionarySectionHandler"/>  <!--以Dictionary字典键值对的形式返回配置节中的信息-->

    <section name="Name" type="System.Configuration.SingleTagSectionHandler" /> <!--基础结构。处理 .config 文件中由单个 XML 标记所表示的各配置节。-->

  </configSections>

  <Person>

    <add key="老大" value="刘备" />

    <add key="老二" value="关羽" />

    <add key="老三" value="张飞" />

  </Person>

  <Man>

    <add key="老大" value="曹操" />

    <add key="老二" value="典韦" />

    <add key="老三" value="郭嘉" />

  </Man>

  <Name one="1" two="2" three="3" four="4" five="5" /> <!--注意是要单个节SingleTagSectionHandler才能处理,但是无论你索性有多少个也能处理-->

</configuration>
读取代码示例:
static void Main(string[] args)

{

    //读取人名

    NameValueCollection nvc = (NameValueCollection)ConfigurationManager.GetSection("Person");

    foreach (string key in nvc.AllKeys)

    {

        Console.WriteLine(key + ":" + nvc[key]);

    }

    //读取男人

    IDictionary dict = (IDictionary)ConfigurationManager.GetSection("Man");

    foreach (string key in dict.Keys)

    {

        Console.WriteLine(key + ":" + dict[key]);

    }

   Hashtable dic1 =(Hashtable)ConfigurationManager.GetSection("Name");

    foreach (string key in dict1.Keys)

    {

        Console.WriteLine(key + ":" + dict1[key]);

    }

    Console.ReadKey();

}
输出结果如下:

2、自定义Handler
自定义读取节点需要实现接口IConfigurationSectionHandler,并提供Create的具体实现。
Appconfig代码:
<?xml version="1.0" encoding="utf-8" ?>

<configuration>

  <configSections>    <!--后面的type是处理处理节点PersonHandler所在的位置第二个参数是程序集,你可以不要Version开始之后的-->

      <section name="Person" type="ConsoleApplication1.PersonHandler,ConsoleApplication1,Version=1.0.0.0,Culture=neutral,PublicKeyToken=null" allowLocation="true" allowDefinition="Everywhere" />

  </configSections>

  <Person age="23" name="刘备" />

</configuration>
主程序代码:
class Program
{
static void Main(string[] args)
{
Hashtable config = ConfigurationManager.GetSection("Person") as Hashtable;
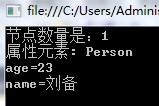
Console.WriteLine("节点数量是:" + config.Count);
//2重键值对的方式,其中deKey又可以再次转化为一个Hashtable
foreach (DictionaryEntry deKey in config)
{
Console.WriteLine("属性元素: " + deKey.Key.ToString());
Hashtable attribs = (Hashtable)deKey.Value;
foreach (DictionaryEntry deAttrib in attribs)
{
Console.WriteLine(deAttrib.Key.ToString() + "=" + deAttrib.Value.ToString());
}
} Console.ReadKey();
}
} //注意必须要实现IConfigurationSectionHandler接口
class PersonHandler : IConfigurationSectionHandler
{
public object Create(object parent, object configContext, System.Xml.XmlNode section)
{
Hashtable myConfig = new Hashtable();
// 本节元素,获取的任何属性。
Hashtable myAttribs = new Hashtable();
//遍历当前节点的属性
foreach (XmlAttribute attrib in section.Attributes)
{
//如果当前节点是属性节点,则添加进入myAttribs
if (XmlNodeType.Attribute == attrib.NodeType)
{
myAttribs.Add(attrib.Name, attrib.Value);
}
}
//把当前属性节点集合添加进myConfig
myConfig.Add(section.Name, myAttribs);
return myConfig;
}
}
输出结果如下:
这样的配置代码看起来还是有点吃力,毕竟Hashtable的层次有两层。
3、property属性的方式读取
- 使用这种方法,需要自定义一个类,并且要继承自ConfigurationSection基类。ConfigurationProperty的构造函数中传入的name字符串将会用于config文件中,表示各参数的属性名称。
- 属性的值的读写要调用this[]或base[],由基类去保存,请不要自行设计Field来保存。
- 为了能使用配置节点能被解析,需要在<configSections>中注册: <section name="Person" type="ConsoleApplication1.PersonSection,ConsoleApplication1,Version=1.0.0.0,Culture=neutral,PublicKeyToken=null" allowLocation="true" allowDefinition="Everywhere" /> ,且要注意name="Person"要与<Person ..... >是对应的。
先来看看配置文件的写法:
<?xml version="1.0" encoding="utf-8" ?>

<configuration>

  <configSections>    <!--后面的type是处理处理节点PersonSection所在的位置第二个参数是程序集,你可以不要Version开始之后的-->

      <section name="Person" type="ConsoleApplication1.PersonSection,ConsoleApplication1,Version=1.0.0.0,Culture=neutral,PublicKeyToken=null" allowLocation="true" allowDefinition="Everywhere" />

  </configSections>

  <Person age="23" name="刘备" />

</configuration>
然后程序代码:
    class Program

    {

        static void Main(string[] args)

        {

            PersonSection person = ConfigurationManager.GetSection("Person") as PersonSection;

            Console.WriteLine("name={0},age={1}", person.Age, person.Name);

            Console.ReadKey();

        }

    }

    //注意 这里是继承自System.Configuration.ConfigurationSection了

    class PersonSection : System.Configuration.ConfigurationSection

    {

        [ConfigurationProperty("age", IsRequired = false, DefaultValue = 0)]

        public int Age

        {

            get { return (int)base["age"]; }

            set { base["age"] = value; }

        }

        [ConfigurationProperty("name", IsRequired = false, DefaultValue = "")]

        public string Name

        {

            get { return (string)base["name"]; }

            set { base["name"] = value; }

        }

    }
输出结果如下:

4、配置子元素
对于稍微在复杂一点的结构,子元素的Model类要继承自ConfigurationElement。
config文件代码:
<?xml version="1.0" encoding="utf-8" ?>

<configuration>

  <configSections>

    <section name="complex" type="ConsoleApplication1.ComplexSection,ConsoleApplication1"/>

  </configSections>

  <complex height="182">

    <child firstName="张" lastName="飞"/>

  </complex>

</configuration>
主程序代码:
  class Program

    {

        static void Main(string[] args)

        {

            ComplexSection sec = ConfigurationManager.GetSection("complex") as ComplexSection;

            Console.WriteLine(sec.Height);          //访问属性

            Console.WriteLine(sec.Child.FirstName); //访问子节点属性

            Console.WriteLine(sec.Child.LastName);  //访问子节点属性

            Console.ReadKey();

        }

    }

    public class ComplexSection : ConfigurationSection

    {

        [ConfigurationProperty("height", IsRequired = true)]

        public int Height

        {

            get { return (int)base["height"]; }

            set { base["height"] = value; }

        }

        [ConfigurationProperty("child", IsDefaultCollection = false)]

        public ChildSection Child

        {

            get { return (ChildSection)base["child"]; }

            set { base["child"] = value; }

        }

    }

    public class ChildSection : ConfigurationElement

    {

        [ConfigurationProperty("firstName", IsRequired = true, IsKey = true)]

        public string FirstName

        {

            get { return (string)base["firstName"]; }

            set { base["firstName"] = value; }

        }

        [ConfigurationProperty("lastName", IsRequired = true)]

        public string LastName

        {

            get { return (string)base["lastName"]; }

            set { base["lastName"] = value; }

        }

    }
输出结果如图所示:

5、配置文件中的CDATA
有时候,在配置文件里可能会包含一些比较复杂的代码段,这时候就要用到XML的CDATA了。
<?xml version="1.0" encoding="utf-8" ?>

<configuration>

  <configSections>

    <section name="MySection" type="ConsoleApplication1.MySection, ConsoleApplication1" />

  </configSections>

  <MySection>

    <HTML>

      <![CDATA[

          <div style="# font-size:24px">加粗显示</div>

      ]]>

    </HTML>

    <SQL>

      <![CDATA[

          SELECT TOP 10 * FROM Person

      ]]>

    </SQL>

  </MySection>

</configuration>
主程序代码如下:
namespace ConsoleApplication1

{

    class Program

    {

        static void Main(string[] args)

        {

            MySection section = ConfigurationManager.GetSection("MySection") as MySection;

            Console.WriteLine("{0}{1}", section.HTML.CommandText, section.SQL.CommandText);

            Console.ReadKey();

        }

    }

    //注意 这里是继承自System.Configuration.ConfigurationSection了

    class MySection : System.Configuration.ConfigurationSection

    {

        [ConfigurationProperty("HTML", IsRequired = false)]

        public MyTextElement HTML

        {

            get { return (MyTextElement)base["HTML"]; }

            set { base["HTML"] = value; }

        }

        [ConfigurationProperty("SQL", IsRequired = false)]

        public MyTextElement SQL

        {

            get { return (MyTextElement)base["SQL"]; }

            set { base["SQL"] = value; }

        }

    }

    public class MyTextElement : ConfigurationElement

    {

        protected override void DeserializeElement(System.Xml.XmlReader reader, bool serializeCollectionKey)

        {

            CommandText = reader.ReadElementContentAs(typeof(string), null) as string;

        }

        protected override bool SerializeElement(System.Xml.XmlWriter writer, bool serializeCollectionKey)

        {

            if (writer != null)

            {

                writer.WriteCData(CommandText);

            }

            return true;

        }

        [ConfigurationProperty("data", IsRequired = false)]

        public string CommandText

        {

            get { return this["data"].ToString(); }

            set { this["data"] = value; }

        }

    }

}
输出如下:

6、配置元素Collection
类似下面的配置方式,在ASP.NET的HttpHandler, HttpModule中太常见了。
<?xml version="1.0" encoding="utf-8" ?>

<configuration>

  <configSections>

    <section name="MySection" type="ConsoleApplication1.MySection, ConsoleApplication1" />

  </configSections>

  <MySection>

    <add key="a" value="刘备"></add>

    <add key="b" value="关羽"></add>

    <add key="c" value="张飞"></add>

  </MySection>

</configuration>
实现代码如下:
    class Program

    {

        static void Main(string[] args)

        {

            MySection section = ConfigurationManager.GetSection("MySection") as MySection;

            foreach (MyKeyValueSetting add in section.KeyValues)

            {

                Console.WriteLine(add.Key + ":" + add.Value);

            }

            Console.ReadKey();

        }

    }

    public class MySection : ConfigurationSection    // 所有配置节点都要选择这个基类

    {

        private static readonly ConfigurationProperty s_property = new ConfigurationProperty(string.Empty, typeof(MyKeyValueCollection), null, ConfigurationPropertyOptions.IsDefaultCollection);

        [ConfigurationProperty("", Options = ConfigurationPropertyOptions.IsDefaultCollection)]

        public MyKeyValueCollection KeyValues

        {

            get

            {

                return (MyKeyValueCollection)base[s_property];

            }

        }

    }

    [ConfigurationCollection(typeof(MyKeyValueSetting))]

    public class MyKeyValueCollection : ConfigurationElementCollection        // 自定义一个集合

    {

        // 基本上,所有的方法都只要简单地调用基类的实现就可以了。

        public MyKeyValueCollection() : base(StringComparer.OrdinalIgnoreCase)    // 忽略大小写

        {

        }

        // 其实关键就是这个索引器。但它也是调用基类的实现,只是做下类型转就行了。

        new public MyKeyValueSetting this[string name]

        {

            get { return (MyKeyValueSetting)base.BaseGet(name); }

        }

        // 下面二个方法中抽象类中必须要实现的。

        protected override ConfigurationElement CreateNewElement()

        {

            return new MyKeyValueSetting();

        }

        protected override object GetElementKey(ConfigurationElement element)

        {

            return ((MyKeyValueSetting)element).Key;

        }

        // 说明:如果不需要在代码中修改集合,可以不实现Add, Clear, Remove

        public void Add(MyKeyValueSetting setting)

        {

            this.BaseAdd(setting);

        }

        public void Clear()

        {

            base.BaseClear();

        }

        public void Remove(string name)

        {

            base.BaseRemove(name);

        }

    }

    public class MyKeyValueSetting : ConfigurationElement    // 集合中的每个元素

    {

        [ConfigurationProperty("key", IsRequired = true)]

        public string Key

        {

            get { return this["key"].ToString(); }

            set { this["key"] = value; }

        }

        [ConfigurationProperty("value", IsRequired = true)]

        public string Value

        {

            get { return this["value"].ToString(); }

            set { this["value"] = value; }

        }

    }
输出如下:

小结:
1. 为每个集合中的参数项创建一个从ConfigurationElement继承的派生类。
2. 为集合创建一个从ConfigurationElementCollection继承的集合类,具体在实现时主要就是调用基类的方法。
3. 在创建ConfigurationSection的继承类时,创建一个表示集合的属性就可以了,注意[ConfigurationProperty]的各参数。
7、配置节点的写入
写入配置节点的示例如下:
    Configuration config = ConfigurationManager.OpenExeConfiguration(ConfigurationUserLevel.None);

    PersonSection Section = config.GetSection("Person") as PersonSection;

    Section.Name = "撼地神牛";

    Section.Age = 10000;

    config.Save();

    ConfigurationManager.RefreshSection("Person");  //让修改之后的结果生效
在修改配置节点前,我们需要调用ConfigurationManager.OpenExeConfiguration(),然后调用config.GetSection()在得到节点后,转成我们定义的节点类型, 然后就可以按照强类型的方式来修改我们定义的各参数项,最后调用config.Save();即可。
注意:
- .net为了优化配置节点的读取操作,会将数据缓存起来,如果希望使用修改后的结果生效,您还需要调用ConfigurationManager.RefreshSection(".....")。
- 如果是修改web.config,则需要使用 WebConfigurationManager。
8、读取.Net Framework中已经定义的节点
.Net Framework已定义节点的读取很简单:
  <system.web>

    <httpModules>

      <add name="ScriptModule" type="System.Web.Handlers.ScriptModule, System.Web.Extensions, Version=3.5.0.0, Culture=neutral, PublicKeyToken=31BF3856AD364E35"/>

      <add name="UrlRoutingModule" type="System.Web.Routing.UrlRoutingModule, System.Web.Routing, Version=3.5.0.0, Culture=neutral, PublicKeyToken=31BF3856AD364E35"/>

    </httpModules>

  </system.web>
主程序如下:
public ActionResult Index()

    {

        HttpModulesSection section = ConfigurationManager.GetSection("system.web/httpModules") as HttpModulesSection;

        foreach (HttpModuleAction action in section.Modules)

        {

            Response.Write(action.Name + "<br/>");

        }

        return Content("");

    }
输出如下:

注意,连服务器上mechine里面的配置都会一起读出来。
在Web.config里是只读的,写不了,而非Web程序的写与上面的例子一样,此处不再复述。
config相关操作(转)的更多相关文章
- python三大框架之一flask中cookie和session的相关操作
状态保持 Cookie cookie 是指某些网站为了 辨别 用户身份,进行会话跟踪而储存在用户本地的数据(通常会经过加密),复数形式是 coolies. cookie是由服务器端生成,发送给客户端 ...
- 【快学Docker】Docker镜像相关操作
前言 镜像是Docker的三大核心概念之一(另外两个分别是:容器和仓库). Docker运行容器前需要本地存在镜像,如果本地不存在镜像,Docker则会尝试从远端仓库拉去镜像.镜像是Docker一大核 ...
- Spark-读写HBase,SparkStreaming操作,Spark的HBase相关操作
Spark-读写HBase,SparkStreaming操作,Spark的HBase相关操作 1.sparkstreaming实时写入Hbase(saveAsNewAPIHadoopDataset方法 ...
- Phoenix简介概述,Phoenix的Java API 相关操作优秀案例
Phoenix简介概述,Phoenix的Java API 相关操作优秀案例 一.Phoenix概述简介 二.Phoenix实例一:Java API操作 2.1 phoenix.properties 2 ...
- openresty 学习笔记三:连接redis和进行相关操作
openresty 学习笔记三:连接redis和进行相关操作 openresty 因其非阻塞的调用,令服务器拥有高性能高并发,当涉及到数据库操作时,更应该选择有高速读写速度的redis进行数据处理.避 ...
- 从零自学Hadoop(20):HBase数据模型相关操作上
阅读目录 序 介绍 命名空间 表 系列索引 本文版权归mephisto和博客园共有,欢迎转载,但须保留此段声明,并给出原文链接,谢谢合作. 文章是哥(mephisto)写的,SourceLink 序 ...
- 从零自学Hadoop(21):HBase数据模型相关操作下
阅读目录 序 变量 数据模型操作 系列索引 本文版权归mephisto和博客园共有,欢迎转载,但须保留此段声明,并给出原文链接,谢谢合作. 文章是哥(mephisto)写的,SourceLink 序 ...
- 理解CSV文件以及ABAP中的相关操作
在很多ABAP开发中,我们使用CSV文件,有时候,关于CSV文件本身的一些问题使人迷惑.它仅仅是一种被逗号分割的文本文档吗? 让我们先来看看接下来可能要处理的几个相关组件的词汇的语义. Separat ...
- Liunx下的有关于tomcat的相关操作 && Liunx 常用指令
先记录以下liunx下的有关于tomcat的相关操作 查看tomcat进程: ps-ef|grep java (回车) 停止tomcat进程: kill -9 PID (进程号如77447) (回车) ...
随机推荐
- NetBean 远程开发的好文1 --> NetBeans的远程Linux C开发实践
from: http://blog.csdn.net/jacktan/article/details/9268535 一直以来总觉得NetBeans生活在Eclipse的阴影下,同样做为一款不错的基 ...
- POJ 1040 Transportation
链接:http://poj.org/problem?id=1040 Transportation Time Limit: 1000MS Memory Limit: 10000K Total Submi ...
- android 4.0 禁用系统home键
2.2 禁用系统home键.这里不说了. 近期项目有一个需求,禁用系统的全部键.像menu, home, back.同一时候还要是想点击响应与view的弹出. 就是UI这部分要正常. back键我们自 ...
- mui 本地打包
第一步:下载HBuilder离线打包Android版SDK 网址:http://ask.dcloud.net.cn/article/38 第二步:导入项目 启动带ADT的eclipse程序,菜单中选择 ...
- 用Python实现邮件发送Hive明细数据
代码地址如下:http://www.demodashi.com/demo/12673.html 一.需求描述 客户需要每周周一接收特定的活动数据,生成Excel或是CSV文件,并通过邮件发送给指定接收 ...
- zabbix客户端安装shadowscoks客户端监控访问google网站
配置zabbix客户端配置文件 vim /etc/zabbix/zabbix_agentd.conf 添加 Include=/etc/zabbix/zabbix_agentd.d/ 添加脚本探测访问 ...
- C#写csv文件
1.在项目中经常需要把报表下载为csv格式的文件,如何在C#中写csv文件,以下为一个简化的例子,不使用任何控件,旨在说明用法. 前端view 下载结果 2.创建一个MVC项目(Intranet Ap ...
- E - Hangover(1.4.1)
Time Limit:1000MS Memory Limit:10000KB 64bit IO Format:%I64d & %I64u Submit cid=1006#sta ...
- linux内核参数分析
这是原来在51cto写的,现在都转到博客园来了 1.time_wait连接数过多,需要调整内核参数 http://blog.renhao.org/2010/07/setup-linux-kernel- ...
- hdu 4417,poj 2104 划分树(模版)归并树(模版)
这次是彻底把划分树搞明确了,与此同一时候发现了模版的重要性.敲代码一个字符都不能错啊~~~ 划分树具体解释:点击打开链接 题意:求一组数列中随意区间不大于h的个数. 这个题的做法是用二分查询 求给定 ...