centos7.3上用源代码安装zabbix3.2.7
安装zabbix之前请自行先搭建好LAMP环境!
1、下载源码安装包并解压
1.1 下载
[root@nmserver- ~]# mkdir zabbix

[root@nmserver- ~]# cd zabbix/

[root@nmserver- zabbix]# wget https://nchc.dl.sourceforge.net/project/zabbix/ZABBIX%20Latest%20Stable/3.2.7/zabbix-3.2.7.tar.gz

---- ::--  https://nchc.dl.sourceforge.net/project/zabbix/ZABBIX%20Latest%20Stable/3.2.7/zabbix-3.2.7.tar.gz

正在解析主机 nchc.dl.sourceforge.net (nchc.dl.sourceforge.net)... 211.79.60.17, :e10:ffff:1f02::

正在连接 nchc.dl.sourceforge.net (nchc.dl.sourceforge.net)|211.79.60.17|:... 已连接。

已发出 HTTP 请求,正在等待回应...  OK

长度: (15M) [application/x-gzip]

正在保存至: “zabbix-3.2..tar.gz”

%[===================================================================================================================>] ,,   195KB/s 用时 82s

-- :: ( KB/s) - 已保存 “zabbix-3.2..tar.gz” [/])
1.2 解压
[root@nmserver- zabbix]# ls

zabbix-3.2..tar.gz

[root@nmserver- zabbix]# tar -zxvf zabbix-3.2..tar.gz
2、创建zabbix数据库
zabbix server 、zabbix proxy及zabbix前端运行需要数据库支持,因此要提前创建好数据库和各种表格;
参考官方文档:https://www.zabbix.com/documentation/3.2/manual/appendix/install/db_scripts
2.1 创建zabbix数据库
[root@nmserver- zabbix-3.2.]# mysql -uroot -p

Enter password:

Welcome to the MariaDB monitor.  Commands end with ; or \g.

Your MariaDB connection id is

Server version: 5.5.-MariaDB MariaDB Server

Copyright (c) , , Oracle, MariaDB Corporation Ab and others.

Type 'help;' or '\h' for help. Type '\c' to clear the current input statement.

MariaDB [(none)]> create database zabbix character set utf8 collate utf8_bin;

Query OK,  row affected (0.00 sec)

MariaDB [(none)]> grant all privileges on zabbix.* to zabbix@localhost identified by 'zabbix';

Query OK,  rows affected (0.03 sec)

MariaDB [(none)]> show databases;

+--------------------+

| Database           |

+--------------------+

| information_schema |

| mysql              |

| performance_schema |

| zabbix             |

+--------------------+

 rows in set (0.03 sec)

MariaDB [(none)]>
2.2 系统创建zabbix用户
#groupadd zabbix -g    #创建用户组,并且设置UID501

#useradd -g zabbix -u  -m zabbix
注意一定要创建不然后面的zabbix服务会启动不了,出现以下问题
问题一:
[root@nmserver- zabbix-3.2.]# /usr/local/zabbix/sbin/zabbix_agentd

zabbix_agentd []: user zabbix does not exist

zabbix_agentd []: cannot run as root!
问题二:
[root@nmserver- zabbix-3.2.]# /etc/init.d/zabbix_agentd start

Starting zabbix_agentd (via systemctl):                    [  确定  ]

[root@nmserver- zabbix-3.2.]# /etc/init.d/zabbix_agentd status

● zabbix_agentd.service - SYSV: Starts and stops Zabbix Agent using chkconfig

   Loaded: loaded (/etc/rc.d/init.d/zabbix_agentd; bad; vendor preset: disabled)

   Active: active (exited) since 日 -- :: CST; 5s ago

     Docs: man:systemd-sysv-generator()

  Process:  ExecStart=/etc/rc.d/init.d/zabbix_agentd start (code=exited, status=/SUCCESS)

7月  :: nmserver-.test.com systemd[]: Starting SYSV: Starts and stops Zabbix Agent using chkconfig...

7月  :: nmserver-.test.com zabbix_agentd[]: Starting zabbix_agentd:  zabbix_agentd []: user zabbix does not exist

7月  :: nmserver-.test.com zabbix_agentd[]: zabbix_agentd []: cannot run as root!

7月  :: nmserver-.test.com zabbix_agentd[]: [失败]

7月  :: nmserver-.test.com systemd[]: Started SYSV: Starts and stops Zabbix Agent using chkconfig.
2.3 创建数据库表格
进入解压源码后的 /zabbix-3.2.7/database/mysql 目录;
[root@nmserver- zabbix]# ls

zabbix-3.2.  zabbix-3.2..tar.gz

[root@nmserver- zabbix]# pwd

/root/zabbix

[root@nmserver- zabbix]# cd zabbix-3.2./database/mysql/

[root@nmserver- mysql]# pwd

/root/zabbix/zabbix-3.2./database/mysql

[root@nmserver- mysql]# ls

data.sql  images.sql  schema.sql

[root@nmserver- mysql]#
2.4 将源码包中的角本导入zabbix数据库
[root@nmserver- mysql]# pwd

/root/zabbix/zabbix-3.2./database/mysql

[root@nmserver-7 mysql]# mysql -uzabbix -pzabbix  zabbix < schema.sql

[root@nmserver-7 mysql]# mysql -uzabbix -pzabbix  zabbix < images.sql

[root@nmserver-7 mysql]# mysql -uzabbix -pzabbix  zabbix < data.sql

[root@nmserver- mysql]# mysql -uzabbix -p

Enter password:

Welcome to the MariaDB monitor.  Commands end with ; or \g.

Your MariaDB connection id is

Server version: 5.5.-MariaDB MariaDB Server

Copyright (c) , , Oracle, MariaDB Corporation Ab and others.

Type 'help;' or '\h' for help. Type '\c' to clear the current input statement.

MariaDB [(none)]> use zabbix;

Reading table information for completion of table and column names

You can turn off this feature to get a quicker startup with -A

Database changed

MariaDB [zabbix]> show tables;

+----------------------------+

| Tables_in_zabbix           |

+----------------------------+

| acknowledges               |

| actions                    |

| alerts                     |

| application_discovery      |

| application_prototype      |

| application_template       |

| applications               |

....................
....................
....................
|

| users_groups               |

| usrgrp                     |

| valuemaps                  |

+----------------------------+

 rows in set (0.00 sec)

MariaDB [zabbix]>
可见数据库及表格已经成功创建完成;
3、编译安装
3.1 编译
./configure --help 可以查询编译时可选参数;
[root@nmserver- zabbix]# cd zabbix-3.2.

[root@nmserver- zabbix-3.2.]# ./configure --help

`configure' configures Zabbix 3.2.7 to adapt to many kinds of systems.
 .................
 .................
我这里只安装zabbix server 和zabbix agentd 服务器,参考官方的编译参数 代码如下:
[root@nmserver- mysql]# cd /root/zabbix/zabbix-3.2.

[root@nmserver- zabbix-3.2.]# ./configure --enable-server --enable-agent --with-mysql --enable-ipv6 --with-net-snmp --with-libcurl --with-libxml --prefix=/usr/local/zabbix
安装路径根据需要修改--prefix参数
第一次编译时时出现问题“configure: error: LIBXML2 library not found” 如下

解决方法:
[root@nmserver- zabbix-3.2.]# yum install libxml2-devel

已加载插件:fastestmirror

Loading mirror speeds from cached hostfile

正在解决依赖关系

--> 正在检查事务

---> 软件包 libxml2-devel.i686.0.2.9.1-.el7_2. 将被 安装

--> 正在处理依赖关系 xz-devel,它被软件包 libxml2-devel-2.9.-.el7_2..i686 需要

--> 正在检查事务

---> 软件包 xz-devel.i686.0.5.2.2-.el7 将被 安装

--> 解决依赖关系完成

...   ...
...   ...
再次编译出现以下问题:
checking for pkg-config... /bin/pkg-config

checking pkg-config is at least version 0.9.... yes

checking for xml2-config... /bin/xml2-config

checking for xmlReadMemory in -lxml2... yes

checking for net-snmp-config... no

configure: error: Invalid Net-SNMP directory - unable to find net-snmp-config
解决方法如下:
[root@nmserver- zabbix-3.2.]# yum install net-snmp-devel
安装完毕后进行第三次编译,编译成功!
[root@nmserver- zabbix-3.2.]# ./configure --enable-server --enable-agent --with-mysql --enable-ipv6 --with-net-snmp --with-libcurl --with-libxml2 --prefix=/usr/local/zabbix

checking for a BSD-compatible install... /bin/install -c

checking whether build environment is sane... yes

checking for a thread-safe mkdir -p... /bin/mkdir -p

checking for gawk... gawk

checking whether make sets $(MAKE)... yes

checking whether make supports nested variables... yes

configure: Configuring Zabbix 3.2.

checking whether make sets $(MAKE)... (cached) yes

checking build system type... i686-pc-linux-gnu

checking host system type... i686-pc-linux-gnu

checking for gcc... gcc

......

......
......

Configuration:

  Detected OS:           linux-gnu

  Install path:          /usr/local/zabbix

  Compilation arch:      linux

  Compiler:              gcc

  Compiler flags:         -g -O2

  Library-specific flags:

    database:               -I/usr/include/mysql

    libXML2:               -I/usr/include/libxml2

    Net-SNMP:               -I/usr/local/include -I/usr/lib/perl5/CORE -I. -I/usr/include

  Enable server:         yes

  Server details:

    With database:         MySQL

    WEB Monitoring:        cURL

    Native Jabber:         no

    SNMP:                  yes

    IPMI:                  no

    SSH:                   no

    TLS:                   no

    ODBC:                  no

    Linker flags:             -L/usr/lib/mysql        -L/usr/lib      -rdynamic

    Libraries:               -lmysqlclient      -lxml2    -lnetsnmp      -lcurl -lm -ldl  -lresolv

  Enable proxy:          no

  Enable agent:          yes

  Agent details:

    TLS:                   no

    Linker flags:              -rdynamic

    Libraries:                 -lcurl -lm -ldl  -lresolv

  Enable Java gateway:   no

  LDAP support:          no

  IPv6 support:          yes

***********************************************************

*            Now run 'make install'                       *

*                                                         *

*            Thank you for using Zabbix!                  *

*              <http://www.zabbix.com>                    *

***********************************************************

[root@nmserver- zabbix-3.2.]#
3.2 安装zabbix
[root@nmserver- zabbix-3.2.]# make install
3.3 验证安装成功
[root@nmserver- conf]# /usr/local/zabbix/sbin/zabbix_server -V

zabbix_server (Zabbix) 3.2.7

Revision   July , compilation time: Jul   ::

Copyright (C)  Zabbix SIA

License GPLv2+: GNU GPL version  or later <http://gnu.org/licenses/gpl.html>.

This is free software: you are free to change and redistribute it according to

the license. There is NO WARRANTY, to the extent permitted by law.

[root@nmserver- conf]# /usr/local/zabbix/sbin/zabbix_agentd -V

zabbix_agentd (daemon) (Zabbix) 3.2.

Revision   July , compilation time: Jul   ::

Copyright (C)  Zabbix SIA

License GPLv2+: GNU GPL version  or later <http://gnu.org/licenses/gpl.html>.

This is free software: you are free to change and redistribute it according to

the license. There is NO WARRANTY, to the extent permitted by law.

[root@nmserver- conf]#
3、启用服务
3.1修改服务器和客户端配置文件
zabbix_server配置文件修改,主要设置好连接数据的数据库名称、登陆账号还有密码!
[root@nmserver- init.d]# vi /usr/local/zabbix/etc/zabbix_server.conf

.....

 # Mandatory: no

      # Default:

      # DBHost=localhost

      ### Option: DBName

      ...... # DBName=

      DBName=zabbix

     ...... # Default:

     # DBUser=

     DBUser=zabbix

    ...... # Mandatory: no

     # Default:

     # DBPassword=

       DBPassword=zabbix
zabbix_agentd配置文件修改;主要配置好zabbix server的IP地址;
[root@nmserver- init.d]# vi /usr/local/zabbix/etc/zabbix_agentd.conf
    ......
    89 # Server=
     90
     91 Server=127.0.0.1
     92
     93 ### Option: ListenPort
     94 #       Agent will listen on this port for connections from the server.

    ......
   ServerActive=127.0.0.1
    ......
    Hostname=127.0.0.1

    ......
将配置文件中的Server、ServerActive、Hostname参数设置成zabbix服务器的IP地址即可,我这次安装的zabbix_agentd和zabbix_server在同一服务器上,所在IP地址为本机IP地址;
3.2 修改firewall设置
开放zabbix端口10050和10051
[root@nmserver- init.d]# firewall-cmd --permanent --add-port=/tcp

success

[root@nmserver- init.d]# firewall-cmd --permanent --add-port=/tcp

success

[root@nmserver- init.d]# systemctl restart firewalld

[root@nmserver- init.d]#
3.3 设置开机启动
3.3.1 将源码包中提供的init.d启动脚本拷贝到系统中
[root@nmserver- zabbix-3.2.]# ls

aclocal.m4  compile        config.sub    depcomp     m4           misc     src

AUTHORS     conf           configure     frontends   Makefile     missing  upgrades

bin         config.guess   configure.ac  include     Makefile.am  NEWS

build       config.log     COPYING       INSTALL     Makefile.in  README

ChangeLog   config.status  database      install-sh  man          sass

[root@nmserver- zabbix-3.2.]# cp misc/init.d/fedora/core/zabbix_*  /etc/init.d/ -v

"misc/init.d/fedora/core/zabbix_agentd" -> "/etc/init.d/zabbix_agentd"

"misc/init.d/fedora/core/zabbix_server" -> "/etc/init.d/zabbix_server"

[root@nmserver- zabbix-3.2.]#
3.3.2 编辑启动脚本以适应自己的安装环境
修改服务器端启动文件
#vi /etc/init.d/zabbix_server
将BASEDIR=/usr/local/替换为BASEDIR=/usr/local/zabbix(以之前编译的位置为准)
修改客户器端启动文件:
#vi /etc/init.d/zabbix_agentd
将BASEDIR=/usr/local/替换为BASEDIR=/usr/local/zabbix(以之前编译的位置为准)
3.4 服务启动与配置验证
方法一:
[root@nmserver- zabbix-3.2.]# /etc/init.d/zabbix_server start

Starting zabbix_server (via systemctl):                    [  确定  ]

[root@nmserver- zabbix-3.2.]# /etc/init.d/zabbix_agentd start

Starting zabbix_agentd (via systemctl):                    [  确定  ]

[root@nmserver- zabbix-3.2.]# /etc/init.d/zabbix_server status

● zabbix_server.service - SYSV: Starts and stops Zabbix Server using chkconfig

   Loaded: loaded (/etc/rc.d/init.d/zabbix_server; bad; vendor preset: disabled)

   Active: active (running) since 日 -- :: CST; 18s ago

     Docs: man:systemd-sysv-generator()

  Process:  ExecStart=/etc/rc.d/init.d/zabbix_server start (code=exited, status=/SUCCESS)

   CGroup: /system.slice/zabbix_server.service

           ├─ /usr/local/zabbix/sbin/zabbix_server

           ├─ /usr/local/zabbix/sbin/zabbix_server: configuration syncer [waiting  sec f...

           ├─ /usr/local/zabbix/sbin/zabbix_server: db watchdog [synced alerts config in ...

           ├─ /usr/local/zabbix/sbin/zabbix_server: poller # [got  values in 0.000011 se...

           ├─ /usr/local/zabbix/sbin/zabbix_server: poller # [got  values in 0.000011 se...

           ├─ /usr/local/zabbix/sbin/zabbix_server: poller # [got  values in 0.000011 se...

           ├─ /usr/local/zabbix/sbin/zabbix_server: poller # [got  values in 0.000011 se...

           ├─ /usr/local/zabbix/sbin/zabbix_server: poller # [got  values in 0.000014 se...

           ├─ /usr/local/zabbix/sbin/zabbix_server: unreachable poller # [got  values in...

           ├─ /usr/local/zabbix/sbin/zabbix_server: trapper # [processed data in 0.000000...

           ├─ /usr/local/zabbix/sbin/zabbix_server: trapper # [processed data in 0.000000...

           ├─ /usr/local/zabbix/sbin/zabbix_server: trapper # [processed data in 0.000000...

           ├─ /usr/local/zabbix/sbin/zabbix_server: trapper # [processed data in 0.000000...

           ├─ /usr/local/zabbix/sbin/zabbix_server: trapper # [processed data in 0.001351...

           ├─ /usr/local/zabbix/sbin/zabbix_server: icmp pinger # [got  values in 0.0000...

           ├─ /usr/local/zabbix/sbin/zabbix_server: alerter [sent alerts:  success,  fai...

           ├─ /usr/local/zabbix/sbin/zabbix_server: housekeeper [startup idle for  minut...

           ├─ /usr/local/zabbix/sbin/zabbix_server: timer # [processed  triggers,  even...

           ├─ /usr/local/zabbix/sbin/zabbix_server: http poller # [got  values in 0.0013...

           ├─ /usr/local/zabbix/sbin/zabbix_server: discoverer # [processed  rules in ....

           ├─ /usr/local/zabbix/sbin/zabbix_server: history syncer # [synced  items in ...

           ├─ /usr/local/zabbix/sbin/zabbix_server: history syncer # [synced  items in ...

           ├─ /usr/local/zabbix/sbin/zabbix_server: history syncer # [synced  items in ...

           ├─ /usr/local/zabbix/sbin/zabbix_server: history syncer # [synced  items in ...

           ├─ /usr/local/zabbix/sbin/zabbix_server: escalator # [processed  escalations ...

           ├─ /usr/local/zabbix/sbin/zabbix_server: proxy poller # [exchanged data with ...

           ├─ /usr/local/zabbix/sbin/zabbix_server: self-monitoring [processed data in 0.0...

           └─ /usr/local/zabbix/sbin/zabbix_server: task manager [processed  task(s) in ...

7月  :: nmserver-.test.com systemd[]: Starting SYSV: Starts and stops Zabbix Serv.....

7月  :: nmserver-.test.com zabbix_server[]: Starting zabbix_server:  [  确定  ]

7月  :: nmserver-.test.com systemd[]: Started SYSV: Starts and stops Zabbix Serve...g.

Hint: Some lines were ellipsized, use -l to show in full.

[root@nmserver- zabbix-3.2.]# /etc/init.d/zabbix_agentd status

● zabbix_agentd.service - SYSV: Starts and stops Zabbix Agent using chkconfig

   Loaded: loaded (/etc/rc.d/init.d/zabbix_agentd; bad; vendor preset: disabled)

   Active: active (running) since 日 -- :: CST; 19s ago

     Docs: man:systemd-sysv-generator()

  Process:  ExecStart=/etc/rc.d/init.d/zabbix_agentd start (code=exited, status=/SUCCESS)

   CGroup: /system.slice/zabbix_agentd.service

           ├─ /usr/local/zabbix/sbin/zabbix_agentd

           ├─ /usr/local/zabbix/sbin/zabbix_agentd: collector [idle  sec]

           ├─ /usr/local/zabbix/sbin/zabbix_agentd: listener # [waiting for connection]

           ├─ /usr/local/zabbix/sbin/zabbix_agentd: listener # [waiting for connection]

           ├─ /usr/local/zabbix/sbin/zabbix_agentd: listener # [waiting for connection]

           └─ /usr/local/zabbix/sbin/zabbix_agentd: active checks # [idle  sec]

7月  :: nmserver-.test.com systemd[]: Starting SYSV: Starts and stops Zabbix Agen.....

7月  :: nmserver-.test.com zabbix_agentd[]: Starting zabbix_agentd:  [  确定  ]

7月  :: nmserver-.test.com systemd[]: Started SYSV: Starts and stops Zabbix Agent...g.

Hint: Some lines were ellipsized, use -l to show in full.

[root@nmserver- zabbix-3.2.]# netstat -tulp

Active Internet connections (only servers)

Proto Recv-Q Send-Q Local Address           Foreign Address         State       PID/Program name

tcp               0.0.0.0:ssh             0.0.0.0:*               LISTEN      /sshd

tcp               0.0.0.0:zabbix-agent    0.0.0.0:*               LISTEN      /zabbix_agentd

tcp               0.0.0.0:zabbix-trapper  0.0.0.0:*               LISTEN      /zabbix_server

tcp               0.0.0.0:mysql           0.0.0.0:*               LISTEN      /mysqld

tcp6              [::]:ssh                [::]:*                  LISTEN      /sshd

tcp6              [::]:zabbix-agent       [::]:*                  LISTEN      /zabbix_agentd

tcp6              [::]:zabbix-trapper     [::]:*                  LISTEN      /zabbix_server

tcp6              [::]:http               [::]:*                  LISTEN      /httpd

udp               localhost:           0.0.0.0:*                           /chronyd

udp6              localhost:           [::]:*                              /chronyd

[root@nmserver- zabbix-3.2.]#
方法二:
[root@nmserver- zabbix-3.2.]# /usr/local/zabbix/sbin/zabbix_server

[root@nmserver- zabbix-3.2.]# /usr/local/zabbix/sbin/zabbix_agentd

[root@nmserver- zabbix-3.2.]# netstat -tulp

Active Internet connections (only servers)

Proto Recv-Q Send-Q Local Address           Foreign Address         State       PID/Program name

tcp               0.0.0.0:ssh             0.0.0.0:*               LISTEN      /sshd

tcp               0.0.0.0:zabbix-agent    0.0.0.0:*               LISTEN      /zabbix_agentd

tcp               0.0.0.0:zabbix-trapper  0.0.0.0:*               LISTEN      /zabbix_server

tcp               0.0.0.0:mysql           0.0.0.0:*               LISTEN      /mysqld

tcp6              [::]:ssh                [::]:*                  LISTEN      /sshd

tcp6              [::]:zabbix-agent       [::]:*                  LISTEN      /zabbix_agentd

tcp6              [::]:zabbix-trapper     [::]:*                  LISTEN      /zabbix_server

tcp6              [::]:http               [::]:*                  LISTEN      /httpd

udp               localhost:           0.0.0.0:*                           /chronyd

udp6              localhost:           [::]:*                              /chronyd

[root@nmserver- zabbix-3.2.]#
3.5 设置zabbix server 和zabbix agentd开机自动启动
[root@nmserver- zabbix-3.2.]# chkconfig --add zabbix_server

[root@nmserver- zabbix-3.2.]# chkconfig --add zabbix_agentd

[root@nmserver- zabbix-3.2.]# chkconfig --level   zabbix_server on

[root@nmserver- zabbix-3.2.]# chkconfig --level   zabbix_agentd  on

[root@nmserver- zabbix-3.2.]# chkconfig --list

注意:该输出结果只显示 SysV 服务,并不包含原生 systemd 服务。SysV 配置数据可能被原生 systemd 配置覆盖。

      如果您想列出 systemd 服务,请执行 'systemctl list-unit-files'。

      欲查看对特定 target 启用的服务请执行

      'systemctl list-dependencies [target]'。

netconsole         :关    :关    :关    :关    :关    :关    :关

network            :关    :关    :开    :开    :开    :开    :关

zabbix_agentd      :关    :关    :关    :开    :关    :开    :关

zabbix_server      :关    :关    :关    :开    :关    :开    :关

[root@nmserver- zabbix-3.2.]#
4、 前端Web配置
4.1 查询apache配置文件确认DocumentRoot位置
[root@nmserver- ~]# vi /etc/httpd/conf/httpd.conf

     # DocumentRoot: The directory out of which you will serve your

     # documents. By default, all requests are taken from this directory, but

     # symbolic links and aliases may be used to point to other locations.

     #

     DocumentRoot "/var/www/html"

     #

     # Relax access to content within /var/www.

     #
4.2 拷贝源码包中的前端PHP代码到apache根目录
[root@nmserver-7 zabbix-3.2.7]# mkdir /var/www/html/zabbix/
[root@nmserver- zabbix-3.2.]# pwd

/root/zabbix/zabbix-3.2.

[root@nmserver- zabbix-3.2.]# cp -a ./frontends/php/  /var/www/html/zabbix
4.3 更改zabbix网页文件权限
[root@nmserver- zabbix-3.2.]# chown -R zabbix.zabbix /var/www/html/zabbix/
4.4 重启apache Web服务器
[root@nmserver- zabbix-3.2.]# systemctl restart httpd
5、浏览器登陆进行zabbix安装初始化
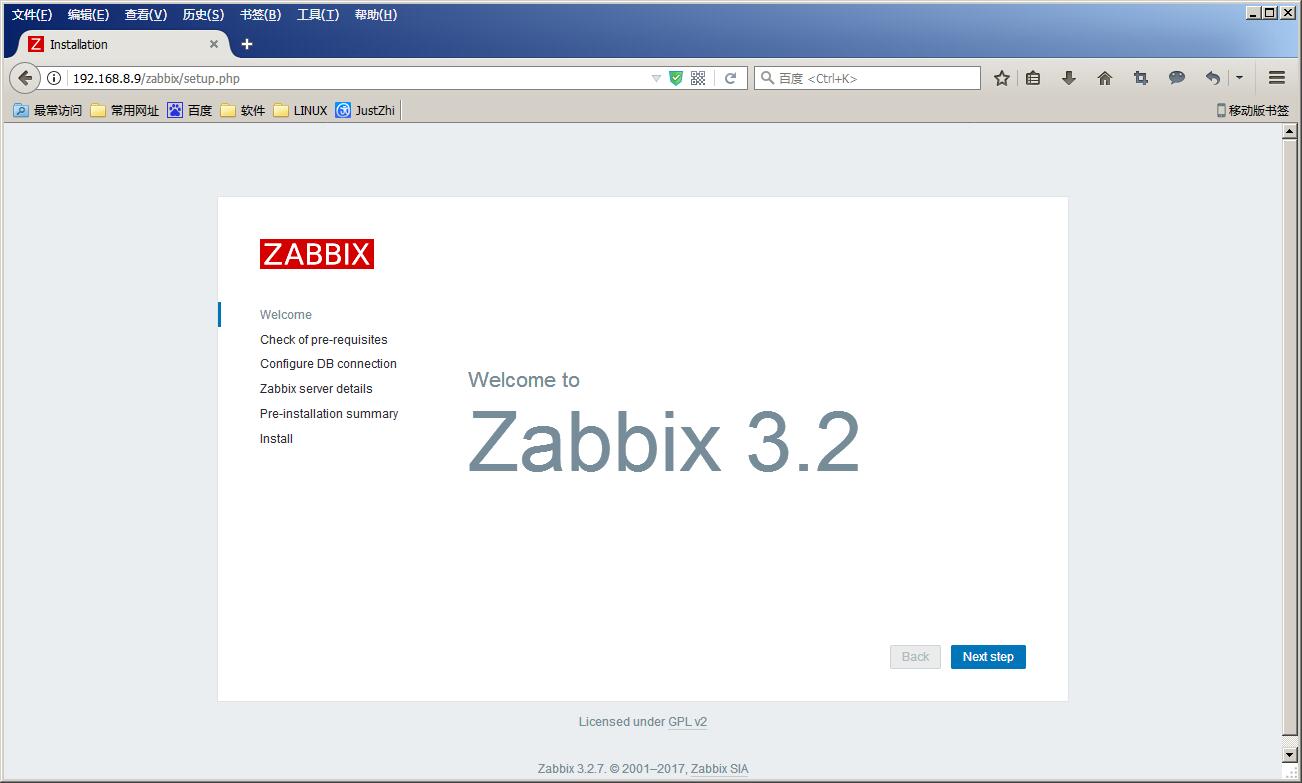
5.1 浏览器输入http://192.168.8.9/zabbix/
注意有时此页面会显示403错误 无权限访问;这时需要reboot服务器再进行登陆;
5.2 下一步检测安装前的一些配置是否满足

我这里有4个错误报警,这里出现的问题须要解决完后才能进行一下步操作;对缺少模块的须要重新编译相应模块并加载,
大部分参数只须要修改PHP配置文件即可满足条件,针对上面4个错误提示来修改PHP配置文件:
[root@nmserver- zabbix-3.2.]# vi /etc/php.ini

#在php配置文件的672行将8M改为16M

  post_max_size = 8M-->16M

#在384行将30改为300

 max_execution_time = -->

#在394行将max_inpu_time原来60改为300

 max_input_time = -->

#在配置文件878行添加亚洲时区

 ;date.timezone =

  date.timezone = Asia/Shanghai

:wq

将4个参数修改完成后保存退出
重启apache服务
[root@nmserver- zabbix-3.2.]# systemctl restart httpd
再重新浏览器登陆http://192.168.8.9/zabbix/setup.php
这次安装条件全部满足没有报警提示

好了,可以进行下一步操作了!
5.3 配置数据库连接
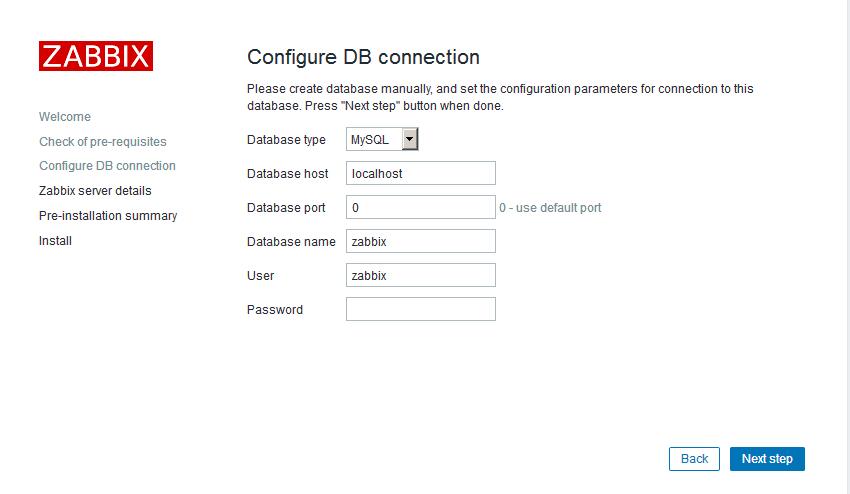
注意:database port是 0表示是默认3306端口
数据库名称、账号名字、密码 根据之前创建数据库时的设置来添加,我这里只用添加“Password"项为”zabbix"即可,然后可以下一步了!
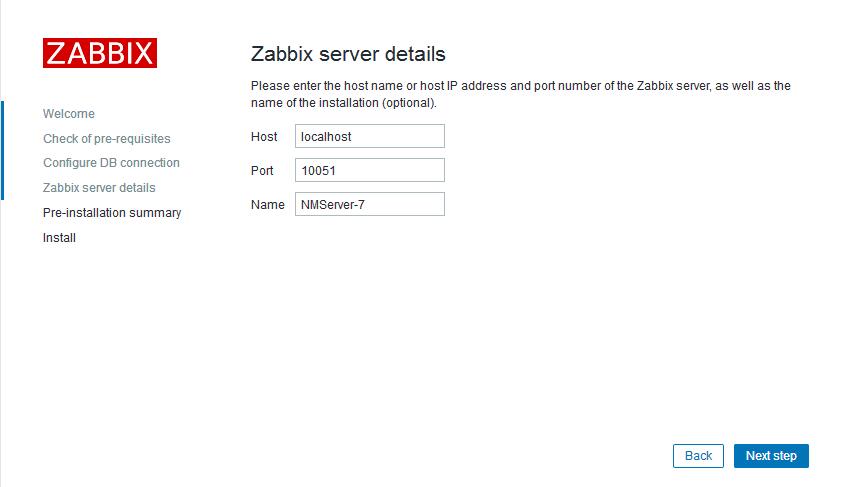
5.4 关于zabbix 服务器的配置
主要有三个参数:host 、port 、name
前二个参数默认即可,Name为zabbix服务器的名字这里可以根据自己情况而设置,我这里设置成NMServer-7,设置好下一步!
5.5 安装摘要,对前面设置参数汇总

没问题就下一步~~~

5.6 安装
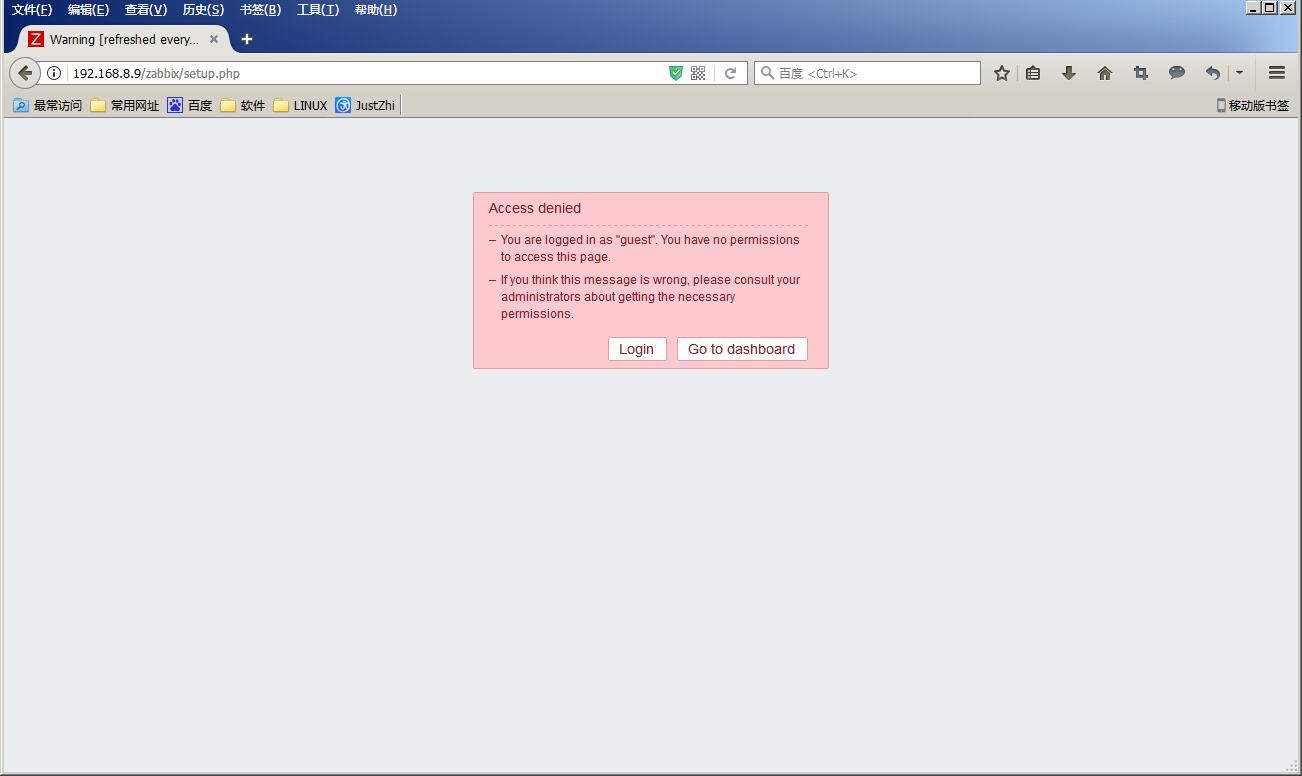
这时突然出现以下问题:

根据提示找出产生这个问题的主要原因是从源码拷贝PHP配置文件后,有关zabbix的配置文件需要修改;
源配置文件内容如下: 可以看到名字没有修改,配置也不对
[root@nmserver- zabbix-3.2.]# cd /var/www/html/zabbix/conf/

[root@nmserver- conf]# ls

maintenance.inc.php  zabbix.conf.php.example

[root@nmserver- conf]# ll

总用量

-rw-r--r--.  zabbix zabbix  7月   : maintenance.inc.php

-rw-r--r--.  zabbix zabbix   7月   : zabbix.conf.php.example

[root@nmserver- conf]# cd /var/www/html/zabbix/conf/

[root@nmserver- conf]# ls

maintenance.inc.php  zabbix.conf.php.example

[root@nmserver- conf]# cat zabbix.conf.php.example

<?php

// Zabbix GUI configuration file.

global $DB;

$DB['TYPE']                = 'MYSQL';

$DB['SERVER']            = 'localhost';

$DB['PORT']                = '';

$DB['DATABASE']            = 'zabbix';

$DB['USER']                = 'zabbix';

$DB['PASSWORD']            = '';

// Schema name. Used for IBM DB2 and PostgreSQL.

$DB['SCHEMA']            = '';

$ZBX_SERVER                = 'localhost';

$ZBX_SERVER_PORT        = '';

$ZBX_SERVER_NAME        = '';

$IMAGE_FORMAT_DEFAULT    = IMAGE_FORMAT_PNG;

[root@nmserver- conf]#
修改配置文件名称,编辑配置文件参数,按照之前设置的添加好,配置如下:
[root@nmserver- conf]# cp zabbix.conf.php.example zabbix.conf.php

[root@nmserver- conf]# ls

maintenance.inc.php  zabbix.conf.php  zabbix.conf.php.example

[root@nmserver- conf]# vi zabbix.conf.php

<?php

// Zabbix GUI configuration file.

global $DB;

$DB['TYPE']                             = 'MYSQL';

$DB['SERVER']                   = 'localhost';

$DB['PORT']                             = '';

$DB['DATABASE']                 = 'zabbix';

$DB['USER']                             = 'zabbix';

$DB['PASSWORD']                 = 'zabbix';

// Schema name. Used for IBM DB2 and PostgreSQL.

$DB['SCHEMA']                   = '';

$ZBX_SERVER                             = 'localhost';

$ZBX_SERVER_PORT                = '';

$ZBX_SERVER_NAME                = 'NMServer-7';

:wq
6、登陆zabbix
6.1 登陆
前端安装好以下直接跳出以下界面,点“Login"
进入登陆界面:
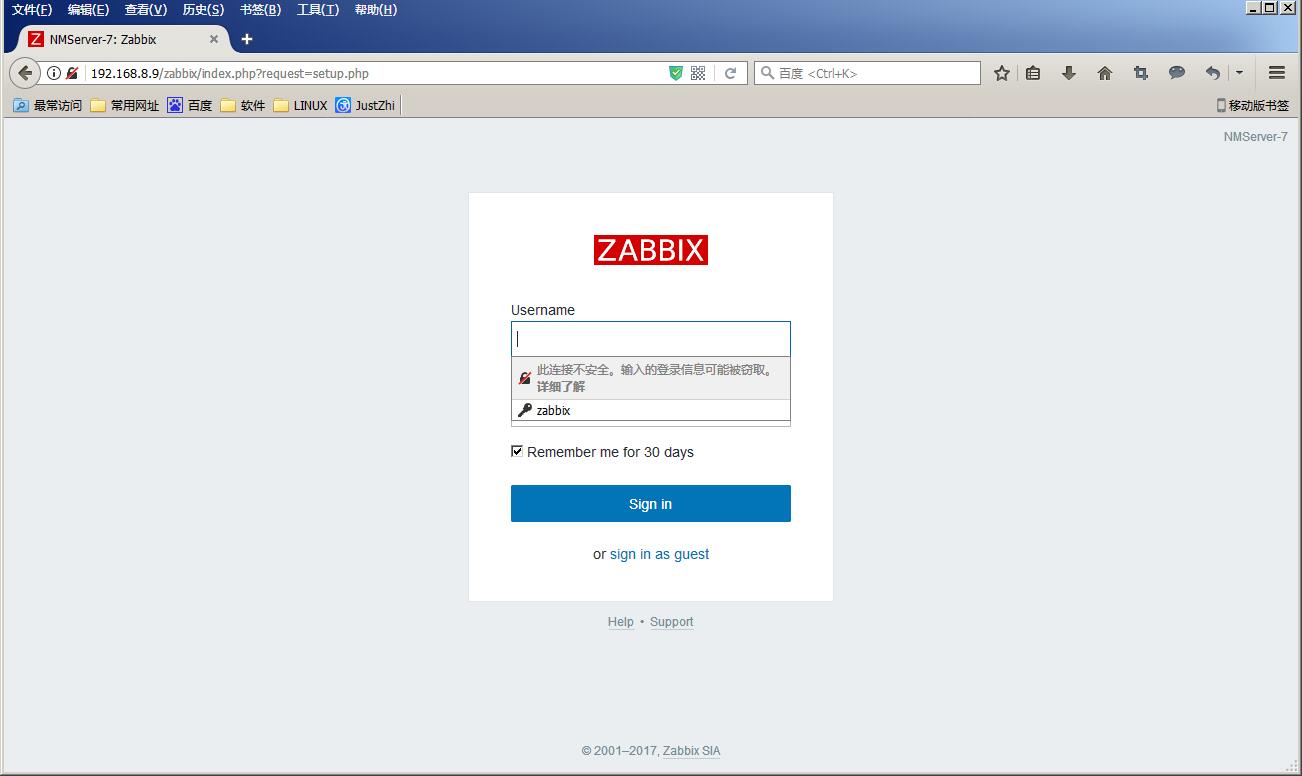
注意默认账号是“Admin" ,密码是:”zabbix" ,Admin的A是大写切记!

6.2 检查状态改为中文
状态正常


修改语言:administration->users->language->Chinese(zh_CN)->update

按F5刷新浏览器,可见中文界面


7、zabbix安装结束
安装只是做为zabbix的入门,接下来要学习各种监控才是重点。
加油!
centos7.3上用源代码安装zabbix3.2.7的更多相关文章
- Ubuntu16.04上用源代码安装ICE
ubuntu16.04上用源代码安装ICE
- Centos7服务器上RabbitMQ单机安装
一.背景 最近项目中用到了RabbitMQ,但是发现自己本地没有安装,此文记录一下本地RabbitMQ的安装过程.注意不同的系统安装方式略有不同,此处我们记录的是Centos7的安装方式. 二.安装方 ...
- CentOS7.2上用KVM安装虚拟机window10踩过的坑
最近两个星期一直在琢磨kvm安装window10操作系统,并且通过桥接模式与外界通信,经历了九九八十一难,终于搞定.下面就记录以下我们在探索的过程中踩过的坑. 安装KVM 1. 系统要求:需要一台可以 ...
- [原创]在Centos7.2上源码安装PHP、Nginx、Zentao禅道
版本 操作系统:CentOS Linux release 7.2.1511 (Core) PHP:5.6.33 Nginx:1.12.2 MySQL:5.6.38(192.168.1.103的Wind ...
- 阿里云centOS7.4上MySql5.6安装
最近一个项目要部署在阿里云上,为了开发团队方便,我自费买了个ECS,先装个数据库给开发用. 因为之前都是在真机安装,与这次阿里云上的部署比起来,还是有点区别的. Mysql 1 安装mysql版本包 ...
- 阿里云服务器CentOS7.3上通过Docker安装MySQL
一.前言 我的服务器环境: CentOS7.3 Docker Portainer -> Docker可视化界面工具 二.拉取mysql镜像 这里我安装的是mysql5.7版本 docker pu ...
- 在CentOS7.4上手动编译安装Mysql-5.7.20
实验环境:CentOS 7.4 mysql软件: mysql-boost-5.7.20.tar.gz 1.安装编译工具 yum -y install \ncurses \ncurses-devel \ ...
- Linux上使用源代码安装软件
- 转:Centos7安装zabbix3.4超详细步骤解析
安装前准备: 1.1 安装依赖包: yum -y install wget net-snmp-devel OpenIPMI-devel httpd openssl-devel java lrzsz f ...
随机推荐
- Ubuntu Server 使用 PPA 安装 Java (JDK) 8
前言 在 Ubuntu Server 中使用 PPA 安装 JDK 相比去 Oracle 官网下载包配置环境变量的好处是,安装方便快捷,还可以 apt-get 更新. 步骤 添加 Java 8 的 P ...
- [Android UI]View基础知识
一.简介 在安卓中,View代表视图,是安卓中十分重要的一个概念,重要程度不亚于四大组件,用户每时每刻都在与View打交道,包括展示数据.事件传递等.因此,熟练掌握View的应用以及原理是Androi ...
- Gym - 101572E Emptying the Baltic bfs加剪枝
题目传送门 题目大意:给出一幅海洋的描述,0为海平面,负数即有水,在给出的xy坐标的底部安放抽水机,问最多能有多少水.水往低处流,且八个方向都可以. 思路:bfs,记录到每一个节点有效的最低海平面,然 ...
- poj2253青蛙(可到达路径的单次跳跃最短距离)
Frogger Time Limit: 1000MS Memory Limit: 65536K Total Submissions: 55388 Accepted: 17455 Descrip ...
- POJ3469Dual Core CPU
题意:给你n个模块,每个模块在A核花费为ai,在B核跑花费为bi,然后由m个任务(ai,bi,wi),表示如果ai,bi不在同一个核上跑,额外的花费为wi,求最小的花费. 分析: 用最小的费用将对象划 ...
- Python 基础学习之if语句
cars=['audi','xiali','bwm','benz',] ##根据要求bmw全部为大写,其他的首字母为大写 for car in cars: if car=='bmw': print(c ...
- 基本数据类型 list and tuple 04
列表和元组 一,列表 1.列表 由[]括起来 可以存放各种数据类型: 存放量比较大 2.列表的索引和切片 列表也有索引 lst [i] i 即列表中各元素的位置 2.1列表的切片 lst[star ...
- HikariPool连接池的使用
HikariDataSource datasource= new HikariDataSource( xxxx ); Connection cn = datasource.getConnection( ...
- 进入wordpress中的模板文件
Wordpress的页面结构 一个简单的wordpress由 头部.内容.页脚组成,每个块中的每一个都由当前wordpress主题中模板文件生成. eg: 头:包含重要的信息,一般都是网页的头部. 内 ...
- vue+iview中的table表格导出excel表格
一.iveiw框架中table中有exportCsv()方法可以导出.csv后缀文件,类似于excel文件,但是并不是excel文件. 二.实现table表格导出excel文件利用Blob.js 和 ...
