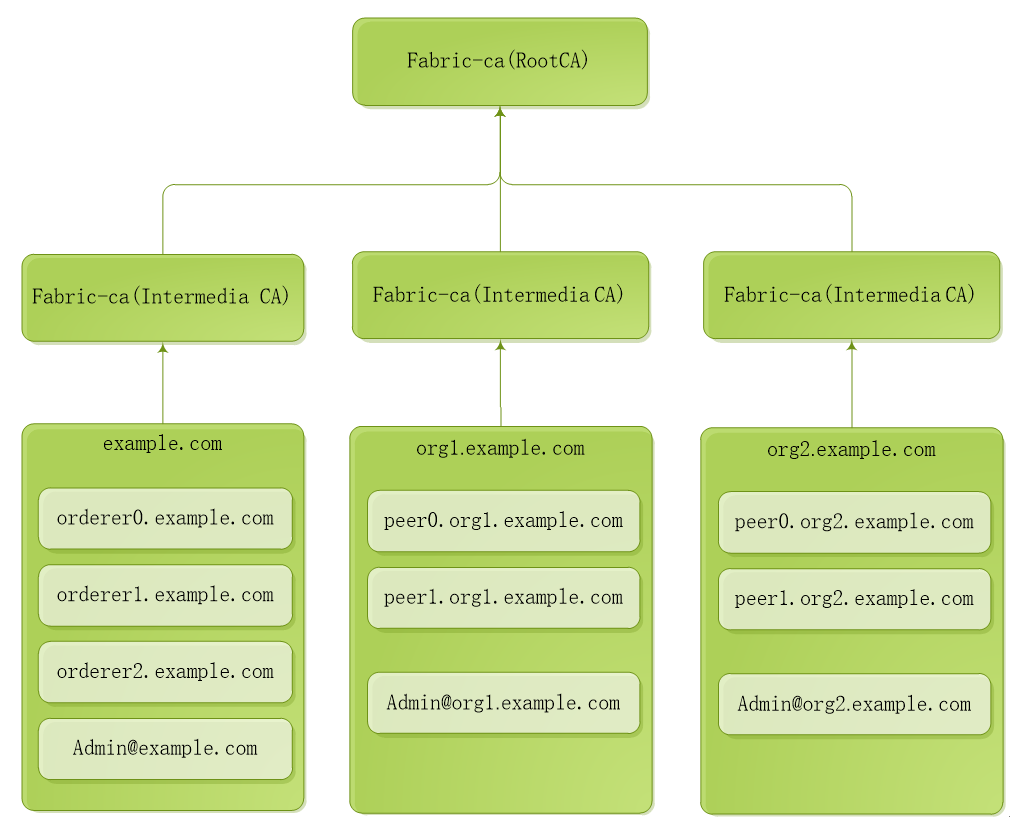
HyperLedger Fabric ca 1.2 正式环境部署
生成一个根CA(RootCA),在根CA下3个中间CA(IntermediaCA)。
1. 运行和配置RootCA服务
#cd /opt/gopath/src/github.com/hyperledger/fabric-ca/bin
#mkdir ca-server
#cd ca-server
#fabric-ca-server start -b admin:adminpw --home ./rootca --cfg.affiliations.allowremove --cfg.identities.allowremove
【docker】方式运行
拷贝文件docker-rootca.yml到ca-server目录
#docker-compose -f docker-rootca.yaml up –d
2. 运行和配置IntermediaCA1
步骤一:启动 ca
#cd /opt/gopath/src/github.com/hyperledger/fabric-ca/bin/ca-server
#fabric-ca-server init -b admin1:adminpw1 -u http://admin:adminpw@localhost:7054 --home ./intermediaca1
#vi ./intermediaca1/fabric-ca-server-config.yaml
修改port为7055
#fabric-ca-server start -b admin1:adminpw1 -u http://admin:adminpw@localhost:7054 --home ./intermediaca1 --cfg.affiliations.allowremove --cfg.identities.allowremove
【docker】方式运行
拷贝文件docker-intermediaca1.yml到ca-server目录
#docker-compose -f docker-intermediaca1.yaml up
#vi ./intermediaca1/fabric-ca-server-config.yaml
修改port为7055
#docker-compose -f docker-intermediaca1.yaml up
步骤二:为example.com准备msp
#cd /opt/gopath/src/github.com/hyperledger/fabric-ca/bin/ca-server
#fabric-ca-client enroll -M ./crypto-config/ordererOrganizations/example.com/msp -u http://admin1:adminpw1@localhost:7055 --home ./fabric-ca-client
#fabric-ca-client affiliation list -M ./crypto-config/ordererOrganizations/example.com/msp -u http://admin1:adminpw1@localhost:7055 --home ./fabric-ca-client
#fabric-ca-client affiliation remove --force org1 -M ./crypto-config/ordererOrganizations/example.com/msp -u http://admin1:adminpw1@localhost:7055 --home ./fabric-ca-client
#fabric-ca-client affiliation remove --force org2 -M ./crypto-config/ordererOrganizations/example.com/msp -u http://admin1:adminpw1@localhost:7055 --home ./fabric-ca-client
#fabric-ca-client affiliation add com -M ./crypto-config/ordererOrganizations/example.com/msp -u http://admin1:adminpw1@localhost:7055 --home ./fabric-ca-client
#fabric-ca-client affiliation add com.example -M ./crypto-config/ordererOrganizations/example.com/msp -u http://admin1:adminpw1@localhost:7055 --home ./fabric-ca-client
步骤三:注册example.com的管理员Admin@example.com
#fabric-ca-client register --id.name Admin@example.com --id.type client --id.affiliation "com.example" --id.attrs '"hf.Registrar.Roles=client,orderer,peer,user","hf.Registrar.DelegateRoles=client,orderer,peer,user",hf.Registrar.Attributes=*,hf.GenCRL=true,hf.Revoker=true,hf.AffiliationMgr=true,hf.IntermediateCA=true,role=admin:ecert' --id.secret=123456 -M ./crypto-config/ordererOrganizations/example.com/msp -u http://admin1:adminpw1@localhost:7055 --home ./fabric-ca-client
#fabric-ca-client enroll -u http://Admin@example.com:123456@localhost:7055 -M ./crypto-config/ordererOrganizations/example.com/users/Admin@example.com/msp --home ./fabric-ca-client
#mkdir ./fabric-ca-client/crypto-config/ordererOrganizations/example.com/users/Admin@example.com/msp/admincerts
#cp ./fabric-ca-client/crypto-config/ordererOrganizations/example.com/users/Admin@example.com/msp/signcerts/cert.pem ./fabric-ca-client/crypto-config/ordererOrganizations/example.com/users/Admin@example.com/msp/admincerts
#mkdir ./fabric-ca-client/crypto-config/ordererOrganizations/example.com/msp/admincerts
#cp ./fabric-ca-client/crypto-config/ordererOrganizations/example.com/users/Admin@example.com/msp/signcerts/cert.pem ./fabric-ca-client/crypto-config/ordererOrganizations/example.com/msp/admincerts
步骤四:为orderer0.example.com准备msp
#fabric-ca-client register --id.name orderer0.example.com --id.type orderer --id.affiliation "com.example" --id.attrs '"role=orderer",ecert=true' --id.secret=123456 -M ./crypto-config/ordererOrganizations/example.com/msp -u http://admin1:adminpw1@localhost:7055 --home ./fabric-ca-client
#fabric-ca-client enroll -u http://orderer0.example.com:123456@localhost:7055 -M ./crypto-config/ordererOrganizations/example.com/orderers/orderer0.example.com/msp --home ./fabric-ca-client
#mkdir ./fabric-ca-client/crypto-config/ordererOrganizations/example.com/orderers/orderer0.example.com/msp/admincerts
#cp ./fabric-ca-client/crypto-config/ordererOrganizations/example.com/users/Admin@example.com/msp/signcerts/cert.pem ./fabric-ca-client/crypto-config/ordererOrganizations/example.com/orderers/orderer0.example.com/msp/admincerts
步骤五:为orderer1.example.com准备msp
#fabric-ca-client register --id.name orderer1.example.com --id.type orderer --id.affiliation "com.example" --id.attrs '"role=orderer",ecert=true' --id.secret=123456 -M ./crypto-config/ordererOrganizations/example.com/msp -u http://admin1:adminpw1@localhost:7055 --home ./fabric-ca-client
#fabric-ca-client enroll -u http://orderer1.example.com:123456@localhost:7055 -M ./crypto-config/ordererOrganizations/example.com/orderers/orderer1.example.com/msp --home ./fabric-ca-client
#mkdir ./fabric-ca-client/crypto-config/ordererOrganizations/example.com/orderers/orderer1.example.com/msp/admincerts
#cp ./fabric-ca-client/crypto-config/ordererOrganizations/example.com/users/Admin@example.com/msp/signcerts/cert.pem ./fabric-ca-client/crypto-config/ordererOrganizations/example.com/orderers/orderer1.example.com/msp/admincerts
步骤六:为orderer2.example.com准备msp
#fabric-ca-client register --id.name orderer2.example.com --id.type orderer --id.affiliation "com.example" --id.attrs '"role=orderer",ecert=true' --id.secret=123456 -M ./crypto-config/ordererOrganizations/example.com/msp -u http://admin1:adminpw1@localhost:7055 --home ./fabric-ca-client
#fabric-ca-client enroll -u http://orderer2.example.com:123456@localhost:7055 -M ./crypto-config/ordererOrganizations/example.com/orderers/orderer2.example.com/msp --home ./fabric-ca-client
#mkdir ./fabric-ca-client/crypto-config/ordererOrganizations/example.com/orderers/orderer2.example.com/msp/admincerts
#cp ./fabric-ca-client/crypto-config/ordererOrganizations/example.com/users/Admin@example.com/msp/signcerts/cert.pem ./fabric-ca-client/crypto-config/ordererOrganizations/example.com/orderers/orderer2.example.com/msp/admincerts
3. 运行和配置IntermediaCA2
步骤一:启动 ca
#cd /opt/gopath/src/github.com/hyperledger/fabric-ca/bin/ca-server
#fabric-ca-server init -b admin2:adminpw2 -u http://admin:adminpw@localhost:7054 --home ./intermediaca2
#vi ./intermediaca2/fabric-ca-server-config.yaml
修改port为7056
#fabric-ca-server start -b admin2:adminpw2 -u http://admin:adminpw@localhost:7054 --home ./intermediaca2 --cfg.affiliations.allowremove --cfg.identities.allowremove
【docker】方式运行
拷贝文件docker-intermediaca2.yml到ca-server目录
#docker-compose -f docker-intermediaca2.yaml up
#vi ./intermediaca2/fabric-ca-server-config.yaml
修改port为7056
#docker-compose -f docker-intermediaca2.yaml up
步骤二:为org1.example.com准备msp
#fabric-ca-client enroll -M ./crypto-config/peerOrganizations/org1.example.com/msp -u http://admin2:adminpw2@localhost:7056 --home ./fabric-ca-client
#fabric-ca-client affiliation list -M ./crypto-config/peerOrganizations/org1.example.com/msp -u http://admin2:adminpw2@localhost:7056 --home ./fabric-ca-client
#fabric-ca-client affiliation remove --force org1 -M ./crypto-config/peerOrganizations/org1.example.com/msp -u http://admin2:adminpw2@localhost:7056 --home ./fabric-ca-client
#fabric-ca-client affiliation remove --force org2 -M ./crypto-config/peerOrganizations/org1.example.com/msp -u http://admin2:adminpw2@localhost:7056 --home ./fabric-ca-client
#fabric-ca-client affiliation add com -M ./crypto-config/peerOrganizations/org1.example.com/msp -u http://admin2:adminpw2@localhost:7056 --home ./fabric-ca-client
#fabric-ca-client affiliation add com.example -M ./crypto-config/peerOrganizations/org1.example.com/msp -u http://admin2:adminpw2@localhost:7056 --home ./fabric-ca-client
#fabric-ca-client affiliation add com.example.org1 -M ./crypto-config/peerOrganizations/org1.example.com/msp -u http://admin2:adminpw2@localhost:7056 --home ./fabric-ca-client
步骤三:注册org1.example.com的管理员Admin@org1.example.com
#fabric-ca-client register --id.name Admin@org1.example.com --id.type client --id.affiliation "com.example.org1" --id.attrs '"hf.Registrar.Roles=client,orderer,peer,user","hf.Registrar.DelegateRoles=client,orderer,peer,user",hf.Registrar.Attributes=*,hf.GenCRL=true,hf.Revoker=true,hf.AffiliationMgr=true,hf.IntermediateCA=true,role=admin:ecert' --id.secret=123456 -M ./crypto-config/peerOrganizations/org1.example.com/msp -u http://admin2:adminpw2@localhost:7056 --home ./fabric-ca-client
#fabric-ca-client enroll -u http://Admin@org1.example.com:123456@localhost:7056 -M ./crypto-config/peerOrganizations/org1.example.com/users/Admin@org1.example.com/msp --home ./fabric-ca-client
#mkdir ./fabric-ca-client/crypto-config/peerOrganizations/org1.example.com/users/Admin@org1.example.com/msp/admincerts
#cp ./fabric-ca-client/crypto-config/peerOrganizations/org1.example.com/users/Admin@org1.example.com/msp/signcerts/cert.pem ./fabric-ca-client/crypto-config/peerOrganizations/org1.example.com/users/Admin@org1.example.com/msp/admincerts
#mkdir ./fabric-ca-client/crypto-config/peerOrganizations/org1.example.com/msp/admincerts
#cp ./fabric-ca-client/crypto-config/peerOrganizations/org1.example.com/users/Admin@org1.example.com/msp/signcerts/cert.pem ./fabric-ca-client/crypto-config/peerOrganizations/org1.example.com/msp/admincerts
步骤四:为peer0.org1.example.com准备msp
#fabric-ca-client register --id.name peer0.org1.example.com --id.type peer --id.affiliation "com.example.org1" --id.attrs '"role=peer",ecert=true' --id.secret=123456 -M ./crypto-config/peerOrganizations/org1.example.com/msp -u http://admin2:adminpw2@localhost:7056 --home ./fabric-ca-client
#fabric-ca-client enroll -u http://peer0.org1.example.com:123456@localhost:7056 -M ./crypto-config/peerOrganizations/org1.example.com/peers/peer0.org1.example.com/msp --home ./fabric-ca-client
#mkdir ./fabric-ca-client/crypto-config/peerOrganizations/org1.example.com/peers/peer0.org1.example.com/msp/admincerts
#cp ./fabric-ca-client/crypto-config/peerOrganizations/org1.example.com/users/Admin@org1.example.com/msp/signcerts/cert.pem ./fabric-ca-client/crypto-config/peerOrganizations/org1.example.com/peers/peer0.org1.example.com/msp/admincerts
步骤五:为peer1.org1.example.com准备msp
#fabric-ca-client register --id.name peer1.org1.example.com --id.type peer --id.affiliation "com.example.org1" --id.attrs '"role=peer",ecert=true' --id.secret=123456 -M ./crypto-config/peerOrganizations/org1.example.com/msp -u http://admin2:adminpw2@localhost:7056 --home ./fabric-ca-client
#fabric-ca-client enroll -u http://peer1.org1.example.com:123456@localhost:7056 -M ./crypto-config/peerOrganizations/org1.example.com/peers/peer1.org1.example.com/msp --home ./fabric-ca-client
#mkdir ./fabric-ca-client/crypto-config/peerOrganizations/org1.example.com/peers/peer1.org1.example.com/msp/admincerts
#cp ./fabric-ca-client/crypto-config/peerOrganizations/org1.example.com/users/Admin@org1.example.com/msp/signcerts/cert.pem ./fabric-ca-client/crypto-config/peerOrganizations/org1.example.com/peers/peer1.org1.example.com/msp/admincerts
4. 运行和配置IntermediaCA3
步骤一:启动 ca
#cd /opt/gopath/src/github.com/hyperledger/fabric-ca/bin/ca-server
#fabric-ca-server init -b admin3:adminpw3 -u http://admin:adminpw@localhost:7054 --home ./intermediaca3
#vi ./intermediaca3/fabric-ca-server-config.yaml
修改port为7057
#fabric-ca-server start -b admin3:adminpw3 -u http://admin:adminpw@localhost:7054 --home ./intermediaca3 --cfg.affiliations.allowremove --cfg.identities.allowremove
【docker】方式运行
拷贝文件docker-intermediaca3.yml到ca-server目录
#docker-compose -f docker-intermediaca3.yaml up
#vi ./intermediaca3/fabric-ca-server-config.yaml
修改port为7057
#docker-compose -f docker-intermediaca3.yaml up
步骤二:为org2.example.com准备msp
#fabric-ca-client enroll -M ./crypto-config/peerOrganizations/org2.example.com/msp -u http://admin3:adminpw3@localhost:7057 --home ./fabric-ca-client
#fabric-ca-client affiliation list -M ./crypto-config/peerOrganizations/org2.example.com/msp -u http://admin3:adminpw3@localhost:7057 --home ./fabric-ca-client
#fabric-ca-client affiliation remove --force org1 -M ./crypto-config/peerOrganizations/org2.example.com/msp -u http://admin3:adminpw3@localhost:7057 --home ./fabric-ca-client
#fabric-ca-client affiliation remove --force org2 -M ./crypto-config/peerOrganizations/org2.example.com/msp -u http://admin3:adminpw3@localhost:7057 --home ./fabric-ca-client
#fabric-ca-client affiliation add com -M ./crypto-config/peerOrganizations/org2.example.com/msp -u http://admin3:adminpw3@localhost:7057 --home ./fabric-ca-client
#fabric-ca-client affiliation add com.example -M ./crypto-config/peerOrganizations/org2.example.com/msp -u http://admin3:adminpw3@localhost:7057 --home ./fabric-ca-client
#fabric-ca-client affiliation add com.example.org2 -M ./crypto-config/peerOrganizations/org2.example.com/msp -u http://admin3:adminpw3@localhost:7057 --home ./fabric-ca-client
步骤三:注册org2.example.com的管理员Admin@org2.example.com
#fabric-ca-client register --id.name Admin@org2.example.com --id.type client --id.affiliation "com.example.org2" --id.attrs '"hf.Registrar.Roles=client,orderer,peer,user","hf.Registrar.DelegateRoles=client,orderer,peer,user",hf.Registrar.Attributes=*,hf.GenCRL=true,hf.Revoker=true,hf.AffiliationMgr=true,hf.IntermediateCA=true,role=admin:ecert' --id.secret=123456 -M ./crypto-config/peerOrganizations/org2.example.com/msp -u http://admin3:adminpw3@localhost:7057 --home ./fabric-ca-client
#fabric-ca-client enroll -u http://Admin@org2.example.com:123456@localhost:7057 -M ./crypto-config/peerOrganizations/org2.example.com/users/Admin@org2.example.com/msp --home ./fabric-ca-client
#mkdir ./fabric-ca-client/crypto-config/peerOrganizations/org2.example.com/users/Admin@org2.example.com/msp/admincerts
#cp ./fabric-ca-client/crypto-config/peerOrganizations/org2.example.com/users/Admin@org2.example.com/msp/signcerts/cert.pem ./fabric-ca-client/crypto-config/peerOrganizations/org2.example.com/users/Admin@org2.example.com/msp/admincerts
#mkdir ./fabric-ca-client/crypto-config/peerOrganizations/org2.example.com/msp/admincerts
#cp ./fabric-ca-client/crypto-config/peerOrganizations/org2.example.com/users/Admin@org2.example.com/msp/signcerts/cert.pem ./fabric-ca-client/crypto-config/peerOrganizations/org2.example.com/msp/admincerts
步骤四:为peer0.org2.example.com准备msp
#fabric-ca-client register --id.name peer0.org2.example.com --id.type peer --id.affiliation "com.example.org2" --id.attrs '"role=peer",ecert=true' --id.secret=123456 -M ./crypto-config/peerOrganizations/org2.example.com/msp -u http://admin3:adminpw3@localhost:7057 --home ./fabric-ca-client
#fabric-ca-client enroll -u http://peer0.org2.example.com:123456@localhost:7057 -M ./crypto-config/peerOrganizations/org2.example.com/peers/peer0.org2.example.com/msp --home ./fabric-ca-client
#mkdir ./fabric-ca-client/crypto-config/peerOrganizations/org2.example.com/peers/peer0.org2.example.com/msp/admincerts
#cp ./fabric-ca-client/crypto-config/peerOrganizations/org2.example.com/users/Admin@org2.example.com/msp/signcerts/cert.pem ./fabric-ca-client/crypto-config/peerOrganizations/org2.example.com/peers/peer0.org2.example.com/msp/admincerts
步骤五:为peer1.org2.example.com准备msp
#fabric-ca-client register --id.name peer1.org2.example.com --id.type peer --id.affiliation "com.example.org2" --id.attrs '"role=peer",ecert=true' --id.secret=123456 -M ./crypto-config/peerOrganizations/org2.example.com/msp -u http://admin3:adminpw3@localhost:7057 --home ./fabric-ca-client
#fabric-ca-client enroll -u http://peer1.org2.example.com:123456@localhost:7057 -M ./crypto-config/peerOrganizations/org2.example.com/peers/peer1.org2.example.com/msp --home ./fabric-ca-client
#mkdir ./fabric-ca-client/crypto-config/peerOrganizations/org2.example.com/peers/peer1.org2.example.com/msp/admincerts
#cp ./fabric-ca-client/crypto-config/peerOrganizations/org2.example.com/users/Admin@org2.example.com/msp/signcerts/cert.pem ./fabric-ca-client/crypto-config/peerOrganizations/org2.example.com/peers/peer1.org2.example.com/msp/admincerts
HyperLedger Fabric ca 1.2 正式环境部署的更多相关文章
- HyperLedger Fabric 1.4 kafka生产环境部署(11.1)
11.1 Kafka模式简介 上一章介绍的Solo模式只存在一个排序(orderer)服务,是一种中心化结构,一旦排序(orderer)服务出现了问题,整个区块链网络将会崩溃,为了能在正式 ...
- Hyperledger Fabric (1.0)环境部署 chaincode【转】
三.测试Fabric 其实我们在前面运行./network_setup.sh up的时候系统已经运行了一个Example02的ChainCode测试,部署上去的ChainCodeName是mycc,所 ...
- Hyperledger Fabric CA的命令行用法
介绍Hyperledger Fabric CA的命令行方式简单用法 Hyperledger Fabric CA由server和client两部分组成. 设置两个环境变量 export FABRIC_C ...
- Hyperledger Fabric CA User’s Guide——概述(二)
概述 下面的图表说明了如何将Hyperledger Fabric CA与总体的Hyperledger Fabric结构相匹配. 有两种方式与一种Hyperledger Fabric CA服务器进行交互 ...
- Hyperledger Fabric CA User’s Guide——CA用户指南(一)
Fabric CA用户指南 Hyperledger Fabric CA是一种用于Hyperledger Fabric的认证机构(CA). 它提供了如下特性: 登记身份(注册ID),或者连接到作为用户注 ...
- Hyperledger fabric 1.3版本的安装部署(原创多机多Orderer部署
首先,我们在安装前,要考虑一个问题 Hyperledger Fabric,通过指定的节点进行背书授权,才能完成交易的存储 延伸开来,就是为了实现容错.高并发.易扩展,需要zookeeper来选择排序引 ...
- ubuntu16.04 HyperLedger Fabric 1.2.0 开发环境搭建
安装准备 1. 安装git.cRUL.gcc/g++和make $ sudo apt-get update $ sudo apt-get install build-essential git cur ...
- Hyperledger Fabric CA User’s Guide——开始(三)
Fabric CA User’s Guide——开始 先决条件 安装Go 1.9+ 设置正确的GOPATH环境变量 安装了libtool和libtdhl-dev包 下面是在Ubuntu上安装libto ...
- HyperLedger Fabric 1.4 单机单节点部署(10.2)
单机单节点指在一台电脑上部署一个排序(Orderer)服务.一个组织(Org1),一个节点(Peer,属于Org1),然后运行官方案例中的example02智能合约例子,实现转财交易和查询功能.单机单 ...
随机推荐
- mysql-5.7安装配置指导
mysql 安装 yum 安装mysql 源码编译安装mysql 通过yum安装 下载yum仓库配置安装包 MySQL Yum Repository http://dev.mysql.com/down ...
- 洛谷 P1215 [USACO1.4]母亲的牛奶 Mother's Milk
题目描述 农民约翰有三个容量分别是A,B,C升的桶,A,B,C分别是三个从1到20的整数, 最初,A和B桶都是空的,而C桶是装满牛奶的.有时,农民把牛奶从一个桶倒到另一个桶中,直到被灌桶装满或原桶空了 ...
- 使用命令创建jenkins的job,解决jenkinsapi.custom_exceptions.JenkinsAPIException错误
如果你使用 Python 2.7.12,Jenkins版本为Jenkins ver. 2.22,你使用我上面一种提到的修改的以下代码可以进行Jenkins的job复制 http://www.cnblo ...
- hdu-3584 Cube---三维树状数组+区域更新单点查询
题目链接: http://acm.hdu.edu.cn/showproblem.php?pid=3584 题目大意: 给定一个N*N*N多维数据集A,其元素是0或是1.A[i,j,k]表示集合中第 i ...
- 抽象类和final
抽象类: 概念:在继承过程中,形成一个继承金字塔,位于金字塔底部的类越来越具体(强大),位于塔顶的越来越抽象(简单). 关键字 :abstract 抽象类特性: [1]抽象类过于抽象,实例化后无语义 ...
- 【转】jpg png区别和使用
为什么想整理这方面的类容,我觉得就像油画家要了解他的颜料和画布.雕塑家要了解他的石材一样,作为网页设计师也应该对图片格式的特性有一定了解,这样才能更好的表达你的创意和想法. 除此之外,我们在平时工作中 ...
- P1316 丢瓶盖
题目描述 陶陶是个贪玩的孩子,他在地上丢了A个瓶盖,为了简化问题,我们可以当作这A个瓶盖丢在一条直线上,现在他想从这些瓶盖里找出B个,使得距离最近的2个距离最大,他想知道,最大可以到多少呢? 输入输出 ...
- 旧文备份:windows下编译和使用IT++
1.下载IT++最新版:<a href="http://sourceforge.net/projects/itpp/">http://sourceforge.net/p ...
- 旧文备份:Python国际化支持
Python通过gettext模块支持国际化(i18n),可以实现程序的多语言界面的支持,下面是我的多语言支持实现: 在python安装目录下的./Tools/i18n/(windows下例 D:\P ...
- jQuery对表单、表格的操作以及更多应用
表单和表格都是HTML的重要组成部分,分别用于采集.提交用户输入的信息和显示列表数据. 表单应用:一个表单有3个基本组成部分: ①表单标签:包含处理表单数据所用的服务器端程序URL以及数据提交到服务器 ...