Nginx配置ProxyCache缓存
利用nginx cache缓存网站数据
nginx本身就有缓存功能,能够缓存静态对象,比如图片、CSS、JS等内容直接缓存到本地,下次访问相同对象时,直接从缓存即可,无需访问后端静态服务器以及存储存储服务器,可以替代squid功能。
1环境准备
我们这里只测试nginx的proxy_cache的缓存功能,所以结构越简单越好,这里我们只需要准备一台nginx的虚拟机即可,如果没有nginx,那么我们可以使用epel源,yum安装一个即可:
#添加epel源
root@~>> wget -O /etc/yum.repos.d/epel.repo http://mirrors.aliyun.com/repo/epel-6.repo
#yum安装nginx
root@~>> yum install nginx -y
#rpm -ql查看主要配置文件位置
root@~>> rpm -ql nginx
这里为了简单,只使用简单的nginx.conf配置文件:
root@nginx>> cat nginx.conf
user nginx;
worker_processes 1;
error_log /var/log/nginx/error.log;
pid /var/run/nginx.pid;
events {
worker_connections 1024;
}
http {
include /etc/nginx/mime.types;
default_type application/octet-stream;
log_formatmain '$remote_addr - $remote_user [$time_local] "$request" '
'$status $body_bytes_sent "$http_referer" '
'"$http_user_agent" "$http_x_forwarded_for"';
sendfile on;
keepalive_timeout 65;
server {
listen 80;
location / {
root /usr/share/nginx/html;
index index.html index.htm;
}
}
}
启动查看初始界面是否正常:
root@nginx>> nginx
root@nginx>> netstat -tupln|grep nginx
tcp 00 0.0.0.0:800.0.0.0:* LISTEN 1043/nginx
root@nginx>> curl -I 192.168.16.199
HTTP/1.1 200 OK
Server: nginx/1.0.15
Date: Mon, 14 Sep 2015 09:40:53 GMT
Content-Type: text/html
Content-Length: 3698
Last-Modified: Tue, 16 Jun 2015 21:34:15 GMT
Connection: keep-alive
Accept-Ranges: bytes
一切正常,首页有2张图片,正好用于实验:
root@html>> tree /usr/share/nginx/html/
/usr/share/nginx/html/
|-- 404.html
|-- 50x.html
|-- index.html
|-- nginx-logo.png
`-- poweredby.png
至此环境准备完毕。
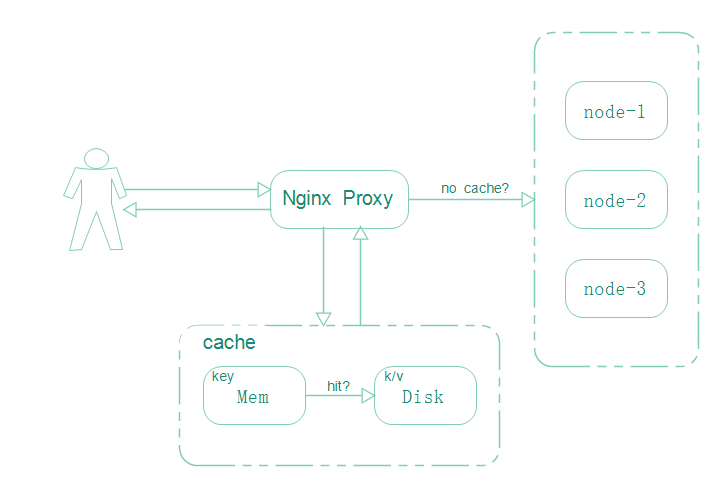
2cache原理
3配置cache
3.1创建目录并挂载tmpfs
nginx的proxy_cache是基于内存和磁盘的缓存,需要指定缓存目录:
root@nginx>> mkdir /tmp/ngx_cache -p
缓存存放于磁盘,磁盘IO会影响缓存的速度,所以我们在将tmpfs挂载于ngx_cache目录上来加速缓存的读取和写入:
root@nginx>> mount -t tmpfs -o size=100M tmpfs /tmp/ngx_cache
root@nginx>> mount|grep tmpfs
tmpfs on /dev/shm type tmpfs (rw)
tmpfs on /tmp/ngx_cache type tmpfs (rw,size=100M)
3.2配置缓存目录大小以及key空间名
将下面配置放至http标签中:
root@nginx>> grep proxy_cache_path nginx.conf
proxy_cache_path /tmp/ngx_cache levels=1:2 keys_zone=cache_one:100m inactive=1d max_size=5g;
#指定缓存目录,缓存等级,键空间名,键空间shm大小,失效时间,以及磁盘最大缓存大小
3.3配置反向代理
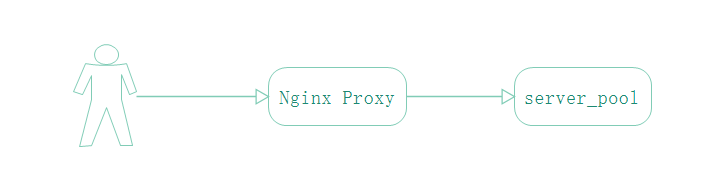
首先配置upstream节点池:
upstream server_pool {
server 127.0.0.1:8080;
}
在server标签的location段中配置代理:
proxy_pass http://server_pool;
配置8080端口的标签:
server {
listen 8080;
location / {
root /usr/share/nginx/html;
index index.html index.htm;
}
access_log/var/log/nginx/access.log main;
}
配置proxy_cache相关参数启用缓存:
proxy_pass http://server_pool;
proxy_next_upstream http_502 http_504 error timeout invalid_header; #出错尝试下一个节点
proxy_cache cache_one; #缓存键空间名
proxy_cache_valid 200 304 12h; #指定对应状态码的缓存时间
proxy_cache_valid 301 302 1m;
proxy_cache_valid any 1m;
proxy_cache_key $host$uri$is_args$args; #指定键key的格式
proxy_set_header Host $host; #传递主机名给后端节点
proxy_set_header X-Forwarded-For $remote_addr; #传递客户端IP给后端节点
expires 1d; #超期时间
最终的nginx.conf配置文件如下:
root@nginx>> cat nginx.conf
user nginx;
worker_processes 1;
error_log /var/log/nginx/error.log;
pid /var/run/nginx.pid;
events {
worker_connections 1024;
}
http {
include /etc/nginx/mime.types;
default_type application/octet-stream;
log_formatmain '$remote_addr - $remote_user [$time_local] "$request" '
'$status $body_bytes_sent "$http_referer" '
'"$http_user_agent" "$http_x_forwarded_for"'
'"addr:$upstream_addr-status:$upstream_status- cachestatus:$upstream_cache_status"';
sendfile on;
keepalive_timeout 65;
proxy_cache_path /tmp/ngx_cache levels=1:2 keys_zone=cache_one:100m inactive=1d max_size=5g;
upstream server_pool {
server 127.0.0.1:8080;
}
server {
listen 80;
location / {
proxy_pass http://server_pool;
proxy_next_upstream http_502 http_504 error timeout invalid_header;
proxy_cache cache_one;
proxy_cache_valid 200 304 12h;
proxy_cache_valid 301 302 1m;
proxy_cache_valid any 1m;
proxy_cache_key $host$uri$is_args$args;
proxy_set_header Host $host;
proxy_set_header X-Forwarded-For $remote_addr;
expires 1d;
}
access_log /var/log/nginx/cache_access.log main;
}
server {
listen 8080;
location / {
root /usr/share/nginx/html;
index index.html index.htm;
}
}
}
3.4配置日志
为了观察缓存的命中状态,我们可以将缓存相关的变量记录在日志中。
定义日志格式:
log_format main'$remote_addr - $remote_user [$time_local] "$request" '
'$status $body_bytes_sent "$http_referer" '
'"$http_user_agent" "$http_x_forwarded_for"'
'"addr:$upstream_addr-status:$upstream_status- cachestatus:$upstream_cache_status"';
#其中upstream_addr记录分发的后端节点IP;upstream_status记录后端节点返回的状态码;upstream_cache_status记录缓存的命中情况。
在反向代理标签中引用日志:
access_log/var/log/nginx/cache_access.logmain;
nginx重新加载配置:
root@nginx>> nginx -s reload
3.5添加头信息查看
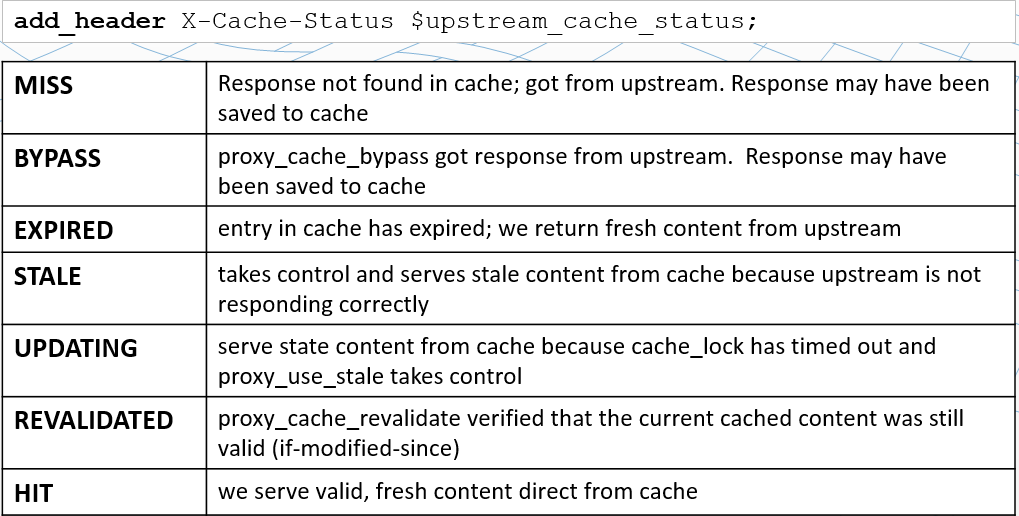
添加响应报头信息:
add_header X-Cache-Status $upstream_cache_status;
查看头信息:
root@~>> curl -I 192.168.16.199
HTTP/1.1 200 OK
Server: nginx/1.0.15
Date: Tue, 15 Sep 2015 02:55:25 GMT
Content-Type: text/html
Connection: keep-alive
Content-Length: 3698
Last-Modified: Tue, 16 Jun 2015 21:34:15 GMT
Expires: Wed, 16 Sep 2015 02:55:25 GMT
Cache-Control: max-age=86400
X-Cache-Status: HIT
Accept-Ranges: bytes
3.6监测缓存
为了监测缓存文件的事件,我们首先安装inotify-tools:
root@/>> yum install inotify-tools
打开一个ssh使用intofiy-tools检测ngx_cache目录:
root@~>> inotifywait -mrq /tmp/ngx_cache/
浏览网站:
root@ngx_cache>> inotifywait -mrq /tmp/ngx_cache/
/tmp/ngx_cache/ CREATE,ISDIR 6
/tmp/ngx_cache/ OPEN,ISDIR 6
/tmp/ngx_cache/ CLOSE_NOWRITE,CLOSE,ISDIR 6
/tmp/ngx_cache/ CREATE,ISDIR 1
/tmp/ngx_cache/ OPEN,ISDIR 1
/tmp/ngx_cache/ CLOSE_NOWRITE,CLOSE,ISDIR 1
/tmp/ngx_cache/ CREATE,ISDIR 3
/tmp/ngx_cache/ OPEN,ISDIR 3
/tmp/ngx_cache/ CLOSE_NOWRITE,CLOSE,ISDIR 3
/tmp/ngx_cache/3/ CREATE,ISDIR fd
/tmp/ngx_cache/3/ OPEN,ISDIR fd
/tmp/ngx_cache/3/ CLOSE_NOWRITE,CLOSE,ISDIR fd
/tmp/ngx_cache/3/fd/ CREATE dd404cd351f6b9efb072e5806dc2efd3.0000000026
/tmp/ngx_cache/3/fd/ OPEN dd404cd351f6b9efb072e5806dc2efd3.0000000026
/tmp/ngx_cache/3/fd/ MODIFY dd404cd351f6b9efb072e5806dc2efd3.0000000026
/tmp/ngx_cache/3/fd/ CLOSE_WRITE,CLOSE dd404cd351f6b9efb072e5806dc2efd3.0000000026
/tmp/ngx_cache/3/fd/ MOVED_FROM dd404cd351f6b9efb072e5806dc2efd3.0000000026
/tmp/ngx_cache/3/fd/ MOVED_TO dd404cd351f6b9efb072e5806dc2efd3
说明:有最后几行可知,图片缓存到目录中。
3.7查看hash对比
添加日志项:
'"KEY:$host$uri$is_args$args"'
重启查看日志项:
192.168.16.1 - - [15/Sep/2015:10:41:23 +0800] "GET /nginx-logo.png HTTP/1.1" 200 368 "http://192.168.16.199/" "Mozilla/5.0 (Windows NT 10.0; WOW64; rv:40.0) Gecko/20100101 Firefox/40.0" "-""addr:--status:-- cachestatus:HIT""KEY:192.168.16.199/nginx-logo.png-"
计算MD5:
root@~>> echo -n "192.168.16.199/nginx-logo.png"|md5sum
6a6e2e4e3251b1aae0488859ed38e7b1 -
缓存文件:
/tmp/ngx_cache/1/7b/ ACCESS 6a6e2e4e3251b1aae0488859ed38e7b1
同时观察三个标红的,之前我们设置了levels=1:2,相当于小抽屉,和memcached的slab以及trunk类似。
Nginx配置ProxyCache缓存的更多相关文章
- nginx配置代理缓存
nginx可以实现反向代理的配置,并且可以使用缓存来加速,本文是简单的实现功能的配置,暂时没有做其他的优化的部分的配置,从网上的资料来看,很多配置都是没有讲哪些是必须配置的,我自己在配置过程中就发现没 ...
- nginx配置资源缓存
缓存nginx服务器的静态文件.如css,js,htm,html,jpg,gif,png,flv,swf,这些文件都不是经常更新.便于缓存以减轻服务器的压力. 打开配置文件/usr/local/ngi ...
- Nginx配置之负载均衡、限流、缓存、黑名单和灰度发布
一.Nginx安装(基于CentOS 6.5) 1.yum命令安装 yum install nginx –y(若不能安装,执行命令yum install epel-release) 2. 启动.停止和 ...
- nginx静态资源缓存策略配置
1. 问题-背景 以前也经常用nginx,但用的不深,通常是简单的设置个location用来做反向代理.直到今天给客户做项目碰到缓存问题:客户有个app,只是用原生做了个壳,里面的内容都是用h5写的, ...
- NGINX负载均衡缓存配置
环境:VMware-Workstation-12-Pro,Windows-10,CentOS-7.5,Xshell5 1 概述 如果我们的架构是前端负载均衡后端WEB集群时,可以开启nginx的缓存功 ...
- 14 nginx 中配置 expires缓存提升网站负载
一:nginx 中配置 expires缓存提升网站负载 对于网站的图片,尤其是新闻站, 图片一旦发布, 改动的可能是非常小的.我们希望 能否在用户访问一次后, 图片缓存在用户的浏览器端,且时间比较长的 ...
- nginx 的 proxy_cache 缓存配置
开头:某个项目涉及到 视频切片下载到本地,然后提供服务给客户端.一个视频有多个文件,存储在本地路径下.当客户端请求的视频在本地没有就会回源, 回源拿到的视频文件再返回给客户端,同时在本地缓存一份,提供 ...
- Nginx服务优化及优化深入(配置网页缓存时间、日志切割、防盗链等等)
原文:https://blog.51cto.com/11134648/2134389 默认的Nginx安装参数只能提供最基本的服务,还需要调整如网页缓存时间.连接超时.网页压缩等相应参数,才能发挥出服 ...
- Nginx如何配置基础缓存
// /path/to/cache/:用于缓存的本地磁盘目录 // levels :在 /path/to/cache/ 设置了一个两级层次结构的目录. // 将大量的文件放置在单个目录中会导致文件访问 ...
随机推荐
- laravel 修改重置密码模板
Laravel里我们可以使用php artisan make:auth来生成一套默认的登陆注册重置邮箱的Authentication System,但是如何修改系统发送给用户的重置密码邮件的样式和内容 ...
- 【test】
{"type":[ {"name":"专题分类","num":1,"value":[ ...
- 在mac os x 下升级emacs
大概是09年的时候接触到emacs这个编辑器,当时我们c语言老师用的,他自信满满,而那时我是个vimer,所以每次看他按那么多组合键我就替他感觉手指头累啊. 再后来我用了几年vim写代码,再后来用了许 ...
- HTMLTestRunner显示用例打印内容
我们知道默认的HTMLTestRunner运行时成功只会显示...,失败也只是显示E suite = unittest.TestLoader().loadTestsFromTestCase(MyTes ...
- {Reship}{Sparse Representation}稀疏表示
===================================================== http://blog.sina.com.cn/s/blog_6d0e97bb01015wo ...
- rem自适应原理
rem自适应原理 rem是根据html的font-size大小来变化,正是基于这个出发,我们可以在每一个设备下根据设备的宽度设置对应的html字号,从而实现了自适应布局.更多介绍请看这篇文章:rem是 ...
- 【数据库】sql连表查询
SQL总结 连表查询 连接查询包括合并.内连接.外连接和交叉连接,如果涉及多表查询,了解这些连接的特点很重要. 只有真正了解它们之间的区别,才能正确使用. 1.Union UNION 操作符用于合并两 ...
- exec 和 exec_
exec_ 是six里面针对py2 , py3 兼容, 而做的重新定义. 和 exec 功能一样. 关键一点是: exec 是一个语法声明,不是一个函数. 也就是说和if,for一样. ex ...
- distinct和group by的性能比较
distinct和group by的性能比较 当去重复的字段 的个数比较多的时候,group by 比distinct要快很多 当去重复的字符 的个数比较少的时候,distinct 比group by ...
- Hadoop 2.7.4 关闭与启动
环境说明:[root@hadp-master sbin]# hadoop versionHadoop 2.7.4 一. 脚本封装全部一起启动.关闭1.1 启动[root@hadp-master sbi ...