Elasticsearch 监控插件安装(elasticsearch-head与Kibana)
摘要
安装Elasticsearch插件Head与Kibana
版本
elasticsearch版本: elasticsearch-2.3.4
elasticsearch-head版本: 2.x(支持elasticsearch 2.x)
Kibana版本: 4.5(支持elasticsearch 2.3 later)
内容
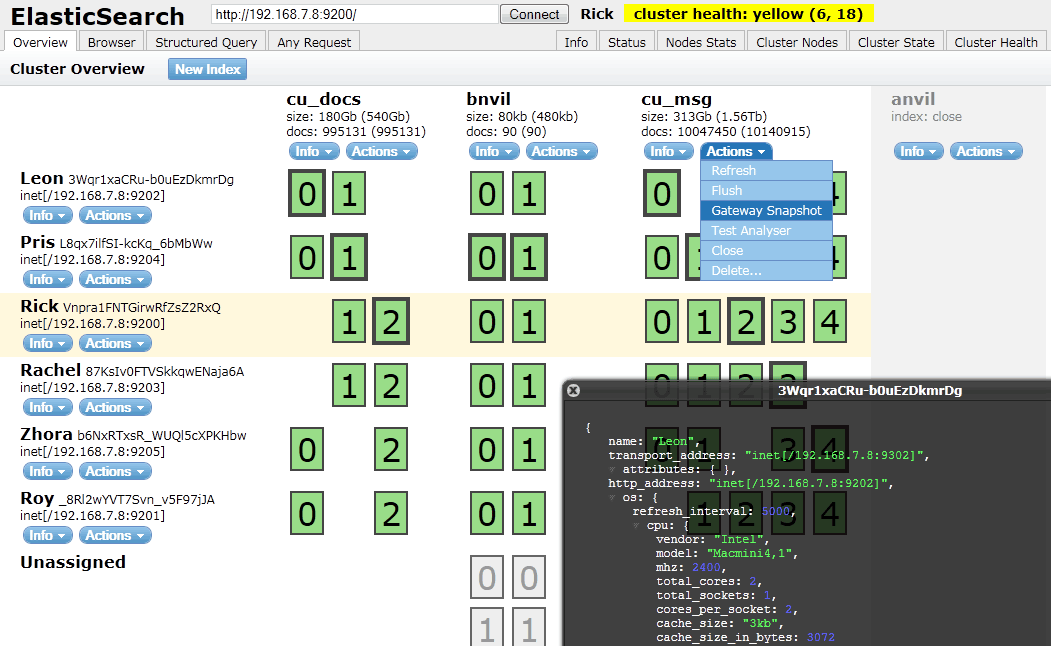
ElasticSearch-Head
关于ElasticSearch-Head官方介绍比较简单,只有一句话:
ElasticSearch-Head 是一个与Elastic集群(Cluster)相交互的Web前台。
ES-Head的主要作用
- 它展现ES集群的拓扑结构,并且可以通过它来进行索引(Index)和节点(Node)级别的操作
- 它提供一组针对集群的查询API,并将结果以json和表格形式返回
- 它提供一些快捷菜单,用以展现集群的各种状态

安装
在线安装
针对ElasticSearch,我们可以直接通过命令行进行在线插件安装
⇒ sudo elasticsearch/bin/plugin install mobz/elasticsearch-head
但是可能会出现SSLHandshakeException错误
参考https://github.com/mobz/elasticsearch-head/issues/190给出的解决方法。
例如:
bin/plugin --install knapsack --url file:///Full/Path/To/elasticsearch-knapsack-2.1.2.zip手动安装
先到github下载文件 elasticsearch-head-master.zip
然后通过指定文件路径来安装
⇒ sudo ./plugin install file:///Users/Richard/Downloads/elasticsearch-head-master.zip
在2.x之前版本的命令行格式为:
bin/plugin --install head --url file:///Full/Path/To/elasticsearch-head-master.zip
Kibana
Kibana 是一个ElasticSearch的管理工具,它也提供了对ES集群操作的API。

Installing Kibana with yum
The repositories set up in this procedure are not compatible with distributions using version 3 of rpm, such as CentOS version 5.
Download and install the public signing key:
rpm --import https://packages.elastic.co/GPG-KEY-elasticsearch
Create a file named
kibana.repoin the/etc/yum.repos.d/directory with the following contents:[kibana-4.5]
name=Kibana repository for 4.5.x packages
baseurl=http://packages.elastic.co/kibana/4.5/centos
gpgcheck=1
gpgkey=http://packages.elastic.co/GPG-KEY-elasticsearch
enabled=1Install Kibana by running the following command:
yum install kibana
Configure Kibana to automatically start during bootup. If your distribution is using the System V version of
init(check withps -p 1), run the following command:chkconfig --add kibana
If your distribution is using
systemd, run the following commands instead:sudo /bin/systemctl daemon-reload
sudo /bin/systemctl enable kibana.service
That’s it! Kibana is now running on port 5601.
Install and Start Kibana local
To get Kibana up and running:
- Download the Kibana 4 binary package for your platform.
- Extract the
.ziportar.gzarchive file. - Run Kibana from the install directory:
bin/kibana(Linux/MacOSX) orbin\kibana.bat(Windows).
On Unix, you can instead run the package manager suited for your distribution.
关于如何配置,请参考:
http://kibana.logstash.es/content/kibana/v4/setup.html
参考:
elasticsearch-head:
https://github.com/mobz/elasticsearch-head
http://mobz.github.io/elasticsearch-head/
ElasticSearch 2 (6) - 插件安装Head、Kopf与Bigdesk
Kibana:
Elasticsearch 监控插件安装(elasticsearch-head与Kibana)的更多相关文章
- Elasticsearch入门教程(一):Elasticsearch及插件安装
原文:Elasticsearch入门教程(一):Elasticsearch及插件安装 版权声明:本文为博主原创文章,遵循CC 4.0 BY-SA版权协议,转载请附上原文出处链接和本声明. 本文链接:h ...
- ELK 学习笔记之 elasticsearch head插件安装
elasticsearch head插件安装: 准备工作: 安装nodejs和npm https://nodejs.org/en/download/ node-v6.11.2-linux-x64.ta ...
- 【windows环境下】RabbitMq的安装和监控插件安装
RabbitMq的安装: RabbitMQ是基于Erlang的,所以必须先配置Erlang环境. 下载Erlang,地址:http://www.erlang.org/download/otp_win3 ...
- 新版elasticsearch的插件安装
安装 yum localinstall elasticsearch-6.1.1.rpm -y mkdir -p /elk/{data,logs} && chown -R elastic ...
- ElasticSearch head 插件安装
head 客户端可以很方便在上面创建索引,类型,文档,还有查询,使用它管理elasticsearch 提高效率. 在安装head 客户端之前必须安装node.js 环境,因为它是用node.js 编写 ...
- Elasticsearch安装(四), elasticsearch head 插件安装和使用。
安装方式如下: 一.安装Elasticsearch-Head 1.插件安装方式(推荐) #在Elasticsearch目录下 $/bin/plugin -install mobz/elasticsea ...
- ElasticSearch及其插件安装配置
elasticsearch安装使用 .安装步骤: 1.下载elasticsearch的rpm包: wget https://artifacts.elastic.co/downloads/elastic ...
- 【linux环境下】RabbitMq的安装和监控插件安装
[注意安装过程中,提示某些命令not found,直接yum isntall一下就好了] 以下是我在CentOS release 6.4下亲测成功的. RabbitMq的安装: RabbitMQ是 ...
- Elasticsearch -- Head插件安装
安装Head插件 由于head插件本质上还是一个nodejs的工程,因此需要安装node,使用npm来安装依赖的包. <1>安装Node.js 下载解压 wget https://node ...
随机推荐
- 01、Windows Phone 套接字(Socket)实战之交互设计
这个 Demo 主要使用 WP 中提供的 Socket 对象,来与 PC 端进行文字.文件的互相传输.因为在 WP 中系统 对存储的操作限制的比较多,例如,你把 .doc..txt..zip 等常见的 ...
- 华中农业大学校赛--c The Same Color
Problem C: The Same Color Time Limit: 1 Sec Memory Limit: 128 MBSubmit: 993 Solved: 595[Submit][St ...
- w3c html dom
http://www.w3school.com.cn/ SQL语句学习 http://www.w3school.com.cn/sql/sql_like.asp
- 跟着百度学PHP[10]-读取COOKIE案例
<?php if(!isset($_COOKIE['visittime'])){ #使用$_COOKIE获取visittime,如果不存在就执行下面的语句块,否则执行else setcookie ...
- oracle存储过程函数
1.函数 create or replace function get_Destroy_no return varchar2 is Result varchar2(50);begin SELECT m ...
- Qt之QThreadPool和QRunnable
简述 QRunnable 是所有 runnable 对象的基类,而 QThreadPool 类用于管理 QThreads 集合. QRunnable 类是一个接口,用于表示一个任务或要执行的代码,需要 ...
- 组建一台计算机5_硬件5 多位存储器&累加器&初始汇编(1)
转载请遵循GNU开源宣言.Copyleft ! <2013>, <http://www.cnblogs.com/sciencefans from buaa 华罗庚班> 阅读此文 ...
- 【转】伪O2O已死?2016年实体零售将迎来真正的O2O
O2O果真如所谓的经济学家许小年所说“是两边都是零,中间一个2货”吗?我觉得,经济学家不是说相声的,这种哗众取宠的观点不应该出自一个严谨的经济学家之口.而且,我也不认为许小年真正懂什么叫O2O. 但O ...
- Android不同版本下Notification创建方法
项目环境 Project Build Target:Android 6.0 问题: 使用 new Notification(int icon, CharSequence tickerText, lon ...
- DELETE 语句用于删除表中的行。
DELETE FROM 表名称 WHERE 列名称 = 值
