A CANBus Tiny Network without Transceiver ICs : STM32F4 Discovery

Sometimes you have a CAN equipped processor on a low cost board but it has no CAN transceiver chips.
Here is a method that can be used to create a small experimental network with such a board.
There will be no noise immunity and you might have to lower the speed….
but many experimenters have made this work satisfactorily.
Use a signal diode similar to 1N914 or 1N4148.
Power supply diodes usually do not have a fast enough recovery time for CAN to function.
Modifying the STM32F4 Discovery:

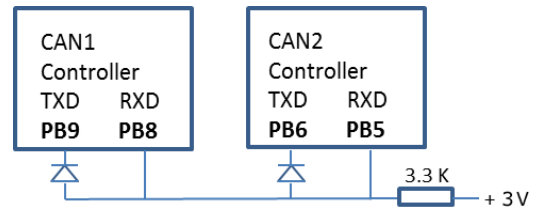
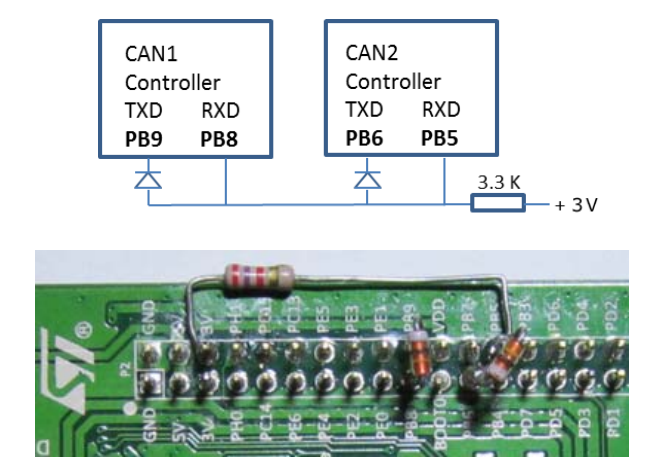
In order to connect the two CAN controllers together, you must add two signal diodes (1N914, 1N4148 or similar)
and one 3.3 KΩ resistor as shown on this schematic.
The connections are easily accessible.
1. Add the three parts as shown on the schematic and in the photo.
2. Connect the resistor to the 3 volt supply as shown.
3. Add a jumper wire (not shown) from PB5 to PB8.
4. Note: I used a 2.7KΩ resistor and it seems to work well.
5. I soldered the components to the board.
6. Note: you will need to open the resistor for a step later.
You cannot connect this to a real CAN network as the voltages are wrong and it is not differential.
It is suitable for small experiments.
TIP: To view CAN frames on an oscilloscope: connect to the low side of the resistor. This will give a clean waveform.
A CANBus Tiny Network without Transceiver ICs : STM32F4 Discovery的更多相关文章
- One-wire Demo on the STM32F4 Discovery Board
One-wire Demo on the STM32F4 Discovery Board Some of the devs at work were struggling to get their s ...
- VGA Output from STM32F4 Discovery board
VGA Output from STM32F4 Discovery board I love the web! There are so many cool projects out there, a ...
- CANBus Determining Network Baud Rate, Automatic bit-rate detection
http://www.canbushack.com/blog/index.php?title=determining-network-baud-rate Determining Network Bau ...
- STM32F4 SPI2初始化及收发数据【使用库函数】
我的STM32F4 Discovery上边有一个加速度传感器LIS302DL.在演示工程中,ST的工程师使用这个传感器做了个很令人羡慕的东西:解算开发板的姿态.当开发板倾斜时候,处于最上边的LED点亮 ...
- STM32F4 HAL Composite USB Device Example : CDC + MSC
STM32F4 USB Composite CDC + MSC I'm in the process of building a USB composite CDC + MSC device on t ...
- Troubleshooting routing topology based on a reference topology
In one embodiment, a computing device (e.g., border router or network management server) transmits a ...
- 搭建基于 STM32 和 rt-thread 的开发平台
我们需要平台 如果说,SharePoint 的价值之一在于提供了几乎开箱即用的 innovation 环境,那么,智能设备的开发平台也一样.不必每次都从头开始,所以需要固定的工作室和开发平台作为创新的 ...
- 【uTenux实验】写在开始实验之前
1.使用的uTenux内核代码:http://www.uloong.cc/cn/download/uTenux_V1.6.00r180.zip 2.uTenux的特性: 1.微内核 2.开放源码.完 ...
- STM32F40xxx 与 STM32F41xxx Flash结构详解
本文原创于http://www.cnblogs.com/humaoxiao,非法转载者请自重! 硬件平台:STM32F4 DISCOVERY开发板 型号:MB997A或MB997C主芯片型号:ST ...
随机推荐
- LeetCode-Valid Number - 有限状态机
判断合法数字,之前好像在哪里看到过这题, 记得当时还写了好久,反正各种改, 今天看到了大神的解法(https://github.com/fuwutu/LeetCode/blob/master/Vali ...
- SQL Server限制IP访问1433端口
1.用系统自带的防火墙,启用防火墙 2.点击[添加端口],名称填1433,端口号填1433 3.协议TCP,点[更改范围],选自定义列表,那个框里就填本机服务器的IP地址.
- ORACLE数据库数据文件转移方法(不同于move方法)
1) 手动拷贝要转移的数据数据文件'd:\OracleData\GWTABLE42.DBF'到新的位置'E:\OracleData\GWTABLE42.DBF'. 2) 把数据文件所属的表空间Offl ...
- linux如何查看端口被哪个进程占用?
参考:https://jingyan.baidu.com/article/546ae1853947b71149f28cb7.html 1.lsof -i:端口号 2.netstat -tunlp|gr ...
- python基础--time和datetime模块
一:说明在Python中,通常有这几种方式来表示时间:1)时间戳 2)格式化的时间字符串 3)元组(struct_time)共九个元素.由于Python的time模块实现主要调用C库,所以各个平台可能 ...
- java Foreach与迭代器
foreach语法主要用于数组,但是它也可以用于Collection对象,下面是一个示例 package object; //: holding/ForEachCollections.java // ...
- csu 1930 roads(DFS)
Description Once upon a time there was a strange kingdom, the kingdom had n cities which were connec ...
- JAVA 图形开发之计算器设计(事件监听机制)
/*文章中用到的代码只是一部分,需要源码的可通过邮箱联系我 1978702969@qq.com*/ 前段时间刚帮同学用MFC写了个计算器,现在学到JAVA的图形开发,就试着水了一个计算器出来.(可以说 ...
- 十个问题带你了解和掌握java HashMap
十个问题带你了解和掌握java HashMap 一.前言 本篇内容是源于 " 由阿里巴巴Java开发规约HashMap条目引发的故事",并在此基础上加了自己的对HashMap更多的 ...
- Python中“if __name__=='__main__':”理解与总结
1 引言 在Python当中,如果代码写得规范一些,通常会写上一句“if __name__==’__main__:”作为程序的入口,但似乎没有这么一句代码,程序也能正常运行.这句代码多余吗?原理又在哪 ...
