ASP.NET Core实现OAuth2.0的AuthorizationCode模式
前言
在上一篇中实现了resource owner password credentials和client credentials模式:http://www.cnblogs.com/skig/p/6079457.html ,而这篇介绍实现AuthorizationCode模式。
OAuth2.0授权框架文档说明参考:https://tools.ietf.org/html/rfc6749 ;
ASP.NET Core开发OAuth2的项目使用了IdentityServer4,参考:https://identityserver4.readthedocs.io/en/dev/,源码:https://github.com/IdentityServer ;
.NET中开发OAuth2可使用OWIN,可参考:https://www.asp.net/aspnet/overview/owin-and-katana/owin-oauth-20-authorization-server
ASP.NET Core实现OAuth2的AuthorizationCode模式
授权服务器
Program.cs --> Main方法中:需要调用UseUrls设置IdentityServer4授权服务的IP地址
             var host = new WebHostBuilder()

                 .UseKestrel()

                 //IdentityServer4的使用需要配置UseUrls

                 .UseUrls("http://localhost:5114")

                 .UseContentRoot(Directory.GetCurrentDirectory())

                 .UseIISIntegration()

                 .UseStartup<Startup>()

                 .Build();
Startup.cs -->ConfigureServices方法中的配置:
             //RSA:证书长度2048以上,否则抛异常

             //配置AccessToken的加密证书

             var rsa = new RSACryptoServiceProvider();

             //从配置文件获取加密证书

             rsa.ImportCspBlob(Convert.FromBase64String(Configuration["SigningCredential"]));

             //配置IdentityServer4

             services.AddSingleton<IClientStore, MyClientStore>();   //注入IClientStore的实现,可用于运行时校验Client

             services.AddSingleton<IScopeStore, MyScopeStore>();    //注入IScopeStore的实现,可用于运行时校验Scope

             //注入IPersistedGrantStore的实现,用于存储AuthorizationCode和RefreshToken等等,默认实现是存储在内存中,

             //如果服务重启那么这些数据就会被清空了,因此可实现IPersistedGrantStore将这些数据写入到数据库或者NoSql(Redis)中

             services.AddSingleton<IPersistedGrantStore, MyPersistedGrantStore>();

             services.AddIdentityServer()

                 .AddSigningCredential(new RsaSecurityKey(rsa));

                 //.AddTemporarySigningCredential()   //生成临时的加密证书,每次重启服务都会重新生成

                 //.AddInMemoryScopes(Config.GetScopes())    //将Scopes设置到内存中

                 //.AddInMemoryClients(Config.GetClients())    //将Clients设置到内存中
Startup.cs --> Configure方法中的配置:
             //使用IdentityServer4

             app.UseIdentityServer();

             //使用Cookie模块

             app.UseCookieAuthentication(new CookieAuthenticationOptions

             {

                 AuthenticationScheme = IdentityServerConstants.ExternalCookieAuthenticationScheme,

                 AutomaticAuthenticate = false,

                 AutomaticChallenge = false

             });
Client配置
方式一:
.AddInMemoryClients(Config.GetClients()) //将Clients设置到内存中,IdentityServer4从中获取进行验证
方式二(推荐):
services.AddSingleton<IClientStore, MyClientStore>(); //注入IClientStore的实现,用于运行时获取和校验Client
IClientStore的实现
     public class MyClientStore : IClientStore

     {

         readonly Dictionary<string, Client> _clients;

         readonly IScopeStore _scopes;

         public MyClientStore(IScopeStore scopes)

         {

             _scopes = scopes;

             _clients = new Dictionary<string, Client>()

             {

                 {

                     "auth_clientid",

                     new Client

                     {

                         ClientId = "auth_clientid",

                         ClientName = "AuthorizationCode Clientid",

                         AllowedGrantTypes = new string[] { GrantType.AuthorizationCode },   //允许AuthorizationCode模式

                         ClientSecrets =

                         {

                             new Secret("secret".Sha256())

                         },

                         RedirectUris = { "http://localhost:6321/Home/AuthCode" },

                         PostLogoutRedirectUris = { "http://localhost:6321/" },

                         //AccessTokenLifetime = 3600, //AccessToken过期时间, in seconds (defaults to 3600 seconds / 1 hour)

                         //AuthorizationCodeLifetime = 300,  //设置AuthorizationCode的有效时间,in seconds (defaults to 300 seconds / 5 minutes)

                         //AbsoluteRefreshTokenLifetime = 2592000,  //RefreshToken的最大过期时间,in seconds. Defaults to 2592000 seconds / 30 day

                         AllowedScopes = (from l in _scopes.GetEnabledScopesAsync(true).Result select l.Name).ToList(),

                     }

                 }

             };

         }

         public Task<Client> FindClientByIdAsync(string clientId)

         {

             Client client;

             _clients.TryGetValue(clientId, out client);

             return Task.FromResult(client);

         }

     }
Scope配置
方式一:
.AddInMemoryScopes(Config.GetScopes()) //将Scopes设置到内存中,IdentityServer4从中获取进行验证
方式二(推荐):
services.AddSingleton<IScopeStore, MyScopeStore>(); //注入IScopeStore的实现,用于运行时获取和校验Scope
IScopeStore的实现
     public class MyScopeStore : IScopeStore

     {

         readonly static Dictionary<string, Scope> _scopes = new Dictionary<string, Scope>()

         {

             {

                 "api1",

                 new Scope

                 {

                     Name = "api1",

                     DisplayName = "api1",

                     Description = "My API",

                 }

             },

             {

                 //RefreshToken的Scope

                 StandardScopes.OfflineAccess.Name,

                 StandardScopes.OfflineAccess

             },

         };

         public Task<IEnumerable<Scope>> FindScopesAsync(IEnumerable<string> scopeNames)

         {

             List<Scope> scopes = new List<Scope>();

             if (scopeNames != null)

             {

                 Scope sc;

                 foreach (var sname in scopeNames)

                 {

                     if (_scopes.TryGetValue(sname, out sc))

                     {

                         scopes.Add(sc);

                     }

                     else

                     {

                         break;

                     }

                 }

             }

             //返回值scopes不能为null

             return Task.FromResult<IEnumerable<Scope>>(scopes);

         }

         public Task<IEnumerable<Scope>> GetScopesAsync(bool publicOnly = true)

         {

             //publicOnly为true:获取public的scope;为false:获取所有的scope

             //这里不做区分

             return Task.FromResult<IEnumerable<Scope>>(_scopes.Values);

         }

     }
资源服务器
资源服务器的配置在上一篇中已介绍(http://www.cnblogs.com/skig/p/6079457.html ),详情也可参考源代码。
测试
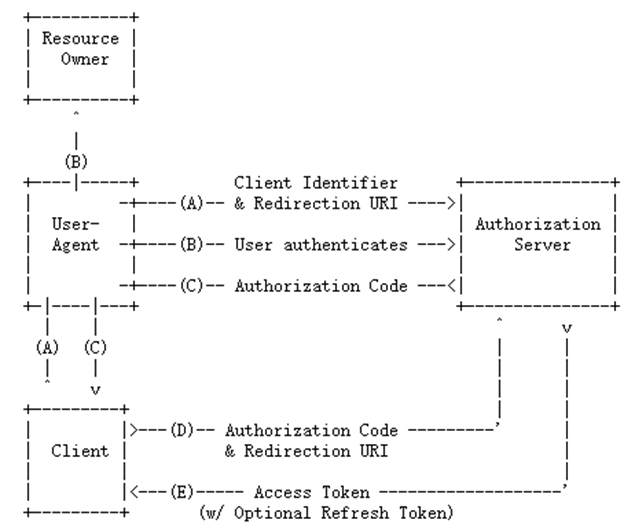
AuthorizationCode模式的流程图(来自:https://tools.ietf.org/html/rfc6749):
流程实现
步骤A
第三方客户端页面简单实现:
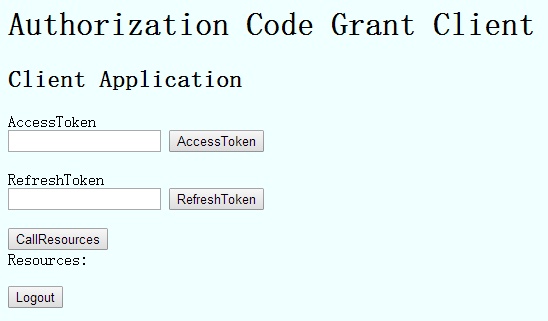
点击AccessToken按钮进行访问授权服务器,就是流程图中步骤A:
                         //访问授权服务器

                         return Redirect(OAuthConstants.AuthorizationServerBaseAddress + OAuthConstants.AuthorizePath + "?"

                             + "response_type=code"

                             + "&client_id=" + OAuthConstants.Clientid

                             + "&redirect_uri=" + OAuthConstants.AuthorizeCodeCallBackPath

                             + "&scope="  + OAuthConstants.Scopes

                             + "&state=" + OAuthConstants.State);
步骤B
授权服务器接收到请求后,会判断用户是否已经登陆,如果未登陆那么跳转到登陆页面(如果已经登陆,登陆的一些相关信息会存储在cookie中):

         /// <summary>

         /// 登陆页面

         /// </summary>

         [HttpGet]

         public async Task<IActionResult> Login(string returnUrl)

         {

             var context = await _interaction.GetAuthorizationContextAsync(returnUrl);

             var vm = BuildLoginViewModel(returnUrl, context);

             return View(vm);

         }

         /// <summary>

         /// 登陆账号验证

         /// </summary>

         [HttpPost]

         [ValidateAntiForgeryToken]

         public async Task<IActionResult> Login(LoginInputModel model)

         {

             if (ModelState.IsValid)

             {

                 //账号密码验证

                 if (model.Username == "admin" && model.Password == "")

                 {

                     AuthenticationProperties props = null;

                     //判断是否 记住登陆

                     if (model.RememberLogin)

                     {

                         props = new AuthenticationProperties

                         {

                             IsPersistent = true,

                             ExpiresUtc = DateTimeOffset.UtcNow.AddMonths()

                         };

                     };

                     //参数一:Subject,可在资源服务器中获取到,资源服务器通过User.Claims.Where(l => l.Type == "sub").FirstOrDefault();获取

                     //参数二:账号

                     await HttpContext.Authentication.SignInAsync("admin", "admin", props);

                     //验证ReturnUrl,ReturnUrl为重定向到授权页面

                     if (_interaction.IsValidReturnUrl(model.ReturnUrl))

                     {

                         return Redirect(model.ReturnUrl);

                     }

                     return Redirect("~/");

                 }

                 ModelState.AddModelError("", "Invalid username or password.");

             }

             //生成错误信息的LoginViewModel

             var vm = await BuildLoginViewModelAsync(model);

             return View(vm);

         }
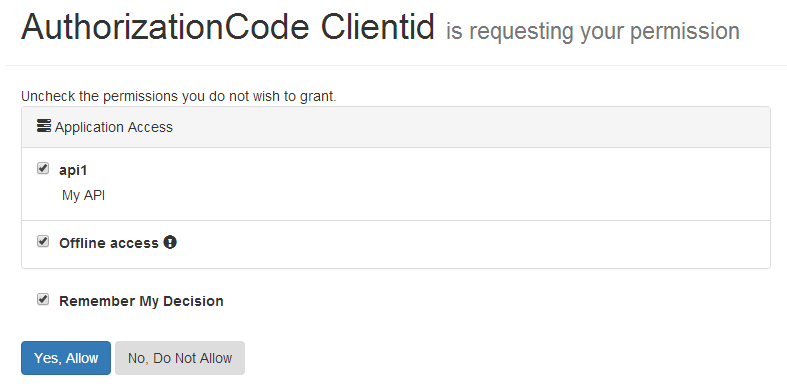
登陆成功后,重定向到授权页面,询问用户是否授权,就是流程图的步骤B了:
         /// <summary>

         /// 显示用户可授予的权限

         /// </summary>

         /// <param name="returnUrl"></param>

         /// <returns></returns>

         [HttpGet]

         public async Task<IActionResult> Index(string returnUrl)

         {

             var vm = await BuildViewModelAsync(returnUrl);

             if (vm != null)

             {

                 return View("Index", vm);

             }

             return View("Error", new ErrorViewModel

             {

                 Error = new ErrorMessage { Error = "Invalid Request" },

             });

         }
步骤C
授权成功,重定向到redirect_uri(步骤A传递的)所指定的地址(第三方端),并且会把Authorization Code也设置到url的参数code中:
         /// <summary>

         /// 用户授权验证

         /// </summary>

         [HttpPost]

         [ValidateAntiForgeryToken]

         public async Task<IActionResult> Index(ConsentInputModel model)

         {

             //解析returnUrl

             var request = await _interaction.GetAuthorizationContextAsync(model.ReturnUrl);

             if (request != null && model != null)

             {

                 if (ModelState.IsValid)

                 {

                     ConsentResponse response = null;

                     //用户不同意授权

                     if (model.Button == "no")

                     {

                         response = ConsentResponse.Denied;

                     }

                     //用户同意授权

                     else if (model.Button == "yes")

                     {

                         //设置已选择授权的Scopes

                         if (model.ScopesConsented != null && model.ScopesConsented.Any())

                         {

                             response = new ConsentResponse

                             {

                                 RememberConsent = model.RememberConsent,

                                 ScopesConsented = model.ScopesConsented

                             };

                         }

                         else

                         {

                             ModelState.AddModelError("", "You must pick at least one permission.");

                         }

                     }

                     else

                     {

                         ModelState.AddModelError("", "Invalid Selection");

                     }

                     if (response != null)

                     {

                         //将授权的结果设置到identityserver中

                         await _interaction.GrantConsentAsync(request, response);

                         //授权成功重定向

                         return Redirect(model.ReturnUrl);

                     }

                 }

                 //有错误,重新授权

                 var vm = await BuildViewModelAsync(model.ReturnUrl, model);

                 if (vm != null)

                 {

                     return View(vm);

                 }

             }

             return View("Error", new ErrorViewModel

             {

                 Error = new ErrorMessage { Error = "Invalid Request" },

             });

         }
步骤D
授权成功后重定向到指定的第三方端(步骤A所指定的redirect_uri),然后这个重定向的地址中去实现获取AccessToken(就是由第三方端实现):
         public IActionResult AuthCode(AuthCodeModel model)

         {

             GrantClientViewModel vmodel = new GrantClientViewModel();

             if (model.state == OAuthConstants.State)

             {

                 //通过Authorization Code获取AccessToken

                 var client = new HttpClientHepler(OAuthConstants.AuthorizationServerBaseAddress + OAuthConstants.TokenPath);

                 client.PostAsync(null,

                     "grant_type=" + "authorization_code" +

                     "&code=" + model.code +    //Authorization Code

                     "&redirect_uri=" + OAuthConstants.AuthorizeCodeCallBackPath +

                     "&client_id=" + OAuthConstants.Clientid +

                     "&client_secret=" + OAuthConstants.Secret,

                     hd => hd.ContentType = new System.Net.Http.Headers.MediaTypeHeaderValue("application/x-www-form-urlencoded"),

                     rtnVal =>

                     {

                         var jsonVal = JsonConvert.DeserializeObject<dynamic>(rtnVal);

                         vmodel.AccessToken = jsonVal.access_token;

                         vmodel.RefreshToken = jsonVal.refresh_token;

                     },

                     fault => _logger.LogError("Get AccessToken Error: " + fault.ReasonPhrase),

                     ex => _logger.LogError("Get AccessToken Error: " + ex)).Wait();

             }

             return Redirect("~/Home/Index?"

                 + nameof(vmodel.AccessToken) + "=" + vmodel.AccessToken + "&"

                 + nameof(vmodel.RefreshToken) + "=" + vmodel.RefreshToken);

         }
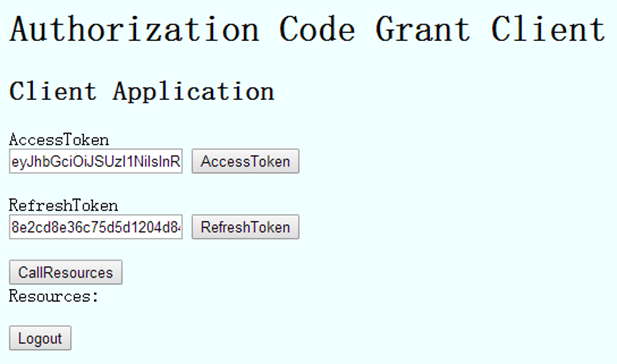
步骤E
授权服务器对步骤D请求传递的Authorization Code进行验证,验证成功生成AccessToken并返回:
其中,点击RefreshToken进行刷新AccessToken:
                             //刷新AccessToken

                             var client = new HttpClientHepler(OAuthConstants.AuthorizationServerBaseAddress + OAuthConstants.TokenPath);

                             client.PostAsync(null,

                                 "grant_type=" + "refresh_token" +

                                 "&client_id=" + OAuthConstants.Clientid +

                                 "&client_secret=" + OAuthConstants.Secret +

                                 "&refresh_token=" + model.RefreshToken,

                                 hd => hd.ContentType = new System.Net.Http.Headers.MediaTypeHeaderValue("application/x-www-form-urlencoded"),

                                 rtnVal =>

                                 {

                                     var jsonVal = JsonConvert.DeserializeObject<dynamic>(rtnVal);

                                     vmodel.AccessToken = jsonVal.access_token;

                                     vmodel.RefreshToken = jsonVal.refresh_token;

                                 },

                                 fault => _logger.LogError("RefreshToken Error: " + fault.ReasonPhrase),

                                 ex => _logger.LogError("RefreshToken Error: " + ex)).Wait();
点击CallResources访问资源服务器:
                             //访问资源服务

                             var client = new HttpClientHepler(OAuthConstants.ResourceServerBaseAddress + OAuthConstants.ResourcesPath);

                             client.GetAsync(null,

                                     hd => hd.Add("Authorization", "Bearer " + model.AccessToken),

                                     rtnVal => vmodel.Resources = rtnVal,

                                     fault => _logger.LogError("CallResources Error: " + fault.ReasonPhrase),

                                     ex => _logger.LogError("CallResources Error: " + ex)).Wait();
点击Logout为注销登陆:
                             //访问授权服务器,注销登陆

                             return Redirect(OAuthConstants.AuthorizationServerBaseAddress + OAuthConstants.LogoutPath + "?"

                                 + "logoutId=" + OAuthConstants.Clientid);
授权服务器的注销实现代码:
         /// <summary>

         /// 注销登陆页面(因为账号的一些相关信息会存储在cookie中的)

         /// </summary>

         [HttpGet]

         public async Task<IActionResult> Logout(string logoutId)

         {

             if (User.Identity.IsAuthenticated == false)

             {

                 //如果用户并未授权过,那么返回

                 return await Logout(new LogoutViewModel { LogoutId = logoutId });

             }

             //显示注销提示, 这可以防止攻击, 如果用户签署了另一个恶意网页

             var vm = new LogoutViewModel

             {

                 LogoutId = logoutId

             };

             return View(vm);

         }

         /// <summary>

         /// 处理注销登陆

         /// </summary>

         [HttpPost]

         [ValidateAntiForgeryToken]

         public async Task<IActionResult> Logout(LogoutViewModel model)

         {

             //清除Cookie中的授权信息

             await HttpContext.Authentication.SignOutAsync();

             //设置User使之呈现为匿名用户

             HttpContext.User = new ClaimsPrincipal(new ClaimsIdentity());

             Client logout = null;

             if (model != null && !string.IsNullOrEmpty(model.LogoutId))

             {

                 //获取Logout的相关信息

                 logout = await _clientStore.FindClientByIdAsync(model.LogoutId);

             }

             var vm = new LoggedOutViewModel

             {

                 PostLogoutRedirectUri = logout?.PostLogoutRedirectUris?.FirstOrDefault(),

                 ClientName = logout?.ClientName,

             };

             return View("LoggedOut", vm);

         }
注意
1. 授权服务器中生成的RefreshToken和AuthorizationCode默认是存储在内存中的,因此如果服务重启这些数据就失效了,那么就需要实现IPersistedGrantStore接口对这些数据的存储,将这些数据写入到数据库或者NoSql(Redis)中,实现代码可参考源代码;
2.资源服务器在第一次解析AccessToken的时候会先到授权服务器获取配置数据(例如会访问:http://localhost:5114/.well-known/openid-configuration 获取配置的,http://localhost:5114/.well-known/openid-configuration/jwks 获取jwks)),之后解析AccessToken都会使用第一次获取到的配置数据,因此如果授权服务的配置更改了(加密证书等等修改了),那么应该重启资源服务器使之重新获取新的配置数据;
3.调试IdentityServer4框架的时候应该配置好ILogger,因为授权过程中的访问(例如授权失败等等)信息都会调用ILogger进行日志记录,可使用NLog,例如:
在Startup.cs --> Configure方法中配置:loggerFactory.AddNLog();//添加NLog
源码:http://files.cnblogs.com/files/skig/OAuth2AuthorizationCode.zip
ASP.NET Core实现OAuth2.0的AuthorizationCode模式的更多相关文章
- ASP.NET Core实现OAuth2.0的ResourceOwnerPassword和ClientCredentials模式
前言 开发授权服务框架一般使用OAuth2.0授权框架,而开发Webapi的授权更应该使用OAuth2.0授权标准,OAuth2.0授权框架文档说明参考:https://tools.ietf.org/ ...
- NET Core实现OAuth2.0的ResourceOwnerPassword和ClientCredentials模式
NET Core实现OAuth2.0的ResourceOwnerPassword和ClientCredentials模式 前言 开发授权服务框架一般使用OAuth2.0授权框架,而开发Webapi的授 ...
- ASP.NET Core 1.1.0 Release Notes
ASP.NET Core 1.1.0 Release Notes We are pleased to announce the release of ASP.NET Core 1.1.0! Antif ...
- Asp.net Core 1.0.1升级到Asp.net Core 1.1.0 Preview版本发布到Windows Server2008 R2 IIS中的各种坑
Asp.net Core 1.0.1升级到Asp.net Core 1.1.0后,程序无法运行了 解决方案:在project.json中加入runtime节点 "runtimes" ...
- ASP.NET CORE MVC 2.0 项目中引用第三方DLL报错的解决办法 - InvalidOperationException: Cannot find compilation library location for package
目前在学习ASP.NET CORE MVC中,今天看到微软在ASP.NET CORE MVC 2.0中又恢复了允许开发人员引用第三方DLL程序集的功能,感到甚是高兴!于是我急忙写了个Demo想试试,我 ...
- [翻译] ASP.NET Core 2.1.0 发布
原文: ASP.NET Core 2.1.0 now available 今天,我们很高兴可以发布 ASP.NET Core 2.1.0!这是我们 .NET平台下开源的.跨平台的 Web 框架的最新版 ...
- ASP.NET WebApi 基于OAuth2.0实现Token签名认证
一.课程介绍 明人不说暗话,跟着阿笨一起玩WebApi!开发提供数据的WebApi服务,最重要的是数据的安全性.那么对于我们来说,如何确保数据的安全将是我们需要思考的问题.为了保护我们的WebApi数 ...
- 在IIS上部署Asp.Net Core 2.2.0
1. .NET Core与Windows环境 Asp.Net Core 2.2.0 Windows 10 2. 先决条件 下载并安装.Net Core Hosting Bundle. 3. 部署过 ...
- asp.net core 从 3.0 到 3.1
asp.net core 从 3.0 到 3.1 Intro 今天 .net core 3.1 正式发布了,.net core 3.1 正式版已发布,3.1 主要是对 3.0 的 bug 修复,以及一 ...
随机推荐
- 可拖动的DIV
在做WEB UI设计的时候,拖动某个HTML元素已经成为一种不能忽视的用户界面模式,比较典型的应用例子就是Dialog,一个元素是怎么实现拖动的呢?其实原理非常简单,要想实现首先得了解几个基本知识. ...
- java系统性能分析
netstat -ano | findstr 31900 注意最后是pid 堆栈的作用: 线程死锁分析 辅助CPU过高分析 线程资源不足分析 性能瓶颈分析 关键线程异常退出 Windows:在运行ja ...
- 爱上MVC系列~过滤器实现对响应流的处理
回到目录 MVC的过滤器相信大家都用过,一般用来作权限控制,因为它可以监视你的Action从进入到最后View的渲染,整个过程ActionFilter这个过滤器都参与了,而这给我们的开发带来了更多的好 ...
- Node.js入门:文件查找机制
文件查找流程图 从文件模块缓存中加载 尽管原生模块与文件模块的优先级不同,但是都不会优先于从文件模块的缓存中加载已经存在的模块. 从原生模块加载 原生模块的优先级仅次于文件模块缓存的优 ...
- Atitit 面向对象 封装的实现原理
Atitit 面向对象 封装的实现原理 1.1. 动态对象的模拟使用map+函数接口可以实现1 1.2. 在用结构体 + 函数指针 模拟 对象 1 1.3. This指针..1 1.4. " ...
- fir.im Weekly - 深度揭秘 App 启动全过程
世纪寒潮席卷全中国,可谓普天之下莫低0℃.无论怎样的严寒都抵挡不了程序员们的创造的激情... 本期的 fir.im Weekly ,最新的 iOS/Android 开发资源,GitHub 源码.前端技 ...
- 静态(static)代码块、构造代码块、构造函数、父类子类执行顺序
静态代码块:static修饰的代码块. 在类加载-初始化的时候进行,主要目的是给变量赋予初始值 构造代码块:直接在类中定义且没有加static关键字的代码块称为构造代码块. java会把构造代码块放到 ...
- unity生成的WP8.1工程的Title本地化实现
不同于WP本身工程的实现,unity的工程在package.appxmanifest文件中已经定义了 <Resources> <Resource Language="x-g ...
- 快速入门系列--WCF--02消息、会话与服务寄宿
经过WCF基础的ABC学习,已经可以构建简单的WCF的服务,使用不同的服务地址和绑定类型,根据业务提供所需的服务契约.但不禁想问,服务所使用的消息报文是什么样的形式么?蕴含什么样内容呢?WCF服务是否 ...
- 面向对象tab栏例子分析
<!DOCTYPE html> <html lang="en"> <head> <meta charset="UTF-8&quo ...