吴裕雄--天生自然 pythonTensorFlow图形数据处理:TensorFlow图像处理函数
import numpy as np
import tensorflow as tf
import matplotlib.pyplot as plt #读取图片
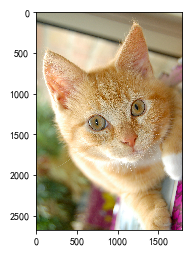
image_raw_data = tf.gfile.FastGFile("F:\\TensorFlowGoogle\\201806-github\\datasets\\cat.jpg",'rb').read() with tf.Session() as sess:
img_data = tf.image.decode_jpeg(image_raw_data)
# 输出解码之后的三维矩阵。
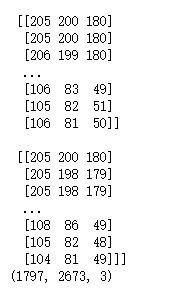
print(img_data.eval())
img_data.set_shape([1797, 2673, 3])
print(img_data.get_shape())
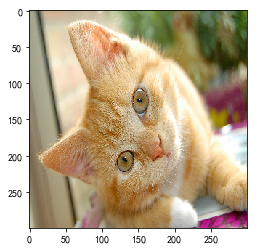
#打印图片

with tf.Session() as sess:

    plt.imshow(img_data.eval())

    plt.show()

#重新调整图片大小

with tf.Session() as sess:

    # 如果直接以0-255范围的整数数据输入resize_images,那么输出将是0-255之间的实数,

    # 不利于后续处理。建议在调整图片大小前,先将图片转为0-1范围的实数。

    image_float = tf.image.convert_image_dtype(img_data, tf.float32)

    resized = tf.image.resize_images(image_float, [300, 300], method=0)

    plt.imshow(resized.eval())

    plt.show()
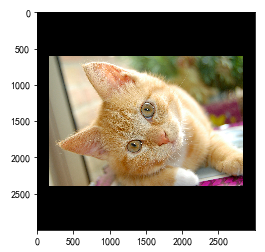
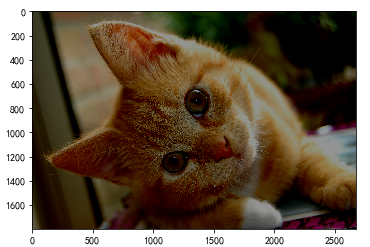
#裁剪和填充图片

with tf.Session() as sess:

    croped = tf.image.resize_image_with_crop_or_pad(img_data, 1000, 1000)

    padded = tf.image.resize_image_with_crop_or_pad(img_data, 3000, 3000)

    plt.imshow(croped.eval())

    plt.show()

    plt.imshow(padded.eval())

    plt.show()
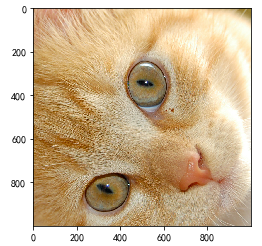
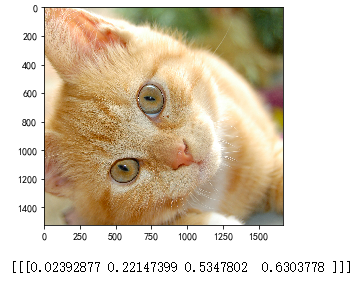
#截取中间50%的图片

with tf.Session() as sess:

    central_cropped = tf.image.central_crop(img_data, 0.5)

    plt.imshow(central_cropped.eval())

    plt.show()

#翻转图片

with tf.Session() as sess:

    # 上下翻转

    #flipped1 = tf.image.flip_up_down(img_data)

    # 左右翻转

    #flipped2 = tf.image.flip_left_right(img_data)

    #对角线翻转

    transposed = tf.image.transpose_image(img_data)

    plt.imshow(transposed.eval())

    plt.show()

    # 以一定概率上下翻转图片。

    #flipped = tf.image.random_flip_up_down(img_data)

    # 以一定概率左右翻转图片。

    #flipped = tf.image.random_flip_left_right(img_data)
#图片色彩调整

with tf.Session() as sess:

    # 在进行一系列图片调整前,先将图片转换为实数形式,有利于保持计算精度。

    image_float = tf.image.convert_image_dtype(img_data, tf.float32)

    # 将图片的亮度-0.5。

    #adjusted = tf.image.adjust_brightness(image_float, -0.5)

    # 将图片的亮度0.5

    #adjusted = tf.image.adjust_brightness(image_float, 0.5)

    # 在[-max_delta, max_delta)的范围随机调整图片的亮度。

    adjusted = tf.image.random_brightness(image_float, max_delta=0.5)

    # 将图片的对比度-5

    #adjusted = tf.image.adjust_contrast(image_float, -5)

    # 将图片的对比度+5

    #adjusted = tf.image.adjust_contrast(image_float, 5)

    # 在[lower, upper]的范围随机调整图的对比度。

    #adjusted = tf.image.random_contrast(image_float, lower, upper)

    # 在最终输出前,将实数取值截取到0-1范围内。

    adjusted = tf.clip_by_value(adjusted, 0.0, 1.0)

    plt.imshow(adjusted.eval())

    plt.show()
#添加色相和饱和度

with tf.Session() as sess:

    # 在进行一系列图片调整前,先将图片转换为实数形式,有利于保持计算精度。

    image_float = tf.image.convert_image_dtype(img_data, tf.float32)

    adjusted = tf.image.adjust_hue(image_float, 0.1)

    #adjusted = tf.image.adjust_hue(image_float, 0.3)

    #adjusted = tf.image.adjust_hue(image_float, 0.6)

    #adjusted = tf.image.adjust_hue(image_float, 0.9)

    # 在[-max_delta, max_delta]的范围随机调整图片的色相。max_delta的取值在[0, 0.5]之间。

    #adjusted = tf.image.random_hue(image_float, max_delta)

    # 将图片的饱和度-5。

    #adjusted = tf.image.adjust_saturation(image_float, -5)

    # 将图片的饱和度+5。

    #adjusted = tf.image.adjust_saturation(image_float, 5)

    # 在[lower, upper]的范围随机调整图的饱和度。

    #adjusted = tf.image.random_saturation(image_float, lower, upper)

    # 将代表一张图片的三维矩阵中的数字均值变为0,方差变为1。

    #adjusted = tf.image.per_image_whitening(image_float)

    # 在最终输出前,将实数取值截取到0-1范围内。

    adjusted = tf.clip_by_value(adjusted, 0.0, 1.0)

    plt.imshow(adjusted.eval())

    plt.show()

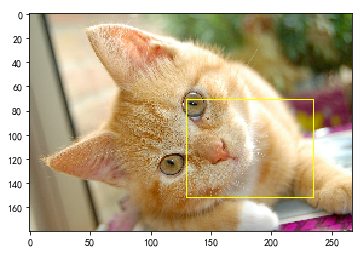
#添加标注框并裁减。

with tf.Session() as sess:

    boxes = tf.constant([[[0.05, 0.05, 0.9, 0.7], [0.35, 0.47, 0.5, 0.56]]])

    # sample_distorted_bounding_box要求输入图片必须是实数类型。

    image_float = tf.image.convert_image_dtype(img_data, tf.float32)

    begin, size, bbox_for_draw = tf.image.sample_distorted_bounding_box(tf.shape(image_float), bounding_boxes=boxes, min_object_covered=0.4)

    # 截取后的图片

    distorted_image = tf.slice(image_float, begin, size)

    plt.imshow(distorted_image.eval())

    plt.show()

    # 在原图上用标注框画出截取的范围。由于原图的分辨率较大(2673x1797),生成的标注框

    # 在Jupyter Notebook上通常因边框过细而无法分辨,这里为了演示方便先缩小分辨率。

    image_small = tf.image.resize_images(image_float, [180, 267], method=0)

    batchced_img = tf.expand_dims(image_small, 0)

    image_with_box = tf.image.draw_bounding_boxes(batchced_img, bbox_for_draw)

    print(bbox_for_draw.eval())

    plt.imshow(image_with_box[0].eval())

    plt.show()
吴裕雄--天生自然 pythonTensorFlow图形数据处理:TensorFlow图像处理函数的更多相关文章
- 吴裕雄--天生自然 pythonTensorFlow图形数据处理:windows操作系统安装指定版本的tensorflow
pip install tensorflow==1.14.0
- 吴裕雄--天生自然 pythonTensorFlow图形数据处理:windows操作系统删除tensorflow
输入:pip uninstall tensorflow Proceed(y/n):y
- 吴裕雄--天生自然 pythonTensorFlow图形数据处理:解决module 'tensorflow' has no attribute 'Session'
原因:因为是tensorflow 2.0版本
- 吴裕雄--天生自然 pythonTensorFlow图形数据处理:循环神经网络预测正弦函数
import numpy as np import tensorflow as tf import matplotlib.pyplot as plt # 定义RNN的参数. HIDDEN_SIZE = ...
- 吴裕雄--天生自然 pythonTensorFlow图形数据处理:数据集高层操作
import tempfile import tensorflow as tf # 1. 列举输入文件. # 输入数据生成的训练和测试数据. train_files = tf.train.match_ ...
- 吴裕雄--天生自然 pythonTensorFlow图形数据处理:数据集基本使用方法
import tempfile import tensorflow as tf # 1. 从数组创建数据集. input_data = [1, 2, 3, 5, 8] dataset = tf.dat ...
- 吴裕雄--天生自然 pythonTensorFlow图形数据处理:输入数据处理框架
import tensorflow as tf # 1. 创建文件列表,通过文件列表创建输入文件队列 files = tf.train.match_filenames_once("F:\\o ...
- 吴裕雄--天生自然 pythonTensorFlow图形数据处理:输入文件队列
import tensorflow as tf # 1. 生成文件存储样例数据. def _int64_feature(value): return tf.train.Feature(int64_li ...
- 吴裕雄--天生自然 pythonTensorFlow图形数据处理:多线程队列操作
import tensorflow as tf #1. 定义队列及其操作. queue = tf.FIFOQueue(100,"float") enqueue_op = queue ...
随机推荐
- 进度5_家庭记账本App_数据库的添加和查看
今天继续在昨天的基础上完成了家庭记账单的在数据库中的添加和查看功能 在之前的基础上舍弃了Fragment,重新在百度上找到了学习资料,并且自我完成了实践 首先在之前的基础上创建CostListAdap ...
- monkey命令详解《转载》
monkey命令详解: https://blog.csdn.net/a136332462/article/details/76014412
- node.js爱心邮件
一.用的软件是VsCode:下载地址:https://code.visualstudio.com/ 二.用的是node.js完成:下载地址:http://nodejs.cn/download/ 无脑下 ...
- cnblogs今天挂了
刚打算搬进来常驻cnblogs,好死不死,它今天11点40分左右挂了.真是不让人省心: 今天把这后面这几个月的随笔放过来,希望能不会被清掉:
- 文献阅读 - MonoLoco与关于Camera Matrix的笔记
目录 概览 HighLights Camera Intrinsic Matrix 笔记 Intrinsic Matrix Task-Error - 不确定性任务下确界的计算 输出假设的Laplace分 ...
- Pickle incompatibility of numpy arrays between Python 2 and 3
Traceback (most recent call last): File "mnist.py", line 7, in <module> train_set, v ...
- [题解] CF622F The Sum of the k-th Powers
CF622F The Sum of the k-th Powers 题意:给\(n\)和\(k\),让你求\(\sum\limits_{i = 1} ^ n i^k \ mod \ 10^9 + 7\ ...
- Zookeeper--Zookeeper单机安装
参考 https://www.cnblogs.com/lsdb/p/7297731.html https://zookeeper.apache.org/doc/r3.4.13/zookeeperSta ...
- git登录账号密码错误remote: Incorrect username or password (access token)
git提交时弹框让输入用户和密码,不小心输入错误了 再次提交 一直就提示 remote: Incorrect username or password 错误了,也不弹框要重新输入 解决方法 win1 ...
- kube-controller-manager配置详解
KUBE_MASTER="--master=http://10.83.52.137:8080" KUBE_CONTROLLER_MANAGER_ARGS=" "