python通过scapy编写arp扫描器
多网卡的情况下发送二层包需要配置网卡
三层包不需要配置接口
发包方法:
sr()

发送三层数据包,等待接收一个或者多个数据包的响应

sr1()

发送三层数据包,只会接收一个数据包的响应

srp()

发送二层数据包,然后一直等待回应

srp1()

发送二层发送数据包,只返回第一个答案

send()

只发送三层数据包,系统自动处理路由和两层信息

sendp()

只发送二层数据包

带p字母的都是发送二层数据包,必须要写以太网头部Ether(),而且如果是多接口一定要指定接口

不带p字母都是发送三层数据包,不需要填Ether头部,不需要指定接口
hwdst表示硬件MAC
verbose=False 表示关闭scapy自身的回显
通过Scapy看ARP结构:
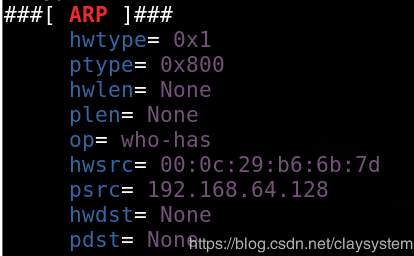
hwdst表示硬件MAC
verbose=False 表示关闭scapy自身的回显
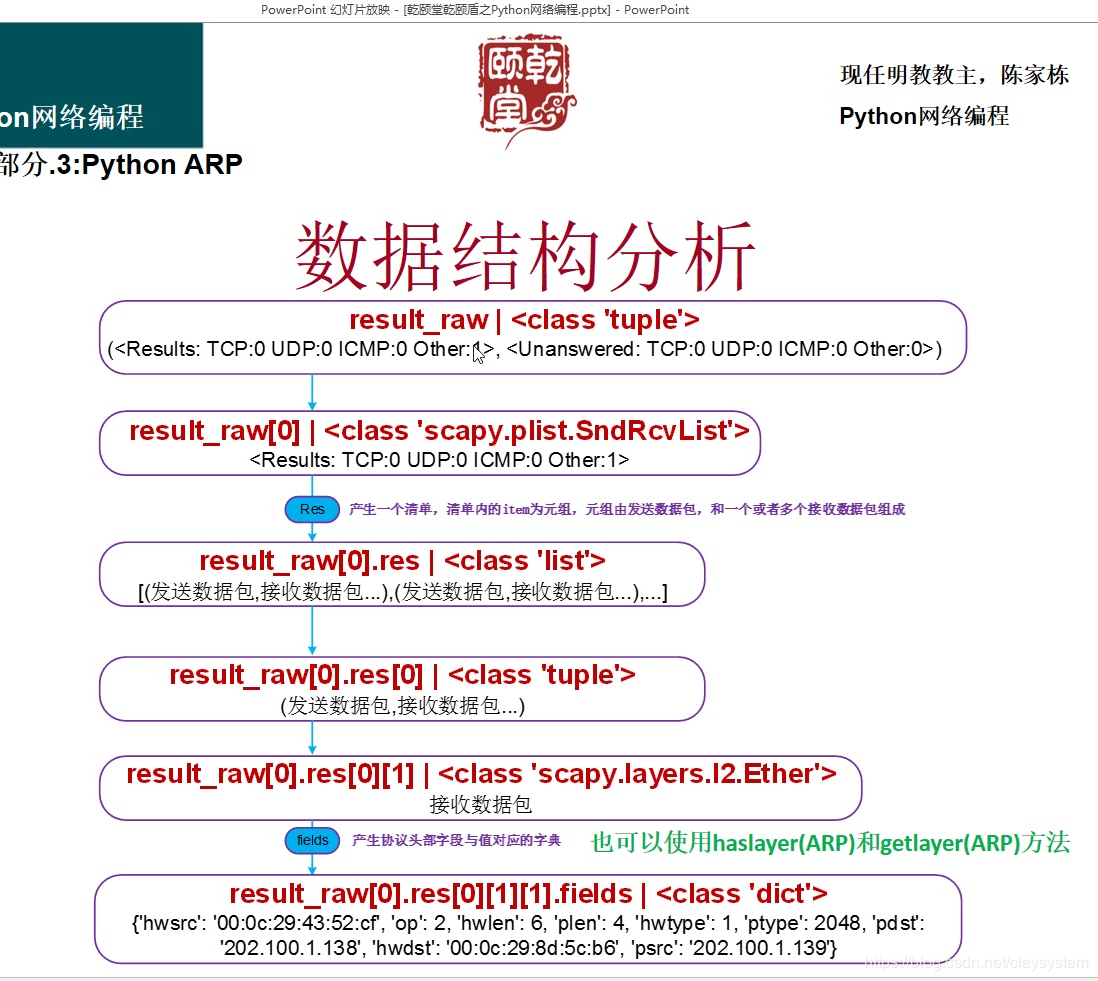
srp返回包结构分析:
Demo:
#!/usr/bin/python3

from scapy.all import *

localmac = '00:0c:29:b6:6b:7d'

localip = '192.168.64.128'

destip = '192.168.64.129'

intername ='eth0'

result_raw = srp(Ether(src=localmac,dst='FF:FF:FF:FF:FF:FF')/ARP(op=1,hwsrc=localmac,hwdst='00:00:00:00:00:00',psrc=localip,pdst=destip),iface = intername,timeout=1,verbose=False)

print("srp返回的类型",type(result_raw));

print("srp返回的信息:",result_raw);

print("=================================");

print("读取tuple中的第一个元素:",result_raw[0]);

print("类型:",type(result_raw[0]));

print("通过res方法将这个scapy内置的类转换成一个由tuple组成的list");

print("=================res======================")

print(result_raw[0].res);

print("=================end======================");

#res返回的是一个list 可是这个list中只有一个tuple阿 [0] [0]指的是什么数据阿

print("通过getlayer(ARP).fields函数将结果转换为字典");

print(result_raw[0].res[0][1].getlayer(ARP).fields)
输出结果:
srp返回的类型 <class 'tuple'>

srp返回的信息: (<Results: TCP:0 UDP:0 ICMP:0 Other:1>, <Unanswered: TCP:0 UDP:0 ICMP:0 Other:0>)

=================================

读取tuple中的第一个元素: <Results: TCP:0 UDP:0 ICMP:0 Other:1>

类型: <class 'scapy.plist.SndRcvList'>

通过res方法将这个scapy内置的类转换成一个由tuple组成的list

=================res======================

[(<Ether  dst=FF:FF:FF:FF:FF:FF src=00:0c:29:b6:6b:7d type=0x806 |<ARP  op=who-has hwsrc=00:0c:29:b6:6b:7d psrc=192.168.64.128 hwdst=00:00:00:00:00:00 pdst=192.168.64.129 |>>

, <Ether  dst=00:0c:29:b6:6b:7d src=00:0c:29:05:66:e5 type=0x806 |<ARP  hwtype=0x1 ptype=0x800 hwlen=6 plen=4 op=is-at hwsrc=00:0c:29:05:66:e5 psrc=192.168.64.129 hwdst=00:0c:29:b6:6b:7d pdst=192.168.64.128 |<Padding  load='\x00\x00\x00\x00\x00\x00\x00\x00\x00\x00\x00\x00\x00\x00\x00\x00\x00\x00' |>>>)]

=================end======================

通过getlayer(ARP).fields函数将结果转换为字典

{'hwtype': 1, 'ptype': 2048, 'hwlen': 6, 'plen': 4, 'op': 2, 'hwsrc': '00:0c:29:05:66:e5', 'psrc': '192.168.64.129', 'hwdst': '00:0c:29:b6:6b:7d', 'pdst': '192.168.64.128'}
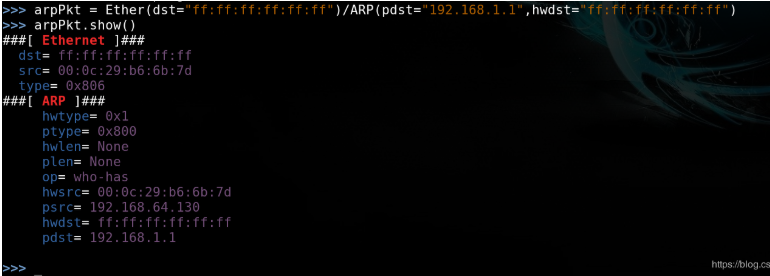
根据赛题构造一个ARP包:
scapy:
arpPkt = Ether(dst="ff:ff:ff:ff:ff:ff")/ARP(pdst='192.168.64.129',hwdst="ff:ff:ff:ff:ff:ff")

参数解释:

Ether()以太网包

dst=广播地址

ARP()ARP包

pdst=目标IP地址

hwdst=广播地址
演示scapy中ARP包结构:
发送ARP包:
res = srp1(arpPkt,timeout=1,verbose=False)

参数解释:

srp1 : Send and receive packets at layer 2 and return only the first answer

翻译来就是 在第2层发送和接收数据包,只返回第一个答案

timeout:设置超时时间

verbose:设置scapy的回显,False表示关闭 默认是开启的
查看srp1返回包的类型,这个比较关键
type(res);

<class 'scapy.layers.l2.Ether'>
可以发现这里返回包结构的数据类型是:scapy.layers.l2.Ether,之前使用srp接收数据包的类型是scapy.plist.SndRcvList
返回包的结构:
>>> res.show()
###[ Ethernet ]###
dst= 00:0c:29:b6:6b:7d
src= 00:0c:29:05:66:e5
type= 0x806
###[ ARP ]###
hwtype= 0x1
ptype= 0x800
hwlen= 6
plen= 4
op= is-at
hwsrc= 00:0c:29:05:66:e5
psrc= 192.168.64.129
hwdst= 00:0c:29:b6:6b:7d
pdst= 192.168.64.130
###[ Padding ]###
load= '\x00\x00\x00\x00\x00\x00\x00\x00\x00\x00\x00\x00\x00\x00\x00\x00\x00\x00' >>>
参数解释:
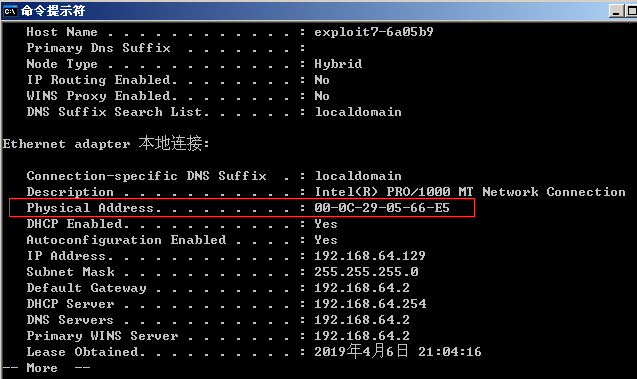
这里有一点需要注意,这个包是目标机器接收我们发送的arp包后返回来的包,怎么说呢,就是我们目标机器发给我们的一个包
所以这里的参数 pdst是我们自身的ip,hwdst是我们自身的mac地址,不能看包结构名是dst就觉得是目标的
而psrc是目标ip的ip地址,hwsrc是目标机器的mac地址 这点比较重要 太多数据很容易萌萌
验证结果是正确的:
有了上面发送单个IP的基础来看下赛题:
#encoding=utf-8

from scapy.all import *

import sys

def worker():

    ip_list=[]

    for ipFix in range(1,Flag1):

        ip = Flag2 + str(ipFix)

        arpPkt = Flag6(dst=Flag3)/ARP(pdst=ip, hwdst="ff:ff:ff:ff:ff:ff")

        res = Flag5(arpPkt, timeout=1, verbose=False)

        if res:

            #print "IP: " + res.psrc + "     MAC: " + res.hwsrc

            ip_list.append(res.psrc)

    return Flag4

if __name__=="__main__":

    fp = open('/root/ip.txt','w')

    ip_list = worker()

    for ip in ip_list:

        fp.write(ip+'\n')

    print('over scan')

    fp.close()

#Flag1 = 255

#Flag2 = "192.168.48."

#Flag3 = "FF:FF:FF:FF:FF:FF" 广播地址

#Flag4 = ip_list 返回这个list

#Flag5 = srp1发包函数

#Flag6 = Ether 二层发包需要添加以太网头部

逻辑分析:

1.可写方式的打开一个文件/root/ip.txt

2.worker函数分析:

    1.创建一个空的list

    2.用for in range 1-255 循环

    3.然后字符串拼接成192.168.1.x的ip

    4.使用srp1构造arp数据包

    5.发送arp数据包返回结果存在res中

    6.如果res中成功接收到值,添加到list中

    7.循环完1-255 返回存活主机的list

3.将worker返回的list写入1打开的文件 OK.
为了巩固自己对这个库的认识和py代码能力的掌握,我写了一个小玩具~
多线程arp扫描:
#!/usr/bin/python3

from scapy.all import *

import sys

import time

import threading

import optparse

#增加多线程 为了线程同步 加了3个全局变量

liveHost_list = [] #存活主机

live_count = 0; #存活主机数量

liveHostPrint_list = [] #打印的时候用

def printBanner():

    banner = '''

         _    ____  ____  ____

   / \  |  _ \|  _ \/ ___|  ___ __ _ _ __  _ __   ___ _ __

  / _ \ | |_) | |_) \___ \ / __/ _` | '_ \| '_ \ / _ \ '__|

 / ___ \|  _ <|  __/ ___) | (_| (_| | | | | | | |  __/ |

/_/   \_\_| \_\_|   |____/ \___\__,_|_| |_|_| |_|\___|_|

                                                                                                       v1.0 by r4bbit

    '''

    print(banner);

def get_current_time():

    year = time.strftime('%Y-%m-%d',time.localtime());

    minute = time.strftime('%H-%M-%S',time.localtime());

    return year+minute #返回时间

def arp_scan(ip):

    global liveHostPrint_list

    global live_count ;

    global liveHost_list

    start_time = time.time();

        #构造arp数据包

    time.sleep(0.001)

    arpPkt = Ether(dst="ff:ff:ff:ff:ff:ff")/ARP(pdst=ip,hwdst="ff:ff:ff:ff:ff:ff");

        #发送arp数据包

    resPkt = srp1(arpPkt,timeout=1,verbose=False);

        #如果resPkt中返回的有包

    if resPkt:

       # print("[+] " + resPkt.psrc+" is Live"+"  MAC:"+resPkt.hwsrc); #这里需要注意 因为是接受的包 所以需要打印出的是发送包的源ip和源mac

        liveHost_list.append(resPkt.psrc); #存储到傻吊list中

        print_tmp = "IP:"+resPkt.psrc+" MAC:"+resPkt.hwsrc

        liveHostPrint_list.append(print_tmp);

        live_count +=1;

    #else:

       # print("[-] "+ip+" Not Alive");

def main():

    printBanner();

    global liveHost_list;

    global live_count;

    global liveHostPrint_list;

    parser = optparse.OptionParser("usage -i <192.168.1> 主要是我菜不会用netaddr库");

    parser.add_option('-i',dest='target_ips',type='string',help='ip no');

    (options,arg) = parser.parse_args()

    if(options.target_ips == None):

        print(parser.usage);

        exit(0);

    else:

        target_ips = options.target_ips

        start_time = time.time();

        for ip in range(1,255):

            ip_str = target_ips+"."+str(ip);

            scan_thread = threading.Thread(target=arp_scan,args=(ip_str,));

            scan_thread.start();

        end_time = time.time();

        #创建文件夹

        #如果文件夹不存在

        #扫描完成打印结果 然后存储文件

        for ip in liveHostPrint_list:

            print(ip);

        print("Scan Done. Live Host Num:%d Use Time:%f s " % (live_count,end_time-start_time));

        if not os.path.exists(target_ips):

            os.mkdir(target_ips)

        log_name = get_current_time();

        fp = open("./"+target_ips+"/"+log_name+".arp","w");

        print("Scan Log in "+target_ips);

        for i in liveHost_list:

            fp.write(i+"\n");

        fp.close();

if __name__ == '__main__':

    main()

python通过scapy编写arp扫描器的更多相关文章
- python 使用scapy编写DNS Fuzzer
1. 描写叙述 使用scapy库,编写一个DNS Fuzzer工具,并測试.在这之前.先说明一下DNS协议请求包是封装在IP包中的UDP包(有些情况也可使用TCP)中.且UDP的端口为53. 进入sc ...
- Python网络编程——编写一个简单的回显客户端/服务器应用
今天将python中socket模块的基本API学习完后,照着书上的实例编写一个套接字服务器和客户端.采用python3.5版本,在注释中会标明python2和python3的不同之处. 1.代码 ( ...
- python实现FTP弱口令扫描器与简单端口扫描器
python实现FTP弱口令扫描器与简单端口扫描器 目录 FTP弱口令扫描器 简单端口扫描器 参考: https://blog.csdn.net/rebelqsp/article/details/22 ...
- 用python + hadoop streaming 编写分布式程序(一) -- 原理介绍,样例程序与本地调试
相关随笔: Hadoop-1.0.4集群搭建笔记 用python + hadoop streaming 编写分布式程序(二) -- 在集群上运行与监控 用python + hadoop streami ...
- 用python + hadoop streaming 编写分布式程序(二) -- 在集群上运行与监控
写在前面 相关随笔: Hadoop-1.0.4集群搭建笔记 用python + hadoop streaming 编写分布式程序(一) -- 原理介绍,样例程序与本地调试 用python + hado ...
- 用python + hadoop streaming 编写分布式程序(三) -- 自定义功能
又是期末又是实训TA的事耽搁了好久……先把写好的放上博客吧 相关随笔: Hadoop-1.0.4集群搭建笔记 用python + hadoop streaming 编写分布式程序(一) -- 原理介绍 ...
- Linux 下Python调用C++编写的动态库
在工程中用到使用Python调用C++编写的动态库,结果报如下错误: OSError: ./extract_str.so: undefined symbol: _ZNSt8ios_base4InitD ...
- python 通过scapy获取网卡列表
python通过scapy 获取网卡列表如下: #coding:utf-8 from scapy.all import * #显示网卡信息 show_interfaces() 运行结果如下:
- python练习:编写一个程序,要求用户输入10个整数,然后输出其中最大的奇数,如果用户没有输入奇数,则输出一个消息进行说明。
python练习:编写一个程序,要求用户输入10个整数,然后输出其中最大的奇数,如果用户没有输入奇数,则输出一个消息进行说明. 重难点:通过input函数输入的行消息为字符串格式,必须转换为整型,否则 ...
随机推荐
- [洛谷P4556] 雨天的尾巴
这道题可以用线段树合并做,网上的题解基本上都是线段树合并的. 但是为什么我就偏偏要用dsu on tree...... 题目传送门 dsu on tree的方法类似[CF1009F] Dominant ...
- SpringMVC_Day01
项目结构 //SpringMVC配置文件 <?xml version="1.0" encoding="UTF-8"?> <!-- spring ...
- 2018.2最新-Scrapy+elasticSearch+Django打造搜索引擎(二)
请问您今天要来个引擎吗? 工欲善其事必先利其器 最终项目上线演示地址: http://search.mtianyan.cn 第二节:我们搞搞比利,搞搞环境的搭建.Github地址: https://g ...
- 使用pandas筛选出指定列值所对应的行
在pandas中怎么样实现类似mysql查找语句的功能: select * from table where column_name = some_value; pandas中获取数据的有以下几种方法 ...
- numpy.random模块用法总结
from numpy import random numpy.random.uniform(low=0.0, high=1.0, size=None) 生出size个符合均分布的浮点数,取值范围为[l ...
- 字符串匹配算法 之BF、KMP
示例: 1. 已知字符串str1="acabaabaabcacaabc",求str2="abaabcac"是否在字符串str1中? 2. DNA病毒检测.已知患 ...
- Java中如何更优雅的处理空值
经常看到项目中存在到处空值判断的情况,这些判断,会让人觉得摸不着头绪,它的出现很有可能和当前的业务逻辑并没有关系.但它会让你很头疼.有时候,更可怕的是系统因为这些空值的情况,会抛出空指针异常,导致业务 ...
- vue项目按需加载的3种方式
本文重要是路由打包优化: 原理:利用webpack对代码进行分割是懒加载的前提,懒加载就是异步调用组件,需要时候才下载. 1.vue异步组件技术 vue-router配置路由,使用vue的异步组件技术 ...
- [LeetCode] 面试题 10.01.合并排序的数组
题目: 这道题有多种实现的思路,这里使用双指针结合数组有序的特点进行解决 思路: m代表A初始时有效元素的个数,n代表B中元素的个数,那么n+m才是A的总长度 从A的最后一个位置开始,设为cur,分别 ...
- GZOJ 1361. 国王游戏【NOIP2012提高组DAY1】
国王游戏[NOIP2012提高组DAY1] Time Limit:1000MS Memory Limit:128000K Description 国王游戏(game.cpp/c/pas) [问题描述] ...