CALayer的additive属性解析
CALayer的additive属性解析

效果:

源码:https://github.com/RylanJIN/ShareOfCoreAnimation
- //
- // CAPartAViewController.m
- // ShareOfCoreAnimation
- //
- // Created by xjin on 8/8/14.
- // Copyright (c) 2014 ArcSoft. All rights reserved.
- //
- #import "CAPartAViewController.h"
- @interface CAPartAViewController ()
- @end
- @implementation CAPartAViewController
- - (id)initWithNibName:(NSString *)nibNameOrNil bundle:(NSBundle *)nibBundleOrNil
- {
- self = [super initWithNibName:nibNameOrNil bundle:nibBundleOrNil];
- if (self) {
- // Custom initialization
- }
- return self;
- }
- - (void)viewDidLoad
- {
- [super viewDidLoad];
- // Do any additional setup after loading the view from its nib.
- [self.view setBackgroundColor:[UIColor whiteColor]];
- }
- - (IBAction)shakeAnimation:(id)sender
- {
- CAKeyframeAnimation *animation = [CAKeyframeAnimation animation];
- animation.keyPath = @"position.x";
- animation.values = @[ @, @, @-, @, @ ];
- animation.keyTimes = @[ @, @( / 6.0), @( / 6.0), @( / 6.0), @ ];
- animation.duration = 0.4;
- animation.additive = YES;
- animation.repeatCount = HUGE_VALF;
- [self.tracker.layer addAnimation:animation forKey:@"shake"];
- }
- - (IBAction)trackAnimation:(id)sender
- {
- CGRect boundingRect = CGRectMake(-, -, , );
- CAKeyframeAnimation *orbit = [CAKeyframeAnimation animation];
- orbit.keyPath = @"position";
- orbit.path = CFAutorelease(CGPathCreateWithEllipseInRect(boundingRect, NULL));
- orbit.duration = ;
- orbit.additive = YES;
- orbit.repeatCount = HUGE_VALF;
- orbit.calculationMode = kCAAnimationPaced;
- orbit.rotationMode = kCAAnimationRotateAuto;
- [self.tracker.layer addAnimation:orbit forKey:@"ani-track"];
- }
- - (IBAction)backToMainView:(id)sender
- {
- [self dismissViewControllerAnimated:YES completion:nil];
- }
- - (void)didReceiveMemoryWarning
- {
- [super didReceiveMemoryWarning];
- // Dispose of any resources that can be recreated.
- }
- @end
详细技术分析:http://ronnqvi.st/multiple-animations/
Just before WWDC I answered an interesting question on Stack Overflow asking where to update the model value when following Core Animation best practices. It may sound like a simple question but it touches on deep topics like implicit vs. explicit animations, stand-alone vs. backing layers, and multiple animations. I’m not going to reiterate the whole question and answer here, but I’m going to start with the same question. The original question and answer still contain useful information, so if you are interested I can recommend it as a complement to this post.
Let’s start with some quick background to get everyone on the same page. Not removing an animation after it finishes is considered bad practice. I’ve written about it in the context of clear code and a follow-up gist explaining why I don’t think there is any reason to do it. There are plenty of people in the community that also talk about it, so I hope that we can all accept that it is a bad practice and start doing it “the other way”.
The “other” way is to update the model value by setting the property being animated to its final value. This means that once the animation finishes and is removed, the model both is and appears to be in the correct state. The question then is: where exactly is it best practice to update the value when adding an animation? Before creating the animation? Before adding the animation to the layer? Or after adding the animation to the object?
// 1. Before configuring the animation?var myAnimation = CABasicAnimation(keyPath: "position.x")myAnimation.fromValue = oldValuemyAnimation.toValue = newValuemyAnimation.duration = 1.0// 2. Before adding the animation?view.layer.addAnimation(myAnimation, forKey: "move to the right")// 3. After adding the animation?
The only meaningful distinction to Core Animation is whether the model is updated before or after adding the explicit animation, so from that perspective, the first and second case can be treated as one case: the “before” case. Exactly where before adding the animation that the model is updated only affects how the animation values are configured. If the model is updated before configuring the animation, the old state might need to be saved first, so that the animation can be configured to animate from the old state to the new state. Since there is no real technical difference between the two cases (1 and 2), we should only optimize for clarity. I usually find that code that configures the animation before updating the model is easier to follow but there are cases where the opposite is true. In the end it comes down to personal preference.
That leaves us with only two cases to compare: before adding the animation and after adding the animation. This is when things start to get interesting. Depending on if we are animating a stand-alone layer or a backing layer (a layer that is attached to a view), we will see some differences between the before and after cases. This has to do with the way that layers implicitly animate property changes and the way that views disable this default layer behavior. Before explaining the difference between the two, let’s look at what an implicit animation is and what the default layer behavior is.
When a layer property changes, the layers looks for an appropriate “action” to run for that change. An action is an object that conforms to the CAActionprotocol. In practice, it’s going to be a subclass of CAAnimation. The steps that the layer takes to look for the action is described in detail in the documentation for the actionForKey: method on CALayer.
The layer starts by asking its delegate which can return with one out of three things:
- An action to run
nilto keep lookingNSNullto stop looking
Next, the layer looks for the property as the key in its actions dictionary. It can end up in one out of three cases:
- An action to run is found for that key.
- That key doesn’t exist, telling the layer to keep looking.
NSNullis found for that key, telling the layer to stop looking.
After that the layer looks for an actions dictionary in the style dictionary (something that I’ve never used myself or seen any other developer use). It then checks if there are any specific actions for that class by callingdefaultActionForKey:. If no action if found the layer uses the implicit action that is defined by Core Animation.
In the normal case, we end up with the implicit animation. This animation object is then added to layer, using the addAnimation:forKey: method, just like we would add an animation object ourselves. This all happens automatically, just by changing a property. Hence the name: implicitanimation.
The important part to take away is that when a property of a stand-alone layer changes, an animation object is added to the layer automatically.
For layers that are attached to views, things work differently. Every view on iOS has a backing layer and the view is always the layers delegate. This means that when the property changes, the view has first say for whether an animation should run or not. As we all know, views don’t implicitly animate. This is because the view returns NSNull when asked to provide an action (except when inside of an animation block). You can read more about this interaction between the view and its backing layer in my objc.io article.
Getting back to updating the model and adding an explicit animation. In the case of the backing layer, the property change doesn’t cause an animation so it doesn’t matter if the layer is updated before or after adding the explicit animation. There is only going to be one animation anyway.
For the stand alone layer however, the property change causes and implicit animation to be added and we are adding an explicit animation so the layer ends up with two animations at the same time! This leads us to the next very interesting and deep topic: multiple animations.
Multiple animations
It’s no surprise that different properties can be animated at the same time but multiple animations for the same property‽ Surely one must cancel out the other. Well, that is actually not the case. An animation is only canceled if another animation is added for the same key. So both animations are added to the layer, in order, and run until they are finished. It’s easy to verify by becoming the delegate of both the implicit and explicit animation and logging the “flag” in the animationDidStop:finished: callback. Another, more visual way to see that both animations are running is to see how the animation looks in the two cases. If the model is updated first, then only the explicit animation can be seen. However, if the model is updated last so that the implicit animation added last, then the implicit animation can be seen running until completion and then the layer continues with the explicit animation as if it was running all along.
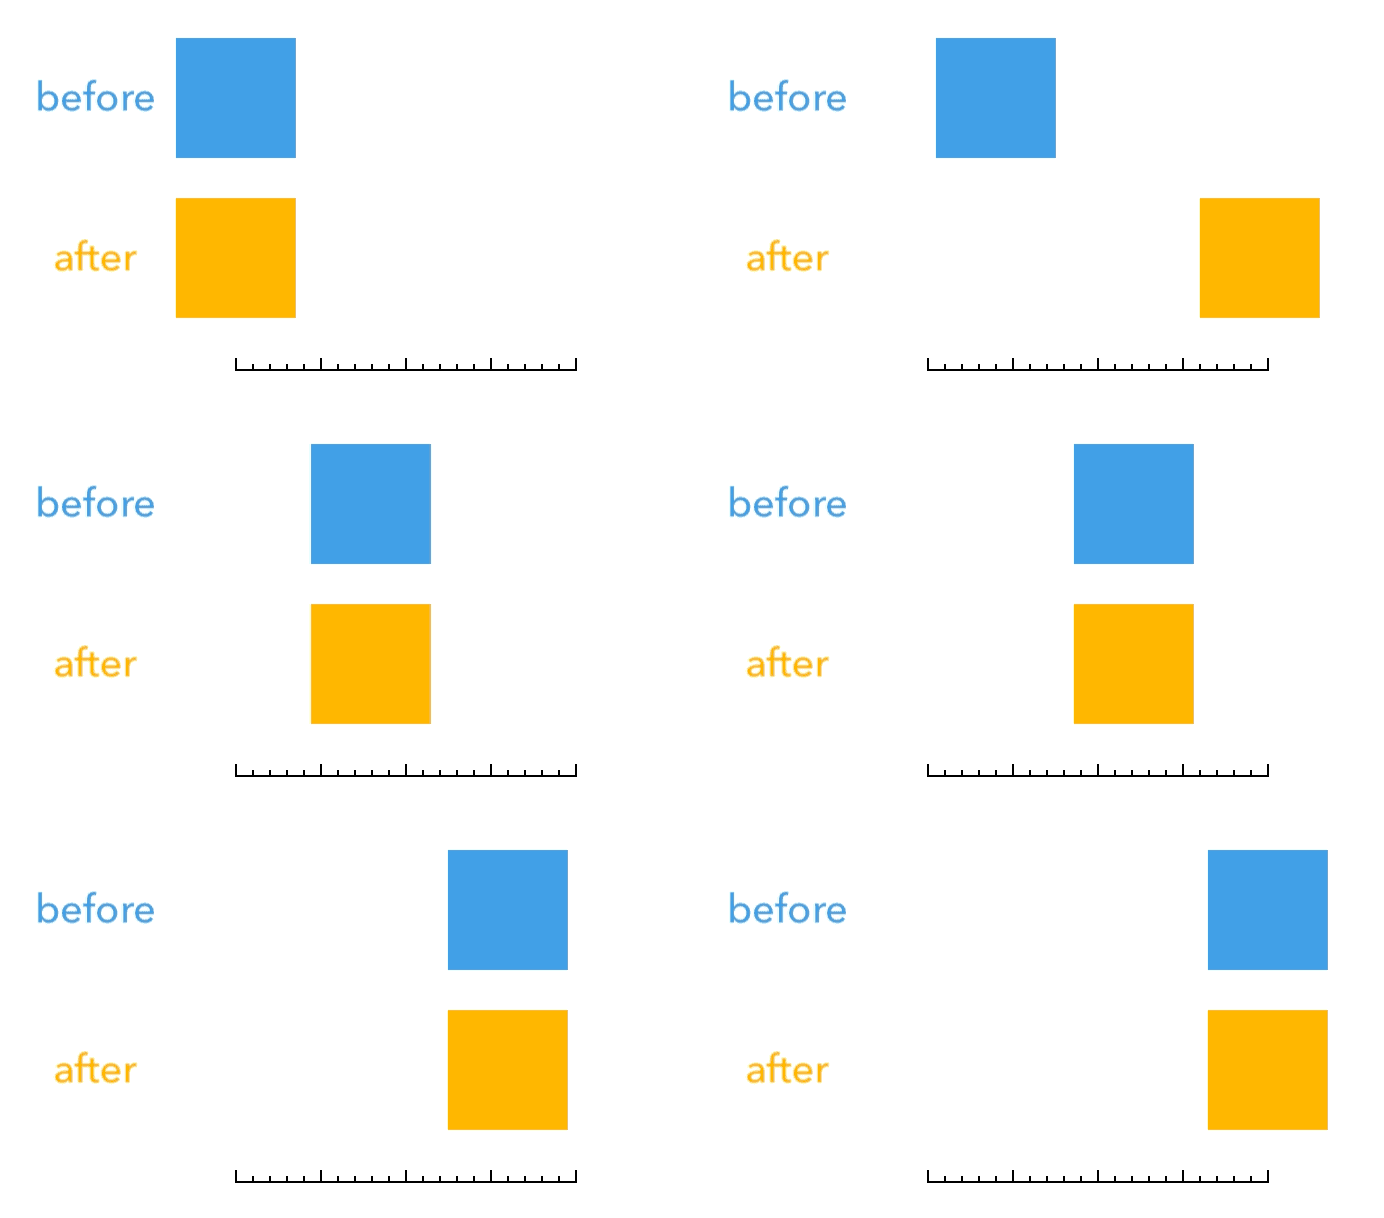
The two different animations when updating the model before and after adding the explicit animation.
There are two things to note in the above figure:
- When the implicit animation completes, the layer doesn’t skip back to the beginning of the explicit animation.
- In both cases the explicit animation end after the same amount of time.
To better understand what is happening it is best to look at how the animation is rendered.
Disclaimer: I don’t work at Apple and I haven’t seen the source code for Core Animation. What I’m about to explained is based on information available in documentation, WWDC videos, or information based on observations and experimentation.
The animation object is created and configured by our application but the application process is not doing the actual rendering. Instead the animation is encoded together with a copy of the layer hierarchy and send over inter-process communication to the render server (which is part of the BackBoarddaemon). With both a copy of the layer tree (called the “render tree”) and the animations, the render server can perform each frame of the animation without having to communicate back and forth with our application process all the time.
For each frame the render server calculates the intermediate values for the animated properties for the specific time of that frame and applies them to the layers in the render tree.
If there are multiple animations going on at the same time, they are all sent to the render server and all of their changes are applied to the render tree for each frame being rendered. If there are two (or more) animations for the same property, the first will apply its intermediate value and the next will apply its intermediate value on top of that, overwriting the first value. Even animations that are completed but not removed apply their changes to the layers in the render tree, leading to some unnecessary overhead.
Knowing this, our two cases with the order of the implicit and explicit animations can be explained and visualized as follows.
In both cases the model value is changed to its new value at the start of the animation. It doesn’t matter if it happens before or after the explicit animation, the model value is updated in the copy of the layer tree that gets sent to the render server.
For the case where the model is updated first, the implicit animation is added to the layer first and the explicit animation is added after that. Since the implicit animation is much shorter than the explicit animation, the intermediate values ii applies to the render tree is always overwritten by the intermediate values of the explicit animation. After a short while, the implicit animation finishes and is removed and the explicit animation runs alone until it finishes, applying its intermediate values directly over the model values. When the explicit animation finishes, it gets removed and we are left seeing the model values (which matches the end value of the explicit animation). The result looks like a smooth animation from the old value to the new value and the implicit animation is never seen.
Note: there may be implementation details and optimizations that detect that the property is being overwritten by another animation and does something smart about it, but this is how we can think of the work being done by the render server.

For the case where the model is updated last, the implicit animation is added after the explicit animation. This means that in the beginning of the animation, the explicit animation sets its intermediate values and the implicit animation overwrites it with its own intermediate values. When the implicit animation finishes and is removed, the explicit animation is still just in the beginning, so for the next frame the property will be perceived as returning to an earlier value but it is actually showing the correct value for the explicit animation for that time. Just as before, when it’s only the explicit animation left, it runs until completion at which point we are left seeing the model values. This animation doesn’t look right at all.

A breakdown of how the render server applies the implicit and explicit animations when the model is updated last
So, which of the two is it best practice to update the model value?
It’s actually a trick question because the answer it both neither place and either place. The best practice is actually to do the same thing as UIView is doing and disable the implicit animation. If we do that, then it doesn’t matter it we update the model before or after. It’s just personal preference. That said: I still like to update the model first:
var myAnimation = CABasicAnimation(keyPath: "position.x")myAnimation.fromValue = oldValue // still the current model value// if you want to be explicit about the toValue you can set it heremyAnimation.duration = 1.0CATransaction.begin()CATransaction.setDisableActions(true)view.layer.position.x = newValue // now there is a new model valueCATransaction.commit()view.layer.addAnimation(myAnimation, forKey: "move along X")
Update:
As pointed out on twitter, another way to achieve the correct behavior is to update the model first and use the key path as the key when adding the explicit animation. This works because the implicit animations already uses the key paths when added to the layer, meaning that the explicit animation cancel out the implicit animation.
I still prefer to use a transaction because I think that it’s clearer what it does. The task is to disable the implicit animation and the transaction does that directly by disabling the actions. To me, that is pretty much self documenting code.
Additive animations
It can seem odd to allow multiple animations for the same key path when it results in either strange animations or calculated values that are never seen, but it is actually what enables one of the more flexible and powerful features of CAAnimations: “additive” animations. Instead of overwriting the value in the render tree, an additive animation adds to the value. It wouldn’t make sense to configure this one animation to be additive and change the model value at the same time. The model would update to its new value right away and the additive animation would add to that:
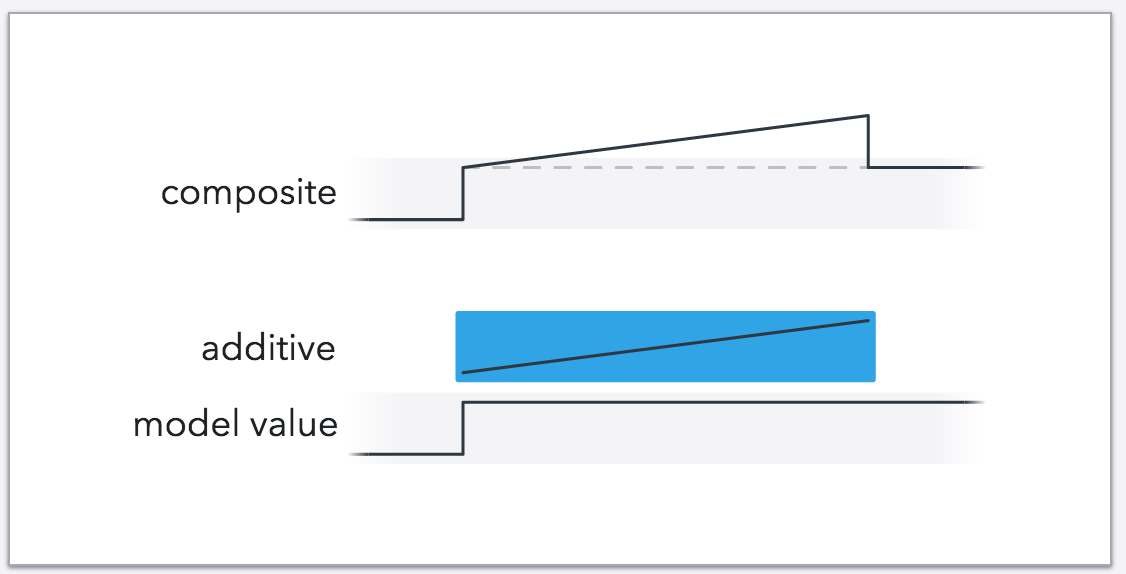
An illustration of what would happen if the explicit animation from before was made additive
Instead we would use a regular animation to perform the transition between the old and new values and then use additive animations to make changes to the animation as it is happening. This can be used to create very dynamic animations and even add to an ongoing animation. For example, to make a small deviation from the straight path between two points:
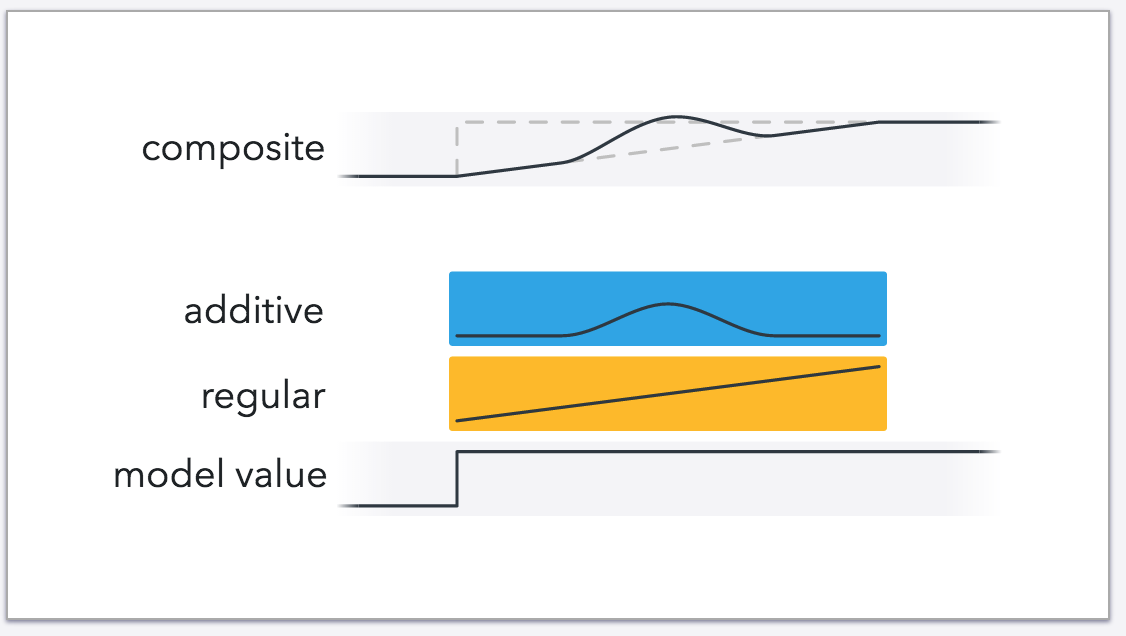
An illustration of how an additive animation adds to another animation
let deviate = CABasicAnimation(keyPath: "position.y")deviate.additive = truedeviate.toValue = 10deviate.fromValue = 0deviate.duration = 0.25deviate.autoreverses = truedeviate.timingFunction = CAMediaTimingFunction(name: "easeInEaseOut")deviate.beginTime = CACurrentMediaTime() + 0.25
This little trick can be used to acknowledge a users touch during an ongoing animation since it can be added to the running animation at any point.
Multiple additive animations can also be used together to create really complex animations that would be very difficult to with just a single animation:
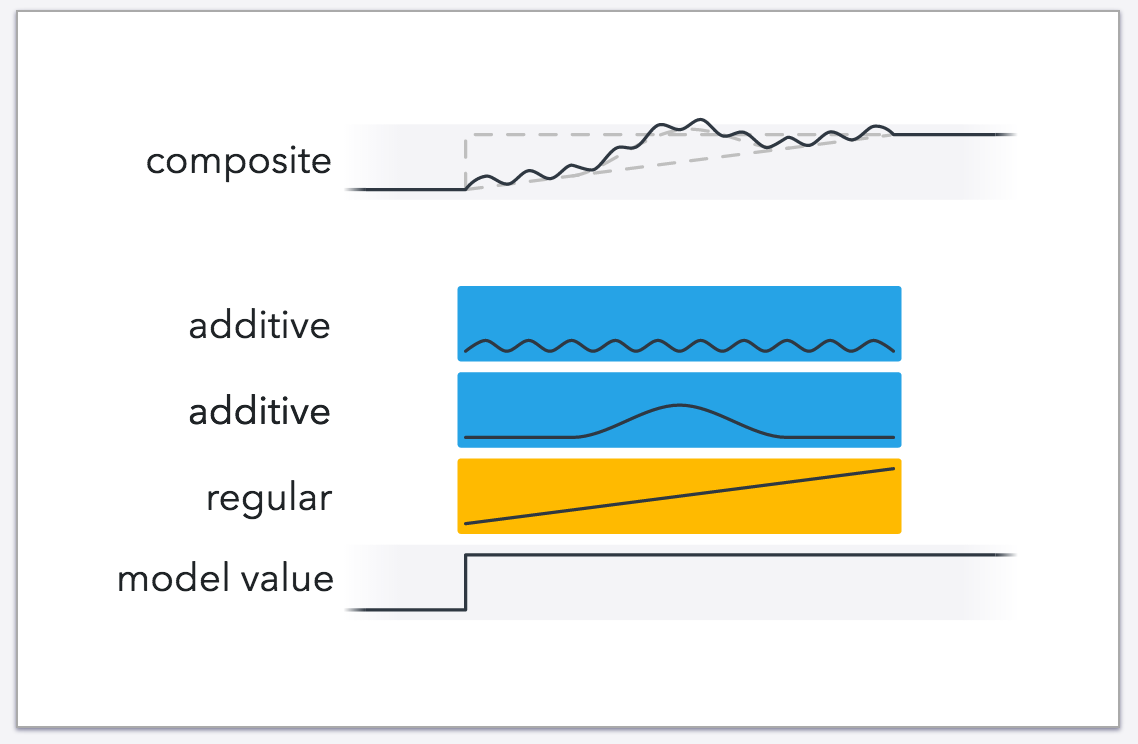
A complex animation created using multiple additive animations
For example, two keyframe animations with different paths can be combined to create an animation where one path loops around the other path, in this case a circle that loops around a heart:

A repeating animation of one path (a circle) looping while following another path (a heart)
There really isn’t much code to such a complex animation but you can imagine how hard it would be to generate a single path for the same type of animation.
let followHeartShape = CAKeyframeAnimation(keyPath: "position")followHeartShape.additive = truefollowHeartShape.path = heartPathfollowHeartShape.duration = 5followHeartShape.repeatCount = HUGEfollowHeartShape.calculationMode = "paced"let circleAround = CAKeyframeAnimation(keyPath: "position")circleAround.additive = truecircleAround.path = circlePathcircleAround.duration = 0.275circleAround.repeatCount = HUGEcircleAround.calculationMode = "paced"layer.addAnimation(followHeartShape, forKey: "follow a heart shape")layer.addAnimation(circleAround, forKey: "loop around")
Update:
For some inexplicable reason I completely missed Session 236: “Building Interruptible and Responsive Interactions” (from WWDC 2014) when I first wrote this post. It also talks about additive animations and the role they play in iOS 8 to create UIKit animations that can seamlessly transition from one to the other. As mentioned in that video, the very same technique can be applied to any CAAnimation.
This works by updating the model value and creating additive animations that animate to zero from minus the difference between the new and old values. The result of one such animation looks just like the regular, smooth transition. When the animation starts out, the model value is updated by full change is subtracted meaning that the rendered value is back at its old value. As the animation progresses the subtracted value becomes smaller and smaller until it becomes zero when the animation finishes and the rendered value is the new model value.
What makes this so powerful is that if the model value changes during the animation, the first animation can continue until it’s contribution becomes zero while a new, similarly constructed additive animation is added on top of it. During the time that both animations are running, the contribution from the first animation becomes smaller and smaller while the contribution from the second animation becomes larger and larger. This makes it look like the animation is adjusting it’s target on the fly while maintaing momentum, taking some time to fully change its course.
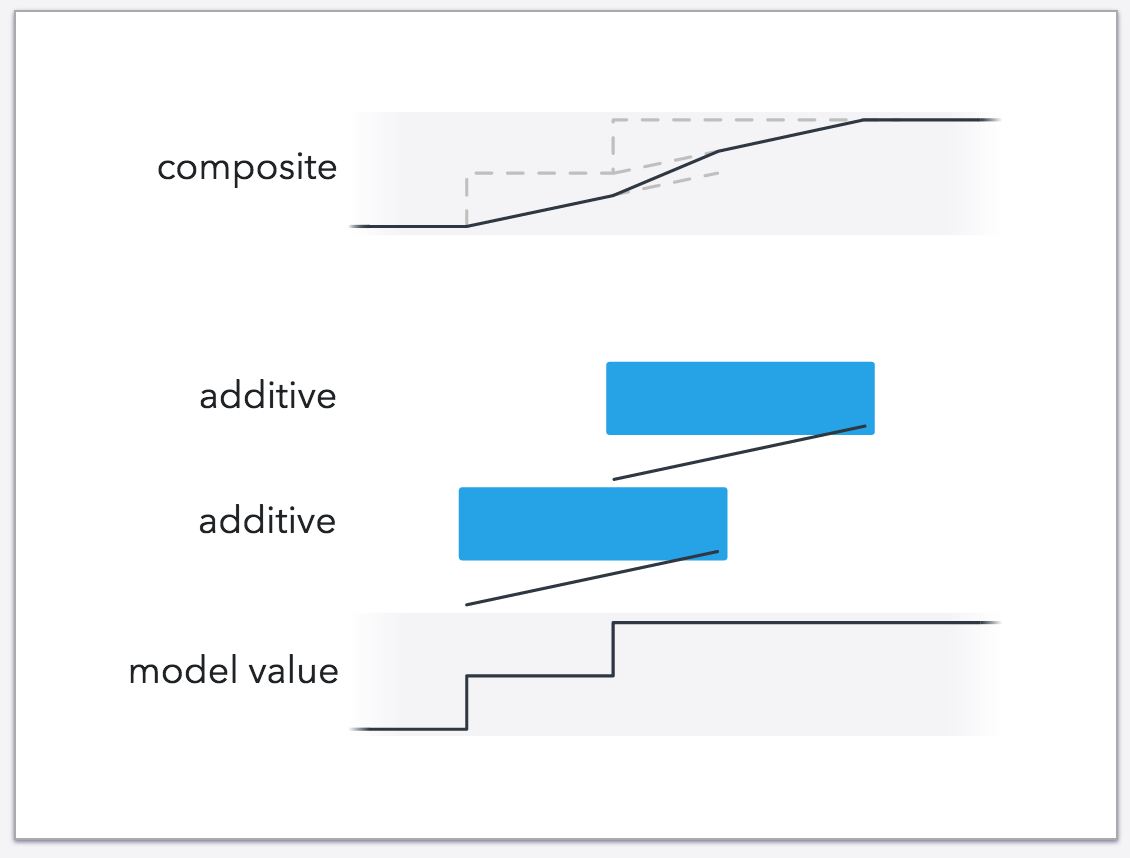
A breakdown of how additive animations can be used to seamlessly transition from one animation to the other
The result is pretty astonishing and a great example of the kind of interaction that can be created using additive animations.
Note: the animations in the above illustration (and all the other illustrations) are linear. Visualizing easing would have made the illustrations more complex, but without easing there will be a noticeable change in velocity when transitioning between animations. The animations below uses easing to show what the real end result looks like.

The difference between regular and additive animations for transitioning between animations.
Perhaps what’s most impressive is how little code it takes. We calculate the difference between the old and new value and use the negative difference as the from values (in this case I calculated the negative difference directly by subtracting the new value from the old value) and the use “zero” as the to value.
let animation = CABasicAnimation(keyPath: "position")animation.additive = true // an additive animationlet negativeDifference = CGPoint(x: layer.position.x - touchPoint.x,y: layer.position.y - touchPoint.y)// from "-(new-old)" to "zero" (additive)animation.fromValue = NSValue(CGPoint: negativeDifference)animation.toValue = NSValue(CGPoint: CGPointZero)animation.duration = 1.5animation.timingFunction = CAMediaTimingFunction(name: "easeInEaseOut")
I made a small sample project that can be downloaded from here if you want to compare the interaction for yourself.
Additive animations isn’t used all that often but can be a great tool both for rich interaction and complex animations. The new playgrounds in Xcode 6 is a great way of experimenting with additive animations. Until XCPlayground becomes available for iOS, you can create an OS X playground and useXCPShowView() to display a live preview of the animating view. Note that views behave differently on iOS and OS X, but stand alone layers work the same.
If you want to use the playground with heart and circle animations as a starting point, it can be downloaded from here.
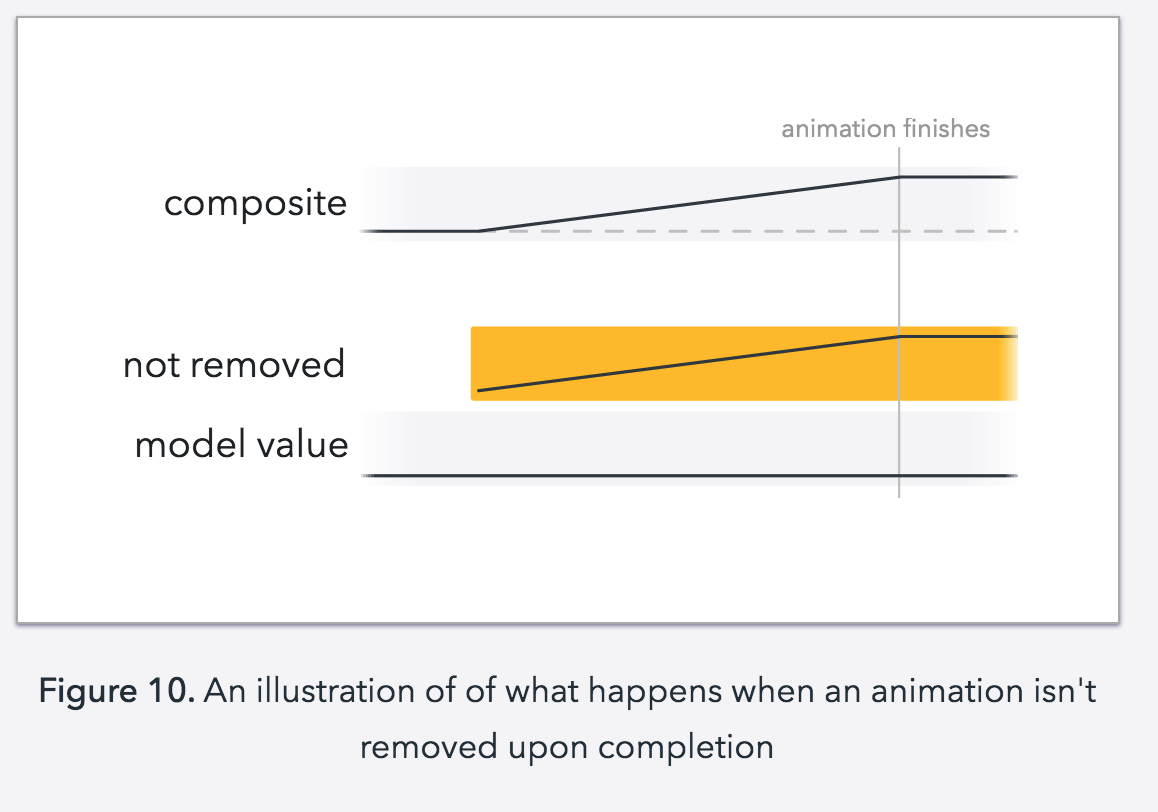
Just because I couldn’t resists doing so, this is a visualization of what happens when an animation isn’t removed upon completion. That is one reason to avoid removedOnCompletion in the common case but the main reason is still that it the model value no longer reflects what’t on screen, something that can lead to many strange bugs:
CALayer的additive属性解析的更多相关文章
- Additive属性动画
Additive属性动画 参考 http://ronnqvi.st/multiple-animations/ 效果 源码 https://github.com/YouXianMing/Animatio ...
- iOS开发UI篇—CAlayer层的属性
iOS开发UI篇—CAlayer层的属性 一.position和anchorPoint 1.简单介绍 CALayer有2个非常重要的属性:position和anchorPoint @property ...
- CAGradientLayer的一些属性解析
CAGradientLayer的一些属性解析 iOS中Layer的坐标系统: 效果: - (void)viewDidLoad { [super viewDidLoad]; CAGradientLaye ...
- CAlayer层的属性
iOS开发UI篇—CAlayer层的属性 一.position和anchorPoint 1.简单介绍 CALayer有2个非常重要的属性:position和anchorPoint @property ...
- CAGradientLayer的一些属性解析-b
CAGradientLayer的一些属性解析 iOS中Layer的坐标系统: 效果: - (void)viewDidLoad { [super viewDidLoad]; CAGradientLaye ...
- iOS开发UI 篇—CAlayer层的属性
一.position和anchorPoint 1.简单介绍 CALayer有2个非常重要的属性:position和anchorPoint @property CGPoint position; 用来设 ...
- CALayer之mask属性-遮罩
CALayer有一个属性叫做mask. 这个属性本身就是个CALayer类型,有和其他图层一样的绘制和布局属性. 它类似于一个子图层,相对于父图层(即拥有该属性的图层)布局,但是它却不是一个普通的子图 ...
- Activity设置全屏显示的两种方式及系统自带theme属性解析
转载说明:原贴地址:http://blog.csdn.net/a_running_wolf/article/details/50480386 设置Activity隐藏标题栏.设置Activity全屏显 ...
- PE知识复习之PE的各种头属性解析
PE知识复习之PE的各种头属性解析 一丶DOS头结构体 typedef struct _IMAGE_DOS_HEADER { // DOS .EXE header WORD e_magic; // M ...
随机推荐
- hibernate的AnnotationHelloWorld
来龙去脉: 最开始sun这个土鳖设计了EJB2.0.EJB2.1那个时代.后来有人发现设计的很烂,不好用,就设计了hibernate,,人们发现用hibernate反而比EJB2.0.2.1好,hib ...
- redis 实现消息发布和订阅
1,打开二个客户端机器 一个用于发布,一个用于接受 2,发布一个channel1 3,用另外一个客户端收听上面的客户端 4,当再次在发布的redis客户端 发布一个消息 其他所有订阅的客户端会自动收 ...
- 实现基于NTP协议的网络校时功能
无论PC端还是移动端系统都自带时间同步功能,基于的都是NTP协议,这里使用C#来实现基于NTP协议的网络校时功能(也就是实现时间同步). 1.NTP原理 NTP[Network Time Protoc ...
- 【Qt开发】常用控件--QLineEdit
QLineEdit是单行文本编辑控件.比如用户名,密码等输入框可以使用该控件. 所属头文件<QLineEdit> 常用方法 1.void setText(const QString &am ...
- vue下拉搜索
vue版本是1.0.21 <!DOCTYPE html> <html> <head> <meta charset="UTF-8"> ...
- IOS多选单选相册图片
之前做项目让实现多选相册的图片,自己写了一个demo一直保存在电脑上,今天下午发现电脑128G的容量已经快没有了,准备清理电脑,所以把之前做的一些demo放在博客上,以后方便用. 1.首先准备3个图片 ...
- 第6天:数据Array
数组Array every() 方法测试数组的所有元素是否都通过了指定函数的测试. array.every callback[, thisArg] callback 被调用时传入三个参数:元素值,元素 ...
- 二、hdfs单节点安装
一.准备环境 在配置hdfs之前,我们需要先安装好hadoop的配置,本文主要讲述hdfs单节点的安装配置. hadoop的单节点安装配置请参考:https://www.cnblogs.com/lay ...
- 【我整理的java开源项目】
摘要: 1. 整理出一些使用比较广或者个人觉得比较好的java开源项目和资料供参考. 2. 如果你觉得好但是我没有列出的开源项目请告诉我,方便我添加到列表里. 3. 如果你发现信息描述有误请联系我,我 ...
- POJ 1006 Biorhythms --中国剩余定理(互质的)
Biorhythms Time Limit: 1000MS Memory Limit: 10000K Total Submissions: 103539 Accepted: 32012 Des ...
