也来“玩”Metro UI之磁贴(二)
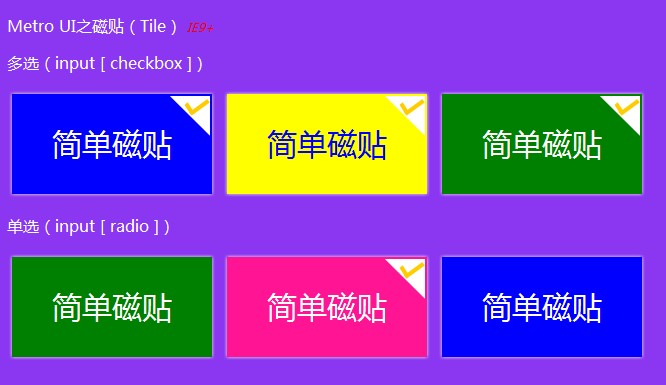
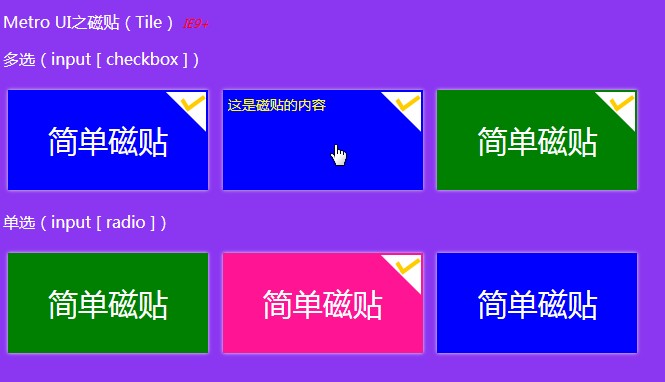
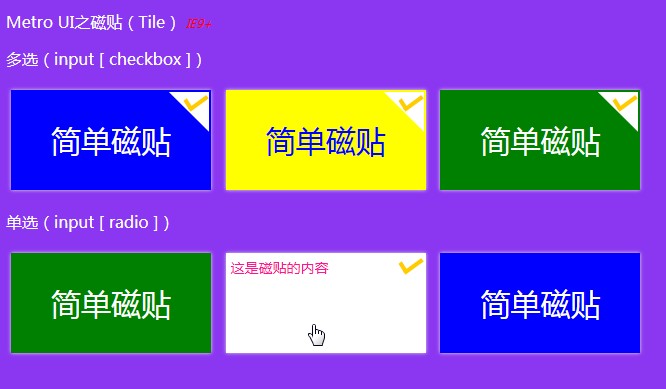
继昨天的“也来“玩”Metro UI之磁贴(一)”之后,还不过瘾,今天继续“玩”吧——今天把单选的功能加进来,还有磁贴的内容,还加了发光效果(CSS3,IE9+浏览器),当然,还是纯CSS,真的要感谢“现代”浏览器~~,废话少说,先上图,然后代码……
效果图:

鼠标经过时显示内容:


代码来了:):
<!DOCTYPE html> <html>
<head>
<meta name="viewport" content="width=device-width" />
<title>Metro UI之磁贴(Tile)</title>
<style type='text/css'>
body {
font-family: '微软雅黑';
background-color: #8b37f1;
} p {
color: white;
} .tile {
display: inline-block;
width: 200px;
height: 100px;
margin: 5px;
padding: 0;
overflow: hidden;
background-color: blue;
color: white;
font-family: '微软雅黑';
font-size: 30px;
vertical-align: middle;
cursor: pointer !important;
box-shadow: 0px 0px 5px #eee;
} .tile label {
width: 200px;
height: 100px;
display: block;
} .tile .title {
display: inline-block;
height: 100px;
width: 200px;
line-height: 100px;
vertical-align: middle;
text-align: center;
} .tile .content {
position: relative;
height: 100px;
padding: 5px;
display: block;
word-wrap: break-word;
word-break: break-all;
font-family: '微软雅黑';
font-size: 14px;
} .tile:hover {
-moz-box-shadow: 0px 0px 5px #ddd;
-webkit-box-shadow: 0px 0px 5px #ddd;
box-shadow: 0px 0px 5px #ddd;
} .tile:hover .content {
margin-top: -100px;
} .tile input[type='checkbox'], .tile input[type='radio'] {
width: 40px;
height: 40px;
margin: 0;
padding: 0;
float: right;
position: relative;
outline: none !important;
border: 0 !important;
top: 0;
right: 0;
display: none;
} .tile .symbol {
display: inline-block !important;
width: 40px;
height: 40px;
position: relative;
top: 2px;
right: 2px;
float: right;
margin-bottom: -40px;
z-index: 10000;
} .tile input[type='checkbox']:checked ~ .symbol, .tile input[type='radio']:checked ~ .symbol {
background-image: url('../Images/tile_selected_symbol.png');
} /*颜色*/
.tile-blue {
background-color: blue;
color: white;
} .tile-blue .content {
background-color: white;
color: blue;
} .tile-yellow {
background-color: yellow;
color: blue;
} .tile-yellow .content {
background-color: blue;
color: yellow;
} .tile-green {
background-color: green;
color: white;
} .tile-green .content {
background-color: white;
color: green;
} .tile-pink {
background-color: deeppink;
color: white;
} .tile-pink .content {
background-color: white;
color: deeppink;
} </style>
</head>
<body>
<p>
Metro UI之磁贴(Tile) <span style="font-style:italic; font-size:12px; color:red;">IE9+</span>
</p>
<p>多选(input [ checkbox ])</p>
<div class="tile tile-blue">
<label>
<input type="checkbox" />
<span class="symbol">
</span><!--这个地方“<span class="symbol"></span>”刚才被编辑器直接过滤掉,也过于“智能”了吧,不是所有的空标签就真的是没有用的……好吧,这样“<span class="symbol"> </span>”,终于把效果效果保住了——这可是关系到钩钩的显示-->
             <span class="title">

                 简单磁贴

             </span>

             <span class="content">这是磁贴的内容</span>

         </label>

     </div>

     <div class="tile tile-yellow">

         <label>

             <input type="checkbox" />

             <span class="symbol">

             </span>

             <span class="title">

                 简单磁贴

             </span>

             <span class="content">这是磁贴的内容</span>

         </label>

     </div>

     <div class="tile tile-green">

         <label>

             <input type="checkbox" />

             <span class="symbol">

             </span>

             <span class="title">

                 简单磁贴

             </span>

             <span class="content">这是磁贴的内容</span>

         </label>

     </div>

     <p>单选(input [ radio ])</p>

     <div class="tile tile-green">

         <label>

             <input type="radio" name="tile_radio" />

             <span class="symbol">

             </span>

             <span class="title">

                 简单磁贴

             </span>

             <span class="content">这是磁贴的内容</span>

         </label>

     </div>

     <div class="tile tile-pink">

         <label>

             <input type="radio" name="tile_radio" />

             <span class="symbol">

             </span>

             <span class="title">

                 简单磁贴

             </span>

             <span class="content">这是磁贴的内容</span>

         </label>

     </div>

     <div class="tile tile-blue">

         <label>

             <input type="radio" name="tile_radio" />

             <span class="symbol">

             </span>

             <span class="title">

                 简单磁贴

             </span>

             <span class="content">这是磁贴的内容</span>

         </label>

     </div>

 </body>

 </html>
在线“玩玩”或者Fork一份自己的:
Metro UI之磁贴(Tile) IE9+
多选(input [ checkbox ])
单选(input [ radio ])
觉得可以的请推荐哦:)
也来“玩”Metro UI之磁贴(二)的更多相关文章
- 也来“玩”Metro UI之磁贴
也来“玩”Metro UI之磁贴 Win8出来已有一段时间了,个人是比较喜欢Metro UI的.一直以来想用Metro UI来做个自己的博客,只是都没有空闲~~今天心血来潮,突然想自己弄一个磁贴玩玩, ...
- 也来“玩”Metro UI之磁贴(一)
Win8出来已有一段时间了,个人是比较喜欢Metro UI的.一直以来想用Metro UI来做个自己的博客,只是都没有空闲~~今天心血来潮,突然想自己弄一个磁贴玩玩,动手……然后就有了本篇. Win8 ...
- ”Metro UI之磁贴(二)
也来“玩”Metro UI之磁贴(二) 继昨天的“也来“玩”Metro UI之磁贴(一)”之后,还不过瘾,今天继续“玩”吧——今天把单选的功能加进来,还有磁贴的内容,还加了发光效果(CSS3,IE9+ ...
- 磁贴界面颜色 Metro UI Colors
http://www.oschina.net/p/metro-ui-colors 介绍 包含了磁贴界面(Metro UI)使用的颜色集合(浅绿色,绿色,深绿色,品红,紫色等).可以查看每一种颜色的各种 ...
- Bootstrap看厌了?试试Metro UI CSS吧
(此文章同时发表在本人微信公众号"dotNET每日精华文章",欢迎右边二维码来关注.) 题记:Bootstrap作为一款超级流行的前端框架,已经成为很多人的首选,不过有时未免有点审 ...
- Metro UI 界面完全解析 (转载)
Metro在微软的内部开发名称为“ typography-based design language”(基于排版的设计语言).它最早出现在微软电子百科全书95,此后微软又有许多知名产品使用了Metro ...
- GitHub 上受欢迎的 Android UI Library 整理二
通知 https://github.com/Tapadoo/Alerter ★2528 - 克服Toast和Snackbar的限制https://github.com/wenmingvs/Notify ...
- 7 款免费的 Metro UI 模板
#1 – Free Metro Ui Style template by Asif Aleem 很棒的蓝色调 Metro UI 管理模板 #2: Metro-Bootstrap by TalksLab ...
- iOS开发~UI布局(二)storyboard中autolayout和size class的使用详解
一.概要:前一篇初步的描述了size class的概念,那么实际中如何使用呢,下面两个问题是我们一定会遇到的: 1.Xcode6中增加了size class,在storyboard中如何使用? 2.a ...
随机推荐
- .aspx IIS发布404.17时候的问题
.aspx IIS发布404.17时候的问题 在发布aspx的时候遇到问题利用网上的cmd加入注册表没有效果 在加入了MIME中加入.aspx和application/.aspx之后却变成了下载文件 ...
- poj1717
两次记忆化搜索,第一次找最小的gap,第二次找最少的次数. #include <iostream> #include <cstdio> #include <cstring ...
- org.apache.axis2.AxisFault: Service class XXXXX must have public as access Modifier解决方案
使用Axis2工具生成客户端调用辅助类后,编写客户端调用代码运行时报错,完整错误信息如下: log4j:WARN No appenders could be found for logger (org ...
- ReactiveCocoa 响应式函数编程
简介 ReactiveCocoa(简称为RAC),RAC具有函数响应式编程特性,由Matt Diephouse开源的一个应用于iOS和OS X的新框架. 为什么使用RAC? 因为RAC具有高聚合低耦合 ...
- nagios的一些东西
make install 用来安装nagios的主程序,cgi和html文件 make install-init 在/etc/rc.d/init.d目录下创建nagios启动脚本 make insta ...
- asp.net core mvc 异步表单(Ajax.BeginForm)
.net core中已经没有beginform扩展函数了. 通过Bower引入jquery-ajax-unobtrusive: <script src="~/lib/jquery-aj ...
- python简单爬虫爬取百度百科python词条网页
目标分析:目标:百度百科python词条相关词条网页 - 标题和简介 入口页:https://baike.baidu.com/item/Python/407313 URL格式: - 词条页面URL:/ ...
- Gersgorin 圆盘
将学习到什么 好多. Gersgorin 圆盘定理 对任何 \(A \in M_n\),我们总可以记 \(A=D+B\),其中 \(D=\mathrm{diag}(a_{11},\cdots, ...
- js模块化AMD、CMD、ES6
AMD CMD ES6模块化 各个模块化规范对比理解 一.AMD 在上一篇js模块化入门与commonjs解析与应用中详细的解析了关于commonjs模块化规范,commonjs采用的用同步加载方式, ...
- 【倍增】7.11fusion
非常奇妙的倍增题 题目描述 知名科学家小A在2118年在计算机上实现了模拟聚变的过程.我们将她研究的过程简化.核子共有26种,可以用a到z共26个字母表示.核子聚变的过程可以用一个字符串描述.按照顺序 ...
