SpringMVC+Spring+Mybatis整合程序之整合
因为每个人思路不一样,所以我在这边先分享自己的思路
对于mybatis开发持久层(DAO:DataBase Access Object 持久层访问对象)有两种。
第一种:传统的开发持久层方式即需要程序员开发持久层接口和持久层实现类
第二种:mybatis代理方式开发持久层只需要程序员提供持久层接口,既然能够对传统开发方式进行优化,
帮我们广大程序员省去了大部分工作的前提就是需要我们程序员遵循一些开发规范。
规范我这里就不说了,有忘记的回顾一下我写的mybatis的第三篇文章
既然是整合框架那我这边就不再使用原始开发持久层方式。
首先分析一下各个框架的职责:
SpringMVC:负责表现层
Service接口:处理业务
Mapper:持久层
spring负责将各层之间整合
通过Spring管理持久层的mapper(相当于Dao接口)
通过Spring管理业务层的service,service中可以调用mapper接口
Spring进行事务控制
通过Spring管理表现层handler,handler中可以调用service接口
mapper、service、handler都属于javabean
第一步:整合dao层
mybatis和spring整合,通过spring管理mapper接口。
使用mapper的扫描器自动扫描mapper接口在spring中进行注册。
第二步:整合service层
通过spring管理 service接口。
使用配置方式将service接口配置在spring配置文件中。
实现事务控制。
第三步:整合springmvc
由于springmvc是spring的模块,不需要整合。
没看懂?没关系再来看张图放松一下。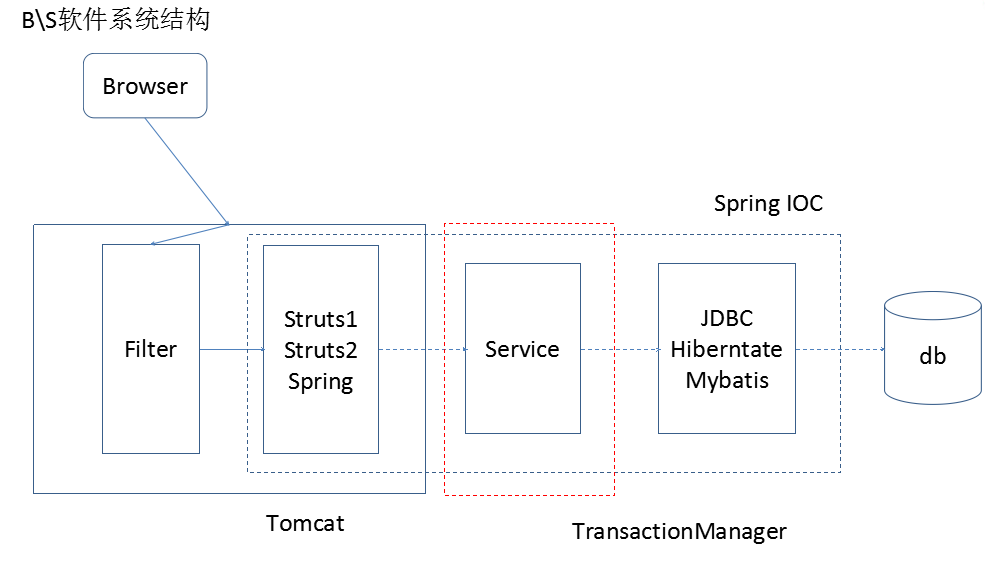
这张图说明所有的组件都要在spring容器中运行。
这里要说的是不熟悉spring的同学要辛苦点看了。对于其他两个框架大部分知识点我已经在之前的文章介绍过了。
在正式动手之前先介绍一下我的开发环境:
Eclipse Indigo-j2ee-64位、JDK-1.7.0_67、Tomcat-7.0.65、Spring版本3.2、mybatis版本3.2.X、
mysql-5.5.36-win32、数据库图形化操作工具:SQLyog-10.0.0-0
几个重要的配置文件
数据库脚本文件内容:直接复制执行提交
CREATE DATABASE /*!32312 IF NOT EXISTS*/`sms` /*!40100 DEFAULT CHARACTER SET utf8 */;

USE `sms`;

/*Table structure for table `t_user` */

DROP TABLE IF EXISTS `t_user`;

CREATE TABLE `t_user` (

  `id` int(10) unsigned NOT NULL AUTO_INCREMENT COMMENT '唯一标识',

  `username` varchar(32) DEFAULT NULL COMMENT '用户名称',

  `age` int(11) DEFAULT NULL COMMENT '用户年龄',

  `gender` varchar(10) DEFAULT NULL COMMENT '用户性别',

  `birthday` varchar(64) DEFAULT NULL COMMENT '用户生日',

  PRIMARY KEY (`id`)

) ENGINE=InnoDB DEFAULT CHARSET=utf8;
log4j.properties和数据库打交道这个文件是少不了的:
log4j.rootLogger=DEBUG, Console

#Console

log4j.appender.Console=org.apache.log4j.ConsoleAppender

log4j.appender.Console.layout=org.apache.log4j.PatternLayout

log4j.appender.Console.layout.ConversionPattern=%d [%t] %-5p [%c] - %m%n

log4j.logger.java.sql.ResultSet=INFO

log4j.logger.org.apache=INFO

log4j.logger.java.sql.Connection=DEBUG

log4j.logger.java.sql.Statement=DEBUG

log4j.logger.java.sql.PreparedStatement=DEBUG
还有一个db.properties文件,我先解释一下为什么要用配置文件,因为配置文件编译的成本很小,不像一个.java文件需要经历打包、测试、发布等等环节,而改动配置文件只要对应的value是正确的就可以直接丢给现场顺手使用。
jdbc.driver=com.mysql.jdbc.Driver
jdbc.url=jdbc:mysql://localhost:3306/ssm
jdbc.username=root
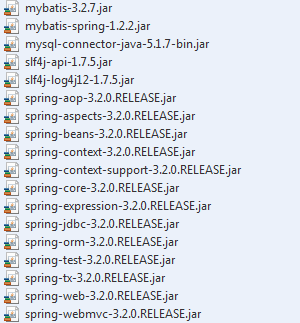
jdbc.password=root导入jar包:这边我就截图了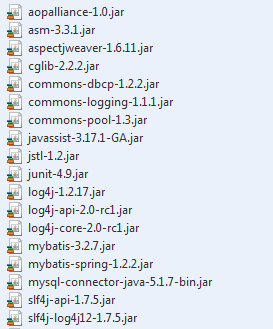
整体工程结构图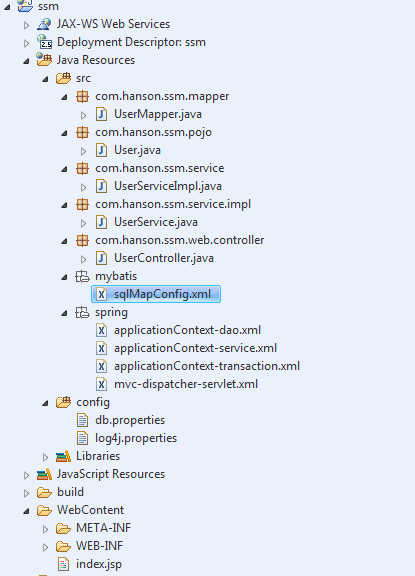
重点:程序中出现的配置文件介绍以及配置
第一个文件:web.xml这个文件主要职责就是配置程序入口在这个文件中要配置上面说道的spring容器因为所有的组件都是在容器中运行的、接着要配置restful风格的url过滤器、请求参数过滤器、spring上下文监听器、以及前端控制器等等
文件内容如下:
<?xml version="1.0" encoding="UTF-8"?>

<web-app xmlns:xsi="http://www.w3.org/2001/XMLSchema-instance"

    xmlns="http://java.sun.com/xml/ns/javaee" xmlns:web="http://java.sun.com/xml/ns/javaee/web-app_2_5.xsd"

    xsi:schemaLocation="http://java.sun.com/xml/ns/javaee http://java.sun.com/xml/ns/javaee/web-app_2_5.xsd"

    id="WebApp_ID" version="2.5">

    <display-name>ssm</display-name>

    <welcome-file-list>

        <welcome-file>index.jsp</welcome-file>

    </welcome-file-list>

    <!-- 加载spring容器 -->

    <context-param>

        <param-name>contextConfigLocation</param-name>

        <param-value>/WEB-INF/classes/spring/applicationContext-*.xml</param-value>

    </context-param>

    <!-- 支持Restful风格的请求Url -->

    <filter>

        <filter-name>HiddenHttpMethodFilter</filter-name>

        <filter-class>org.springframework.web.filter.HiddenHttpMethodFilter</filter-class>

    </filter>

    <filter-mapping>

        <filter-name>HiddenHttpMethodFilter</filter-name>

        <url-pattern>/*</url-pattern>

    </filter-mapping>

    <!-- 过滤中文乱码 -->

    <filter>

        <filter-name>CharacterEncodingFilter</filter-name>

        <filter-class>org.springframework.web.filter.CharacterEncodingFilter</filter-class>

        <init-param>

            <param-name>encoding</param-name>

            <param-value>utf-8</param-value>

        </init-param>

    </filter>

    <filter-mapping>

        <filter-name>CharacterEncodingFilter</filter-name>

        <url-pattern>/*</url-pattern>

    </filter-mapping>

    <!-- spring容器监听器 -->

    <listener>

        <listener-class>org.springframework.web.context.ContextLoaderListener</listener-class>

    </listener>

    <!-- 配置前端控制器 -->

    <servlet>

        <servlet-name>ssm</servlet-name>

        <servlet-class>org.springframework.web.servlet.DispatcherServlet</servlet-class>

        <!--加载前端控制器配置文件 上下文配置位置 -->

        <init-param>

            <param-name>contextConfigLocation</param-name>

            <param-value>classpath:spring/mvc-dispatcher-servlet.xml</param-value>

        </init-param>

        <!-- 随服务器启动 -->

        <load-on-startup>1</load-on-startup>

    </servlet>

    <servlet-mapping>

        <servlet-name>ssm</servlet-name>

                <!-- restful风格url -->

        <url-pattern>/</url-pattern>

    </servlet-mapping>

</web-app>
applicationContext-dao.xml文件中主要负责配置:加载db.properties、配置数据源、配置SqlSessionFactoryBean、Mapper扫描器
内容如下:
<beans xmlns="http://www.springframework.org/schema/beans"

    xmlns:xsi="http://www.w3.org/2001/XMLSchema-instance" xmlns:mvc="http://www.springframework.org/schema/mvc"

    xmlns:context="http://www.springframework.org/schema/context"

    xmlns:aop="http://www.springframework.org/schema/aop" xmlns:tx="http://www.springframework.org/schema/tx"

    xsi:schemaLocation="http://www.springframework.org/schema/beans

        http://www.springframework.org/schema/beans/spring-beans-3.2.xsd

        http://www.springframework.org/schema/mvc

        http://www.springframework.org/schema/mvc/spring-mvc-3.2.xsd

        http://www.springframework.org/schema/context

        http://www.springframework.org/schema/context/spring-context-3.2.xsd

        http://www.springframework.org/schema/aop

        http://www.springframework.org/schema/aop/spring-aop-3.2.xsd

        http://www.springframework.org/schema/tx

        http://www.springframework.org/schema/tx/spring-tx-3.2.xsd ">

        <!-- 加载db.properties文件中的内容,db.properties文件中的key要有一定的特殊规则 -->

        <context:property-placeholder location="classpath:db.properties"/>

        <!-- 配置数据源,使用dbcp连接池 -->

        <bean id="dataSource" class="org.apache.commons.dbcp.BasicDataSource" destroy-method="close">

            <property name="driverClassName" value="${jdbc.driver}"/>

            <property name="url" value="${jdbc.url}"/>

            <property name="username" value="${jdbc.username}"/>

            <property name="password" value="${jdbc.password}"/>

            <property name="maxActive" value="30"/>

            <property name="maxIdle" value="5"/>

        </bean>

        <!-- 配置SqlSessionFactory -->

        <bean id="sqlSessionFactory" class="org.mybatis.spring.SqlSessionFactoryBean">

            <!-- 数据源 -->

            <property name="dataSource" ref="dataSource"/>

            <!-- 加载mybatis的全局配置文件 -->

            <property name="configLocation" value="classpath:mybatis/sqlMapConfig.xml" />

        </bean>

        <!-- 配置Mapper扫描器 -->

        <bean class="org.mybatis.spring.mapper.MapperScannerConfigurer">

            <!-- 扫描包路径,如果需要扫描多个包中间用半角逗号隔开 -->

            <property name="basePackage" value="com.hanson.ssm.mapper"/>

            <!-- 这边不能使用ref="sqlSessionFactory"原因是因为上面加载配置文件导致这边引用会报错 -->

            <property name="sqlSessionFactoryBeanName" value="sqlSessionFactory" />

        </bean>

</beans>
applicationContext-service.xml该文件主要负责扫描业务层组件
内容如下:
<beans xmlns="http://www.springframework.org/schema/beans"

    xmlns:xsi="http://www.w3.org/2001/XMLSchema-instance" xmlns:mvc="http://www.springframework.org/schema/mvc"

    xmlns:context="http://www.springframework.org/schema/context"

    xmlns:aop="http://www.springframework.org/schema/aop" xmlns:tx="http://www.springframework.org/schema/tx"

    xsi:schemaLocation="http://www.springframework.org/schema/beans

        http://www.springframework.org/schema/beans/spring-beans-3.2.xsd

        http://www.springframework.org/schema/mvc

        http://www.springframework.org/schema/mvc/spring-mvc-3.2.xsd

        http://www.springframework.org/schema/context

        http://www.springframework.org/schema/context/spring-context-3.2.xsd

        http://www.springframework.org/schema/aop

        http://www.springframework.org/schema/aop/spring-aop-3.2.xsd

        http://www.springframework.org/schema/tx

        http://www.springframework.org/schema/tx/spring-tx-3.2.xsd ">

        <!-- 扫描标注@Repository注解的service -->

        <context:component-scan base-package="com.hanson.ssm.service.impl.*"/>

</beans>
applicationContext-transaction.xml配置文件主要负责处理事务等(这个需要了解spring AOP概念、代理模式、反射(必须要会)等技术)
文件主要内容:
<beans xmlns="http://www.springframework.org/schema/beans"

    xmlns:xsi="http://www.w3.org/2001/XMLSchema-instance" xmlns:mvc="http://www.springframework.org/schema/mvc"

    xmlns:context="http://www.springframework.org/schema/context"

    xmlns:aop="http://www.springframework.org/schema/aop" xmlns:tx="http://www.springframework.org/schema/tx"

    xsi:schemaLocation="http://www.springframework.org/schema/beans

        http://www.springframework.org/schema/beans/spring-beans-3.2.xsd

        http://www.springframework.org/schema/mvc

        http://www.springframework.org/schema/mvc/spring-mvc-3.2.xsd

        http://www.springframework.org/schema/context

        http://www.springframework.org/schema/context/spring-context-3.2.xsd

        http://www.springframework.org/schema/aop

        http://www.springframework.org/schema/aop/spring-aop-3.2.xsd

        http://www.springframework.org/schema/tx

        http://www.springframework.org/schema/tx/spring-tx-3.2.xsd ">

    <!-- 事务管理器 对mybatis操作数据库事务控制,spring使用jdbc的事务控制类 -->

    <bean id="transactionManager" class="org.springframework.jdbc.datasource.DataSourceTransactionManager">

        <!-- 数据源 dataSource在applicationContext-dao.xml中配置了 -->

        <property name="dataSource" ref="dataSource" />

    </bean>

    <!-- 通知 -->

    <tx:advice id="txAdvice" transaction-manager="transactionManager">

        <tx:attributes>

            <!-- 传播行为 -->

            <tx:method name="save*" propagation="REQUIRED" />

            <tx:method name="delete*" propagation="REQUIRED" />

            <tx:method name="insert*" propagation="REQUIRED" />

            <tx:method name="update*" propagation="REQUIRED" />

            <tx:method name="find*" propagation="SUPPORTS" read-only="true" />

            <tx:method name="get*" propagation="SUPPORTS" read-only="true" />

            <tx:method name="select*" propagation="SUPPORTS" read-only="true" />

        </tx:attributes>

    </tx:advice>

    <!-- aop -->

    <aop:config>

        <aop:advisor advice-ref="txAdvice"

            pointcut="execution(* com.hanson.ssm.service.impl.*.*(..))" />

    </aop:config>

</beans>
mvc-dispatcher-servlet.xml这个配置文件主要负责加载标注@Controller类、打开注解的处理器适配器、注解的处理器映射器、视图解析器等等
文件内容如下:
<beans xmlns="http://www.springframework.org/schema/beans"

    xmlns:xsi="http://www.w3.org/2001/XMLSchema-instance" xmlns:mvc="http://www.springframework.org/schema/mvc"

    xmlns:context="http://www.springframework.org/schema/context"

    xmlns:aop="http://www.springframework.org/schema/aop" xmlns:tx="http://www.springframework.org/schema/tx"

    xsi:schemaLocation="http://www.springframework.org/schema/beans

        http://www.springframework.org/schema/beans/spring-beans-3.2.xsd

        http://www.springframework.org/schema/mvc

        http://www.springframework.org/schema/mvc/spring-mvc-3.2.xsd

        http://www.springframework.org/schema/context

        http://www.springframework.org/schema/context/spring-context-3.2.xsd

        http://www.springframework.org/schema/aop

        http://www.springframework.org/schema/aop/spring-aop-3.2.xsd

        http://www.springframework.org/schema/tx

        http://www.springframework.org/schema/tx/spring-tx-3.2.xsd ">

    <!-- 组件扫描器扫描这一层组要扫描处理器 -->

    <context:component-scan base-package="com.hanson.ssm.web.controller.*"></context:component-scan>

    <!-- 配置注解的映射器和适配器以及其他配置 -->

    <mvc:annotation-driven></mvc:annotation-driven>

    <!-- 处理静态资源问题 -->

    <mvc:default-servlet-handler />

    <!-- 配置视图解析器 -->

    <bean

        class="org.springframework.web.servlet.view.InternalResourceViewResolver">

        <property name="prefix" value="/WEB-INF/" />

        <property name="suffix" value=".jsp" />

    </bean>

</beans>
sqlMapConfig.xml这个配置文件主要配置配置mybatis框架的一些设置例如开启二级缓存、设置pojo的别名等等
文件内容如下:
<?xml version="1.0" encoding="UTF-8" ?>

<!DOCTYPE configuration

PUBLIC "-//mybatis.org//DTD Config 3.0//EN"

"http://mybatis.org/dtd/mybatis-3-config.dtd">

<configuration>

    <!-- 全局setting配置,根据需要添加 -->

    <!-- 配置别名 -->

    <typeAliases>

        <!-- 批量扫描设置别名 -->

        <package name="com.hanson.ssm.pojo"/>

    </typeAliases>

    <!-- 配置Mapper

        备注:由于使用Spring整合mybtais的整合包进行mapper扫描,这里不需要配置了

        必须遵循:mapper.xml和mapper.java文件同名且在同一目录下

        <mappers></mappers>

     -->

</configuration>
总结:当这些文件都配置好,java类可以先只写类名加上注解,运行没有报错说明框架就被整合成功了。
SpringMVC+Spring+Mybatis整合程序之整合的更多相关文章
- springmvc学习总结(二) -- maven+springmvc+spring+mybatis+mysql详细搭建整合过程讲解
@_@ 写在最前 之前分享过下面这几篇: mybatis学习笔记(五) -- maven+spring+mybatis从零开始搭建整合详细过程(上)(附demo和搭建过程遇到的问题解决方法) myba ...
- maven+springmvc+spring+mybatis+mysql详细搭建整合过程讲解
转自:https://www.cnblogs.com/lmei/p/7190755.html?utm_source=itdadao&utm_medium=referral @_@ 写在最前 之 ...
- SSM(SpringMVC+Spring+Mybatis)框架程序on IDEA
有了之前文章搭建的SSH框架之后,现在搭建基于Mybatis的框架.主要基于如下这篇文章: http://blog.csdn.net/gallenzhang/article/details/51932 ...
- 3.springMVC+spring+Mybatis整合Demo(单表的增删该查,这里主要是贴代码,不多解释了)
前面给大家讲了整合的思路和整合的过程,在这里就不在提了,直接把springMVC+spring+Mybatis整合的实例代码(单表的增删改查)贴给大家: 首先是目录结构: 仔细看看这个目录结构:我不详 ...
- 2.springMVC+spring+Mybatis整合
前面已经说了,springMVC+spring+Mybatis的整合思路了,现在就照着这个思路来做一下: 在开始之前先来看一下工程的目录结构: config这个目录底下放的都是配置文件: mybati ...
- SpringMVC+Spring+Mybatis整合
SpringMVC+Spring+Mybatis整合 导包 配置jdbc.properties.log4j.properties jdbc.driver=com.mysql.jdbc.Driver j ...
- ztree使用系列三(ztree与springmvc+spring+mybatis整合实现增删改查)
在springmvc+spring+mybatis里整合ztree实现增删改查,上一篇已经写了demo,以下就仅仅贴出各层实现功能的代码: Jsp页面实现功能的js代码例如以下: <script ...
- 手把手教你整合 SpringMvc+Spring+MyBatis+Maven
注:该教程是参考孙宇老师的<SpringMvc+Spring+Mybatis+Maven整合视频教程1>整理的,花了我六个多小时,边复习视频边调代码边写教程,保证该教程每一步都能正确执行, ...
- Springmvc+Spring+Mybatis整合开发(架构搭建)
Springmvc+Spring+Mybatis整合开发(架构搭建) 0.项目结构 Springmvc:web层 Spring:对象的容器 Mybatis:数据库持久化操作 1.导入所有需要的jar包 ...
- SpringMvc+Spring+Mybatis+Maven整合
一.建立数据库表,使用generator自动生成相关代码: /* SQLyog Ultimate v11.24 (32 bit) MySQL - 5.1.62-community : Database ...
随机推荐
- Forward Rendering 正向渲染
Forward Rendering 正向渲染 正向渲染一个基于着色器的渲染路径.它支持逐像素计算光照(包括法线贴图和灯光Cookies)和来自一个平行光的实时阴影.在默认设置中,少数最亮 ...
- andriod ndk配置
r7及以后版本不需要再配置cywin ,留影 先在path中配置ndk的环境变量,位置为ndk的根目录,也可在图5中的位置配置环境变量
- 基于 Laravel 开发 ThinkSNS+ 中前端的抉择(webpack/Vue)踩坑日记
在上一篇文章< ThinkSNS+基于Laravel master分支,从1到 0,再到0.1>,简单的介绍了 ThinkSNS+ ,这里分享在开发过程中,前端选择的心理活动. Larav ...
- js对数组处理(数组里边相同元素提取成map)
1.数组里边相同元素提取成map,并以‘’,‘’分隔 例如:var arr = [{a:"xx",b:''xxx''},{a:"xxx",b:''xxxxx'' ...
- Mybatis分页中遇到的坑3
Mybatis Mapper.xml 配置文件中 resultMap 节点的源码解析 相关文章 Mybatis 解析配置文件的源码解析 Mybatis 类型转换源码分析 Mybatis 数据源和数 ...
- RPC跟MQ之间的差异比较
在阿里的平台技术部参与开发了Dubbo(远程调用服务)和Napoli(消息解决方案),又给网站应用支持这2个产品很长一段时间,了解了这2个产品的实现及应用对这两个产品的用法. 大部分情况下,“给定场景 ...
- 在接口的实现类里使用@Override注解报错
问题分析 @Override注解用来检测子类对父类或接口的方法的重写是否正确,但有一次我在Eclipse里对接口的实现类里使用@Override注解却报错,不过在父类的子类里使用该注解却是正常的. 百 ...
- python数据结构转换&格式化
列表,元组和字符串python中有三个内建函数:,他们之间的互相转换使用三个函数,str(),tuple()和list(),具体示例如下所示 >>> s = "xxxxx& ...
- Metasploits之ms10_018
漏洞详情:https://technet.microsoft.com/library/security/ms10-018 一准备: 1:kali Linux系统 192.168.195.129 2:W ...
- 《深入理解java虚拟机》笔记(1)运行时数据区域
1.Java与C++之间有一堵由内存动态分配和垃圾收集技术所围成的“高墙”,墙外面的人想进去,墙里面的人却想出来. 2.运行时数据区域划分 java虚拟机在执行java程序的过程中会把它所管理的内存划 ...