django-rest-framework-源码解析004-三大验证(认证/权限/限流)
三大验证模块概述
在DRF的APIView重写的dispatch方法中, self.initial(request, *args, **kwargs) 这句话就是执行三大验证的逻辑, 点进去可以看到依次执行的就是认证(authentication)/权限(permission)/限流(throttle)
        # Ensure that the incoming request is permitted

        self.perform_authentication(request)

        self.check_permissions(request)

        self.check_throttles(request)
简单来说认证的作用就是验证传入请求中携带的用户信息
如果用户信息没有问题, 那么就进行权限验证, 也就是判断这个用户是否有权访问这个页面
如果也有权访问, 那么就进行限流(频率)验证, 也就是判断这个用户是不是访问该页面是否过于频繁(这是一个反爬策略)
认证模块
有些页面是需要用户登录才能访问的, 而因为http是无状态的, 无法直接在请求中携带用户的登录状态, 因此如何判断用户是否登录的一般方法就是在用户登录后, 后台生成并记录一个token信息, 然后将token信息返回给浏览器, 下次访问需要登录才能访问的页面时, 就在请求中带上这个token信息, 后台拿到这个token信息后, 经过比对校验或者解密校验, 拿到了对应的用户信息, 那么就说明这个token携带的用户是没有问题的, 就可以访问这个页面或者继续进行后续的校验了.
源码流程分析
我们点开上面认证模块的入口函数 self.perform_authentication(request) , 可以看到里面只是简单一句话 request.user , 这有点像获取request的user属性, 前面第一章已经知道了, 这个request是DRF封装好的一个request, 于是我们来到rest_framework.request.Request类中
    @property

    def user(self):

        """

        Returns the user associated with the current request, as authenticated

        by the authentication classes provided to the request.

        """

        if not hasattr(self, '_user'):

            with wrap_attributeerrors():

                self._authenticate()

        return self._user
可以看到这是一个property装饰的方法, 难怪直接.user就可以执行了, 可以看到该方法返回的是self的_user属性, 前面我们并没有给该属性赋值, 根据上面的if条件我们可以看出一开始request并没有_user属性, 于是就说明在 self._authenticate() 中应该有赋值的逻辑
我们再回顾一下在上一个函数的 self.perform_authentication(request) 中只是简单调用了一下 request.user , 而并没有将 request.user 的值返回出去, 说明 self.perform_authentication(request) 并不想要返回什么, 而只是想让程序执行 self._authenticate() 这个方法而已
我们再点进去, 来到 _authenticate() 方法:
    def _authenticate(self):

        """

        Attempt to authenticate the request using each authentication instance

        in turn.

        """

        # 遍历验证器

        for authenticator in self.authenticators:

            try:

                # 执行验证器的 authenticate 方法, 返回验证的结果, 该结果是一个元组 (user, auth)

                user_auth_tuple = authenticator.authenticate(self)

            except exceptions.APIException:

                # 如果验证器的 authenticate 方法抛出 APIException 异常,

                # 说明验证代码逻辑可能出现了异常情况

                # 那么就执行 _not_authenticated 方法

                self._not_authenticated()

                # 执行完后还要继续向外抛出异常

                raise

            # 如果验证器的 authenticate 方法正常返回了元组, 就给request对象添加三个属性: _authenticator user auth

            if user_auth_tuple is not None:

                self._authenticator = authenticator

                self.user, self.auth = user_auth_tuple

                return

        # 否则继续执行 _not_authenticated 方法

        self._not_authenticated()

    def _not_authenticated(self):

        """

        Set authenticator, user & authtoken representing an unauthenticated request.

        Defaults are None, AnonymousUser & None.

        """

        # 该方法说明请求没有认证信息, 那么就将:

        # _authenticator 属性设置None,

        # user 属性设为 api_settings.UNAUTHENTICATED_USER()的值, 这个值可以在我们的settings文件中自己设置,

        #      默认值为Django预定义的匿名用户对象AnonymousUser

        # auth 属性设为 api_settings.UNAUTHENTICATED_TOKEN()的值, 这个值也可以在我们的settings文件中自己设置,

        #      默认值为None

        self._authenticator = None

        if api_settings.UNAUTHENTICATED_USER:

            self.user = api_settings.UNAUTHENTICATED_USER()

        else:

            self.user = None

        if api_settings.UNAUTHENTICATED_TOKEN:

            self.auth = api_settings.UNAUTHENTICATED_TOKEN()

        else:

            self.auth = None
可以看到_authenticate()方法可能返回两种结果:
第一种结果是遍历到某个认证器时, 其authenticate(self)返回了一个非空(user, auth)元组, 那么就说明认证成功
第二种结果是认证器运行异常或者返回空元组, 那么就说明该请求没有携带认证信息, 默认返回的就是django的匿名用户, 这个返回值可以在我们自己的settings中自定义
那么说明详细的认证校验逻辑还是在认证器的authenticate()方法中, 根据前面的经验我们知道DRF的各种器(如前面说的解析器和渲染器)一般都会组成一个对象列表, 然后循环调用对象的函数, 这里的认证器同样如此, 上面代码告诉我们request有一个 authenticators 属性, 这个属性应该是一个认证器列表, 但是我们分析过程中并没有发现给这个属性赋值的逻辑, 回忆一下发现其实这个赋值逻辑是在dispatch的三大验证的上一步, 初始化Request对象时执行的, 进入到dispatch的 request = self.initialize_request(request, *args, **kwargs) 中, 可以看到赋值语句 authenticators=self.get_authenticators() 再点进去就可以找到典型的DRF代码
    def get_authenticators(self):

        """

        Instantiates and returns the list of authenticators that this view can use.

        """

        return [auth() for auth in self.authentication_classes]
点进去这里的authentication_classes可以看到DRF默认的认证器有两个 SessionAuthentication和BasicAuthentication
'DEFAULT_AUTHENTICATION_CLASSES': [

        'rest_framework.authentication.SessionAuthentication',

        'rest_framework.authentication.BasicAuthentication'

    ]
也就是说默认情况下, 我们每个DRF请求都会经过这两个验证器, 那为什么没有验证报错呢?我们明明都没有给验证信息. 我们找 BasicAuthentication 看看其源码一探究竟
BasicAuthentication
我们来到rest_framework.authentication.py. 可以看到DRF预定义了几个认证器, 如 BasicAuthentication/ RemoteUserAuthentication/ SessionAuthentication/ TokenAuthentication, 我们分析一下 BasicAuthentication 源码, 有助于我们自己写自定义的认证器
验证规则
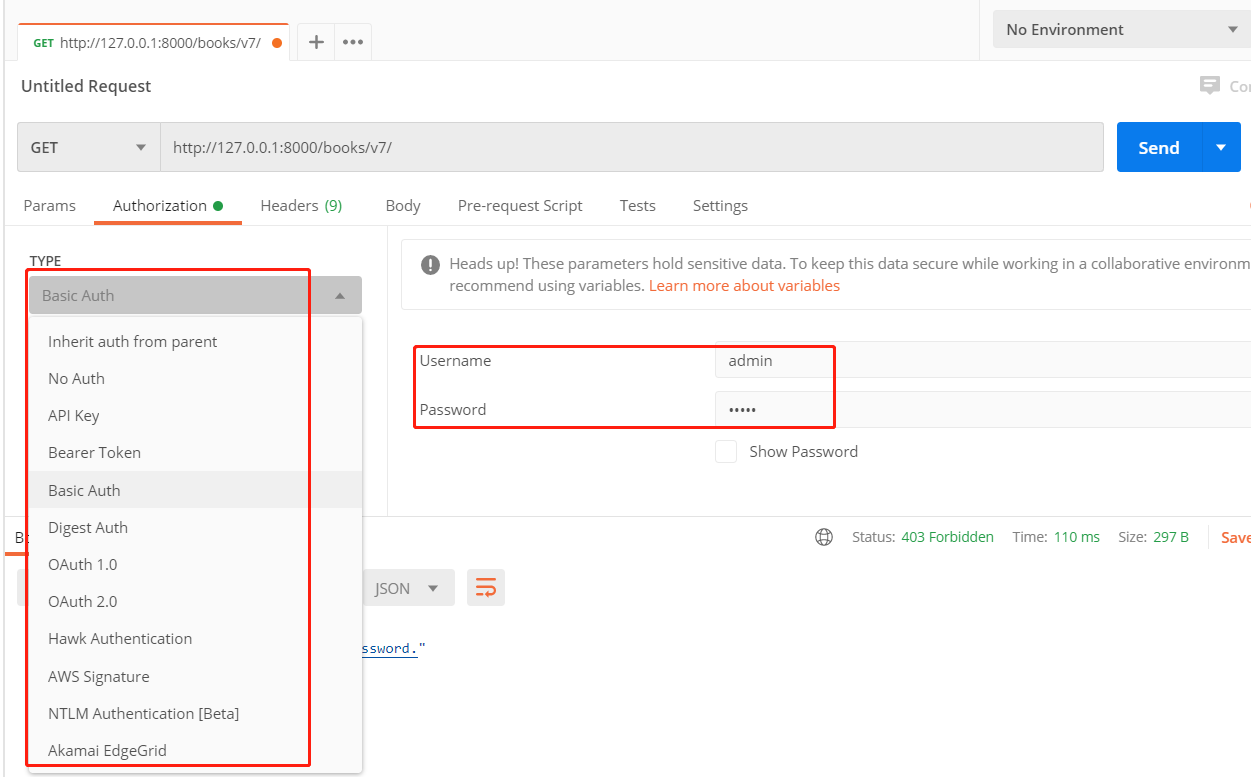
这里我们先说一下验证规则, 首先, 既然是验证, 那么一定需要预先定义一个验证的规则才能判断验证是否通过, BasicAuth 验证的规则就是给请求头的 Authorization 参数添加一个字符串, 这个字符串的组成规则就是'basic+空格+密钥', basic是固定的字符串前缀, 可以理解为是盐值.密钥是用户名和密码组成的字符串在进行加密得到的.
在程序验证时, 首先拿到 Authorization的值, 然后判断该值组成格式是否符合前面定的规则, 不符合则返回None, 符合则解析密钥, 得到用户名和密码, 然后和数据库的用户名密码进行校验, 不通过抛异常, 通过则说明整个验证流程通过
上面的这个规则是BasicAuth的验证规则, 应该是比较常见的验证规则之一, 当然验证规则随着时间的推移, 越常见可能就越容易被攻破, 于是也有一些其他的通用验证规则诞生, 我们可以在postman软件上选择常见的验证规则, 初次之外, postman还能将我们输入的用户名密码进行加密再发送出去, 这样能够省去我们手动去加密, 非常好用
源码分析
前面我们知道验证器的核心程序就是 authenticate() 方法, 该方法在自定义认证器时是必须要写的.
class BasicAuthentication(BaseAuthentication):

    """

    HTTP Basic authentication against username/password.

    """

    www_authenticate_realm = 'api'

    def authenticate(self, request):

        """

        Returns a `User` if a correct username and password have been supplied

        using HTTP Basic authentication.  Otherwise returns `None`.

        """

        # 将请求头的 Authorization 参数值按空格拆分 成一个列表

        auth = get_authorization_header(request).split()

        # 若拆分的列表为空或者第一位不是basic, 则返回None

        if not auth or auth[0].lower() != b'basic':

            return None

        # 若auth长度!=2则抛出异常

        if len(auth) == 1:

            msg = _('Invalid basic header. No credentials provided.')

            raise exceptions.AuthenticationFailed(msg)

        elif len(auth) > 2:

            msg = _('Invalid basic header. Credentials string should not contain spaces.')

            raise exceptions.AuthenticationFailed(msg)

        # 解密得到用户名和密码

        try:

            auth_parts = base64.b64decode(auth[1]).decode(HTTP_HEADER_ENCODING).partition(':')

        except (TypeError, UnicodeDecodeError, binascii.Error):

            msg = _('Invalid basic header. Credentials not correctly base64 encoded.')

            raise exceptions.AuthenticationFailed(msg)

        userid, password = auth_parts[0], auth_parts[2]

        # 将得到的用户名和密码进行认证

        return self.authenticate_credentials(userid, password, request)

    def get_authorization_header(request):

        """

        Return request's 'Authorization:' header, as a bytestring.

        Hide some test client ickyness where the header can be unicode.

        """

        # 获取请求头中的Authorization参数值

        #   在DRF中因为request已经是被封装过的, 因此获取请求头数据时, 可以使用原生的request._request.headers.get()

        #   也可以使用request.META.get(), 但是META中对原请求参数进行了改造:

        #      a) 将原中划线(-)改成了下划线(_)

        #      b) 将字母全都转成大写

        #      c) 原参数前都加上了HTTP_前缀

        auth = request.META.get('HTTP_AUTHORIZATION', b'')

        # 将auth编码为 iso-8859-1

        if isinstance(auth, str):

            # Work around django test client oddness

            auth = auth.encode(HTTP_HEADER_ENCODING)

        return auth

    def authenticate_credentials(self, userid, password, request=None):

        """

        Authenticate the userid and password against username and password

        with optional request for context.

        """

        credentials = {

            get_user_model().USERNAME_FIELD: userid,

            'password': password

        }

        # 将用户密码进行认证, 得到User对象

        user = authenticate(request=request, **credentials)

        # 若用户对象为空, 则抛异常

        if user is None:

            raise exceptions.AuthenticationFailed(_('Invalid username/password.'))

        # 若用户对象未激活, 则抛异常

        if not user.is_active:

            raise exceptions.AuthenticationFailed(_('User inactive or deleted.'))

        # 成功的到User对象, 则返回元组

        return (user, None)
这里看源码我们可以发现, 它有三种返回结果:
a. None : 当 Authorization 参数值第一位不是basic时返回, 结合上一步的外层流程 _authenticate() , 这时最终会认为没有携带认证信息, 返回匿名用户 AnonymousUser
b. raise exceptions.AuthenticationFailed : 大部分认证失败情况时抛出, 上一步的外层流程 _authenticate() 并不会将该异常捕获, 继续往外抛出, 最终在dispatch中被捕获了, 交给异常模块进行返回处理
c. return (user, None) : 认证通过时返回, 必须返回一个元组, 结合上一步的外层流程 _authenticate() , 会给request赋值三个属性
自定义验证类
我们可以仿照上述BasicAuthentication自定义一个验证类叫MyAuthentication , 规则为先进行 BasicAuthentication 验证, 若验证未通过, 还可以进行我们的MyAuthentication验证, 我们的验证规则为, 在请求头中传一个my-token参数, 字符串格式为'auth_sort/username', 若传入格式正确且username存在与数据库中, 则认证通过, 代码示例为:
class MyAuthentication(BaseAuthentication):

    def authenticate(self, request):

        """

        约定在请求头中带一个my-token参数, 格式为 auth_sort/username

        注意:

            1. 在HTTP请求头中的参数最好不要使用下划线, 否则有可能获取不到这个参数

            2. 在DRF中因为request已经是被封装过的, 因此获取请求头数据时, 可以使用原生的request._request.headers.get()

               也可以使用request.META.get(), 但是META中对原请求参数进行了改造:

                    a) 将原中划线(-)改成了下划线(_)

                    b) 将字母全都转成大写

                    c) 原参数前都加上了HTTP_前缀

                那么原参数 my-token 就变成了 HTTP_MY_TOKEN

        """

        # 获取token参数

        token = request.META.get('HTTP_MY_TOKEN')

        # print(request._request.headers.get('my-token'))

        if not token:

            raise exceptions.AuthenticationFailed('无token, 认证失败')

        # 拆分token

        auth = token.split('/')

        if len(auth) != 2 or auth[0] != 'auth_sort':

            raise exceptions.AuthenticationFailed('token格式错误')

        # 拿到用户名判断用户是否存在

        user = User.objects.filter(username=auth[1])

        if not user:

            raise exceptions.AuthenticationFailed('用户名不存在')

        # 认证成功

        return user, None

class BookAuthViewSet(mixins.ListModelMixin, GenericViewSet):

    queryset = Book.objects.filter(is_delete=False)

    serializer_class = BookSerializer

    authentication_classes = [BasicAuthentication, MyAuthentication, ]

    def list(self, request, *args, **kwargs):

        print(request.user)

        response = super().list(request, *args, **kwargs)

        return MyResponse(response.data)
权限模块
代码分析方式与认证模块相似, 点进 self.check_permissions(request) 可以看到 self.get_permissions() 返回了一个权限器列表, 循环权限器的 has_permission(request, self) 方法返回是否有权限访问, 如果没有权限访问, 则抛出异常 raise exceptions.PermissionDenied(detail=message) , 来到rest_framework.settings查看默认的权限类为 AllowAny
'DEFAULT_PERMISSION_CLASSES': [

        'rest_framework.permissions.AllowAny',

    ]
来到 rest_framework.permissions.AllowAny类, 可以看到其 has_permission 只是简单的返回了True, 也就是顾名思义, 任何请求进来都允许通过
class AllowAny(BasePermission):

    """

    Allow any access.

    This isn't strictly required, since you could use an empty

    permission_classes list, but it's useful because it makes the intention

    more explicit.

    """

    def has_permission(self, request, view):

        return True
需要注意的是权限类除了 has_permission(self, request, view) 外, 还可以定义 has_object_permission(self, request, view, obj) , 这个权限验证方法针对的是具体某一个模型对象, 而 has_permission 是针对视图类的权限限制.
DRF还定义了其他权限类, 如 IsAdminUser(user.is_staff必须为True) / IsAuthenticated(经过了认证的用户) / IsAuthenticatedOrReadOnly(请求方式为GET/HEAD/OPTIONS或者经过了认证的用户)
如果权限验证失败, 可以将错误信息定义在权限类的类属性message中, 在dispatch的 check_permissions(self, request) 方法中, 如果 permission.has_permission 返回为False, 则 self.permission_denied(request, message=getattr(permission, 'message', None)) 会获取权限类的 message 属性作为报错信息.
自定义权限类
要自定义权限,需要继承 BasePermission 类,并实现以下方法中的一个或两个:
has_permission(self, request, view)
has_object_permission(self, request, view, obj)
如果请求被授予访问权限,方法应该返回 True ,否则返回 False 。
这里我们定义一个权限规则就是: 匿名用户不能查看book数据, 普通用户只能查看id为1的出版社出版的图书的详细信息, 管理员用户可以查看所有数据
class MyPermission(BasePermission):

    """

    匿名用户不能查看book数据, 普通用户只能查看id为1的出版社出版的图书的详细信息, 管理员用户可以查看所有数据

    """

    message = '非管理员用户只能查看上海出版社的数据'

    def has_permission(self, request, view):

        # 匿名用户返回False

        return not isinstance(request.user, AnonymousUser)

    def has_object_permission(self, request, view, obj):

        # 管理员或者非管理员且图书出版社ID为1, 返回True

        return bool(request.user.is_staff or (request.user.is_staff is False and obj.publish_id == 1))

class BookAuthViewSet(mixins.ListModelMixin, mixins.RetrieveModelMixin, GenericViewSet):

    queryset = Book.objects.filter(is_delete=False)

    serializer_class = BookSerializer

    authentication_classes = [BasicAuthentication, MyAuthentication]

    permission_classes = [MyPermission, ]

    def list(self, request, *args, **kwargs):

        print(request.user)

        response = super().list(request, *args, **kwargs)

        return MyResponse(result=response.data)
限流模块(或频率模块)
限流可以形象地比喻为节流阀,指示 一种临时状态,用于控制客户端在某段时间内允许向API发出请求的次数,也就是频率。例如,你可能希望将用户限制为每分钟最多60个请求,每天1000个请求。
代码分析方式与认证模块相似, 点进 self.check_throttles(request) 可以看到 self.get_throttles() 返回了一个限流器列表, 循环限流器的 allow_request(request, self) 方法返回是否允许访问, 如果不允许访问, 则调用限流器的wait()方法返回还需等待的时间, 将每个限流器的还需等待时间存放在 throttle_durations 数组中, 找出最大的时间, 抛出异常 raise exceptions.Throttled(wait)
    def check_throttles(self, request):

        """

        Check if request should be throttled.

        Raises an appropriate exception if the request is throttled.

        """

        throttle_durations = []

        for throttle in self.get_throttles():

            if not throttle.allow_request(request, self):

                throttle_durations.append(throttle.wait())

        if throttle_durations:

            # Filter out `None` values which may happen in case of config / rate

            # changes, see #1438

            durations = [

                duration for duration in throttle_durations

                if duration is not None

            ]

            duration = max(durations, default=None)

            self.throttled(request, duration)
来到settings中可以看到默认的限流器是空列表, 说明不进行限流.
来到rest_framework.throttling.py可以看到一些定义好的限流器, 如 SimpleRateThrottle(BaseThrottle) / AnonRateThrottle(SimpleRateThrottle) / UserRateThrottle(SimpleRateThrottle) / ScopedRateThrottle(SimpleRateThrottle)
通过继承关系我们可以发现 SimpleRateThrottle 是其他限流器的父类, 前面提到的限流器必须有的方法 allow_request() 和 wait() 都是在 SimpleRateThrottle 类中定义的, 而其他子类只是重写了 get_cache_key(self, request, view) 这个方法. 那我们就来看看 SimpleRateThrottle 的源码, 有益于帮助我们写自定义的限流器
SimpleRateThrottle源码分析
通过类的文档字符串可以看到: 这是一个通过缓存实现的简单频率限制器, 频率需要设置为 '请求的次数/周期' 这样的格式, 比如一秒钟3次则为'3/s' , 这里我们以一分钟三次('3/m')为例讲解代码
我们直接来到 allow_request() 方法, 这是程序的入口.
    def allow_request(self, request, view):

        """

        Implement the check to see if the request should be throttled.

        On success calls `throttle_success`.

        On failure calls `throttle_failure`.

        """

        # 未设置频率, 则允许请求通过

        if self.rate is None:

            return True

        # 拿到缓存的key, 若key为空, 则允许请求通过

        self.key = self.get_cache_key(request, view)

        if self.key is None:

            return True

        # 拿到缓存key对应的缓存值

        self.history = self.cache.get(self.key, [])

        # 记录当前时间

        self.now = self.timer()
     ......代码省略
可以看到需要调用 get_cache_key 获取缓存的key, 再通过key获取缓存的值, 那么我们先来看看这个缓存的key和值到底存的是什么
来到上面的 get_cache_key 发现该方法需要在子类中重写, 那么我们就看一下子类 AnonRateThrottle(SimpleRateThrottle) 是怎么重写这个方法的. AnonRateThrottle 针对的就是对匿名用户的限流
class AnonRateThrottle(SimpleRateThrottle):

    """

    Limits the rate of API calls that may be made by a anonymous users.

    The IP address of the request will be used as the unique cache key.

    """

    # 定义一个字符串前缀

    scope = 'anon'

    def get_cache_key(self, request, view):

        if request.user.is_authenticated:

            return None  # Only throttle unauthenticated requests.

        # 给cache_format字符串赋值

        return self.cache_format % {

            'scope': self.scope,

            'ident': self.get_ident(request)

        }
可以看到其实 get_cache_key 方法就是给 cache_format 属性赋了值并返回, 点进去可以看到 cache_format 字符串的格式为 cache_format = 'throttle_%(scope)s_%(ident)s' ,
这是字符串格式化%的一种键值对赋值方法, 一般我们使用%格式化时, 都是在后面的小括号中按顺序写出需要替代的值是什么, 而这种键值对赋值方式语法为在格式化的字符串中把变量名用小括号包裹, 然后在%后面使用大括号字典的方式通过键值对赋值. 上述赋值语句中 get_ident(request) 返回的是通过IP地址等请求信息确定的该匿名用户的唯一标识
因为限流限制的是某一个用户或者某一台机器的访问频率, 而匿名用户有没有对应的用户ID, 所以只能通过IP等信息去确定唯一性, 我们不妨再看看另外一个限流器 UserRateThrottle(SimpleRateThrottle) 重写的 get_cache_key , 可以看到其前缀是 'user', 'ident'是用户的主键pk,
class UserRateThrottle(SimpleRateThrottle):

    """

    Limits the rate of API calls that may be made by a given user.

    The user id will be used as a unique cache key if the user is

    authenticated.  For anonymous requests, the IP address of the request will

    be used.

    """

    scope = 'user'

    def get_cache_key(self, request, view):

        if request.user.is_authenticated:

            ident = request.user.pk

        else:

            ident = self.get_ident(request)

        return self.cache_format % {

            'scope': self.scope,

            'ident': ident

        }
通过上面两个例子可以看到 get_cache_key 返回的就是一个标识用户唯一性的字符串, 最终 AnonRateThrottle 的返回值就是 throttle_anons_123jnajduyyu12h3bs , UserRateThrottle 的返回值就是 throttle_users_1s
弄清楚了 get_cache_key , 我们再回到 SimpleRateThrottle 的 allow_request()
    def allow_request(self, request, view):

        """

        Implement the check to see if the request should be throttled.

        On success calls `throttle_success`.

        On failure calls `throttle_failure`.

        """

        # 未设置频率, 则允许请求通过

        if self.rate is None:

            return True

        # 拿到缓存的key, 若key为空, 则允许请求通过

        self.key = self.get_cache_key(request, view)

        if self.key is None:

            return True

        # 拿到缓存key对应的缓存值, 第一次拿到的是一个空列表

        self.history = self.cache.get(self.key, [])

        # 记录当前时间

        self.now = self.timer()

        # Drop any requests from the history which have now passed the

        # throttle duration

        # 循环history列表, 当列表最后一个元素小于当前时间减去过期时间, 就把最后一个元素弹出
     #  即当前时间减去最早的history时间大于等于过期时间, 说明最早的history时间已经超过了频率限制的时间, 就把该时间弹出, 不记为限制的次数
        while self.history and self.history[-1] <= self.now - self.duration:

            self.history.pop()

        # 如果history长度大于等于限制的请求次数, 则说明请求次数太多了, 没有通过频率验证

        if len(self.history) >= self.num_requests:

            return self.throttle_failure()

        # 否则通过了频率验证, 允许请求

        return self.throttle_success()
前面我们拿到了 self.key 的值, 下一步是在缓存中拿到key对应的值并赋值给history属性, 若拿不到, 则返回一个空列表, 说明这个history应该是一个记录某个历史的列表, 我们前面分析步骤是模拟的第一次请求的步骤, 在前面的步骤中并没有给缓存插入数据的逻辑, 那么现在拿到的history应该就是一个空列表
既然是空列表那么就不会进入while循环, history列表长度应该也不会>=self.num_requests , 除非 self.num_requests 也等于0, 我们可以看到 self.duration 和 self.num_requests 在前面并没有赋值过, 那么点进去看看这两个属性到底是什么意思
点进去发现这两个参数是在__init__初始化时 self.num_requests, self.duration = self.parse_rate(self.rate) 赋值的
先看一下 self.rate 属性是如何得到的, 发现是通过 get_rate(self) 获取的, 点进去发现其实际上是一个类属性 THROTTLE_RATES , 这个类属性可以在我们自定义的限流器中定义(即局部定义), 也可以在项目的settings中定义(即全局定义), 默认的定义为
# Throttling

    'DEFAULT_THROTTLE_RATES': {

        'user': None,

        'anon': None,

    }
然后回到上一步的 parse_rate(self.rate) 方法
    def parse_rate(self, rate):

        """

        Given the request rate string, return a two tuple of:

        <allowed number of requests>, <period of time in seconds>

        """

        if rate is None:

            return (None, None)

        num, period = rate.split('/')

        num_requests = int(num)

        duration = {'s': 1, 'm': 60, 'h': 3600, 'd': 86400}[period[0]]

        return (num_requests, duration)
发现其就是把传进来的rate进行'/'拆分然后解析的, 如rate='3/m', 说明一分钟最多访问三次, 那么解析出来的 num_requests=3 , duration=60, 说明最终都是转换为xxx秒最多访问xxx次, 若num_requests=0, 就说明一次都不能访问, 通通拒绝.
弄清了这两个属性后, 继续回到 allow_request() , 发现只要num_requests不等于0, 那么第一次请求是肯定能够通过的, 就来到了 throttle_success() 方法
    def throttle_success(self):

        """

        Inserts the current request's timestamp along with the key

        into the cache.

        """

        # 在history列表的第一位插入当前的时间

        self.history.insert(0, self.now)

        # 在缓存中也设置一条数据, 键为get_cache_key返回的key, 值为history列表, 过期时间为rate设置的xxx秒

        self.cache.set(self.key, self.history, self.duration)

        return True
这个方法做了两件事, 第一件就是往history列表头中插入了当前时间, 第二件事就是往缓存中插入了history列表, 并设置了过期时间.例如, 此时 history=['2020-07-23 10:30:00']
我们这里以一分钟最多访问三次为例, 那么:
当我们在一分钟之内(如 '2020-07-23 10:30:10' )第二次访问该接口时, len(history) = 1 , 验证依然通过, 此时 history=['2020-07-23 10:30:10', '2020-07-23 10:30:00'] , 然后会重新设置缓存, 缓存过期时间为新的60秒
当我们在一分钟之内(如 '2020-07-23 10:30:20' )第三次访问该接口时 len(history) = 2 , 验证依然通过, 此时 history=['2020-07-23 10:30:20', '2020-07-23 10:30:10', '2020-07-23 10:30:00'] , 然后会重新设置缓存, 缓存过期时间为新的60秒
当我们在一分钟之内(如 '2020-07-23 10:30:30' )第四次访问该接口时 len(history) = 3 , len(self.history) >= self.num_requests 即 3>=3 成立, 验证不通过, 返回False
此时程序回到上一步外层的 check_throttles(self, request) , 将调用限流器的 wait() 方法, 把该方法返回的需要等待时间追加到列表 throttle_durations 中.
于是来到 wait() 方法 , 该方法就是计算出还需要等待多长时间才能再次访问该接口
    def wait(self):

        """

        Returns the recommended next request time in seconds.

        """

        if self.history:

            # 下一次访问需要等待的时间=过期时间-(当前时间-最早的history时间)

            remaining_duration = self.duration - (self.now - self.history[-1])

        else:

            remaining_duration = self.duration

        # 剩余可访问的次数=限制总次数-已访问的次数, 按实际情况算这个值结果应该都为1

        available_requests = self.num_requests - len(self.history) + 1

        if available_requests <= 0:

            return None

        # 返回需要等待的时间

        return remaining_duration / float(available_requests)
再次回到 check_throttles(self, request) , 得到了wait()的时间之后, 找到限流器中需要等待时间最长的时间 duration = max(durations, default=None) , 然后抛出异常, 提示还需等待多少秒才能继续访问
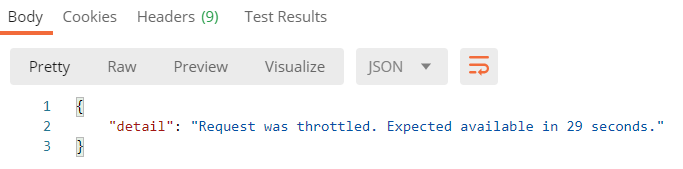
这时我们的案例应该返回的是还需要30秒才能继续访问,
当时间走到 ''2020-07-23 10:31:00'' 时, 我们再次访问该接口, 此时 history=['2020-07-23 10:30:20', '2020-07-23 10:30:10', '2020-07-23 10:30:00'] , 那么 while self.history and self.history[-1] <= self.now - self.duration: 这句话就会成立, 即最早的history时间已经过了60秒到期时间, 那么就会执行 self.history.pop() ,把最在的history时间弹出, 这样 history=['2020-07-23 10:30:20', '2020-07-23 10:30:10']
程序继续往下走, 此时 if len(self.history) >= self.num_requests 即 2>=3 不成立, 那么就验证通过, 走到 throttle_success() , 继续往history和缓存中插入数据, 此时 history=['2020-07-23 10:31:00', '2020-07-23 10:30:20', '2020-07-23 10:30:10']
如果又立马访问该接口, 那么又会抛出异常, wait时间为10秒
权限类测试
我们在视图类中局部定义权限类设置, 普通用户一分钟最多访问5次, 匿名用户一分钟最多访问3次
class BookAuthViewSet(mixins.ListModelMixin, mixins.RetrieveModelMixin, GenericViewSet):

    # 查询结果集

    queryset = Book.objects.filter(is_delete=False)

    # 序列化类

    serializer_class = BookSerializer

    # 认证类列表

    authentication_classes = [BasicAuthentication, MyAuthentication]

    # 权限类列表

    permission_classes = [MyPermission, ]

    # 限流/频率类列表

    throttle_classes = [UserRateThrottle, AnonRateThrottle]
RATE在项目的settings.py中设置
REST_FRAMEWORK = {

    # 限流频率

    'DEFAULT_THROTTLE_RATES': {

        'user': '5/m',

        'anon': '3/m',

    }

}
测试结果为:
django-rest-framework-源码解析004-三大验证(认证/权限/限流)的更多相关文章
- Django rest framework源码分析(1)----认证
目录 Django rest framework(1)----认证 Django rest framework(2)----权限 Django rest framework(3)----节流 Djan ...
- Django rest framework 源码分析 (1)----认证
一.基础 django 2.0官方文档 https://docs.djangoproject.com/en/2.0/ 安装 pip3 install djangorestframework 假如我们想 ...
- Django Rest Framework源码剖析(八)-----视图与路由
一.简介 django rest framework 给我们带来了很多组件,除了认证.权限.序列化...其中一个重要组件就是视图,一般视图是和路由配合使用,这种方式给我们提供了更灵活的使用方法,对于使 ...
- Django Rest Framework源码剖析(三)-----频率控制
一.简介 承接上篇文章Django Rest Framework源码剖析(二)-----权限,当服务的接口被频繁调用,导致资源紧张怎么办呢?当然或许有很多解决办法,比如:负载均衡.提高服务器配置.通过 ...
- django之admin源码解析
解析admin的源码 第一步:项目启动,加载settings文件中的 INSTALLED_APPS 里边有几个app就加载几个,按照注册顺序来执行. 第二步:其中加载的是admin.py,加载每一个a ...
- Django Rest Framework源码剖析(一)-----认证
一.简介 Django REST Framework(简称DRF),是一个用于构建Web API的强大且灵活的工具包. 先说说REST:REST是一种Web API设计标准,是目前比较成熟的一套互联网 ...
- Django Rest Framework源码剖析(五)-----解析器
一.简介 解析器顾名思义就是对请求体进行解析.为什么要有解析器?原因很简单,当后台和前端进行交互的时候数据类型不一定都是表单数据或者json,当然也有其他类型的数据格式,比如xml,所以需要解析这类数 ...
- Django rest framework源码分析(4)----版本
版本 新建一个工程Myproject和一个app名为api (1)api/models.py from django.db import models class UserInfo(models.Mo ...
- Django rest framework源码分析(3)----节流
目录 Django rest framework(1)----认证 Django rest framework(2)----权限 Django rest framework(3)----节流 Djan ...
随机推荐
- 入门大数据---Flume的搭建
一.下载并解压到指定目录 崇尚授人以渔的思想,我说给大家怎么下载就行了,就不直接放连接了,大家可以直接输入官网地址 http://flume.apache.org ,一般在官网的上方或者左边都会有Do ...
- Python实用笔记 (15)函数式编程——装饰器
什么函数可以被称为闭包函数呢?主要是满足两点:函数内部定义的函数:引用了外部变量但非全局变量. python装饰器本质上就是一个函数,它可以让其他函数在不需要做任何代码变动的前提下增加额外的功能,装饰 ...
- python设计模式之模版方法设计模式
我们在使用python的flask框架时,可能会经常用到生命周期函数如:before_request, before_first_request,或者信号等,刚开始学的时候就想只要写一个函数,然后加上 ...
- 告别传统机房:3D 机房数据可视化实现智能化与VR技术的新碰撞
前言 随着各行业对计算机依赖性的日益提高,计算机信息系统的发展使得作为其网络设备.主机服务器.数据存储设备.网络安全设备等核心设备存放地的计算机机房日益显现出它的重要地位,而机房的环境和动力设备如供配 ...
- gitlab在k8s上运行的一些优化
由 林坤创建,最终由 林坤修改于七月02,2020 gitlab组件图 gitlab在k8s上占用资源 kubectl top pods -n default | grep git* gitlab-g ...
- 机器分配——线性dp输出路径
题目描述 总公司拥有高效设备M台, 准备分给下属的N个分公司.各分公司若获得这些设备,可以为国家提供一定的盈利.问:如何分配这M台设备才能使国家得到的盈利最大?求出最大盈利值.其中M <= 15 ...
- BUUCTF-Misc-No.4
比赛信息 比赛地址:Buuctf靶场 内心os(蛮重要的) 我只想出手把手教程,希望大家能学会然后自己也成为ctf大佬,再来带带我QWQ 被偷走的文件 | SOLVED | foremost分离一下文 ...
- MySQL 快速删除大量数据(千万级别)的几种实践方案
笔者最近工作中遇见一个性能瓶颈问题,MySQL表,每天大概新增776万条记录,存储周期为7天,超过7天的数据需要在新增记录前老化.连续运行9天以后,删除一天的数据大概需要3个半小时(环境:128G, ...
- Java实现上传文件到指定服务器指定目录(ChannelSftp实现文件上传下载)
package com.tianyang.task.utils; import java.io.File;import java.io.FileInputStream;import java.io.I ...
- Centos 6.4最小化安装后的优化(1)
一.更新yum官方源 Centos 6.4系统自带的更新源速度比较慢,相比各位都有所感受,国内的速度慢的让人受不了.为了让centos6.4系统使用速度更快的yum更新源,一般都会选择更换源,详细步骤 ...