WPF 入门笔记 - 02 - 布局综合应用
本篇博文对接上篇末尾处WPF常用布局控件的综合应用,为痕迹g布局控件介绍课后作业的一个思路方法。
前言
首先来谈一谈布局原则:
WPF窗口只能包含一个元素(Window元素属于内容控件,内容控件只允许有一个子元素),所以我们得在窗口中放置一个容器,才能使我们的窗口放置更多的内容。
所以在WPF中,布局由容器决定,使用容器布局需要注意以下几点:
- 不要显示设置元素的尺寸:可以通过设置最大和最小尺寸来限定范围。
- 不要使用屏幕坐标来指定元素位置:根据元素在那种容器中,来合理安排元素的位置。如需要元素之间留白,可以使用Margin设置边距。
- 可以嵌套布局容器:新建
WPF程序会默认提供一个Grid容器,但是我们仍可在Grid中添加容器来安排我们的布局。
一般的布局流程可以概括为以下几步:
- 确定布局需求:根据
UI设计和功能需求,确定所需的布局方式和控件组织结构。 - 选择合适的布局容器:根据布局需求选择适合的布局容器,如
Grid、StackPanel、WrapPanel等。 - 设置布局属性:使用布局属性控制控件在容器中的位置、大小、对齐方式等。
- 嵌套布局容器:根据需要,嵌套多个布局容器以实现复杂的布局效果。
- 调试和优化布局:使用布局调试工具,如布局边框和布局分隔器,对布局进行调试和优化,确保布局效果符合预期。
常用布局面板回顾:
| Name | Description |
|---|---|
Grid |
根据一个不可见的表格在行和列中安排元素,最灵活容器之一。 |
StackPanel |
在水平或垂直的堆栈中放置元素,多用于复杂窗口中的一些小区域。 |
WrapPanel |
自适应款高度并自动换行 |
DockPanel |
根据容器的整个边界调整元素 |
Uniform |
Grid 简化版,强制所有单元格具有相同尺寸。 |
Canvas |
最基本的面板,只是一个存储控件的容器,使用固定的坐标绝对定位元素 |
常用布局属性:
| Property | Description |
|---|---|
HorizontalAlignment |
用于设置子元素在容器中的水平位置 - Center、Left、Right、Stretch |
VerticalAlignment |
用于设置子元素在容器中的垂直位置 - Center、Top、Bottom、Stretch |
Margin |
用于指定元素与其父级或同级之间的距离 - 4个方向的边距(左、上、右、下)使用,可以同时设置4个相同边距、也可以单独设置每条边的边距 |
Padding |
用于指定元素与其子级之间的距离 - 4个方向的边距(左、上、右、下)使用,可以同时设置4个相同边距、也可以单独设置每条边的边距 |
布局详解
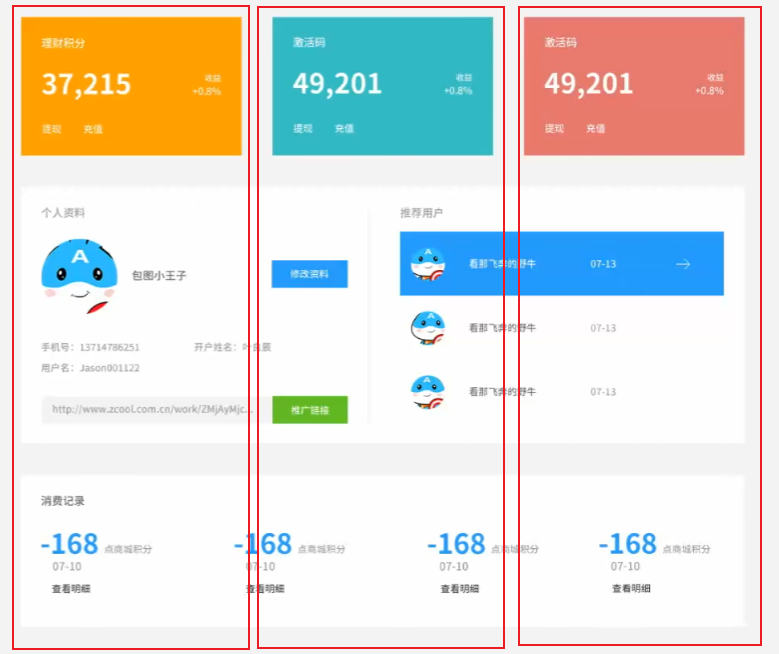
作业页面布局如下:
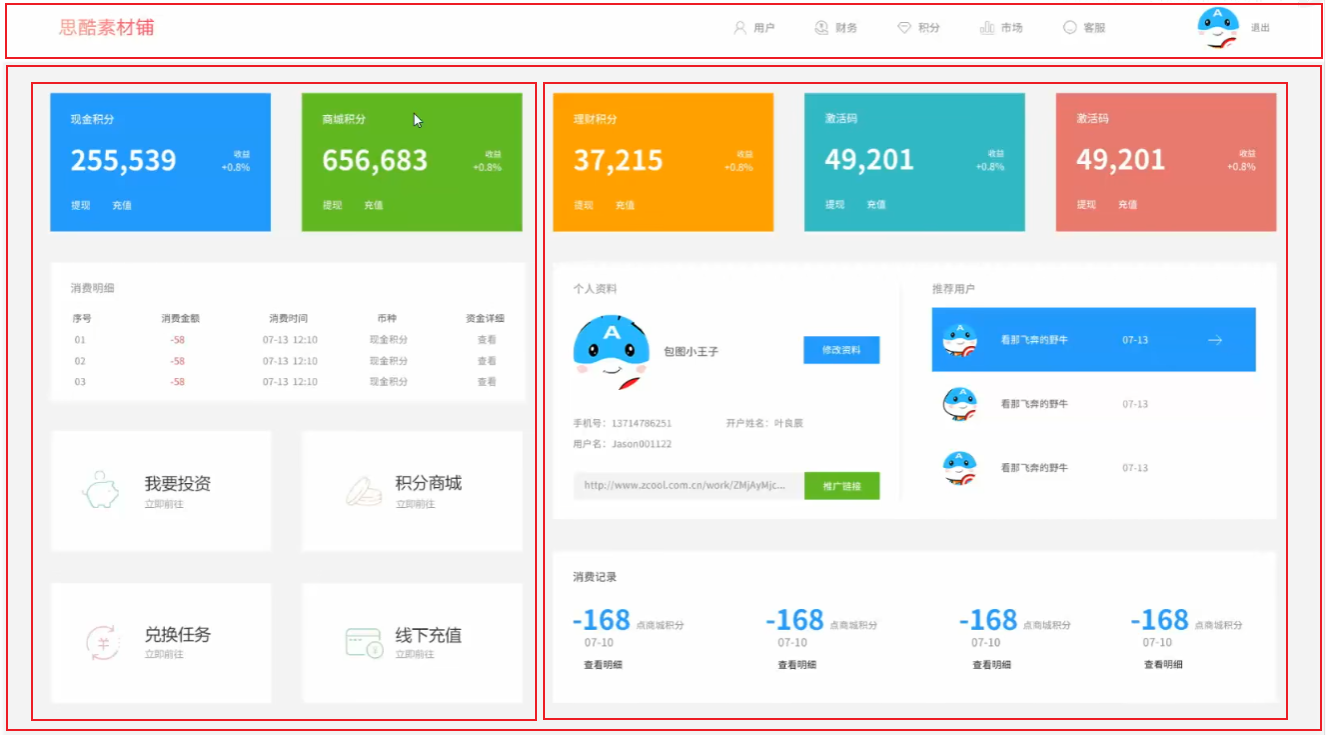
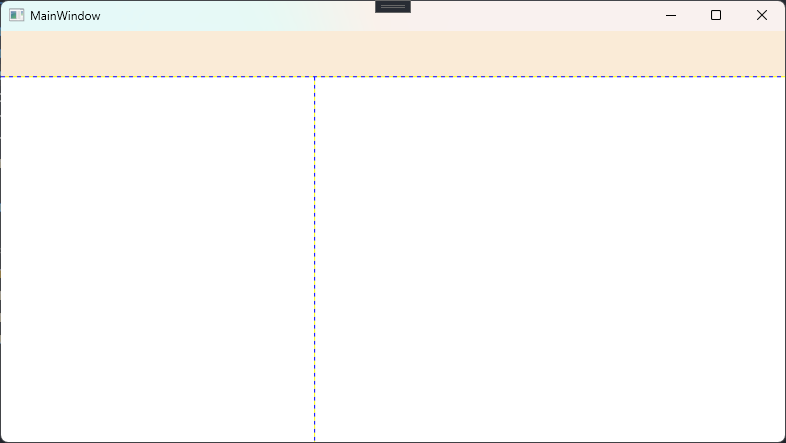
大致上可以划分为图示中的两行一列的布局,然后再细化(这里为了方便查看,我把表格线显示了出来):
<Window x:Class="HELLOWPF.MainWindow"

        xmlns="http://schemas.microsoft.com/winfx/2006/xaml/presentation"

        xmlns:x="http://schemas.microsoft.com/winfx/2006/xaml"

        xmlns:d="http://schemas.microsoft.com/expression/blend/2008"

        xmlns:mc="http://schemas.openxmlformats.org/markup-compatibility/2006"

        xmlns:local="clr-namespace:HELLOWPF"

        mc:Ignorable="d"

        Title="MainWindow" Height="450" Width="800">

    <Grid ShowGridLines="True">

        <Grid.RowDefinitions>

            <RowDefinition Height="*"/>

            <RowDefinition Height="8*"/>

        </Grid.RowDefinitions>

        <Border Background="AntiqueWhite"/>

        <Grid Grid.Row="1" ShowGridLines="True">

            <Grid.ColumnDefinitions>

                <ColumnDefinition Width="4*"/>

                <ColumnDefinition Width="6*"/>

            </Grid.ColumnDefinitions>

        </Grid>

    </Grid>

</Window>
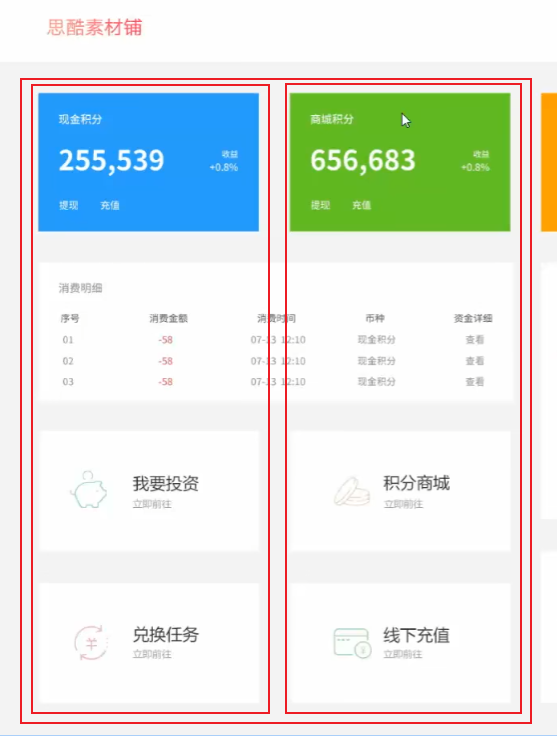
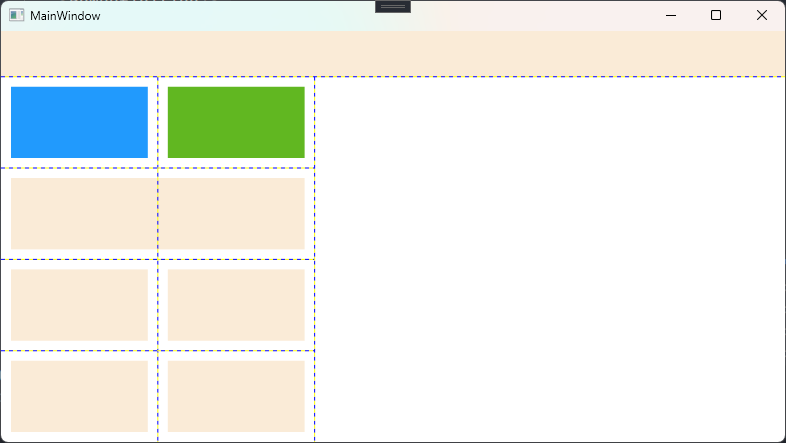
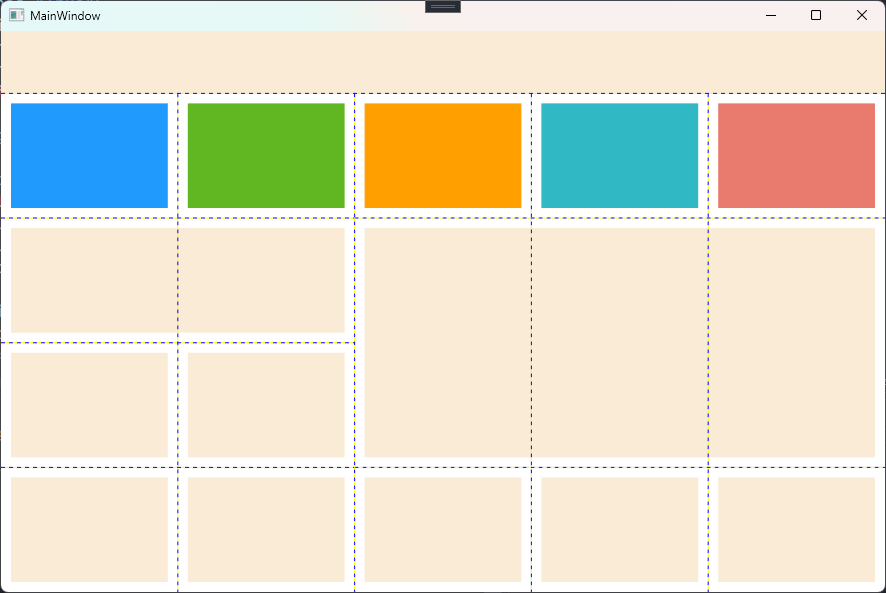
然后完成子元素的布局,左边是个四行两列的布局:
<Grid Grid.Column="0" ShowGridLines="True">

    <Grid.RowDefinitions>

        <RowDefinition/>

        <RowDefinition/>

        <RowDefinition/>

        <RowDefinition/>

    </Grid.RowDefinitions>

    <Grid.ColumnDefinitions>

        <ColumnDefinition/>

        <ColumnDefinition/>

    </Grid.ColumnDefinitions>

    <Border Margin="10" Background="#219afd"/>

    <Border Margin="10" Background="#61b721" Grid.Row="0" Grid.Column="1"/>

    <Border Margin="10" Background="AntiqueWhite" Grid.Row="1" Grid.ColumnSpan="2"/>

    <Border Margin="10" Background="AntiqueWhite" Grid.Row="2" Grid.Column="0"/>

    <Border Margin="10" Background="AntiqueWhite" Grid.Row="2" Grid.Column="1"/>

    <Border Margin="10" Background="AntiqueWhite" Grid.Row="3" Grid.Column="0"/>

    <Border Margin="10" Background="AntiqueWhite" Grid.Row="3" Grid.Column="1"/>

</Grid>
右边是个四行三列的布局,也可以通过设置行高的比例设计为三行三列的布局:
<Grid Grid.Row="1" Grid.Column="1" ShowGridLines="True">

    <Grid.RowDefinitions>

        <RowDefinition Height="*"/>

        <RowDefinition Height="2*"/>

        <RowDefinition Height="*"/>

    </Grid.RowDefinitions>

    <Grid.ColumnDefinitions>

        <ColumnDefinition/>

        <ColumnDefinition/>

        <ColumnDefinition/>

    </Grid.ColumnDefinitions>

    <Border Margin="10" Background="#ffa000"/>

    <Border Margin="10" Background="#30b8c4" Grid.Column="1"/>

    <Border Margin="10" Background="#e87a6e" Grid.Column="2"/>

    <Border Margin="10" Background="AntiqueWhite" Grid.Row="1" Grid.ColumnSpan="3"/>

    <Border Margin="10" Background="AntiqueWhite" Grid.Row="2" Grid.Column="0"/>

    <Border Margin="10" Background="AntiqueWhite" Grid.Row="2" Grid.Column="1"/>

    <Border Margin="10" Background="AntiqueWhite" Grid.Row="2" Grid.Column="2"/>

</Grid>
这样就初步完成了这个页面的布局:
<Window x:Class="HELLOWPF.MainWindow"

        xmlns="http://schemas.microsoft.com/winfx/2006/xaml/presentation"

        xmlns:x="http://schemas.microsoft.com/winfx/2006/xaml"

        xmlns:d="http://schemas.microsoft.com/expression/blend/2008"

        xmlns:mc="http://schemas.openxmlformats.org/markup-compatibility/2006"

        xmlns:local="clr-namespace:HELLOWPF"

        mc:Ignorable="d"

        Title="MainWindow" Height="600" Width="900">

    <Grid ShowGridLines="True">

        <Grid.RowDefinitions>

            <RowDefinition Height="*"/>

            <RowDefinition Height="8*"/>

        </Grid.RowDefinitions>

        <Border Background="AntiqueWhite"/>

        <Grid Grid.Row="1" ShowGridLines="True">

            <Grid.ColumnDefinitions>

                <ColumnDefinition Width="4*"/>

                <ColumnDefinition Width="6*"/>

            </Grid.ColumnDefinitions>

            <Grid Grid.Column="0" ShowGridLines="True">

                <Grid.RowDefinitions>

                    <RowDefinition/>

                    <RowDefinition/>

                    <RowDefinition/>

                    <RowDefinition/>

                </Grid.RowDefinitions>

                <Grid.ColumnDefinitions>

                    <ColumnDefinition/>

                    <ColumnDefinition/>

                </Grid.ColumnDefinitions>

                <Border Margin="10" Background="#219afd"/>

                <Border Margin="10" Background="#61b721" Grid.Row="0" Grid.Column="1"/>

                <Border Margin="10" Background="AntiqueWhite" Grid.Row="1" Grid.ColumnSpan="2"/>

                <Border Margin="10" Background="AntiqueWhite" Grid.Row="2" Grid.Column="0"/>

                <Border Margin="10" Background="AntiqueWhite" Grid.Row="2" Grid.Column="1"/>

                <Border Margin="10" Background="AntiqueWhite" Grid.Row="3" Grid.Column="0"/>

                <Border Margin="10" Background="AntiqueWhite" Grid.Row="3" Grid.Column="1"/>

            </Grid>

            <Grid Grid.Row="1" Grid.Column="1" ShowGridLines="True">

                <Grid.RowDefinitions>

                    <RowDefinition Height="*"/>

                    <RowDefinition Height="2*"/>

                    <RowDefinition Height="*"/>

                </Grid.RowDefinitions>

                <Grid.ColumnDefinitions>

                    <ColumnDefinition/>

                    <ColumnDefinition/>

                    <ColumnDefinition/>

                </Grid.ColumnDefinitions>

                <Border Margin="10" Background="#ffa000"/>

                <Border Margin="10" Background="#30b8c4" Grid.Column="1"/>

                <Border Margin="10" Background="#e87a6e" Grid.Column="2"/>

                <Border Margin="10" Background="AntiqueWhite" Grid.Row="1" Grid.ColumnSpan="3"/>

                <Border Margin="10" Background="AntiqueWhite" Grid.Row="2" Grid.Column="0"/>

                <Border Margin="10" Background="AntiqueWhite" Grid.Row="2" Grid.Column="1"/>

                <Border Margin="10" Background="AntiqueWhite" Grid.Row="2" Grid.Column="2"/>

            </Grid>

        </Grid>

    </Grid>

</Window>
内容相对基础,当然也有其他布局方式,本篇内容仅作参考,希望可以帮助到大家
WPF 入门笔记 - 02 - 布局综合应用的更多相关文章
- WPF 入门笔记之布局
一.布局原则: 1. 不应显示的设定元素的尺寸,反而元素可以改变它的尺寸,并适应它们的内容 2. 不应使用平布的坐标,指定元素的位置. 3. 布局容器和它的子元素是共享可以使用的空间 4. 可以嵌套的 ...
- Css技术入门笔记02
第一篇见Css入门笔记01http://blog.csdn.net/qq_32059827/article/details/51406674 4.其他选择器 4.1.关联选择器 有时在页面上会出现我们 ...
- WPF 入门笔记之控件内容控件
一.控件类 在WPF中和用户交互的元素,或者说.能够接受焦点,并且接收键盘鼠标输入的元素所有的控件都继承于Control类. 1. 常用属性: 1.1 Foreground:前景画刷/前景色(文本颜色 ...
- WPF 入门笔记之事件
一.事件路由 1. 直接路由事件 起源于一个元素,并且不能传递给其他元素 MouserEnter 和MouserLeave 就是直接事件路由 2. 冒泡路由事件 在包含层次中向上传递,首先由引发的元素 ...
- WPF 入门笔记之基础
一.创建WPF程序 1. App.xaml 相当于窗体的配置文件 2. xmlns:xml名称空间的缩写 xmlns="http://schemas.microsoft.com/winfx/ ...
- WPF学习笔记02_布局
布局原则 WPF窗口只能包含单个元素.如果要放置多个元素,需要放置一个容器,然后在容器中添加元素. 不应显示的设定元素的尺寸 不应该使用屏幕坐标指定元素的位置 布局容器的子元素"共享&quo ...
- 【python3两小时快速入门】入门笔记02:类库导入
昨晚遇到了一个问题:pip下载了request类库,以及在pyCharm的setting中下载了request类库,项目左侧也能显示出requst文件夹,但是引入报错! 这里贴一下我的解决方案,在此记 ...
- ES6入门笔记
ES6入门笔记 02 Let&Const.md 增加了块级作用域. 常量 避免了变量提升 03 变量的解构赋值.md var [a, b, c] = [1, 2, 3]; var [[a,d] ...
- dotnet 读 WPF 源代码笔记 布局时 Arrange 如何影响元素渲染坐标
大家是否好奇,在 WPF 里面,对 UIElement 重写 OnRender 方法进行渲染的内容,是如何受到上层容器控件的布局而进行坐标偏移.如有两个放入到 StackPanel 的自定义 UIEl ...
- WPF 界面布局、常用控件入门教程实例 WPF入门学习控件快速教程例子 WPF上位机、工控串口通信经典入门
WPF(Windows Presentation Foundation)是一种用于创建 Windows 桌面应用程序的框架,它提供了丰富的控件库和灵活的界面布局,可以创建现代化的用户界面.下面是 WP ...
随机推荐
- 推荐一个前后端分离.NetCore+Angular快速开发框架
今天给大家推荐一个开源项目,基于.NetCore开发的.前后端分离.前端有Vue.Angular.MVC多个版本的快速开发框架. 项目简介 这是一个基于.NetCore开发的快速开发框架,项目采用模块 ...
- Github Copilot 比在座各位更会写代码。jpg
之前大佬和我安利过 Copilot, 作为一个能用就行的践行者, 我一贯对这些东西都不太感兴趣. 就如我多年VS Code写各种编程语言, jetbrains 全家桶我都懒得搞~ 不过最近看到过Cha ...
- MyBatis 分页(前后端插件)实现
一.后端使用 PageHelper插件 [1]引入 PageHelper jar包(Maven项目) 1 <dependency> 2 <groupId>com.github. ...
- Synchronized 关键字详解
更多内容,前往 IT-BLOG Synchronized原理分析 加锁和释放锁的原理 深入JVM看字节码,创建如下的代码: 1 public class SynchronizedDemo2 { 2 O ...
- 酷狗的kgma文件,居然包含两个版本
酷狗的kgma文件,居然可以包含两个版本,看看两首歌的歌曲信息. 歌曲信息中可以看到两首格式.时间.大小都是不一样的,但是这两首歌曲的本地文件地址都指向 F:\KuGou\KugouMusic\丸子呦 ...
- 5.Web信息收集
Web信息收集 目录 Web信息收集 1.whois查询 2.服务器操作系统的识别 3.服务器加固 4.服务版本识别 5.常见组合: 6.指纹识别 7.敏感路径识别 8.历史漏洞信息收集 1.whoi ...
- crontab使用说明【一文搞懂Linux定时任务Crontab】
1.简介 cron是一个在后台运行调度的守护进程,而crontab是一个设置cron的工具.cron调度的是/etc/crontab文件. 2.centos安装crontab yum install ...
- 职场「OKR」,魔幻又内卷
个人习惯称之为[O-KR-KPI]组合: 01 从进厂实习那天开始,就接触了KPI的概念: 互联网公司,年初入职,可能因为那天是周五,又赶上月底,少不了要把KPI搬出来折腾一番: 天时,地利,人和: ...
- 机器学习基础09DAY
分类算法之逻辑回归 逻辑回归(Logistic Regression),简称LR.它的特点是能够是我们的特征输入集合转化为0和1这两类的概率.一般来说,回归不用在分类问题上,因为回归是连续型模型,而且 ...
- AcWing 1353. 滑雪场设计
原题链接 思路 本题如果以贪心的思路来理解,则会遇到如果根据贪心算法变更后的最高峰和最低峰会发生改变,产生后效性,导致贪心算法无效,再考虑到本题目数据量不大,山峰数量在1k以内,山峰高度在100之内, ...
