Spring Boot JWT 用户认证
JWT token验证后,通过 ThreadLocal 进行传值
https://jwt.io/#debugger 官网提供的 JAVA 工具还是挺多的,选了个 Star 比较多的
https://github.com/jwtk/jjwt
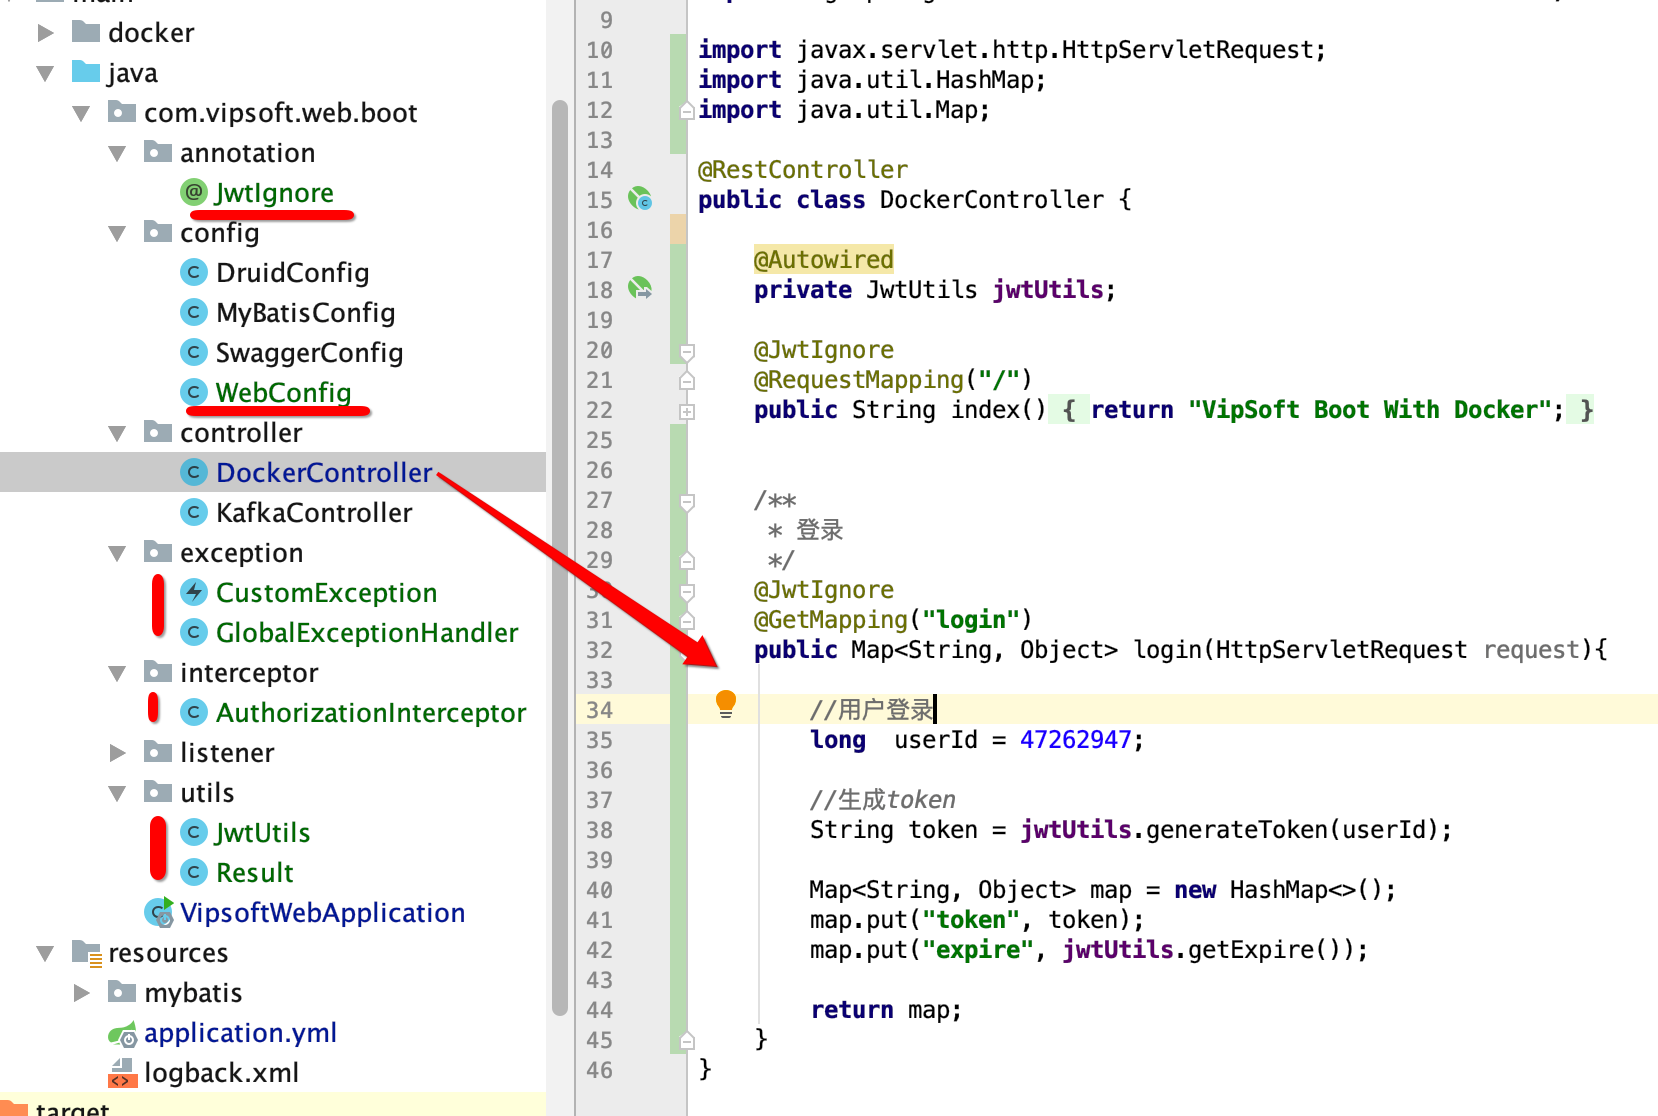
代码结构如图:需要源码联系QQ:47262947

1. 添加 Maven 引用
<dependency>

    <groupId>io.jsonwebtoken</groupId>

    <artifactId>jjwt-api</artifactId>

    <version>0.11.0</version>

</dependency>

<dependency>

    <groupId>io.jsonwebtoken</groupId>

    <artifactId>jjwt-impl</artifactId>

    <version>0.11.0</version>

    <scope>runtime</scope>

</dependency>

<dependency>

    <groupId>io.jsonwebtoken</groupId>

    <artifactId>jjwt-jackson</artifactId> <!-- or jjwt-gson if Gson is preferred -->

    <version>0.11.0</version>

    <scope>runtime</scope>

</dependency>

<dependency>

    <groupId>cn.hutool</groupId>

    <artifactId>hutool-all</artifactId>

    <version>5.3.7</version>

</dependency>
2. 添加 annotation JwtIgnore 用于忽略不需要验证的接口
package com.vipsoft.web.boot.annotation;

import java.lang.annotation.*;

@Target({ElementType.METHOD})

@Retention(RetentionPolicy.RUNTIME)

@Documented

public @interface JwtIgnore {

}
3. 添加工具类 JwtUtils
package com.vipsoft.web.boot.utils;

import io.jsonwebtoken.Claims;

import io.jsonwebtoken.Jwts;

import io.jsonwebtoken.SignatureAlgorithm;

import org.slf4j.Logger;

import org.slf4j.LoggerFactory;

import org.springframework.boot.context.properties.ConfigurationProperties;

import org.springframework.stereotype.Component;

import java.util.Date;

@ConfigurationProperties(prefix = "vipsoft.jwt")

@Component

public class JwtUtils {

    private Logger logger = LoggerFactory.getLogger(getClass());

    private String secret;

    private long expire;

    private String header;

    /**

     * 生成jwt token

     */

    public String generateToken(long userId) {

        Date nowDate = new Date();

        //过期时间

        Date expireDate = new Date(nowDate.getTime() + expire * 1000);

        return Jwts.builder()

                .setHeaderParam("typ", "JWT")

                .setSubject(userId+"") //这边不加“”的话,取的时候可能会报过期

                .setIssuedAt(nowDate)

                .setExpiration(expireDate)

                .signWith(SignatureAlgorithm.HS256, secret)

                .compact();

    }

    public Claims getClaimByToken(String token) {

        try {

            return Jwts.parser()

                    .setSigningKey(secret)

                    .parseClaimsJws(token)

                    .getBody();

        }catch (Exception e){

            logger.debug("validate is token error ", e);

            return null;

        }

    }

    /**

     * token是否过期

     * @return  true:过期

     */

    public boolean isTokenExpired(Date expiration) {

        return expiration.before(new Date());

    }

    public String getSecret() {

        return secret;

    }

    public void setSecret(String secret) {

        this.secret = secret;

    }

    public long getExpire() {

        return expire;

    }

    public void setExpire(long expire) {

        this.expire = expire;

    }

    public String getHeader() {

        return header;

    }

    public void setHeader(String header) {

        this.header = header;

    }

}
4. 添加拦截器 AuthorizationInterceptor
package com.vipsoft.web.boot.interceptor;

import cn.hutool.core.util.StrUtil;

import com.vipsoft.web.boot.annotation.JwtIgnore;

import com.vipsoft.web.boot.exception.CustomException;

import com.vipsoft.web.boot.utils.JwtUtils;

import io.jsonwebtoken.Claims;

import org.slf4j.Logger;

import org.slf4j.LoggerFactory;

import org.springframework.beans.factory.annotation.Autowired;

import org.springframework.http.HttpMethod;

import org.springframework.http.HttpStatus;

import org.springframework.stereotype.Component;

import org.springframework.web.method.HandlerMethod;

import org.springframework.web.servlet.handler.HandlerInterceptorAdapter;

import javax.servlet.http.HttpServletRequest;

import javax.servlet.http.HttpServletResponse;

@Component

public class AuthorizationInterceptor extends HandlerInterceptorAdapter {

    private Logger logger = LoggerFactory.getLogger(this.getClass());

    @Autowired

    private JwtUtils jwtUtils;

    public static final String USER_KEY = "userId";

    @Override

    public boolean preHandle(HttpServletRequest request, HttpServletResponse response, Object handler) throws Exception {

        // 忽略带JwtIgnore注解的请求, 不做后续token认证校验

        if (handler instanceof HandlerMethod) {

            HandlerMethod handlerMethod = (HandlerMethod) handler;

            JwtIgnore jwtIgnore = handlerMethod.getMethodAnnotation(JwtIgnore.class);

            if (jwtIgnore != null) {

                return true;

            }

        }

        if (HttpMethod.OPTIONS.equals(request.getMethod())) {

            response.setStatus(HttpServletResponse.SC_OK);

            return true;

        }

        //获取用户凭证

        String token = request.getHeader(jwtUtils.getHeader());

        if (StrUtil.isBlank(token)) {

            token = request.getParameter(jwtUtils.getHeader());

        }

        //凭证为空

        if (StrUtil.isBlank(token)) {

            throw new CustomException(HttpStatus.UNAUTHORIZED.value(), "token 不能为空");

        }

        Claims claims = jwtUtils.getClaimByToken(token);

        if (claims == null || jwtUtils.isTokenExpired(claims.getExpiration())) {

            throw new CustomException(HttpStatus.UNAUTHORIZED.value(), "token  失效,请重新登录");

        }

        //设置userId到request里,后续根据userId,获取用户信息

        request.setAttribute(USER_KEY, Long.parseLong(claims.getSubject()));

        return true;

    }

}
5. 添加 WebConfig,启用拦截器
package com.vipsoft.web.boot.config;

import com.vipsoft.web.boot.interceptor.AuthorizationInterceptor;

import org.springframework.beans.factory.annotation.Autowired;

import org.springframework.context.annotation.Configuration;

import org.springframework.web.servlet.config.annotation.CorsRegistry;

import org.springframework.web.servlet.config.annotation.InterceptorRegistry;

import org.springframework.web.servlet.config.annotation.WebMvcConfigurer;

@Configuration

public class WebConfig implements WebMvcConfigurer {

    @Autowired

    private AuthorizationInterceptor authorizationInterceptor;

    /**

     * 添加拦截器

     */

    @Override

    public void addInterceptors(InterceptorRegistry registry) {

        //拦截路径可自行配置多个 可用 ,分隔开

        registry.addInterceptor(authorizationInterceptor).addPathPatterns("/**");

    }

    /**

     * 跨域支持

     *

     * @param registry

     */

    @Override

    public void addCorsMappings(CorsRegistry registry) {

        registry.addMapping("/**")

                .allowedOrigins("*")

                .allowCredentials(true)

                .allowedMethods("GET", "POST", "DELETE", "PUT", "PATCH", "OPTIONS", "HEAD")

                .maxAge(3600 * 24);

    }

}
6. 添加返回对象 Result
package com.vipsoft.web.boot.utils;

/**

 * 返回的对象,项目中要移到Core中

 */

public class Result<T> {

    //操作代码

    int code;

    //提示信息

    String message;

    T Data;

    public Result(int code, String message){

        this.code = code;

        this.message = message;

    }

    public Result(int code, String message,T data){

        this.code = code;

        this.message = message;

        this.setData(data);

    }

    public int getCode() {

        return code;

    }

    public void setCode(int code) {

        this.code = code;

    }

    public String getMessage() {

        return message;

    }

    public void setMessage(String message) {

        this.message = message;

    }

    public T getData() {

        return Data;

    }

    public void setData(T data) {

        Data = data;

    }

}
7. 添加自定义异常类 CustomException.java 用于拦截器中的异常捕获
package com.vipsoft.web.boot.exception;

public class CustomException extends RuntimeException {

    private static final long serialVersionUID = 1L;

    private int code;

    private String msg;

    public CustomException(String msg) {

        super(msg);

        this.code = 500;

        this.msg = msg;

    }

    public CustomException(String msg, Throwable e) {

        super(msg, e);

        this.msg = msg;

    }

    public CustomException(int code, String msg) {

        super(msg);

        this.code = code;

        this.msg = msg;

    }

    public CustomException(int code, String msg, Throwable e) {

        super(msg, e);

        this.code = code;

        this.msg = msg;

    }

    public int getCode() {

        return code;

    }

    public void setCode(int code) {

        this.code = code;

    }

    public String getMsg() {

        return msg;

    }

    public void setMsg(String msg) {

        this.msg = msg;

    }

}
8. 添加全局异常处理类 GlobalExceptionHandler.java , 可以将 返回 前端的数据处理成 JSON格式
package com.vipsoft.web.boot.exception;

import com.vipsoft.web.boot.utils.Result;

import org.slf4j.Logger;

import org.slf4j.LoggerFactory;

import org.springframework.validation.BindException;

import org.springframework.validation.BindingResult;

import org.springframework.validation.FieldError;

import org.springframework.validation.ObjectError;

import org.springframework.web.bind.MethodArgumentNotValidException;

import org.springframework.web.bind.annotation.ExceptionHandler;

import org.springframework.web.bind.annotation.RestControllerAdvice;

import java.util.List;

/**

 * 全局异常处理器

 */

@RestControllerAdvice

public class GlobalExceptionHandler {

    private static final Logger logger = LoggerFactory.getLogger(GlobalExceptionHandler.class);

    /**

     * 处理自定义异常

     */

    @ExceptionHandler(CustomException.class)

    public Result handleException(CustomException e) {

        // 打印异常信息

        logger.error("### 异常信息:{} ###", e.getMessage());

        return new Result(e.getCode(), e.getMessage());

    }

    /**

     * 参数错误异常

     */

    @ExceptionHandler({MethodArgumentNotValidException.class, BindException.class})

    public Result handleException(Exception e) {

        if (e instanceof MethodArgumentNotValidException) {

            MethodArgumentNotValidException validException = (MethodArgumentNotValidException) e;

            BindingResult result = validException.getBindingResult();

            StringBuffer errorMsg = new StringBuffer();

            if (result.hasErrors()) {

                List<ObjectError> errors = result.getAllErrors();

                errors.forEach(p -> {

                    FieldError fieldError = (FieldError) p;

                    errorMsg.append(fieldError.getDefaultMessage()).append(",");

                    logger.error("### 请求参数错误:{" + fieldError.getObjectName() + "},field{" + fieldError.getField() + "},errorMessage{" + fieldError.getDefaultMessage() + "}");

                });

            }

        } else if (e instanceof BindException) {

            BindException bindException = (BindException) e;

            if (bindException.hasErrors()) {

                logger.error("### 请求参数错误: {}", bindException.getAllErrors());

            }

        }

        return new Result(10001, "参数无效");

    }

    /**

     * 处理所有不可知的异常

     */

    @ExceptionHandler(Exception.class)

    public Result handleOtherException(Exception e) {

        //打印异常堆栈信息

        e.printStackTrace();

        // 打印异常信息

        logger.error("### 不可知的异常:{} ###", e.getMessage());

        return new Result(40001, "系统内部错误");

    }

}
9. 配置 application.yml
vipsoft:

  jwt:

    # 加密秘钥

    secret: d3d3LnZpcHNvZnQuY29tLmNuLjQ3MjYyOTQ3LnNwcmluZyBib290

    # token有效时长,单位秒

    expire: 60 # 方便测试,设成 60 秒

    header: token
10. 登录测试代码
    /**

     * 登录

     */

    @JwtIgnore

    @GetMapping("login")

    public Map<String, Object> login(HttpServletRequest request){

        //用户登录

        long  userId = 47262947;

        //生成token

        String token = jwtUtils.generateToken(userId);

        Map<String, Object> map = new HashMap<>();

        map.put("token", token);

        map.put("expire", jwtUtils.getExpire());

        return map;

    }


Spring Boot JWT 用户认证的更多相关文章
- spring boot+jwt 权限验证
上周看了一下jwt以前公司的开发都是使用session共享的方法.现在主流的两种方式一种是把登录信息保存在服务器,另一种则是把信息保存在客户端.在使用session 存储的时候会遇到很多的问题,随着项 ...
- 玩转spring boot——简单登录认证
前言 在一个web项目中,某些页面是可以匿名访问的,但有些页面则不能.spring mvc提供了HandlerInterceptor接口来应对,只需要重写preHandle方法便可以实现此功能.那么使 ...
- Spring Boot JWT 快速入门
本章节讨论 jwt 在 spring boot 中的应用.意在快速入门 jwt. java jdk1.8 maven 3.2+ spring boot 2.0+ JSON Web Token(JWT) ...
- DRF的JWT用户认证
目录 DRF的JWT用户认证 JWT的认证规则 JWT的格式 JWT认证的流程 JWT模块的导入为 JWT的使用 DRF的JWT用户认证 从根本上来说,JWT是一种开放的标准(RFC 7519), 全 ...
- TinyFrame尾篇:整合Spring AOP实现用户认证
创建Manager用户验证表 这一篇主要讲解使用AOP对用户操作进行验证,如果通过验证,则继续执行,反之,则不能执行.其思想和上一篇完全一致. 由于需要用到用户认证,所以我们新建一个Manager实体 ...
- [django]前后端分离之JWT用户认证
在前后端分离开发时为什么需要用户认证呢?原因是由于HTTP协定是不储存状态的(stateless),这意味着当我们透过帐号密码验证一个使用者时,当下一个request请求时它就把刚刚的资料忘了.于是我 ...
- 前后端分离之JWT用户认证(转)
在前后端分离开发时为什么需要用户认证呢?原因是由于HTTP协定是不储存状态的(stateless),这意味着当我们透过帐号密码验证一个使用者时,当下一个request请求时它就把刚刚的资料忘了.于是我 ...
- 前后端分离之JWT用户认证zf
在前后端分离开发时为什么需要用户认证呢?原因是由于HTTP协定是不储存状态的(stateless),这意味着当我们透过帐号密码验证一个使用者时,当下一个request请求时它就把刚刚的资料忘了.于是我 ...
- [转] 前后端分离之JWT用户认证
[From] http://www.jianshu.com/p/180a870a308a 在前后端分离开发时为什么需要用户认证呢?原因是由于HTTP协定是不储存状态的(stateless),这意味着当 ...
- 前后端分离之JWT用户认证
在前后端分离开发时为什么需要用户认证呢?原因是由于HTTP协定是不储存状态的(stateless),这意味着当我们透过帐号密码验证一个使用者时,当下一个request请求时它就把刚刚的资料忘了.于是我 ...
随机推荐
- 高精度加法(C语言实现)
高精度加法(C语言实现) 介绍 众所周知,整数在C和C++中以int ,long,long long三种不同大小的数据存储,数据大小最大可达2^64,但是在实际使用中,我们仍不可避免的会遇到爆long ...
- TortoiseGit 使用 OpenSSH Key
中文互联网上没一个说这个东西的,还得是 stackoverflow,原文在这. 方法很简单,修改 TortoiseGit 默认 SSH Client: 修改为 Windows 系统默认 OpenSSH ...
- 深入了解PBKDF2加密技术:原理与实践
摘要:本文详细介绍了PBKDF2(Password-Based Key Derivation Function 2)加密技术,包括其原理.算法流程和实际应用,旨在帮助读者更好地理解这一重要的加密方法. ...
- 校园社团活动管理系统(适合小白)基础javaweb前端项目实战【包含增删改查,mysql】一
校园社团活动管理系统(20分) 1.项目需求: 校园社团作为高校课外活动的重要组成部分,发展十分迅速,也受到越来越多学生的欢迎,社团规模.数量等都在日益增长,社团活动也更为多样和丰富.然而,大多数高校 ...
- PageHelper插件注意事项
PageHelper插件注意事项 使用PageHelper.startPage后要紧跟查询语句 下面的代码就有可能出问题: PageHelper.startPage(10, 10); if(param ...
- centos虚拟机安装
目录 一.准备工作 1.vmware workstation软件安装 2.准备ios镜像 二.创建Centos虚拟机 三.进行Centos7的系统安装 四.虚拟机快照的使用 1.创建虚拟机快照 2.还 ...
- chatgpt接口开发笔记3: 语音识别接口
chatgpt接口开发笔记3: 语音识别接口 1.文本转语音 1.了解接口参数 接口地址: POST https://api.openai.com/v1/audio/speech 下面是接口文档描述内 ...
- 【WCH以太网接口系列芯片】基于CH395的组播应用
---------------------------------------------------------------------------------------------------- ...
- VUE2.0 学习 第一组
本笔记主要参考菜鸟教程和官方文档编写. 1. 对于Vue2.0来说每个vue应用都需要实例化vue来实现. var vm = new Vue({ // 选项 }) 2.首先,DOM是一种api,它可以 ...
- ElasticSearch之Task management API
命令样例如下: curl -X GET "https://localhost:9200/_tasks?pretty" --cacert $ES_HOME/config/certs/ ...
