[翻译]使用Swift在Xcode中创建自定义控件
使用Swift在Xcode中创建自定义控件
IBDesignable and IBInspectable
With IBDesignable and IBInspectable, developers are allowed to create interface (or view) that renders in Interface Builder in real time. In general, to apply this new feature, all you need to do is create a visual class by subclassing UIView or UIControl and then prefix the class name with @IBDesignable keyword in Swift. If you are using Objective-C, you use IB_DESIGNABLE macro instead. Here is a sample code in Swift:
使用IBDesignable以及IBInspectable,开发者们被允许创建界面(或视图),在Interface Builder中实时渲染。通常,运用这个特性,你需要做的就是继承UIView或者UIControl的一个虚拟子类,然后在Swift中使用@IBDesignable关键字进行标识。如果你使用Objective-C,你可以使用IB_DESIGNABLE宏代替。下面是一段加单的Swift示例代码:
@IBDesignableclass Rainbow: UIView {}
In older versions of Xcode, you can edit the user-defined runtime attributes to change properties of an object (e.g. layer.cornerRadius) in Interface Builder. The problem is you have to key in the exact name of the properties. IBInspectable takes a step forward. When you prefix a property of the visual class with IBInspectable, the property will be exposed to the Interface Builder such that you can change its value in a much straightforward way:
在老版本的Xcode中,你可以在Interface Builder中编辑user-defined运行时属性来修改一个对象的特性(如:layer.cornerRadius。IBInspectable前进了一步。当你在一个虚拟子类前面使用IBInspectable关键字标识的时候,属性将会暴露给Interface Builder,这样你就可以使用一种非常直接的方式来修改它的值。
Again if you are developing your app in Swift, what you have to do is just prefix your chosen property with the keyword @IBInspectable. Here is a sample code snippet:
如果你使用Swift开发你的应用,你需要做的仅仅是标识出@IBInspectable。下面是一个简单的示例代码段:
@IBInspectable var firstColor: UIColor = UIColor.blackColor() {// Update your UI when value changes}
Building Your Xcode Project
Let’s get started by creating a new project in Xcode and choose Single View Application as a template, and name it RainbowDemo. We will use Swift in this project as the programming language, so don’t forget to choose it when creating the project.
让我们从在Xcode中创建一个新的项目并选择SingleViewApplication模板开始,然后明明它为RainbowDemo。我们将在这个项目中使用Swfit作为开发语言,所以在创建项目的时候不要忘记选择语言。
Once finished, select the Main.storyboard in the Project Navigator and drag a View object from the Object Library to the View Controller. Change its color to #38334C (or whatever color you want) as well as set its size to 600 by 434. Then put it in the center of the main view. Don’t forget to change the color of the main view to the same color of the view object.
创建成功后,在项目导航中选择Main.storyboard,然后从对象库中拖拽一个视图对象到视图控制器。修改它的颜色为#38334C,以及设置它的尺寸为600*434。然后把它放到主视图的中间。不要忘记修改主视图的颜色与视图对象的颜色一致。

With Xcode 6, you have to configure auto layout constraints for the view in order to support all types of iOS devices. Auto Layout is pretty powerful in the latest version of Xcode. For simple constraints, you can just click the Issues option of the Auto Layout menu and choose “Add Missing Contraints”, and Xcode will automatically configure the layout constraints for the view.
使用Xcode6,你需要为这个视图配置自动布局常量,以便支持全部的iOS设备。在最新一版本的Xcode中,自动布局(Auto Layout)是非常有力的。对于简单的约束,你可以仅仅点击自动布局菜单中的Issues并选择“Add Missing Contraints”,然后Xcode将为视图自动配置布局约束。

Creating Custom View Class
Now that you’ve created the view in storyboard, it’s time to create our custom view class. We’ll use the Swift class template for the class creation. Name it “Rainbow”.
现在,你已经在Storyboard中创建了视图,是时候创建我们的自定义视图类了。我们将使用Swift类模板来创建类。命名它为“Rainbow”。
Then insert the following code in the class:
然后在类中插入下面的代码:
import UIKitclass Rainbow: UIView {required init(coder aDecoder: NSCoder) {super.init(coder: aDecoder)}override init(frame: CGRect) {super.init(frame: frame)}}
As mentioned before, the visual class is a subclass of UIView. In order to use our custom class in live rendering, we need to override both initializers as shown above. Next split the view by selecting the assistant editor:
就像上面提到的,这个虚拟类是UIView的子类。为了在渲染的时候使用我们的自定义类,我们需要重载上面呈现的代码。然后通过选择辅助编辑器来分割视图:

Once done, select the main storyboard in the assistant editor, so you can see what you are building in real time. Remember to change the class name of the view to “Rainbow” under the Identity inspector:
一旦完成,在辅助编辑器中选择Main.storyboard,然后你可以看到你实时创建的东西。记得在Identity Inspector中更改视图的类名为Rainbow:

Implementing IBDesignable Controls
The first step to enable a control for live rendering is to set the custom view as Designable by prefixing the class name with @IBDesignable:
启用控件的实时渲染的第一步是通过给类名加上@IBDesignable前缀来设置自定义视图为Designable。
@IBDesignableclass Rainbow: UIView {...}
It’s kinda simple as you can see. But this simple keyword would make your development much easier. Next, we will add a few properties for setting the colors of the circles. Insert these lines of code in the Rainbow class:
这就像你看到的一样简单。但是这个简单的关键字将使你的开发非常的容易。下一步,我们将添加一些属性来设置圈的颜色。在Rainbow类中,插入几行代码:
@IBInspectable var firstColor: UIColor = UIColor(red: (37.0/255.0), green: (252.0/255), blue: (244.0/255.0), alpha: 1.0)@IBInspectable var secondColor: UIColor = UIColor(red: (171.0/255.0), green: (250.0/255), blue: (81.0/255.0), alpha: 1.0)@IBInspectable var thirdColor: UIColor = UIColor(red: (238.0/255.0), green: (32.0/255), blue: (53.0/255.0), alpha: 1.0)
Here, we predefine each property with a default colour, and tell it to redraw the view each time a user changes its value. Most importantly, we prefix each property with the @IBInspectable keyword. If you go to the Attributes inspectable of the view, you should find these properties visually:
这里,我们使用默认的颜色来预定义每一个属性,然后告诉他,在用户每一次更改它的值的时候重绘视图。最重要的是,我们给每一个属性都加上@IBIspectable关键字。如果你查看视图的属性指示器,你将找到这些视觉属性:
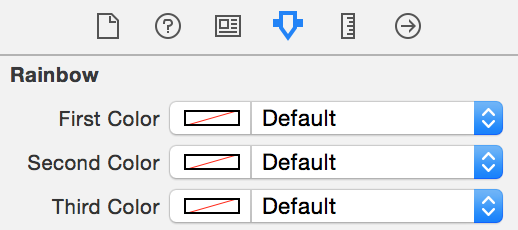
Cool, right? By indicating the properties as IBInspectable, you can edit them visually using color picker.
很酷,对么?通过标识属性为IBInspectable,你可以使用颜色选取器来编辑他们。
Okay let’s move to implement the main methods of the Rainbow class, which is used to draw a circle on the screen. Insert the following method in the class:
让我们开始实现Rainbow类用于在屏幕上绘制圆圈的主要方法。在类中插入下面的方法:
func addOval(lineWidth: CGFloat, path: CGPathRef, strokeStart: CGFloat, strokeEnd: CGFloat, strokeColor: UIColor, fillColor: UIColor, shadowRadius: CGFloat, shadowOpacity: Float, shadowOffsset: CGSize) {let arc = CAShapeLayer()arc.lineWidth = lineWidtharc.path = patharc.strokeStart = strokeStartarc.strokeEnd = strokeEndarc.strokeColor = strokeColor.CGColorarc.fillColor = fillColor.CGColorarc.shadowColor = UIColor.blackColor().CGColorarc.shadowRadius = shadowRadiusarc.shadowOpacity = shadowOpacityarc.shadowOffset = shadowOffssetlayer.addSublayer(arc)}
To make the code clean and readable, we create a common method for drawing a full or half circle according to the parameters provided by the caller. It’s pretty straightforward to draw a circle or an arc using CAShapeLayer class. You can control the start and end of the stoke using the strokeStart and strokeEnd properties. By varying the value of stokeEnd between 0.0 and 1.0, you can draw a full or partial circle. The rest of the properties are just used to set the color of a stroke, shadow color, etc. You can check out the official documentation for details of all the properties available in CAShapeLayer.
为了使代码干净且可读,我们创建一个公共的方法根据调用者传入的参数来来绘制一整个或半个圆。它使用CAShapeLayer类漂亮地直接绘制一个圆或一个圆弧。你可以使用strokeStart以及strokeEnd属性来控制线的起点和终点。通过控制strokeEnd的值在0.0与1.0之间,你可以绘制一整个或部分圆。剩下的属性仅用于设置线的颜色、阴影颜色等。你可以在官方文档中查看在CAShapeLayer中可用的属性的细节。
Next, insert the following methods in the Rainbow class:
接下来,插入下面的代码到Rainbow类中:
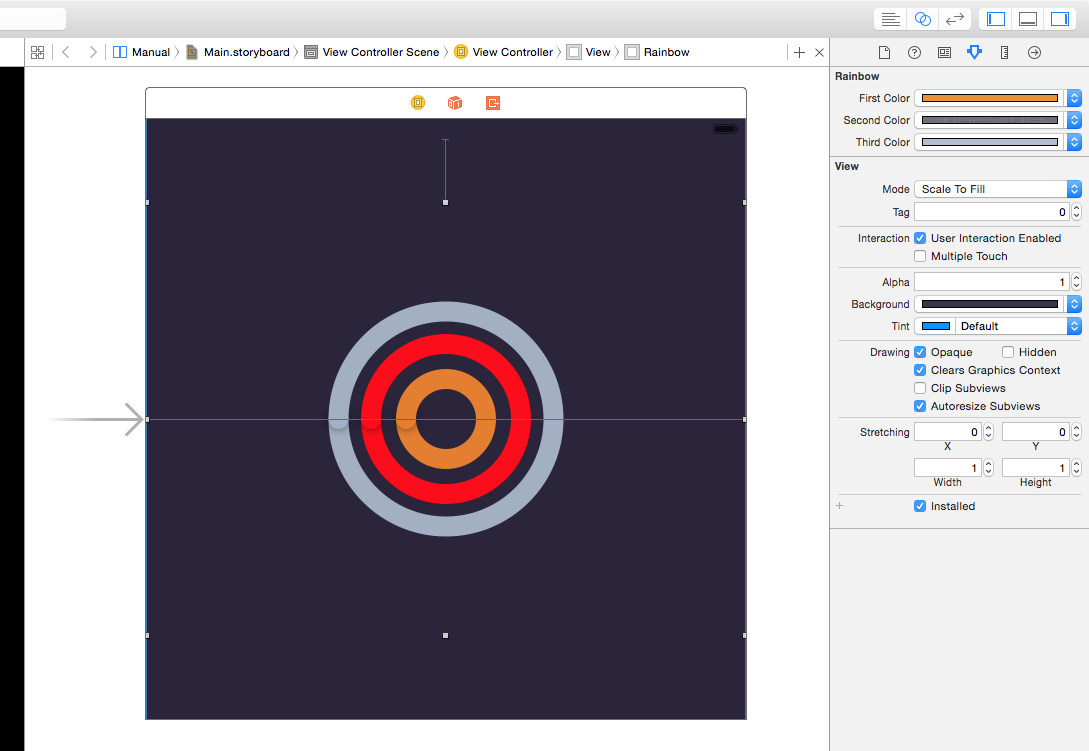
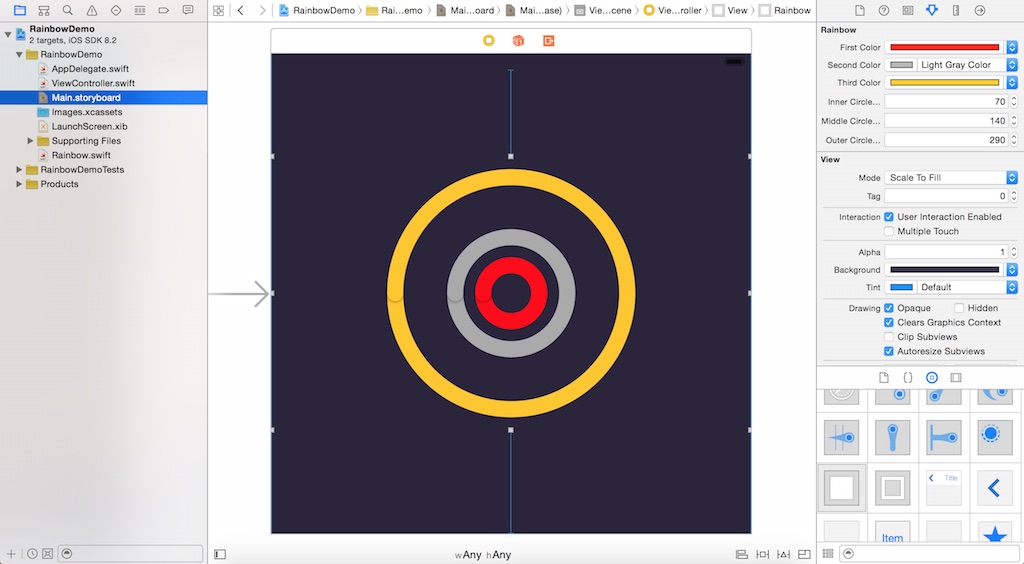
override func drawRect(rect: CGRect) {// Add ARCsself.addCirle(80, capRadius: 20, color: self.firstColor)self.addCirle(150, capRadius: 20, color: self.secondColor)self.addCirle(215, capRadius: 20, color: self.thirdColor)}func addCirle(arcRadius: CGFloat, capRadius: CGFloat, color: UIColor) {let X = CGRectGetMidX(self.bounds)let Y = CGRectGetMidY(self.bounds)// Bottom Ovallet pathBottom = UIBezierPath(ovalInRect: CGRectMake((X - (arcRadius/2)), (Y - (arcRadius/2)), arcRadius, arcRadius)).CGPathself.addOval(20.0, path: pathBottom, strokeStart: 0, strokeEnd: 0.5, strokeColor: color, fillColor: UIColor.clearColor(), shadowRadius: 0, shadowOpacity: 0, shadowOffsset: CGSizeZero)// Middle Caplet pathMiddle = UIBezierPath(ovalInRect: CGRectMake((X - (capRadius/2)) - (arcRadius/2), (Y - (capRadius/2)), capRadius, capRadius)).CGPathself.addOval(0.0, path: pathMiddle, strokeStart: 0, strokeEnd: 1.0, strokeColor: color, fillColor: color, shadowRadius: 5.0, shadowOpacity: 0.5, shadowOffsset: CGSizeZero)// Top Ovallet pathTop = UIBezierPath(ovalInRect: CGRectMake((X - (arcRadius/2)), (Y - (arcRadius/2)), arcRadius, arcRadius)).CGPathself.addOval(20.0, path: pathTop, strokeStart: 0.5, strokeEnd: 1.0, strokeColor: color, fillColor: UIColor.clearColor(), shadowRadius: 0, shadowOpacity: 0, shadowOffsset: CGSizeZero)}
The default implementation of the drawRect method does nothing. In order to draw circles in the view, we override the method to implement our own drawing code. The addCircle method takes in three parameters: arcRadius, capRadius and color. The arcRadius is the radius of the circle, while the capRadius is the radius of the rounded cap.
drawRect函数的默认实现什么都不做。为了在视图中绘制圆,我们重载这个函数来实现我们自己的绘制代码。addCircle方法使用三个参数:arcRadius、capRadius、color。arcRadius是圆的半径,capRadius是圆型覆盖的半径。
The addCircle method makes use of UIBezierPath to draw the arcs and it works like this:
- First it draws a half circle at the bottom
- Next it draws a full small circle at the edge of the arc.
- Finally, it draws the other half of the circle
addCircle函数使用UIBezierPath来绘制圆弧,并且它像这样工作:
- 首先,绘制一个半圆在底部。
- 然后,绘制一整个小圆在弧的边界。
- 最后,绘制这个圆的加一半。
In the drawRect method, we call the addCircle method three times with different radius and color. This figure illustrates how the circles are drawn:
在drawRect函数中,我们使用不同的半径与颜色调用addCircle函数三次。这个特点阐述这些圆如何被绘制:

With the IBInspectable properties, you are now free to change the color of each circle right in the Interface Builder without diving into the code:
使用IBInspectable属性,你现在可以在Interface Builder中自由地正确修改每一个圆,而不用沉浸在代码中。
Obviously, you can further expose arcRadius as an IBInspectable property. I’ll leave it as an exercise for you.
显然地,你可以更深入的挖掘arcRadius作为一个IBInspectable属性。
Summary
After going through this tutorial, I hope that you now understand how to use both IBDesignable and IBInspectable in Xcode 6. With the real-time preview in the Interface Builder, this new feature would allow you to create custom componenents in a more effcient way.
在随着这个教程做完之后,我希望你可以理解如何使用IBDesignable和IBInspectable在Xcode6当中。利用在Interface Builder的实时预览,新的特性允许你使用一种高效的方式创建自定义组件。
For your reference, you can download the complete Xcode project from here. As always, leave me comment and share your thought about the tutorial.
为了便于你参考,你可以从这里下载完整的Xcode项目。
Reference
[翻译]使用Swift在Xcode中创建自定义控件的更多相关文章
- Android中创建自定义控件
1.创建一个TitleLayout继承LinearLayout: //创建自定义控件 public class TitleLayout extends LinearLayout { private f ...
- 【翻译】在Sencha Touch中创建离线/在线代理
原文:Creating an Online/Offline proxy in Sencha Touch 概述 在Sencha Touch中,一个常见的需求就是,当设备在没有连接互联网的时候,应用程序必 ...
- 【翻译】在Ext JS中创建特定主题的重写
Ext JS提供了大量的功能来使类的创建和处理变得简单,还提供了一系列的功能来扩展和重新现有的Javascript类.这意味着可以为类添加行为和创建属于自己的类,或者重写某些函数的行为.在本文,将展示 ...
- Xcode中创建文件夹
如果在xcode工程中new group,只是在视觉效果上分好了几个文件夹,方便分类管理,但在finder中并不会创建新的文件夹,在硬盘目录还是所有文件都并列在一个文件夹内,更恶心的是当你重新打开工程 ...
- [Swift实际操作]九、完整实例-(2)在Xcode 10中创建新项目
本文将在Xcode中创建上一文<在iTunesConnect网站中创建产品>在iTunes Connect创建的产品具有相同的Bundle ID的应用程序. 在项目模板窗口中,选择单视图模 ...
- 在Xcode中使用Git进行源码版本控制
http://www.cocoachina.com/ios/20140524/8536.html 资讯 论坛 代码 工具 招聘 CVP 外快 博客new 登录| 注册 iOS开发 Swift Ap ...
- 【转】在Xcode中使用Git进行源码版本控制 -- 不错
原文网址:http://www.cocoachina.com/ios/20140524/8536.html 本文翻译自Understanding Git Source Control in Xcode ...
- Xcode 中 Git 的配置与使用
Xcode 中 Git 的配置与使用主要围绕下面几个问题展开阐述: 问题1,如何在Xcode中创建本地代码库,并添加和提交代码到本地代码库? 问题2,如何在Xcode中提交推送给远程服务器代码库? 问 ...
- Git在Xcode中的配置与使用常见问题总结
书接上回提出的Git在Xcode中的配置与使用常见问题4个问题 问题1,如何在Xcode中创建代码库,并添加和提交代码到代码库? 问题2,如何在Xcode中提交推送给远程服务器代码库? 问题3,如何在 ...
随机推荐
- [安卓] 8、VIEW和SURFACEVIEW游戏框架
这是个简单的游戏框架,上图显示我们实现了屏幕上对象的位置控制.这里要1个简单的layout资源和2个java类:在MainActivity中主要和以往一样,唯一不同的是去除电池图标和标题等操作,然后第 ...
- [OpenCV] 2、边缘检测 canny
>_<" 边缘检测代码:
- [ACM_动态规划] 轮廓线动态规划——铺放骨牌(状态压缩1)
Description Squares and rectangles fascinated the famous Dutch painter Piet Mondriaan. One night, af ...
- jQuery document window load ready 区别详解
用过JavaScript的童鞋,应该知道window对象和document对象,也应该听说过load事件和ready事件,小菜当然也知道,而且自认为很了解,直到最近出了问题,才知道事情并不是那么简单. ...
- 使用Jekyll官方的ReadMore摘要功能
今天才发现,Jekyll官方就支持ReadMore摘要功能,记录一下. 我之前的方法,在index.html中 {{ post.content ||split:'<!-- more --> ...
- solr详解,开发必备
1.基础知识 创建索引的过程如下: (1).建立索引器IndexWriter,这相当于一本书的框架 (2).建立文档对象Document,这相当于一篇文章 (3).建立信息字段对象Field,这相当于 ...
- 【转】使用Cocoapods创建私有podspec
Cocoapods是非常好用的一个iOS依赖管理工具,使用它可以方便的管理和更新项目中所使用到的第三方库,以及将自己的项目中的公共组件交由它去管理.Cocoapods的介绍及优点本文就不在赘述,我开始 ...
- 【转载】UEditor前端配置项说明
UEditor 的配置项分为两类:前端配置项 和 后端配置项 后端配置项具体看这个文档L:后端配置项说明 本文档介绍如何通过设置前端配置项,定制编辑器的特性,配置方法主要通过修改ueditor.con ...
- android 6.0权限判断 音频 拍照 相册
------------------------------------------打开音频权限------------------------------------------------ if ...
- Material Design练习
最近写了个小应用练习material design的控件使用,使用豆瓣V2 API访问豆瓣电影,程序很小,也就用了几个API而已,能够显示北美票房榜.电影排行榜,查看电影详情,以及进行电影搜索,可惜豆 ...