spring-boot 2.5.4,nacos 作为配置、服务发现中心,Cloud Native Buildpacks 打包镜像,GitLab CI/CD
spring-boot 2.5.4,nacos 作为配置、服务发现中心,Cloud Native Buildpacks 打包镜像,GitLab CI/CD
本文主要介绍 Java 通过 Cloud Native Buildpacks 打包镜像,通过 Gitlab 配置 CI/CD。以及使用 nacos 作为配置中心,使用 grpc 作为 RPC 框架。
前置条件:
- JDK 版本:1.8
- gradle 版本:7.1
- spring-boot 版本:2.5.4
- nacos 版本:1.3.1
- GitLab 配置
spring-boot gradle 插件
spring-boot gradle 插件在 gradle 中提供 spring-boot 支持。该插件可以打 jar 或者 war 包。
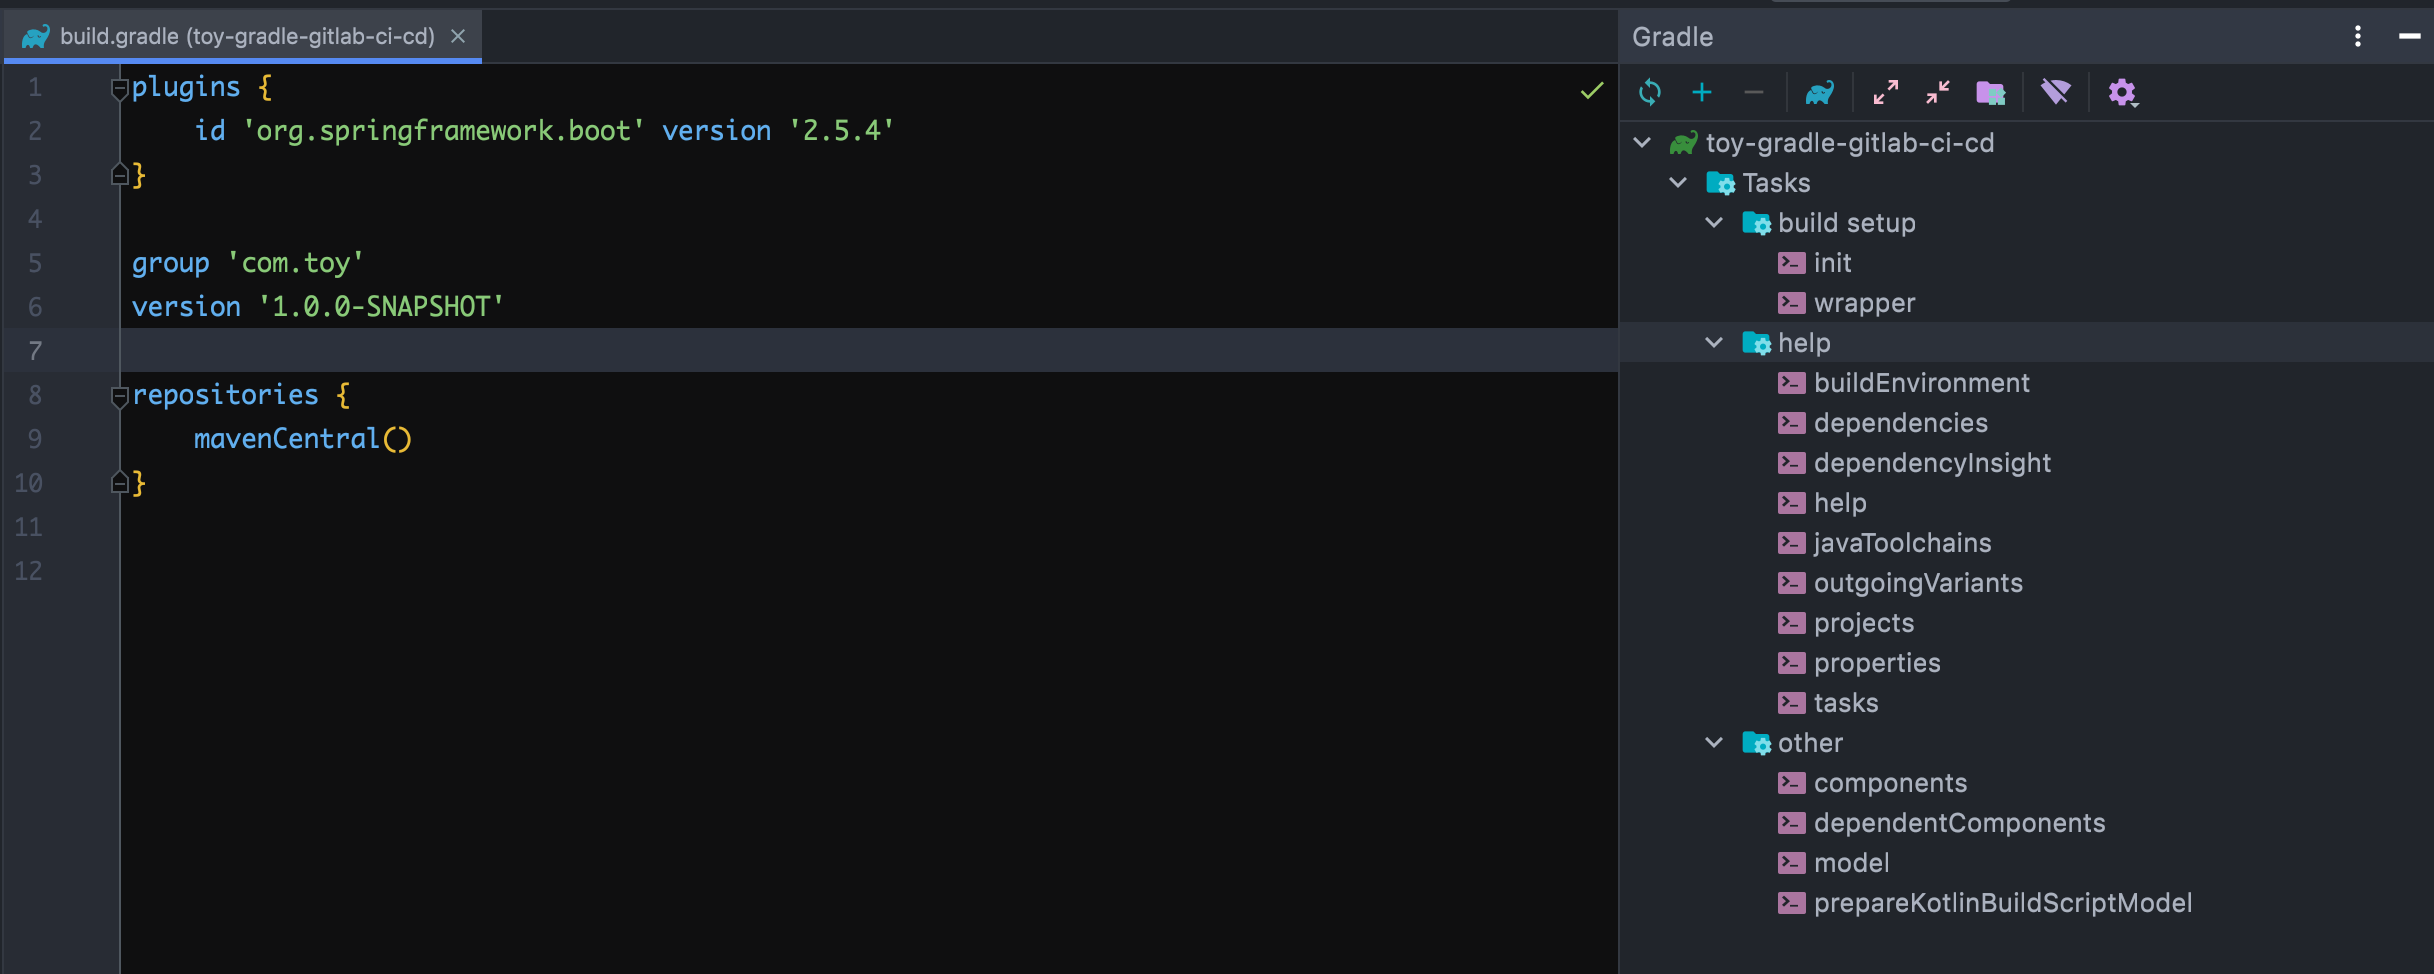
plugins {

	id 'org.springframework.boot' version '2.5.4'

}
新建一个 gradle 项目,该项目在只引用 id 'org.springframework.boot' version '2.5.4' 插件的情况下,gralde 任务分布完全没有变化,如下图所示。
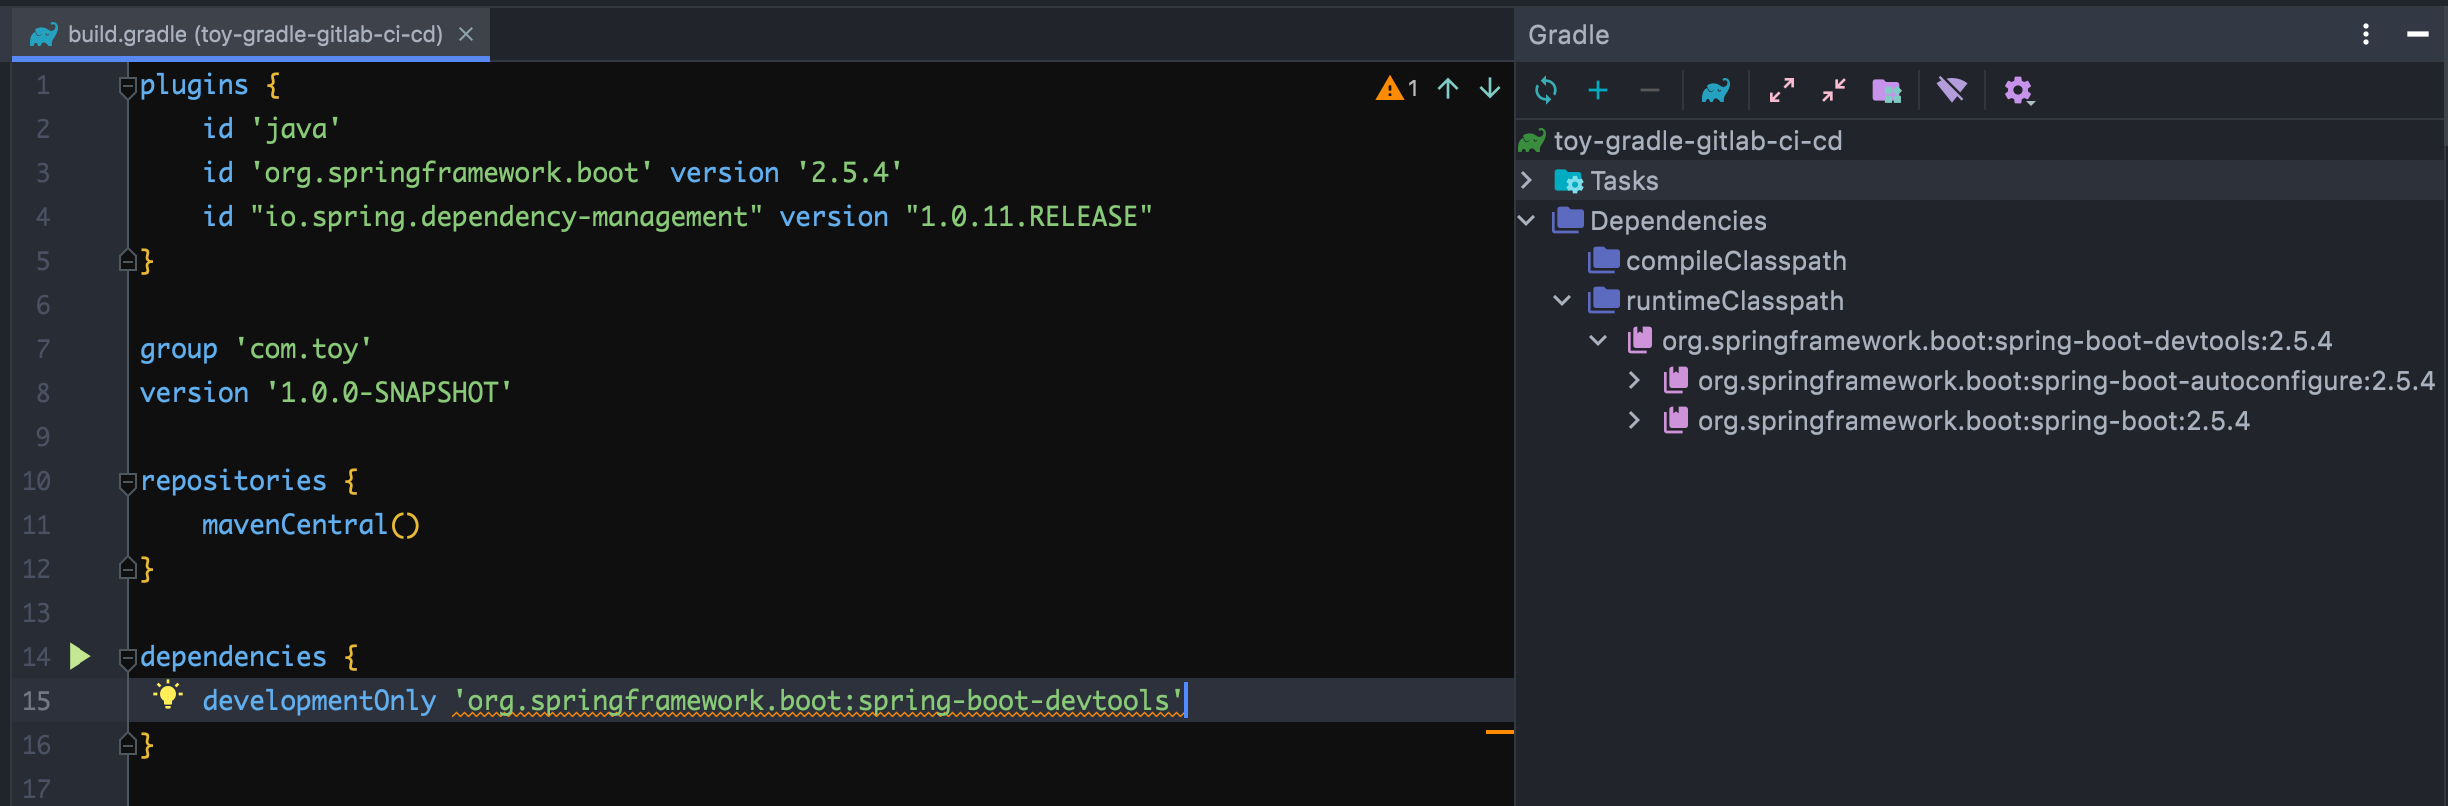
引入 java 插件
plugins {

    id 'java'

    id 'org.springframework.boot' version '2.5.4'

}
但当引入 java 插件后,情况就大大不同了,可见,spring-boot 插件和 java 插件一起应用后,将产生如下反应:

创建
bootJar任务,执行该任务会生成一个 fat jar。该 jar 包把所有的类文件打包进BOOT-INF/classes中,把项目依赖的所有 jar 包打包进BOOT-INF/lib中。配置
assemble任务,该任务依赖于bootJar任务,所以执行assemble任务的时候也会执行bootJar。配置
jar任务,该任务可以配置 jar 包的classifier。配置方式如下,默认情况下 classifier 为空字符串:bootJar {
classifier = 'boot'
} jar {
classifier = ''
}
创建
bootRun任务用于运行应用程序。创建
bootArchives配置,注意这里是配置,不是任务。当应用maven插件时会为bootArchives配置创建uploadBootArchives任务。bootArchives默认情况下包含bootJar或bootWar任务生成的文件。uploadBootArchives {
repositories {
mavenDeployer {
repository url: 'https://repo.example.com'
}
}
}
创建
developmentOnly配置。该配置用于管理开发时的依赖,比如org.springframework.boot:spring-boot-devtools,该依赖仅在开发时使用,无需打进 jar 包中。dependencies {
developmentOnly 'org.springframework.boot:spring-boot-devtools'
}
创建
productionRuntimeClasspath配置。它等价于runtimeClasspath中的依赖减去developmentOnly配置中的依赖。配置
JavaCompile任务默认使用UTF-8。配置
JavaCompile任务使用-parameters配置编译器参数。
引入 io.spring.dependency-management 插件
引入该插件后,将自动管理依赖版本。
plugins {
id 'java'
id 'org.springframework.boot' version '2.5.4'
id "io.spring.dependency-management" version "1.0.11.RELEASE"
}
group 'com.toy'
version '1.0.0-SNAPSHOT'
repositories {
mavenCentral()
}
dependencies {

    developmentOnly 'org.springframework.boot:spring-boot-devtools'

}
引入 grpc 框架
基于本示例使用 nacos 作为服务发现中心,本示例将使用 net.devh:grpc-spring-boot-starter 依赖作为框架。
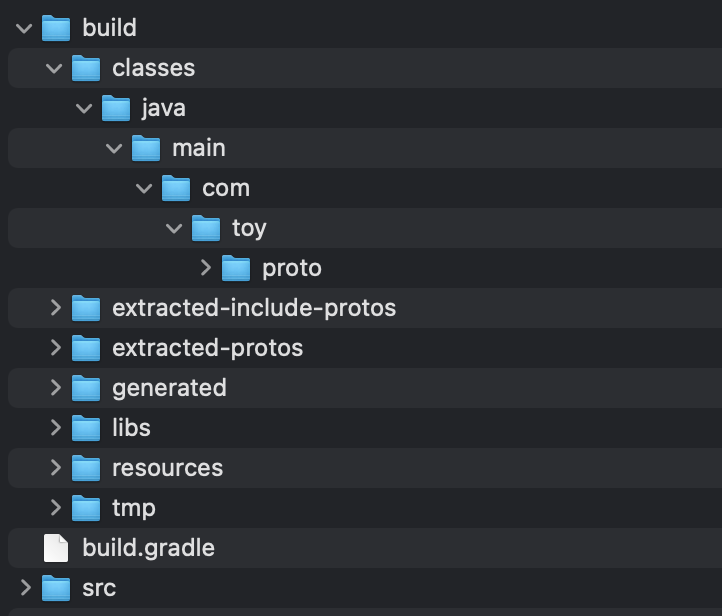
工程结构
目前为止,我们介绍了 java 项目中引入 spring gradle 所需的插件,以及各个组件的作用。接下来我们介绍如何引入 grpc,以及引入 grpc 后,我们的工程结构。
改造后工程结构总体如下:

protobuf
用于保存 proto 文件,以及发布 proto 文件,当客户端引用时,保证 jar 包最小。build.gradle 文件内容如下:
plugins {

    id 'java'

    id 'idea'

    id 'com.google.protobuf' version '0.8.17' //google proto 插件

    id 'maven-publish'

}

group 'com.toy'

version '1.0.0-SNAPSHOT'

repositories {

    mavenCentral()

}

dependencies {

    //用于生成 java 类

    compileOnly 'io.grpc:grpc-protobuf:1.39.0'

    compileOnly 'io.grpc:grpc-stub:1.39.0'

}

protobuf {

    protoc {

        artifact = "com.google.protobuf:protoc:3.17.3"

    }

    plugins {

        grpc {

            artifact = 'io.grpc:protoc-gen-grpc-java:1.39.0'

        }

    }

    generateProtoTasks {

        all()*.plugins {

            grpc {

            }

        }

    }

}

publishing {

    publications {

        proto_package(MavenPublication) {

        }

    }

    repositories {

        maven {

            allowInsecureProtocol = true

            url '你的 Maven 仓库地址'

            credentials {

                username = 'Maven 账号'

                password = 'Maven 密码'

            }

        }

    }

}
生成的 Java 类路径为 $projectName/build/.. 如下所示,生成的所有 class 文件位于 proto 文件夹下:
rpc
在 rpc 项目中添加启动类
ToyApplication,内容如下:package com.toy.rpc; import org.springframework.boot.SpringApplication;
import org.springframework.boot.autoconfigure.SpringBootApplication; /**
* @author Zhang_Xiang
* @since 2021/8/20 15:34:58
*/
@SpringBootApplication(scanBasePackages = {"com.toy.*"})
public class ToyApplication {
public static void main(String[] args) {
SpringApplication.run(ToyApplication.class, args);
}
}
在包
com.toy.rpc.impl中添加HelloImpl文件,内容如下:package com.toy.rpc.impl; import com.toy.proto.GreeterGrpc;
import com.toy.proto.HelloReply;
import com.toy.proto.HelloRequest;
import io.grpc.stub.StreamObserver;
import net.devh.boot.grpc.server.service.GrpcService; /**
* @author Zhang_Xiang
* @since 2021/8/20 15:35:56
*/
@GrpcService
public class HelloImpl extends GreeterGrpc.GreeterImplBase { @Override
public void sayHello(HelloRequest request, StreamObserver<HelloReply> responseObserver) {
HelloReply reply = HelloReply.newBuilder().setMessage("Hello " + request.getName()).build();
responseObserver.onNext(reply);
responseObserver.onCompleted();
}
}
添加集成测试
(1)添加集成测试配置
package com.toy.config;

import net.devh.boot.grpc.client.autoconfigure.GrpcClientAutoConfiguration;

import net.devh.boot.grpc.server.autoconfigure.GrpcServerAutoConfiguration;

import net.devh.boot.grpc.server.autoconfigure.GrpcServerFactoryAutoConfiguration;

import org.springframework.boot.autoconfigure.ImportAutoConfiguration;

import org.springframework.boot.test.context.TestConfiguration;

/**

* @author Zhang_Xiang

* @since 2021/8/12 16:26:25

*/

@TestConfiguration

@ImportAutoConfiguration({

        GrpcServerAutoConfiguration.class, // Create required server beans

        GrpcServerFactoryAutoConfiguration.class, // Select server implementation

        GrpcClientAutoConfiguration.class}) // Support @GrpcClient annotation

public class IntegrationTestConfigurations {

}
(2)添加测试类
package com.toy;

import com.toy.config.IntegrationTestConfigurations;

import com.toy.proto.GreeterGrpc;

import com.toy.proto.HelloReply;

import com.toy.proto.HelloRequest;

import net.devh.boot.grpc.client.inject.GrpcClient;

import org.junit.jupiter.api.Test;

import org.springframework.boot.test.context.SpringBootTest;

import org.springframework.test.annotation.DirtiesContext;

import org.springframework.test.context.junit.jupiter.SpringJUnitConfig;

import static org.junit.jupiter.api.Assertions.assertEquals;

/**

* @author Zhang_Xiang

* @since 2021/8/20 16:02:41

*/

@SpringBootTest(properties = {

        "grpc.server.inProcessName=test", // Enable inProcess server

        "grpc.server.port=-1", // Disable external server

        "grpc.client.inProcess.address=in-process:test" // Configure the client to connect to the inProcess server

})

@SpringJUnitConfig(classes = {IntegrationTestConfigurations.class})

@DirtiesContext

public class HelloServerTest {

    @GrpcClient("inProcess")

    private GreeterGrpc.GreeterBlockingStub blockingStub;

    @Test

    @DirtiesContext

    public void sayHello_replyMessage() {

        HelloReply reply = blockingStub.sayHello(HelloRequest.newBuilder().setName("Zhang").build());

        assertEquals("Hello Zhang", reply.getMessage());

    }

}
build.gradle
plugins {

    id 'java'

    id 'idea'

    id 'org.springframework.boot' version '2.5.4'

    id "io.spring.dependency-management" version "1.0.11.RELEASE"

}

group 'com.toy'

version '1.0.0-SNAPSHOT'

repositories {

    mavenCentral()

}

dependencies {

    implementation platform('io.grpc:grpc-bom:1.39.0') //使所有 protobuf 插件的版本保持一致

    implementation 'net.devh:grpc-spring-boot-starter:2.12.0.RELEASE'

    developmentOnly 'org.springframework.boot:spring-boot-devtools'

    implementation project(':protobuf') //引入 protobuf 项目

    testImplementation 'org.junit.jupiter:junit-jupiter-api:5.7.2'

    testRuntimeOnly 'org.junit.jupiter:junit-jupiter-engine:5.7.2'

    testImplementation 'io.grpc:grpc-testing'

    testImplementation('org.springframework.boot:spring-boot-starter-test')

}

bootBuildImage {

    imageName = "harbor.xxx.com/rpc/${project.name}:${project.version}"

    publish = true

    docker {

    publishRegistry {

            username = "admin"

            password = "admin"

            url = "harbor.xxx.com"

        }

    }

}

test {

    useJUnitPlatform()

}
至此,整个 grpc 项目基础结构完成。
添加 nacos 配置中心、服务发现
在 rpc 项目 build.gradle 文件中引入读取 nacos 配置的 jar 包和注册服务到 nacos 中的 jar 包。
dependencies{

    implementation 'org.springframework.boot:spring-boot-starter-web' //用于注册服务

    //添加此引用的原因是为了解决 spring boot 2.5.4 无法读取 nacos 配置的问题

    implementation 'org.springframework.cloud:spring-cloud-starter-bootstrap:3.0.3'

    implementation 'com.alibaba.cloud:spring-cloud-starter-alibaba-nacos-discovery:2021.1'

    implementation 'com.alibaba.cloud:spring-cloud-starter-alibaba-nacos-config:2021.1'

}
添加读取服务配置,在 rpc 项目中添加
bootstrap.propertise,内容如下:spring.profiles.active=dev
spring.application.name=toy
添加
bootstrap-dev.properties,内容如下:spring.cloud.nacos.config.server-addr=127.0.0.1:8848
spring.cloud.nacos.config.namespace=52f2f610-46f6-4c57-a089-44072099adde
spring.cloud.nacos.config.file-extension=yaml
spring.cloud.nacos.config.group=DEFAULT_GROUP
spring.cloud.nacos.discovery.namespace=52f2f610-46f6-4c57-a089-44072099adde
spring.cloud.nacos.discovery.server-addr=127.0.0.1:8848
至此,完成了服务端通过 nacos 读取配置,并且把服务端注册到 nacos 中。
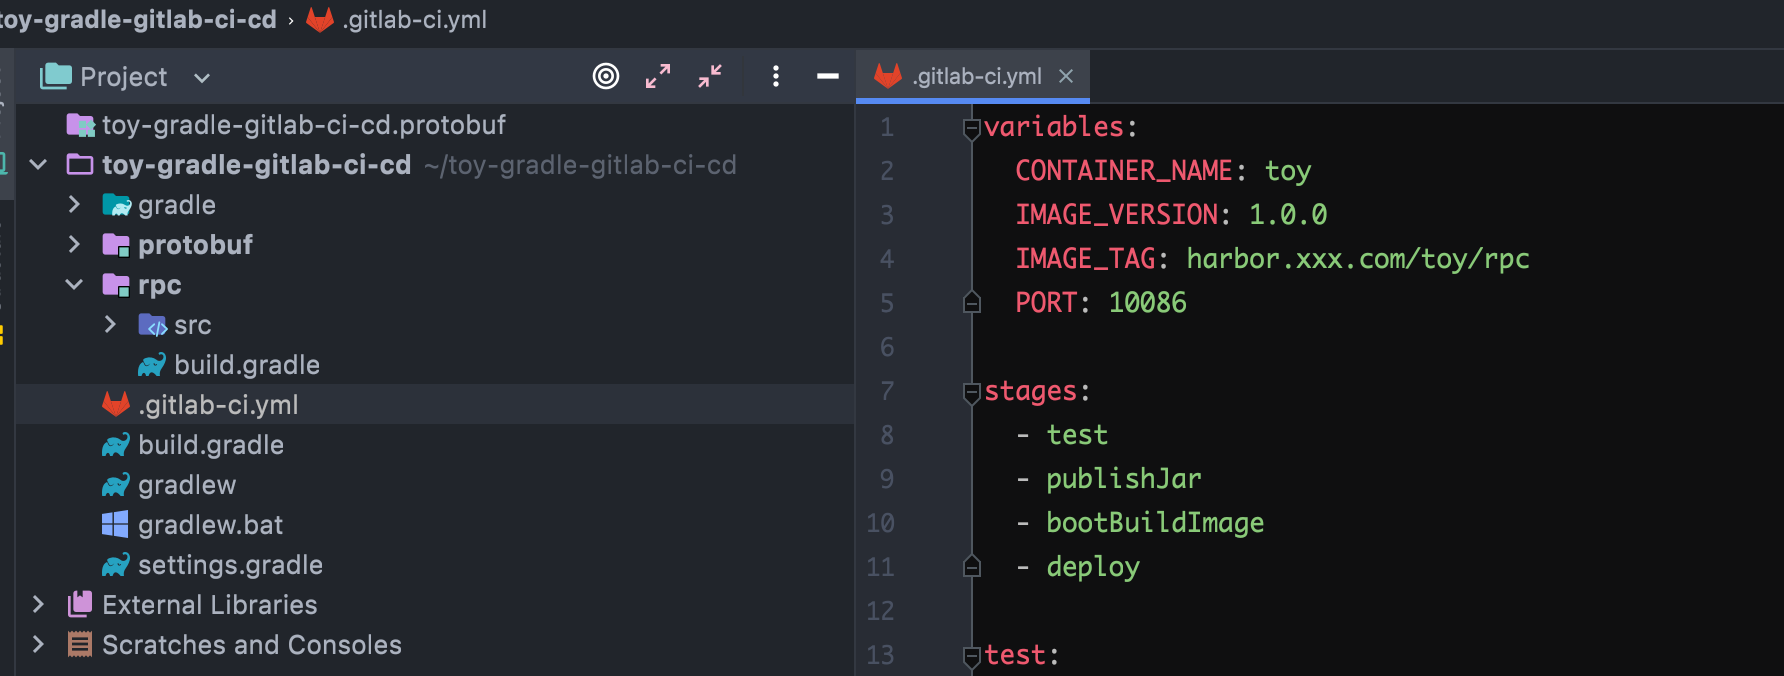
gitlab CI/CD
在根项目目录下添加 .gitlab-ci.yml 文件。当 gitlab 安装了 runner 后,将自动触发 CI/CD,内容如下:
variables:

  CONTAINER_NAME: toy

  IMAGE_VERSION: 1.0.0

  IMAGE_TAG: harbor.xxx.com/toy/rpc

  PORT: 10086

stages:

  - test

  - publishJar

  - bootBuildImage //spring-boot 从 2.3.0 版本以后引入了 BootBuildImage 任务。

  - deploy

test:

  stage: test

  script:

    - gradle clean

    - gradle rpc:test

publishProtoBuf:

  stage: publishJar

  script:

    - gradle protobuf:publish

bootBuildImage:

  stage: bootBuildImage

  script:

    - gradle rpc:bootBuildImage

deployDev:

  stage: deploy

  script:

    - ssh $SERVER_USER@$SERVER_IP "docker login --username=$REGISTERY_NAME --password=$REGISTRY_PWD harbor.xxx.com; docker pull $IMAGE_TAG:$IMAGE_VERSION;"

    - ssh $SERVER_USER@$SERVER_IP "docker container rm -f $CONTAINER_NAME || true"

    - ssh $SERVER_USER@$SERVER_IP "docker run -d -p $PORT:$PORT -e JAVA_OPTS='-Xms512m -Xmx512m -Xss256K'  --net=host --name $CONTAINER_NAME $IMAGE_TAG:$IMAGE_VERSION"

  when: manual
这几个步骤什么意思呢?
- 定义项目级别的变量
- 定义了 4 个步骤,其中每个步骤中的任务又是可以并行的
- test:运行项目中的单元测试(项目中没有写单元测试)、集成测试
- publishJar:发布项目中 protobuf 项目到私有 maven 仓库中
- bootBuildImage:打包镜像,并根据配置发布到镜像仓库中,这里打包过程需要详细说明
- deploy:部署镜像到远程服务器中,在此步骤中配置了
when:manual,意思是手动触发此步骤
注意: 这里 SERVER_USER、SERVER_IP、$REGISTERY_NAME 和 $REGISTRY_PWD 在 Gitlab 中通过超级管理员做了全局配置,即在所有项目中都可以使用。

定义 gitlab CI/CD 变量
CI/CD 变量一共有 4 种定义方式,如下:
- 在
.gitlab-ci.yml文件中定义
- 在项目中定义
- 在组中定义
- gitlab 全局变量
变量优先级(从高到低)
- 触发变量、流水线变量、手动流水线变量
- 项目变量
- 组变量
- 全局变量
- 继承变量
.gitlab-ci.yml文件中,job 中定义的变量.gitlab-ci.yml中定义的变量,job 外的变量- 部署变量
- 预定义变量
spring-boot 2.5.4,nacos 作为配置、服务发现中心,Cloud Native Buildpacks 打包镜像,GitLab CI/CD的更多相关文章
- Spring Boot 系列(三)属性配置&自定义属性配置
在使用spring boot过程中,可以发现项目中只需要极少的配置就能完成相应的功能,这归功于spring boot中的模块化配置,在pom.xml中依赖的每个Starter都有默认配置,而这些默认配 ...
- 分布式事务、多数据源、分库分表中间件之spring boot基于Atomikos+XADataSource分布式事务配置(100%纯动态)
本文描述spring boot基于Atomikos+DruidXADataSource分布式事务配置(100%纯动态),也就是增加.减少数据源只需要修改application.properties文件 ...
- 让Spring Boot项目启动时可以根据自定义配置决定初始化哪些Bean
让Spring Boot项目启动时可以根据自定义配置决定初始化哪些Bean 问题描述 实现思路 思路一 [不符合要求] 思路二[满足要求] 思路三[未试验] 问题描述 目前我工作环境下,后端主要的框架 ...
- Spring Boot 多模块项目创建与配置 (一) (转)
Spring Boot 多模块项目创建与配置 (一) 最近在负责的是一个比较复杂项目,模块很多,代码中的二级模块就有9个,部分二级模块下面还分了多个模块.代码中的多模块是用maven管理的,每个模块都 ...
- Spring Boot 源码分析 数据源 + Mybatis 配置
公司今年开始使用 Spring Boot 开发,当然使用 Spring Boot 也是大势所趋,尤其是现在微服务的趋向,当然是选择基于Spring Boot 的 Spring Cloud.(所谓的 S ...
- Spring Boot 多模块项目创建与配置 (一)
最近在负责的是一个比较复杂项目,模块很多,代码中的二级模块就有9个,部分二级模块下面还分了多个模块.代码中的多模块是用maven管理的,每个模块都使用spring boot框架.之前有零零散散学过一些 ...
- Spring Boot 2.x Redis多数据源配置(jedis,lettuce)
Spring Boot 2.x Redis多数据源配置(jedis,lettuce) 96 不敢预言的预言家 0.1 2018.11.13 14:22* 字数 65 阅读 727评论 0喜欢 2 多数 ...
- 51. spring boot属性文件之多环境配置【从零开始学Spring Boot】
原本这个章节是要介绍<log4j多环境不同日志级别的控制的>但是没有这篇文章做基础的话,学习起来还是有点难度的,所以我们先一起了解下spring boot属性文件之多环境配置,当然文章中也 ...
- spring boot和maven的约定大于配置体现在哪些方面
spring boot和maven的约定大于配置体现在哪些方面? 两者都遵从了约定大于配置的路线 约定优于配置体现点: 1.maven的目录文件结构 1)默认有resources文件夹,存放资源配置文 ...
随机推荐
- FreeRTOS基本概念
1.在FreeRTOS中,使用的数据类型虽然都是标准C里面的数据类型,但是针对不同的处理器,对标准C的数据类型又进行了重新定义. 2.链表由节点组成,节点与节点之间首尾相连,节点包含用于指向后一个节点 ...
- P4480 「BJWC2018」「网络流与线性规划24题」餐巾计划问题
刷了n次用了奇淫技巧才拿到rk1,亥 这道题是网络流二十四题中「餐巾计划问题」的加强版. 于是怀着试一试的心情用费用流交了一发: 哇塞,过了9个点!(强烈谴责出题人用*造数据 下面是费用流解法简述: ...
- shell脚本(3)-格式化输出
一个程序需要有0个或以上的输入,一个或更多输出 一.echo语法 1.功能:将内容输出到默认显示设备. echo命令功能在显示器上显示一段文字,一般提到提示的作用 2.语法:echo[-ne][字符串 ...
- canvas实现任意正多边形的移动(点、线、面)
前言 我在上一篇文章简单实现了在canvas中移动矩形(点线面),不清楚的小伙伴请看我这篇文章:用canvas 实现矩形的移动(点.线.面)(1). ok,废话不多说,直接进入文章主题, 上一篇文章我 ...
- Python+js进行逆向编程加密MD5格式
一.安装nodejs 二.安装:pip install PyExecJs 三.js源文件Md5格式存放本地,如下 var n = {}function l(t, e) {var n = (65535 ...
- Unittest方法 -- 测试套件
TestSuite 测试固件 一. import unittestclass F6(unittest.TestCase): def setUp(self): pass def tearDown(sel ...
- 微信小程序云开发-数据库-商品列表数据显示N条数据
一.wxml文件 在wxml文件中,写页面和点击事件,添加绑定事件limitGoods 二.js文件 在js文件中写limitGoods(),使用.limit(3)表示只显示3条数据
- OpenFaaS实战之二:函数入门
欢迎访问我的GitHub https://github.com/zq2599/blog_demos 内容:所有原创文章分类汇总及配套源码,涉及Java.Docker.Kubernetes.DevOPS ...
- 最近被旷视的YOLOX刷屏了!
目录 论文主要信息 文章概要 背景 YOLOX-DarkNet53 实现细节 YOLOv3 baseline Decoupled head 实验 思路 story Strong data augmen ...
- 动态 DP
一道入门 DP + 修改 = 动态 DP. 以模板题为例,多次询问树的最大独立集,带修改. 先有 naive 的 DP,记 \(f_{u,0/1}\) 表示 \(u\) 点不选/选时以 \(u\) 为 ...