在树莓派用C#+Winform实现传感器监测
最近学校里发了个任务,说要做一个科技节小发明,然后我就掏出我的树莓派准备大干一场。
调料
Raspberry Pi 3B+
树莓派GPIO扩展板
3.5寸电容触摸屏(GPIO接口)
土壤湿度传感器(GPIO接口)
光照传感器(GPIO接口)
由于作品已经交上去了 这里只能先放个以前的图
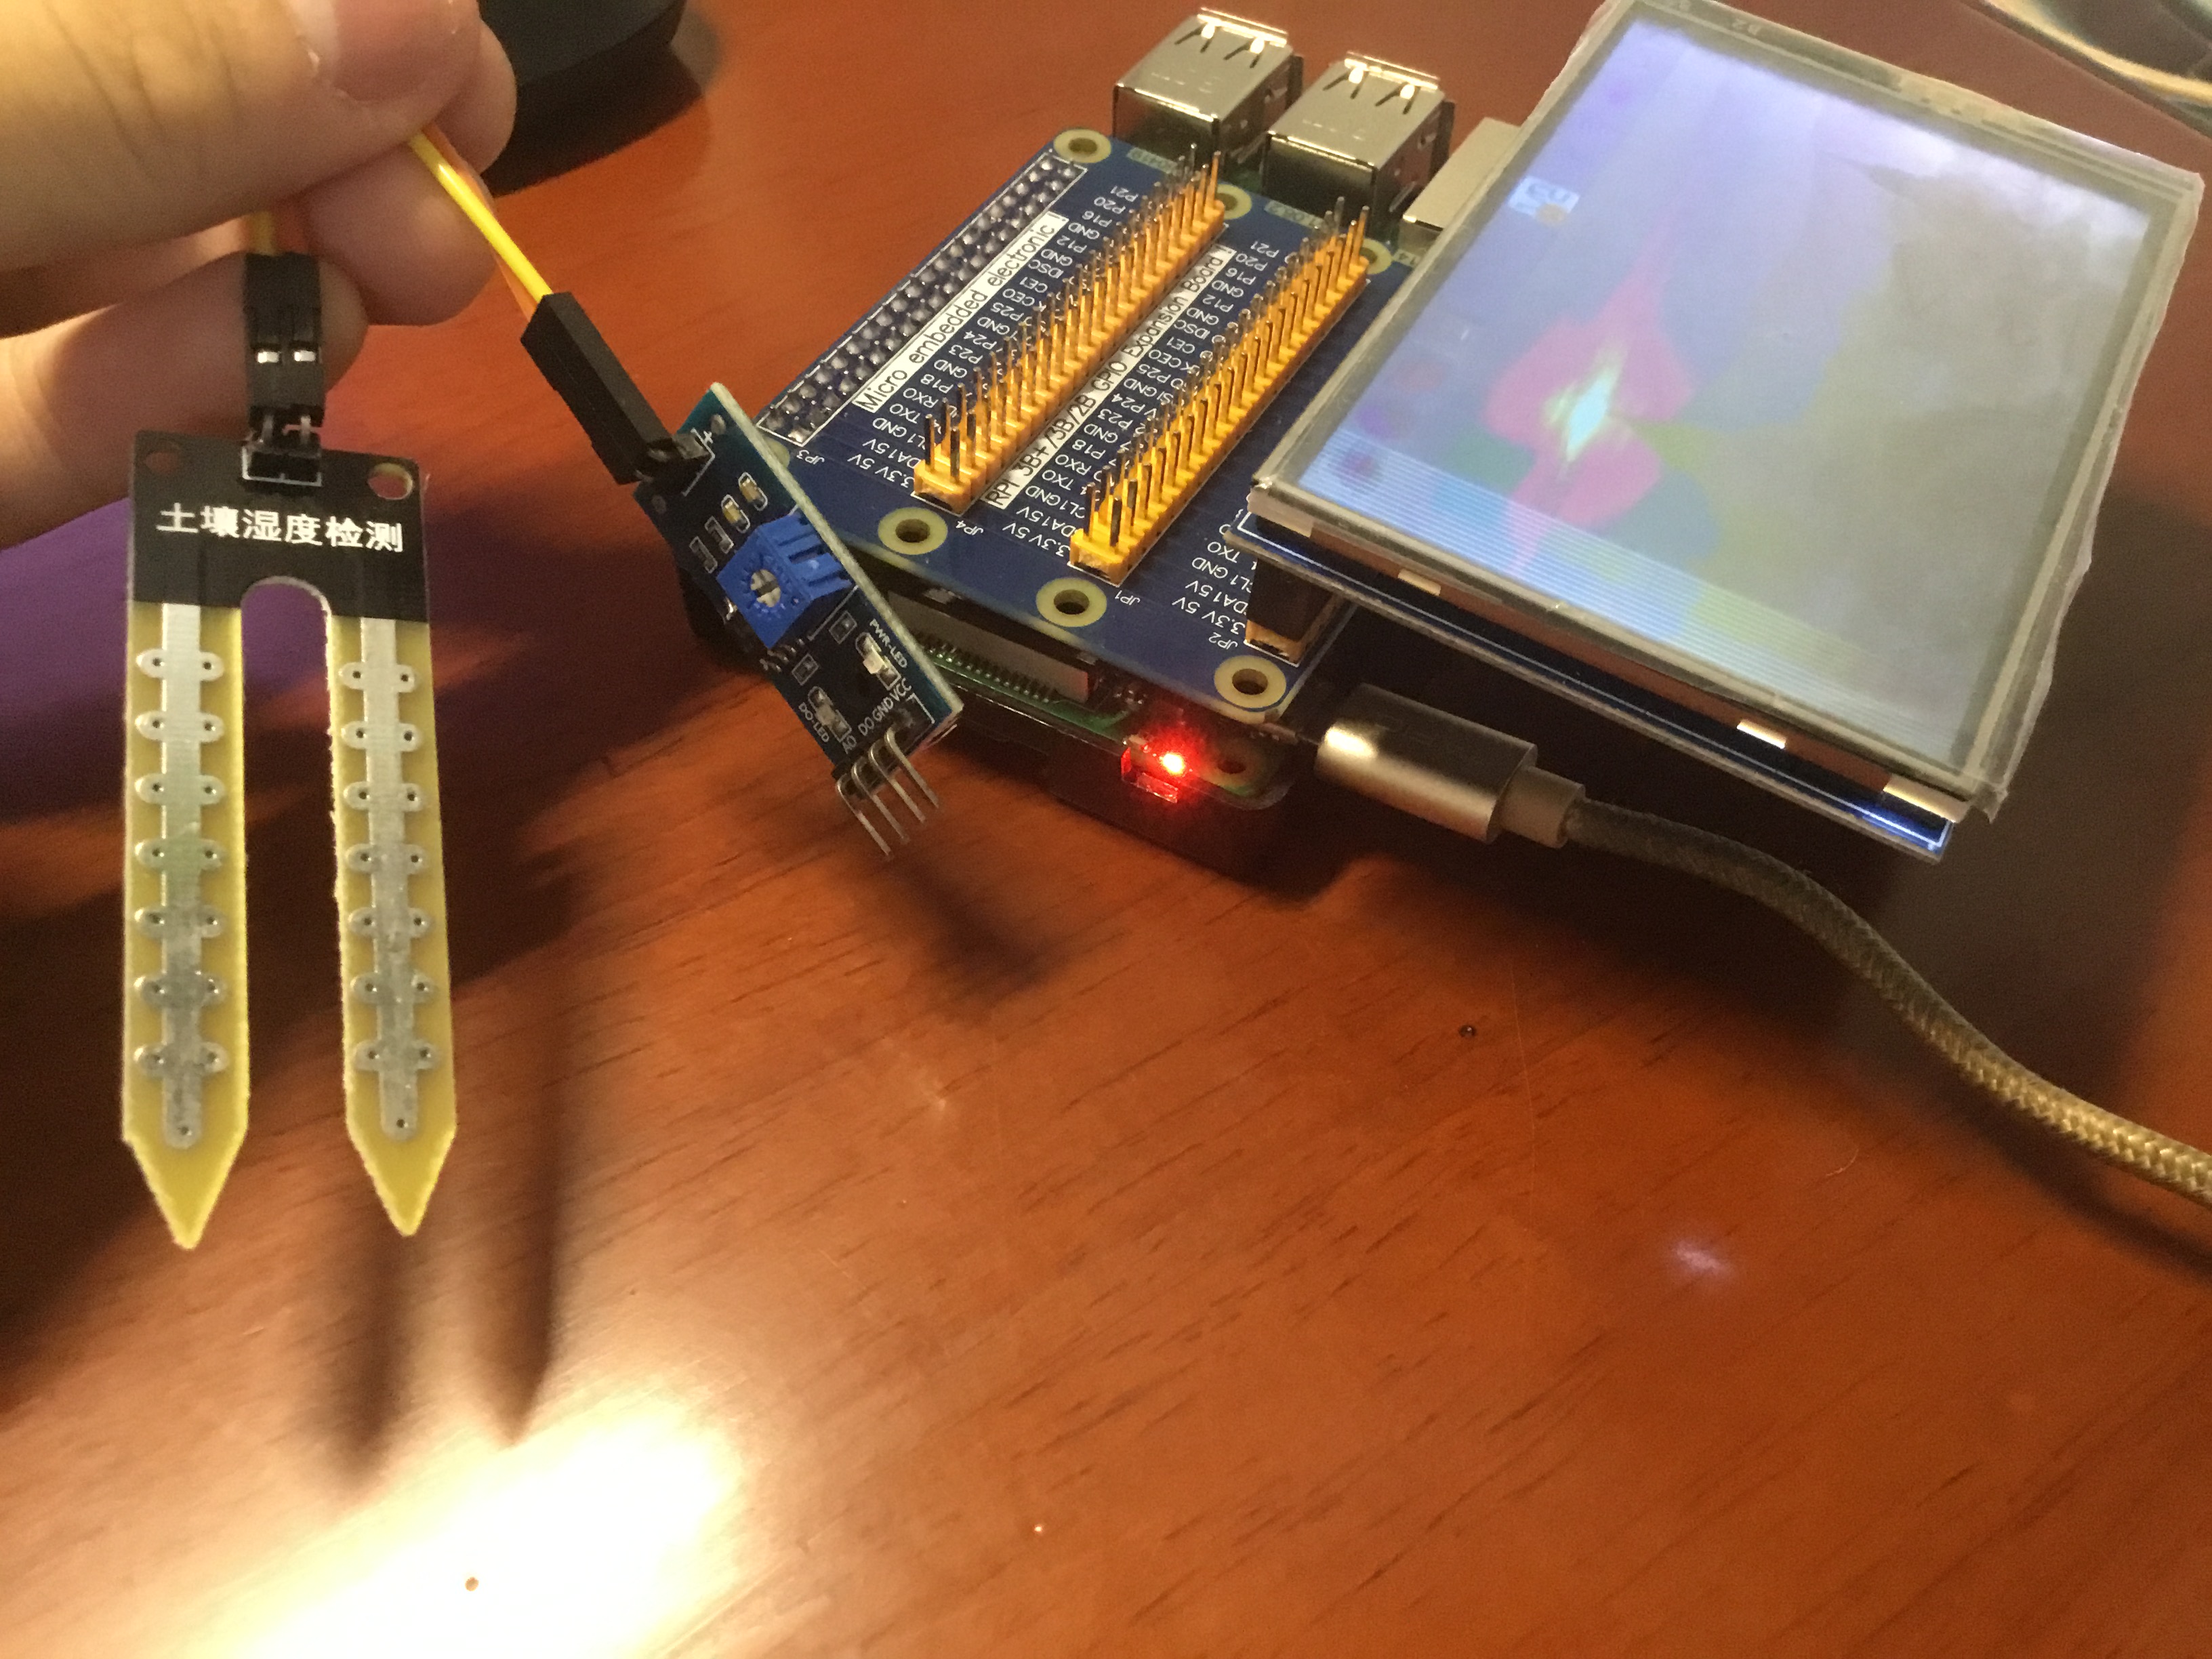
这里展示的是土壤湿度传感器,光照传感器道理一样
第一步 安装mono
树莓派不能直接运行C#图形化应用程序,去网上搜了一下解决方案,WPF框架是肯定没戏,不过我看到了一个叫mono的项目,可以在Linux平台运行Winform程序,还有这等好事?!赶紧整!
国际惯例哈,更新软件源
sudo apt-get update
然后执行安装命令
sudo apt-get install mono-complete -y
如果没法安装就检查你的软件源是否包含mono,我个人推荐清华大学的开源镜像站
最后我们检查是否安装成功
mono
如果不报错,就是安装成功了
第二步 探索GPIO
环境搭建好了,然而我对GPIO接口所知甚少,还是上网查查
连接传感器,首先是单片机和检测头的连接,母对母两条杜邦线搞定
然后是树莓派和单片机,VCC接3.3V或者5V,GND接树莓派GND,DO接任意GPIO空闲接口
树莓派的GPIO对应表可以在网上搜或者看下面的字符画

一开始使用CSDN上某个大佬的GPIO类
https://blog.csdn.net/weixin_30878361/article/details/97233437
结果测试了好久都抛异常,如果哪位大佬知道如何调用可以在评论区告诉我,感谢
于是我果断放弃了这个现成的类库,然后去读了下传感器的文档,发现文档里有一个很有意思的命令
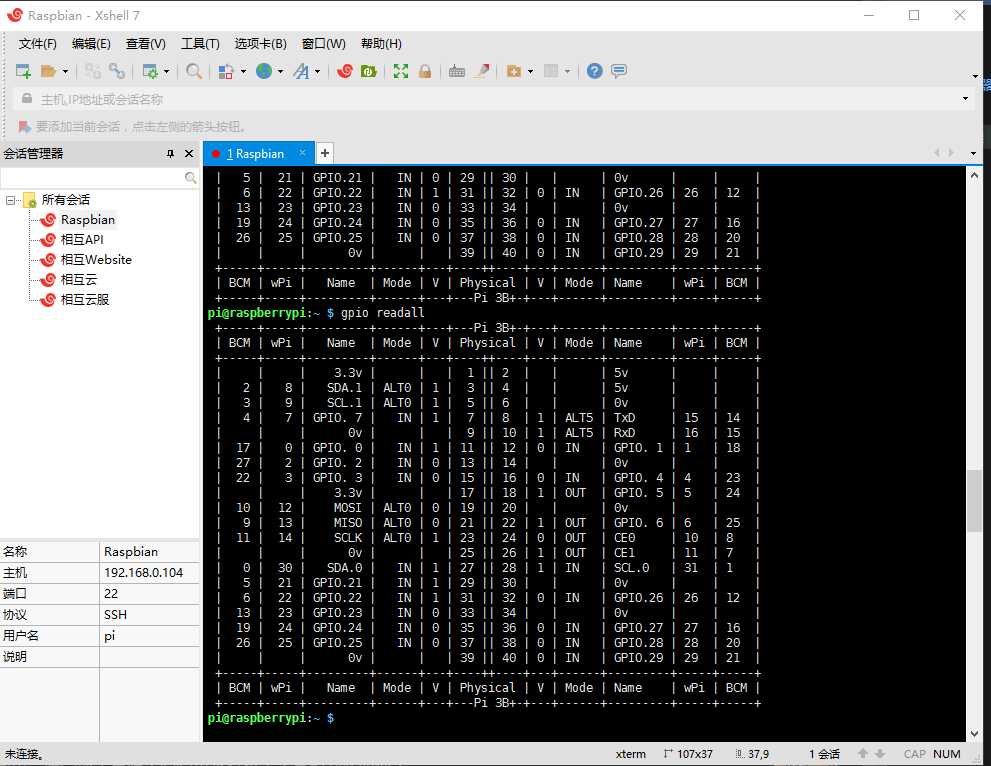
gpio readall
赶紧跑到树莓派终端上,运行它!
pi@raspberrypi:~ $ gpio readall
+-----+-----+---------+------+---+---Pi 3B+-+---+------+---------+-----+-----+
| BCM | wPi | Name | Mode | V | Physical | V | Mode | Name | wPi | BCM |
+-----+-----+---------+------+---+----++----+---+------+---------+-----+-----+
| | | 3.3v | | | 1 || 2 | | | 5v | | |
| 2 | 8 | SDA.1 | ALT0 | 1 | 3 || 4 | | | 5v | | |
| 3 | 9 | SCL.1 | ALT0 | 1 | 5 || 6 | | | 0v | | |
| 4 | 7 | GPIO. 7 | IN | 1 | 7 || 8 | 1 | ALT5 | TxD | 15 | 14 |
| | | 0v | | | 9 || 10 | 1 | ALT5 | RxD | 16 | 15 |
| 17 | 0 | GPIO. 0 | IN | 1 | 11 || 12 | 0 | IN | GPIO. 1 | 1 | 18 |
| 27 | 2 | GPIO. 2 | IN | 0 | 13 || 14 | | | 0v | | |
| 22 | 3 | GPIO. 3 | IN | 0 | 15 || 16 | 0 | IN | GPIO. 4 | 4 | 23 |
| | | 3.3v | | | 17 || 18 | 1 | OUT | GPIO. 5 | 5 | 24 |
| 10 | 12 | MOSI | ALT0 | 0 | 19 || 20 | | | 0v | | |
| 9 | 13 | MISO | ALT0 | 0 | 21 || 22 | 1 | OUT | GPIO. 6 | 6 | 25 |
| 11 | 14 | SCLK | ALT0 | 1 | 23 || 24 | 0 | OUT | CE0 | 10 | 8 |
| | | 0v | | | 25 || 26 | 1 | OUT | CE1 | 11 | 7 |
| 0 | 30 | SDA.0 | IN | 1 | 27 || 28 | 1 | IN | SCL.0 | 31 | 1 |
| 5 | 21 | GPIO.21 | IN | 0 | 29 || 30 | | | 0v | | |
| 6 | 22 | GPIO.22 | IN | 1 | 31 || 32 | 0 | IN | GPIO.26 | 26 | 12 |
| 13 | 23 | GPIO.23 | IN | 0 | 33 || 34 | | | 0v | | |
| 19 | 24 | GPIO.24 | IN | 0 | 35 || 36 | 0 | IN | GPIO.27 | 27 | 16 |
| 26 | 25 | GPIO.25 | IN | 0 | 37 || 38 | 0 | IN | GPIO.28 | 28 | 20 |
| | | 0v | | | 39 || 40 | 0 | IN | GPIO.29 | 29 | 21 |
+-----+-----+---------+------+---+----++----+---+------+---------+-----+-----+
| BCM | wPi | Name | Mode | V | Physical | V | Mode | Name | wPi | BCM |
+-----+-----+---------+------+---+---Pi 3B+-+---+------+---------+-----+-----+
从这里看可能不太直观哈,放个图
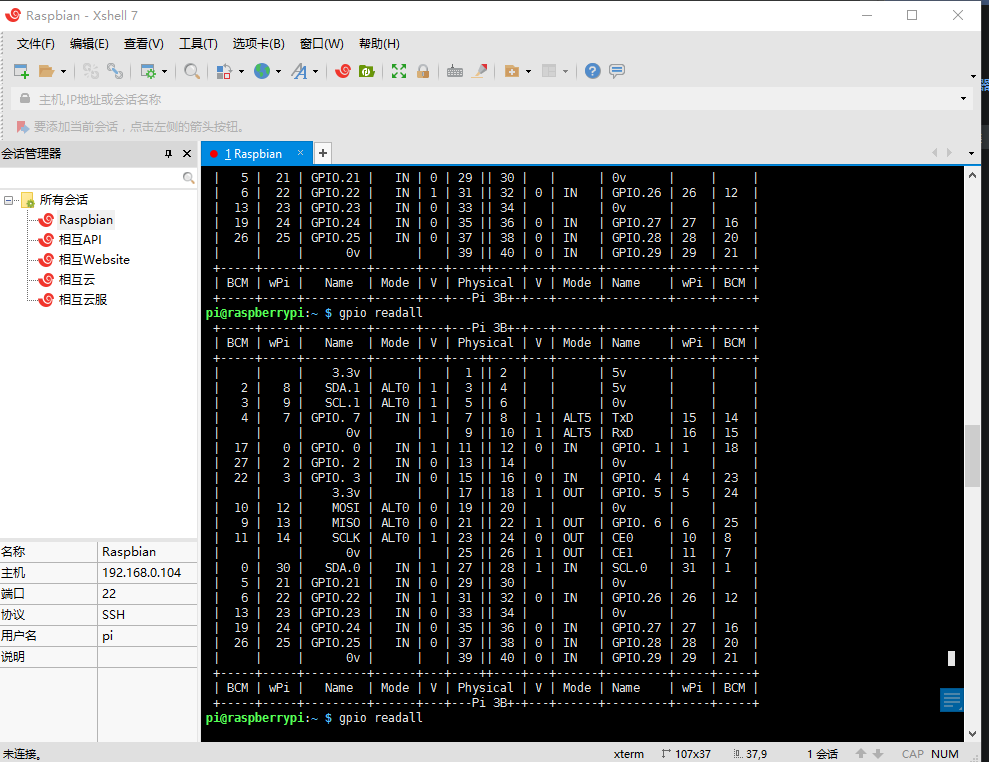
然后把传感器从水里拿出来,再次readall
pi@raspberrypi:~ $ gpio readall
+-----+-----+---------+------+---+---Pi 3B+-+---+------+---------+-----+-----+
| BCM | wPi | Name | Mode | V | Physical | V | Mode | Name | wPi | BCM |
+-----+-----+---------+------+---+----++----+---+------+---------+-----+-----+
| | | 3.3v | | | 1 || 2 | | | 5v | | |
| 2 | 8 | SDA.1 | ALT0 | 1 | 3 || 4 | | | 5v | | |
| 3 | 9 | SCL.1 | ALT0 | 1 | 5 || 6 | | | 0v | | |
| 4 | 7 | GPIO. 7 | IN | 1 | 7 || 8 | 1 | ALT5 | TxD | 15 | 14 |
| | | 0v | | | 9 || 10 | 1 | ALT5 | RxD | 16 | 15 |
| 17 | 0 | GPIO. 0 | IN | 1 | 11 || 12 | 0 | IN | GPIO. 1 | 1 | 18 |
| 27 | 2 | GPIO. 2 | IN | 0 | 13 || 14 | | | 0v | | |
| 22 | 3 | GPIO. 3 | IN | 0 | 15 || 16 | 0 | IN | GPIO. 4 | 4 | 23 |
| | | 3.3v | | | 17 || 18 | 1 | OUT | GPIO. 5 | 5 | 24 |
| 10 | 12 | MOSI | ALT0 | 0 | 19 || 20 | | | 0v | | |
| 9 | 13 | MISO | ALT0 | 0 | 21 || 22 | 1 | OUT | GPIO. 6 | 6 | 25 |
| 11 | 14 | SCLK | ALT0 | 1 | 23 || 24 | 0 | OUT | CE0 | 10 | 8 |
| | | 0v | | | 25 || 26 | 1 | OUT | CE1 | 11 | 7 |
| 0 | 30 | SDA.0 | IN | 1 | 27 || 28 | 1 | IN | SCL.0 | 31 | 1 |
| 5 | 21 | GPIO.21 | IN | 1 | 29 || 30 | | | 0v | | |
| 6 | 22 | GPIO.22 | IN | 1 | 31 || 32 | 0 | IN | GPIO.26 | 26 | 12 |
| 13 | 23 | GPIO.23 | IN | 0 | 33 || 34 | | | 0v | | |
| 19 | 24 | GPIO.24 | IN | 0 | 35 || 36 | 0 | IN | GPIO.27 | 27 | 16 |
| 26 | 25 | GPIO.25 | IN | 0 | 37 || 38 | 0 | IN | GPIO.28 | 28 | 20 |
| | | 0v | | | 39 || 40 | 0 | IN | GPIO.29 | 29 | 21 |
+-----+-----+---------+------+---+----++----+---+------+---------+-----+-----+
| BCM | wPi | Name | Mode | V | Physical | V | Mode | Name | wPi | BCM |
+-----+-----+---------+------+---+---Pi 3B+-+---+------+---------+-----+-----+

可以看到BCM为6,接口号29发生了变化,在水中是0,不在水中是1.
OK 搞清楚了,接下来就好办了
第三步 撰写代码
首先写个UI,没UI设计头脑的我就简单粗暴解决了

`namespace OpenEnvLite
{
partial class Form1
{
///
/// 必需的设计器变量。
///
private System.ComponentModel.IContainer components = null;
    /// <summary>

    /// 清理所有正在使用的资源。

    /// </summary>

    /// <param name="disposing">如果应释放托管资源,为 true;否则为 false。</param>

    protected override void Dispose(bool disposing)

    {

        if (disposing && (components != null))

        {

            components.Dispose();

        }

        base.Dispose(disposing);

    }

    #region Windows 窗体设计器生成的代码

    /// <summary>

    /// 设计器支持所需的方法 - 不要修改

    /// 使用代码编辑器修改此方法的内容。

    /// </summary>

    private void InitializeComponent()

    {

        this.title = new System.Windows.Forms.Label();

        this.土壤湿度 = new System.Windows.Forms.Label();

        this.土壤湿度显示 = new System.Windows.Forms.Label();

        this.亮度 = new System.Windows.Forms.Label();

        this.亮度显示 = new System.Windows.Forms.Label();

        this.label2 = new System.Windows.Forms.Label();

        this.label1 = new System.Windows.Forms.Label();

        this.button2 = new System.Windows.Forms.Button();

        this.SuspendLayout();

        //

        // title

        //

        this.title.AutoSize = true;

        this.title.Font = new System.Drawing.Font("宋体", 21.75F, System.Drawing.FontStyle.Regular, System.Drawing.GraphicsUnit.Point, ((byte)(134)));

        this.title.ForeColor = System.Drawing.Color.White;

        this.title.Location = new System.Drawing.Point(12, 36);

        this.title.Name = "title";

        this.title.Size = new System.Drawing.Size(187, 29);

        this.title.TabIndex = 1;

        this.title.Text = "土壤属性探测";

        //

        // 土壤湿度

        //

        this.土壤湿度.AutoSize = true;

        this.土壤湿度.Font = new System.Drawing.Font("宋体", 15.75F, System.Drawing.FontStyle.Regular, System.Drawing.GraphicsUnit.Point, ((byte)(134)));

        this.土壤湿度.ForeColor = System.Drawing.Color.White;

        this.土壤湿度.Location = new System.Drawing.Point(43, 89);

        this.土壤湿度.Name = "土壤湿度";

        this.土壤湿度.Size = new System.Drawing.Size(94, 21);

        this.土壤湿度.TabIndex = 6;

        this.土壤湿度.Text = "土壤湿度";

        //

        // 土壤湿度显示

        //

        this.土壤湿度显示.AutoSize = true;

        this.土壤湿度显示.Font = new System.Drawing.Font("宋体", 15.75F, System.Drawing.FontStyle.Regular, System.Drawing.GraphicsUnit.Point, ((byte)(134)));

        this.土壤湿度显示.ForeColor = System.Drawing.Color.White;

        this.土壤湿度显示.Location = new System.Drawing.Point(143, 89);

        this.土壤湿度显示.Name = "土壤湿度显示";

        this.土壤湿度显示.Size = new System.Drawing.Size(73, 21);

        this.土壤湿度显示.TabIndex = 7;

        this.土壤湿度显示.Text = "检测中";

        //

        // 亮度

        //

        this.亮度.AutoSize = true;

        this.亮度.Font = new System.Drawing.Font("宋体", 15.75F, System.Drawing.FontStyle.Regular, System.Drawing.GraphicsUnit.Point, ((byte)(134)));

        this.亮度.ForeColor = System.Drawing.Color.White;

        this.亮度.Location = new System.Drawing.Point(63, 110);

        this.亮度.Name = "亮度";

        this.亮度.Size = new System.Drawing.Size(52, 21);

        this.亮度.TabIndex = 8;

        this.亮度.Text = "亮度";

        //

        // 亮度显示

        //

        this.亮度显示.AutoSize = true;

        this.亮度显示.Font = new System.Drawing.Font("宋体", 15.75F, System.Drawing.FontStyle.Regular, System.Drawing.GraphicsUnit.Point, ((byte)(134)));

        this.亮度显示.ForeColor = System.Drawing.Color.White;

        this.亮度显示.Location = new System.Drawing.Point(143, 110);

        this.亮度显示.Name = "亮度显示";

        this.亮度显示.Size = new System.Drawing.Size(73, 21);

        this.亮度显示.TabIndex = 9;

        this.亮度显示.Text = "检测中";

        //

        // label2

        //

        this.label2.AutoSize = true;

        this.label2.Font = new System.Drawing.Font("宋体", 15.75F, System.Drawing.FontStyle.Regular, System.Drawing.GraphicsUnit.Point, ((byte)(134)));

        this.label2.ForeColor = System.Drawing.Color.White;

        this.label2.Location = new System.Drawing.Point(27, 174);

        this.label2.Name = "label2";

        this.label2.Size = new System.Drawing.Size(189, 21);

        this.label2.TabIndex = 10;

        this.label2.Text = " 微型土壤探测系统";

        //

        // label1

        //

        this.label1.AutoSize = true;

        this.label1.Cursor = System.Windows.Forms.Cursors.Default;

        this.label1.Font = new System.Drawing.Font("宋体", 15.75F, System.Drawing.FontStyle.Regular, System.Drawing.GraphicsUnit.Point, ((byte)(134)));

        this.label1.ForeColor = System.Drawing.Color.White;

        this.label1.Location = new System.Drawing.Point(27, 142);

        this.label1.Name = "label1";

        this.label1.Size = new System.Drawing.Size(189, 21);

        this.label1.TabIndex = 10;

        this.label1.Text = "相互科技 版权所有";

        //

        // button2

        //

        this.button2.BackColor = System.Drawing.Color.Black;

        this.button2.Font = new System.Drawing.Font("宋体", 12F, System.Drawing.FontStyle.Regular, System.Drawing.GraphicsUnit.Point, ((byte)(134)));

        this.button2.ForeColor = System.Drawing.Color.White;

        this.button2.Location = new System.Drawing.Point(191, 26);

        this.button2.Name = "button2";

        this.button2.Size = new System.Drawing.Size(74, 39);

        this.button2.TabIndex = 13;

        this.button2.Text = "刷新";

        this.button2.UseVisualStyleBackColor = false;

        this.button2.Click += new System.EventHandler(this.button2_Click);

        //

        // Form1

        //

        this.AutoScaleDimensions = new System.Drawing.SizeF(6F, 12F);

        this.AutoScaleMode = System.Windows.Forms.AutoScaleMode.Font;

        this.BackColor = System.Drawing.Color.Black;

        this.ClientSize = new System.Drawing.Size(266, 235);

        this.Controls.Add(this.button2);

        this.Controls.Add(this.label1);

        this.Controls.Add(this.label2);

        this.Controls.Add(this.亮度显示);

        this.Controls.Add(this.亮度);

        this.Controls.Add(this.土壤湿度显示);

        this.Controls.Add(this.土壤湿度);

        this.Controls.Add(this.title);

        this.ForeColor = System.Drawing.Color.White;

        this.FormBorderStyle = System.Windows.Forms.FormBorderStyle.None;

        this.Name = "Form1";

        this.StartPosition = System.Windows.Forms.FormStartPosition.CenterScreen;

        this.Text = "Form1";

        this.TopMost = true;

        this.ResumeLayout(false);

        this.PerformLayout();

    }

    #endregion

    private System.Windows.Forms.Label title;

    private System.Windows.Forms.Label 土壤湿度;

    private System.Windows.Forms.Label 土壤湿度显示;

    private System.Windows.Forms.Label 亮度;

    private System.Windows.Forms.Label 亮度显示;

    private System.Windows.Forms.Label label2;

    private System.Windows.Forms.Label label1;

    private System.Windows.Forms.Button button2;

}
}这是设计器代码 然后是主要代码using System;
using System.Collections.Generic;
using System.ComponentModel;
using System.Data;
using System.Drawing;
using System.Linq;
using System.Text;
using System.Threading;
using System.Windows.Forms;
using System.Globalization;
using System.IO;
using System.Diagnostics;
using System.Collections;
namespace OpenEnvLite
{
public partial class Form1 : Form
{
public Form1()
{
InitializeComponent();
}
    public static string Bash(string command)

    {

        var escapedArgs = command.Replace("\"", "\\\"");

        var process = new Process()

        {

            StartInfo = new ProcessStartInfo

            {

                FileName = "/bin/bash",

                Arguments = $"-c \"{escapedArgs}\"",

                RedirectStandardOutput = true,

                UseShellExecute = false,

                CreateNoWindow = true,

            }

        };

        process.Start();

        string result = process.StandardOutput.ReadToEnd();

        process.WaitForExit();

        process.Dispose();

        return result;

    }

    private void button2_Click(object sender, EventArgs e)

    {

        string SenseWater = Bash("gpio readall");

        if (SenseWater.Contains("|   5 |  21 | GPIO.21 |   IN | 0 | 29 |"))

        {

            土壤湿度显示.Text = "湿度正常";

        }

        else

        {

            土壤湿度显示.Text = "湿度过低";

        }

        string SenseLight = Bash("gpio readall");

        if (SenseLight.Contains("| 40 | 1 | IN   | GPIO.29 | 29  | 21  |"))

        {

            亮度显示.Text = "亮度过低";

        }

        else

        {

            亮度显示.Text = "亮度正常";

        }

    }

}
}
`
搞定!
如果要调节传感器的灵敏度可以用十字起子转动单片机上的电阻。
光敏电阻和湿度电阻道理是一样的。
最后导入exe文件到树莓派,使用mono运行
mono -run test.exe
test.exe换成自己程序的名字,运行后点击刷新可以正常显示
大功告成!
该项目在gayhub 啊不github开源:
https://github.com/fengye1003/OpenEnvLite
在树莓派用C#+Winform实现传感器监测的更多相关文章
- 在树莓派上读取DHT11温湿度传感器-python代码实现及常见问题(全面简单易懂)
最近由于自己的课题需要,想要用在树莓派上使用DHT11温湿度传感器来读取空气中温湿度,遇到了几个问题,解决之后也对之前的知识进行了回顾,总结,特整理如下,希望能给也在学习树莓派的小伙伴们带来一些帮助. ...
- 树莓派 LED+蜂鸣+声音传感器+红外模块组合打造声控/红外控制LED
昨天搞了控制LED,玩了第一个,剩下的就感觉很简单了,这里记录一下 先来几张照片 玩了蜂蜜模块才发现规律,一般这种模块,都会有三个针脚,VCC(3.3V或5V供电输出针脚).GNC(对应GPIO针脚的 ...
- 树莓派从 DHT11 温度湿度传感器读取数据
时序图参考厂家说明书:DHT11数字湿温度传感器的原理和应用范例 四个阵脚连接:VCC接3.3伏电源,Dout接GPIO口,我接的是物理12针脚,NC留空,GND接地. 波折1:电阻被错接进了VCC, ...
- 【.NET 与树莓派】六轴飞控传感器(MPU 6050)
所谓"飞控",其实是重力加速度计和陀螺仪的组合,因为多用于控制飞行器的平衡(无人机.遥控飞机).有同学会问,这货为什么会有六轴呢?咱们常见的不是X.Y.Z三轴吗?重力加速度有三轴, ...
- 树莓派外设、模块、传感器 —— 数码管(F3461BH)
1. 4 位 8 段(7+点)数码管 树莓派GPIO入门05-驱动数码管显示数字 其内部电路图及各个段的引脚控制如下: 共阳与共阴: 数码管从电源极性上分共阳和共阴两种.解释一下,如果数码管上每一个独 ...
- 《物联网框架ServerSuperIO教程》-22.Web端对传感器实时监测与控制。附:v3.6.8版本,支持WebSocket
1.ServerSuperIO v3.6.8更新内容 1.1 增加WebSocket服务端功能,支持自控模式.并发模式.单例模式,不支持轮询模式1.2 接收数据缓存与现有的IO实例分离.1.3 优化代 ...
- 常用Raspberry Pi周边传感器的使用教程
在Raspberry Pi 的使用和开发过程中,你可能时常需要一些硬件和传感器等来支持你的开发工作,例如,加入一个超声波测距的模块来让你的Raspberry Pi具备测距功能,加入一个测温模块以实现测 ...
- 利用树莓派来安装opencv从而来调动摄像头工作(没有坑,超超自己试过)
超超最近参加了学校里一位特别厉害的老师讲的课(两天,我就从一个小白然后了解了树莓派以及Arduino这些我之前都没有了解过的东西,由于结课的需要,我们需要自己设计一个创意以及完成作品)所以才有了这篇文 ...
- 常用Raspberry Pi周边传感器的使用教程(转)
转:http://bbs.xiaomi.cn/thread-7797152-1-1.html 在Raspberry Pi 的使用和开发过程中,你可能时常需要一些硬件和传感器等来支持你的开发工作,例如, ...
随机推荐
- Spring Cloud Alibaba - Spring Cloud Stream 整合 RocketMQ
Spring Cloud Stream 简介 在微服务的开发过程中,可能会经常用到消息中间件,通过消息中间件在服务与服务之间传递消息,不管你使用的是哪款消息中间件,比如RabbitMQ.Kafka和R ...
- JavaScript new 关键词解析及原生实现 new
java里面,new 运算符是用来实例化一个类,从而在内存中分配一个实例对象. 但在 javascript 中,原型语言没类,只有对象与原型链继承 JavaScript 中 new 表达式的作用是生成 ...
- vue3.0安装
一 .vue3.0安装 vue3.0安装 个人推荐以下2种 (1). 开发工具的对应代码中 插入CDN <script src="https://unpkg.com/vue@next& ...
- pikachu RCE远程系统命令执行
远程系统命令执行 一般出现这种漏洞,是因为应用系统从设计上需要给用户提供指定的远程命令操作的接口比如我们常见的路由器.防火墙.入侵检测等设备的web管理界面上一般会给用户提供一个ping操作的web界 ...
- SQL 练习35
查询选修「张三」老师所授课程的学生中,成绩最高的学生信息及其成绩 方式1: SELECT Student.sid,Student.sname,t.score from Student , (SELEC ...
- centos7上安装redis6-0-5
下载tar包 wget http://download.redis.io/releases/redis-6.0.5.tar.gz 解压tar包 tar -zxvf redis-6.0.5.tar.gz ...
- @Transactional-同一个类中方法自调,调用方法事物失效
问题分析 一个类中的方法调用另一个事物传播性为创建事物的方法,调用的方法事物失效? SpringAOP 代理的Service对象调用了其方法,这个方法再去调用这个Service中的其他方法是没有使用A ...
- ITIL学习笔记——ITIL入门小知识
1. 什么是ITIL? ITIL即IT基础架构库(Information Technology Infrastructure Library)由英国政府部门CCTA(Central Computing ...
- Quartz任务调度(3)存储与持久化操作配置详细解
内存存储RAMJobStore Quartz默认使用RAMJobStore,它的优点是速度.因为所有的 Scheduler 信息都保存在计算机内存中,访问这些数据随着电脑而变快.而无须访问数据库或IO ...
- C#设计模式---观察者模式(Observer Pattern)
一.目的 提供一种一对多的关系,当主题发生变化时候,可以通知所有关联的对象. 二.定义 观察者模式定义了一种一对多的依赖关系,让多个观察者对象同时监听某一个主题对象,这个主题对象在状态发生变化时,会通 ...