FIR仿真module_04
作者:桂。
时间:2018-02-06 12:10:14
链接:http://www.cnblogs.com/xingshansi/p/8421001.html
前言
本文主要记录基本的FIR实现,以及相关的知识点。
一、基本型实现
首先从最基本的FIR入手:
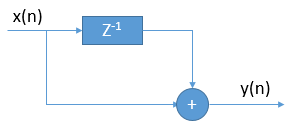
对应module:
`default_nettype	none

//

module	smplfir(i_clk, i_ce, i_val, o_val);

	parameter			IW=15;

	localparam			OW=IW+1;

	input	wire			i_clk, i_ce;

	input	wire	[(IW-1):0]	i_val;

	output	reg	[(OW-1):0]	o_val;

	reg	[(IW-1):0]	delayed;

	initial	delayed = 0;

	always @(posedge i_clk)

		if (i_ce)

			delayed <= i_val;

	always @(posedge i_clk)

		if (i_ce)

			o_val <= i_val + delayed;

endmodule
二、通用版FIR
前文里最多涉及阶数为5的FIR,这里给出适用任意阶、给定位宽的FIR。
A-参数转化
vivado仿真用到浮点->定点,需要将给定数据转为定点补码、或通过补码读取数据。
1)浮点转定点补码:
clc;clear all;close all;
%=============产生输入信号==============%
N=12; %数据位宽
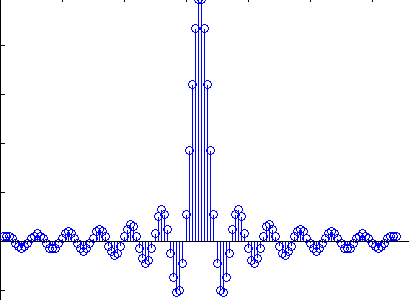
load fir128.mat;
y_n = fir128;
y_n=round(y_n*(2^(N-3)-1)); %N比特量化;如果有n个信号相加,则设置(N-n)
%=============设置系统参数==============%
L=length(y_n); %数据长度
%=================画图==================%
stem(1:L,y_n);
%=============写入外部文件==============%
fid=fopen('win.txt','w'); %把数据写入sin_data.txt文件中,如果没有就创建该文件
for k=1:length(y_n)
B_s=dec2bin(y_n(k)+((y_n(k))<0)*2^N,N);
for j=1:N
if B_s(j)=='1'
tb=1;
else
tb=0;
end
fprintf(fid,'%d',tb);
end
fprintf(fid,'\r\n');
end fprintf(fid,';');
fclose(fid);
原型滤波器fir128为128阶的FIR滤波器。
生成的txt调用:$readmemb("*.txt",data);
2)给定补码,读取原数据:
clc;clear all;close all;
filename = 'win.txt';
fid = fopen(filename);
data_cell = textscan(fid,'%s','HeaderLines',0);
data = data_cell{1,1}; Nbit = 12;%number of bits
len = length(data)-1;%length of filter
wins = zeros(1,len);
for i = 1:len
str_win = data{i};
if (str_win(1) == '0')
wins(i) = bin2dec(str_win(2:end));
end
if (str_win(1) == '1')
wins(i) = -bin2dec(num2str(ones(1,Nbit-1)))+bin2dec(str_win(2:end));
end
end
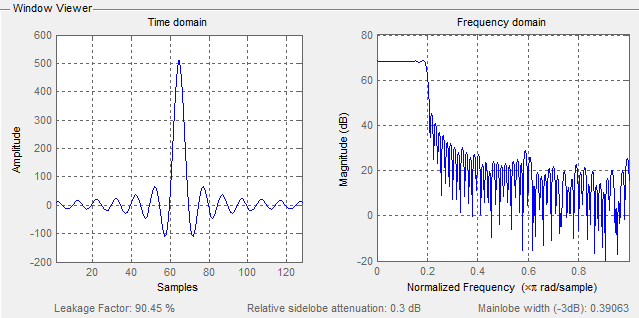
wvtool(wins)
得到滤波器特性如下图所示,当然也可以hex2dec转为16进制,思路一致。
B-仿真模型
testbench:
`timescale 1ns / 1ps

module tb;

    // Inputs

    reg Clk;

    reg rst;

    // Outputs

    parameter datawidth = 12;

    wire signed [2*datawidth-1:0] Yout;

    //Generate a clock with 10 ns clock period.

initial  Clk <= 0;

always #5 Clk = ~Clk;

//Initialize and apply the inputs.

//-------------------------------------//

parameter data_num = 32'd1024;

integer   i = 0;

reg [datawidth-1:0]  Xin[1:data_num];

reg  [datawidth-1:0]  data_out;

initial begin

 rst = 1;

#20

  rst = 0;

    $readmemb("D:/PRJ/vivado/simulation_ding/009_lpf6tap/matlab/sin_data.txt",Xin);

end

 always @(posedge Clk) begin

 if(rst)

 begin

    data_out <= 0;

 end

 else

 begin

    data_out <= Xin[i];

    i <= i + 8'd1;

    end

end

fastfir firinst(

.i_clk(Clk),

.i_reset(rst),

.i_ce(1'b1),

.i_sample(data_out),

.o_result(Yout)

);

endmodule
fast.v:
//

`default_nettype	none

//

module	fastfir(i_clk, i_reset, i_ce, i_sample, o_result);

	parameter		NTAPS=127, IW=12, TW=IW, OW=2*IW+7;

	input	wire			i_clk, i_reset;

	//

	input	wire			i_ce;

	input	wire	[(IW-1):0]	i_sample;

	output	wire signed	[(2*IW-1):0]	o_result;

	reg 	[(TW-1):0] tap		[0:NTAPS];

	wire	[(TW-1):0] tapout	[NTAPS:0];

	wire	[(IW-1):0] sample	[NTAPS:0];

	wire	[(OW-1):0] result	[NTAPS:0];

	wire		tap_wr;

	// The first sample in our sample chain is the sample we are given

	assign	sample[0]	= i_sample;

	// Initialize the partial summing accumulator with zero

	assign	result[0]	= 0;

     //observe filter

     reg [IW-1:0] fir_coef;

     integer i = 0;

     always @(posedge i_clk)

     begin

        if(i_reset) fir_coef <= 0;

        else

        begin

            fir_coef <= tap[i];

            i <= i+ 8'd1;

        end

     end

	genvar	k;

	generate

	begin

		initial $readmemb("D:/PRJ/vivado/simulation_ding/009_lpf6tap/matlab/win.txt", tap);

		assign	tap_wr = 1'b1;

	end

	for(k=0; k<NTAPS; k=k+1)

	begin: FILTER

		firtap #(.FIXED_TAPS(1'b1),

				.IW(IW), .OW(OW), .TW(TW),

				.INITIAL_VALUE(0))

				tapk(

				.i_clk(i_clk),

				.i_reset(i_reset),

				.i_tap_wr(tap_wr),

				.i_tap( tap[k]),

				.o_tap(tapout[k+1]),

				.i_ce(i_ce),

				.i_sample(sample[0]),

				.o_sample(sample[k+1]),

                .i_partial_acc(result[k]),

                .o_acc( result[k+1])

                );

	end endgenerate

	assign	o_result = result[NTAPS][2*IW-1:0];

endmodule
firtap.v:
//

`default_nettype	none

//

module	firtap(i_clk, i_reset, i_tap_wr, i_tap, o_tap,

		i_ce, i_sample, o_sample,

		i_partial_acc, o_acc);

	parameter		IW=12, TW=IW, OW=IW+TW+8;

	parameter [0:0]		FIXED_TAPS=1;

	parameter [(TW-1):0]	INITIAL_VALUE=0;

	//

	input	wire			i_clk, i_reset;

	//

	input	wire			i_tap_wr;

	input	wire	[(TW-1):0]	i_tap;

	output	wire signed [(TW-1):0]	o_tap;

	//

	input	wire			i_ce;

	input	wire signed [(IW-1):0]	i_sample;

	output	reg 	[(IW-1):0]	o_sample;

	//

	input	wire	[(OW-1):0]	i_partial_acc;

	output	reg 	[(OW-1):0]	o_acc;

	//

	reg		[(IW-1):0]	delayed_sample;

	reg	signed	[(TW+IW-1):0]	product;

	// Determine the tap we are using

	generate

	if (FIXED_TAPS != 0)

		// If our taps are fixed, the tap is given by the i_tap

		// external input.  This allows the parent module to be

		// able to use readmemh to set all of the taps in a filter

		assign	o_tap = i_tap;

	else begin

		// If the taps are adjustable, then use the i_tap_wr signal

		// to know when to adjust the tap.  In this case, taps are

		// strung together through the filter structure--our output

		// tap becomes the input tap of the next tap module, and

		// i_tap_wr causes all of them to shift forward by one.

		reg	[(TW-1):0]	tap;

		initial	tap = INITIAL_VALUE;

		always @(posedge i_clk)

			if (i_tap_wr)

				tap <= i_tap;

		assign o_tap = tap;

	end endgenerate

	// Forward the sample on down the line, to be the input sample for the

	// next component

	always @(posedge i_clk)

		if (i_reset)

		begin

			delayed_sample <= 0;

			o_sample <= 0;

		end else if (i_ce)

		begin

			// Note the two sample delay in this forwarding

			// structure.  This aligns the inputs up so that the

			// accumulator structure (below) works.

			delayed_sample <= i_sample;

			o_sample <= delayed_sample;

		end

	// Multiply the filter tap by the incoming sample

	always @(posedge i_clk)

		if (i_reset)

			product <= 0;

		else if (i_ce)

			product <= o_tap * i_sample;

	// Continue summing together the output components of the FIR filter

	always @(posedge i_clk)

		if (i_reset)

			o_acc <= 0;

		else if (i_ce)

			o_acc <= i_partial_acc

				+ { {(OW-(TW+IW)){product[(TW+IW-1)]}},

						product };

	// Make verilator happy

	// verilate lint_on  UNUSED

	wire	unused;

	assign	unused = i_tap_wr;

	// verilate lint_off UNUSED

endmodule
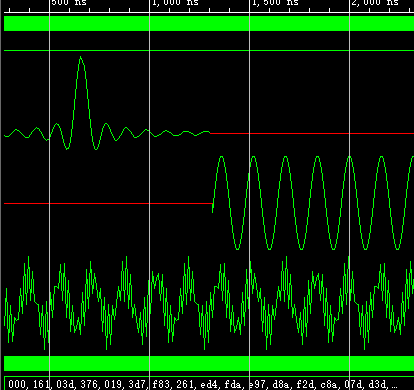
仿真结果:
FIR仿真module_04的更多相关文章
- FIR特性及仿真实现_01
作者:桂. 时间:2018-02-05 19:01:21 链接:http://www.cnblogs.com/xingshansi/p/8419007.html 前言 本文主要记录FIR(finit ...
- FIR调用DSP48E_05
作者:桂. 时间:2018-02-06 17:52:38 链接:http://www.cnblogs.com/xingshansi/p/8423457.html 前言 到目前为止,本文没有对滤波器实 ...
- modelsim 仿真xilinx fir ip
到现在不管fir ip 用的对不对,但是在使用modelsim是可以仿真fir ip的. 具体步骤: 1.仿真库,添加到modelsim目录配置文件: 2.将这个文件中的: :List of dyna ...
- FIR基本型仿真_03
作者:桂. 时间:2018-02-05 20:50:54 链接:http://www.cnblogs.com/xingshansi/p/8419452.html 一.仿真思路 设计低通滤波器(5阶,6 ...
- 基于FPGA的音频信号的FIR滤波(Matlab+Modelsim验证)
1 设计内容 本设计是基于FPGA的音频信号FIR低通滤波,根据要求,采用Matlab对WAV音频文件进行读取和添加噪声信号.FFT分析.FIR滤波处理,并分析滤波的效果.通过Matlab的分析验证滤 ...
- DVB-C系统中QAM调制与解调仿真
本文简单记录一下自己学习<通信原理>的时候调试的一个仿真DVB-C(Cable,数字有线电视)系统中QAM调制和解调的程序.自己一直是研究"信源"方面的东西,所以对&q ...
- 声反馈抑制使用matlab/simulink仿真
第一份工作时做啸叫抑制的仿真,调大0.3可以有大的啸叫产生,下图的SIMULINK仿真模型 实现移相有多种方法: 1.iir实现 2.FFT实现 3.使用FIR实现 所有信号均可以由正弦信号叠加而成.
- SG仿真常用模块
workspace交互 配合gateway in/out,实现信号仿真与workspace的互联. 滤波器 可与FDATool同时使用,直接关联FDATool的参数,而不必输入FDATool的滤波器系 ...
- 关于FIR的modelsim
(1)FIR ip核仿真 (2)FIR 多通道应用 (3)多通道fir ip核需要注意的复位问题 =================================================== ...
随机推荐
- SQL Server删除log文件
数据库文件太大 SQL Server用的久了,会发现备份文件越来越大,这个其实主要是log文件的增加,删掉log文件就可以了.不过操作之前最好还是有个完整备份的好. 分离数据库 分离数据库,勾选删除链 ...
- 二、Django用Eclipse编写一个登录界面
一.Django用Eclipse编写一个登录界面 二.Django用Eclipse编写一个登录界面Ajax和Django交互 各软件版本:Python 2.7.14,django 1.6.11 原来已 ...
- Jenkins 关闭和重启
关闭jenkins服务:http://localhost:8080/exit 将上面的exit改为restart后就可以重新启动jenkins服务器.http://localhost:8080/res ...
- cocos2d-js 3.0 RC0 监听返回键、菜单键、进入后台(home键)、恢复显示等事件
cc.eventManager.addListener({ event: cc.EventListener.KEYBOARD, onKeyReleased: function(keyCode, eve ...
- Android实训案例(七)——四大组件之中的一个Service初步了解,实现通话录音功能,抽调接口
Service Service的奇妙之处.在于他不须要界面,一切的操作都在后台操作,所以非常多全局性(手机助手,语音助手)之类的应用非常长须要这个.我们今天也来玩玩 我们新建一个project--Se ...
- 一个简单的ExtJS搜索建议框
封装的是一个Ext4.2的组件,继承并兼容于Ext的ComboBox. 实现原理非常easy,在 combo 中监听 keyup 事件就可以. 搜索建议的Combo.基本上全然兼容, 使用方式与Com ...
- V-rep学习笔记:Reflexxes Motion Library 1
V-REP中集成了在线运动轨迹生成库Reflexxes Motion Library Type IV,目前Reflexxes公司已经被谷歌收购.(The Reflexxes Motion Librar ...
- V-rep学习笔记:串口操作
VREP Regular API提供了串口操作的相关函数,可以对串口进行打开.关闭和读写: 下面使用一款淘宝上常见的AHRS(Attitude and heading reference system ...
- JAVA正确的四舍五入方法
在JDK版本为1.8的情况运行下面的代码,会发现很神奇的情况(见运行结果). 看如下代码: package com.longge.mytest; import java.math.BigDecimal ...
- Qt Installer Framework 使用说明(三)
目录 6.Qt Installer Framework 示例 7.参考 Reference 配置文件 Configuration File 配置文件元素的简要说明 Summary of Configu ...