spark集群搭建整理之解决亿级人群标签问题
最近在做一个人群标签的项目,也就是根据客户的一些交易行为自动给客户打标签,而这些标签更有利于我们做商品推荐,目前打上标签的数据已达5亿+,
用户量大概1亿+,项目需求就是根据各种组合条件寻找标签和人群信息。
举个例子:
集合A: ( 购买过“牙膏“的人交易金额在10-500元并且交易次数在5次的客户并且平均订单价在20 -200元) 。
集合B: (购买过“牙刷”的人交易金额在5-50 并且交易次数在3次的客户并且平均订单价在10-30元)。
求:<1> 获取集合A 交 集合B 客户数 和 客户的具体信息,希望时间最好不要超过15s。
上面这种问题如果你用mysql做的话,基本上是算不出来的,时间上更无法满足项目需求。
一:寻找解决方案
如果你用最小的工作量解决这个问题的话,可以搭建一个分布式的Elasticsearch集群,查询中相关的Nick,AvgPrice,TradeCount,TradeAmont字段可以用
keyword模式存储,避免出现fieldData字段无法查询的问题,虽然ES大体上可以解决这个问题,但是熟悉ES的朋友应该知道,它的各种查询都是我们通过json
的格式去定制,虽然可以使用少量的script脚本,但是灵活度相比spark来说的话太弱基了,用scala函数式语言定制那是多么的方便,第二个是es在group by的
桶分页特别不好实现,也很麻烦,社区里面有一些 sql on elasticsearch 的框架,大家可以看看:https://github.com/NLPchina/elasticsearch-sql,只支持一
些简单的sql查询,不过像having这样的关键词是不支持的,跟sparksql是没法比的,基于以上原因,决定用spark试试看。
二:环境搭建
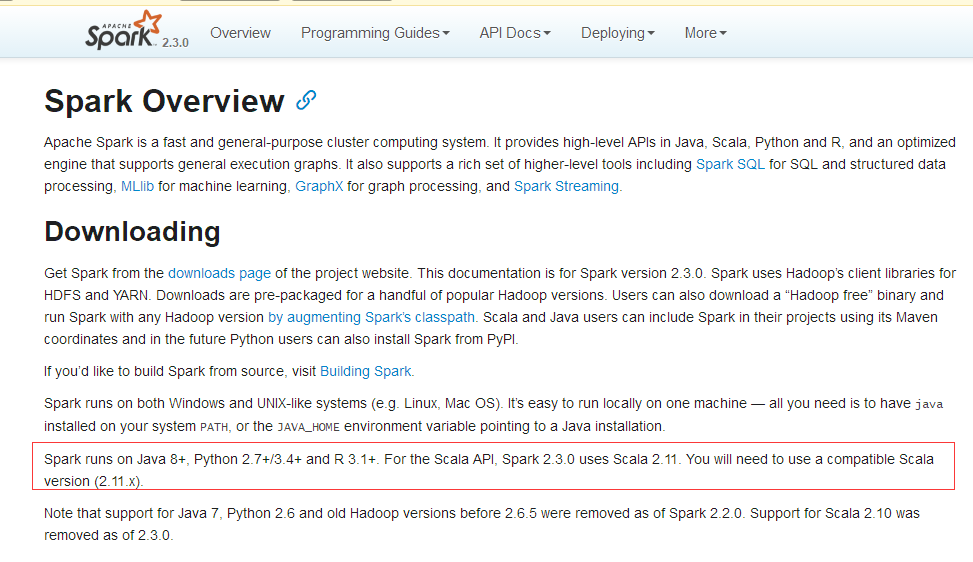
搭建spark集群,需要hadoop + spark + java + scala,搭建之前一定要注意各自版本的对应关系,否则遇到各种奇葩的错误让你好受哈!!!不信去官网看
看: https://spark.apache.org/downloads.html 。
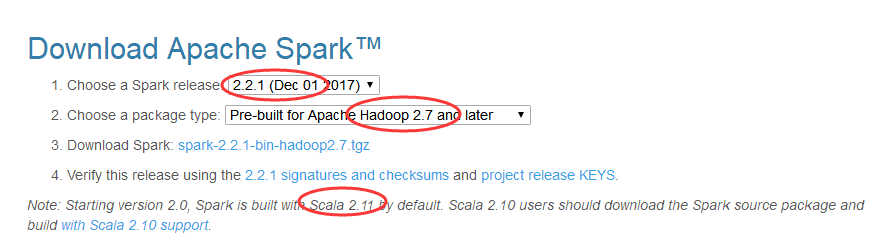
这里我采用的组合是:
hadoop-2.7.6.tar.gz
jdk-8u144-linux-x64.tar.gz
scala-2.11.0.tgz
spark-2.2.1-bin-hadoop2.7.tgz
jdk-8u144-linux-x64.tar.gz
mysql-connector-java-5.1.46.jar
sqoop-1.4.7.bin__hadoop-2.6.0.tar.gz
使用3台虚拟机:一台【namenode +resourcemanager + spark master node】 + 二台 【datanode + nodemanager + spark work data】
192.168.2.227 hadoop-spark-master
192.168.2.119 hadoop-spark-salve1
192.168.2.232 hadoop-spark-salve2
1. 先配置三台机器的免ssh登录。
[root@localhost ~]# ssh-keygen -t rsa -P ''

Generating public/private rsa key pair.

Enter file in which to save the key (/root/.ssh/id_rsa):

/root/.ssh/id_rsa already exists.

Overwrite (y/n)? y

Your identification has been saved in /root/.ssh/id_rsa.

Your public key has been saved in /root/.ssh/id_rsa.pub.

The key fingerprint is:

0f:4e::4a:ce:7d::b0:7e:::c6:::a2:5d root@localhost.localdomain

The key's randomart image is:

+--[ RSA ]----+

|. o E            |

| = +             |

|o o              |

|o. o             |

|.oo + . S        |

|.. = = * o       |

|  . * o o .      |

|   . . .         |

|                 |

+-----------------+

[root@localhost ~]# ls /root/.ssh

authorized_keys  id_rsa  id_rsa.pub  known_hosts

[root@localhost ~]#
2. 然后将公钥文件 id_rsa.pub copy到另外两台机器,这样就可以实现hadoop-spark-master 免密登录到另外两台
slave上去了。
scp /root/.ssh/id_rsa.pub root@192.168.2.119:/root/.ssh/authorized_keys

scp /root/.ssh/id_rsa.pub root@192.168.2.232:/root/.ssh/authorized_keys

cat /root/.ssh/id_rsa.pub >> /root/.ssh/authorized_keys
3. 在三台机器上增加如下的host映射。
[root@hadoop-spark-master ~]# cat /etc/hosts

127.0.0.1   localhost localhost.localdomain localhost4 localhost4.localdomain4

::         localhost localhost.localdomain localhost6 localhost6.localdomain6

192.168.2.227   hadoop-spark-master

192.168.2.119   hadoop-spark-salve1

192.168.2.232   hadoop-spark-salve2
4. 然后就是把我列举的那些 tar.gz 下载下来之后,在/etc/profile中配置如下,然后copy到另外两台salves机器上。
[root@hadoop-spark-master ~]# tail - /etc/profile

export JAVA_HOME=/usr/myapp/jdk8

export NODE_HOME=/usr/myapp/node

export SPARK_HOME=/usr/myapp/spark

export SCALA_HOME=/usr/myapp/scala

export HADOOP_HOME=/usr/myapp/hadoop

export HADOOP_CONF_DIR=/usr/myapp/hadoop/etc/hadoop

export LD_LIBRARY_PATH=/usr/myapp/hadoop/lib/native:$LD_LIBRARY_PATH

export SQOOP=/usr/myapp/sqoop

export NODE=/usr/myapp/node

export PATH=$NODE/bin:$SQOOP/bin:$SCALA_HOME/bin:$HADOOP_HOME/bin:$HADOOP/sbin$SPARK_HOME/bin:$NODE_HOME/bin:$JAVA_HOME/bin:$PATH
5. 最后就是hadoop的几个配置文件的配置了。
《1》core-site.xml
[root@hadoop-spark-master hadoop]# cat core-site.xml

<?xml version="1.0" encoding="UTF-8"?>

<?xml-stylesheet type="text/xsl" href="configuration.xsl"?>

<!--

  Licensed under the Apache License, Version 2.0 (the "License");

  you may not use this file except in compliance with the License.

  You may obtain a copy of the License at

    http://www.apache.org/licenses/LICENSE-2.0

  Unless required by applicable law or agreed to in writing, software

  distributed under the License is distributed on an "AS IS" BASIS,

  WITHOUT WARRANTIES OR CONDITIONS OF ANY KIND, either express or implied.

  See the License for the specific language governing permissions and

  limitations under the License. See accompanying LICENSE file.

-->

<!-- Put site-specific property overrides in this file. -->

<configuration>

   <property>

      <name>hadoop.tmp.dir</name>

      <value>/usr/myapp/hadoop/data</value>

      <description>A base for other temporary directories.</description>

   </property>

   <property>

     <name>fs.defaultFS</name>

     <value>hdfs://hadoop-spark-master:9000</value>

   </property>

</configuration>
《2》 hdfs-site.xml :当然也可以在这里使用 dfs.datanode.data.dir 挂载多个硬盘:
[root@hadoop-spark-master hadoop]# cat hdfs-site.xml

<?xml version="1.0" encoding="UTF-8"?>

<?xml-stylesheet type="text/xsl" href="configuration.xsl"?>

<!--

  Licensed under the Apache License, Version 2.0 (the "License");

  you may not use this file except in compliance with the License.

  You may obtain a copy of the License at

    http://www.apache.org/licenses/LICENSE-2.0

  Unless required by applicable law or agreed to in writing, software

  distributed under the License is distributed on an "AS IS" BASIS,

  WITHOUT WARRANTIES OR CONDITIONS OF ANY KIND, either express or implied.

  See the License for the specific language governing permissions and

  limitations under the License. See accompanying LICENSE file.

-->

<!-- Put site-specific property overrides in this file. -->

<configuration>

  <property>

    <name>dfs.replication</name>

    <value>2</value>

  </property>

</configuration>
《3》 mapred-site.xml 这个地方将mapreduce的运作寄存于yarn集群。
[root@hadoop-spark-master hadoop]# cat mapred-site.xml

<?xml version="1.0"?>

<?xml-stylesheet type="text/xsl" href="configuration.xsl"?>

<!--

  Licensed under the Apache License, Version 2.0 (the "License");

  you may not use this file except in compliance with the License.

  You may obtain a copy of the License at

    http://www.apache.org/licenses/LICENSE-2.0

  Unless required by applicable law or agreed to in writing, software

  distributed under the License is distributed on an "AS IS" BASIS,

  WITHOUT WARRANTIES OR CONDITIONS OF ANY KIND, either express or implied.

  See the License for the specific language governing permissions and

  limitations under the License. See accompanying LICENSE file.

-->

<!-- Put site-specific property overrides in this file. -->

<configuration>

  <property>

   <name>mapreduce.framework.name</name>

   <value>yarn</value>

  </property>

</configuration>
《4》 yarn-site.xml 【这里要配置resoucemanager的相关地址,方便slave进行连接,否则你的集群会跑不起来的】
[root@hadoop-spark-master hadoop]# cat yarn-site.xml

<?xml version="1.0"?>

<!--

  Licensed under the Apache License, Version 2.0 (the "License");

  you may not use this file except in compliance with the License.

  You may obtain a copy of the License at

    http://www.apache.org/licenses/LICENSE-2.0

  Unless required by applicable law or agreed to in writing, software

  distributed under the License is distributed on an "AS IS" BASIS,

  WITHOUT WARRANTIES OR CONDITIONS OF ANY KIND, either express or implied.

  See the License for the specific language governing permissions and

  limitations under the License. See accompanying LICENSE file.

-->

<configuration>

<!-- Site specific YARN configuration properties -->

 <property>

   <name>yarn.nodemanager.aux-services</name>

   <value>mapreduce_shuffle</value>

 </property>

 <property>

   <name>yarn.resourcemanager.address</name>

   <value>hadoop-spark-master:8032</value>

</property>

<property>

   <name>yarn.resourcemanager.scheduler.address</name>

   <value>hadoop-spark-master:8030</value>

</property>

<property>

   <name>yarn.resourcemanager.resource-tracker.address</name>

   <value>hadoop-spark-master:8031</value>

</property>

</configuration>
《5》 修改slaves文件,里面写入的各自salve的地址。
[root@hadoop-spark-master hadoop]# cat slaves

hadoop-spark-salve1

hadoop-spark-salve2
《6》这些都配置完成之后,可以用scp把整个hadoop文件scp到两台slave机器上。
scp /usr/myapp/hadoop root@192.168.2.119:/usr/myapp/hadoop

scp /usr/myapp/hadoop root@192.168.2.232:/usr/myapp/hadoop
《7》因为hdfs是分布式文件系统,使用之前先给hdfs格式化一下,因为当前hadoop已经灌了很多数据,就不真的执行format啦!
[root@hadoop-spark-master bin]# ./hdfs namenode -format
[root@hadoop-spark-master bin]# pwd
/usr/myapp/hadoop/bin
《8》 然后分别开启 start-dfs.sh 和 start-yarn.sh ,或者干脆点直接执行 start-all.sh 也可以,不然后者已经是官方准备废弃的方式。
[root@hadoop-spark-master sbin]# ls

distribute-exclude.sh  hdfs-config.sh           refresh-namenodes.sh  start-balancer.sh    start-yarn.cmd  stop-balancer.sh    stop-yarn.cmd

hadoop-daemon.sh       httpfs.sh                slaves.sh             start-dfs.cmd        start-yarn.sh   stop-dfs.cmd        stop-yarn.sh

hadoop-daemons.sh      kms.sh                   start-all.cmd         start-dfs.sh         stop-all.cmd    stop-dfs.sh         yarn-daemon.sh

hdfs-config.cmd        mr-jobhistory-daemon.sh  start-all.sh          start-secure-dns.sh  stop-all.sh     stop-secure-dns.sh  yarn-daemons.sh
《9》 记住,只要在hadoop-spark-master 节点开启 dfs 和yarn就可以了,不需要到其他机器。
[root@hadoop-spark-master sbin]# ./start-dfs.sh

Starting namenodes on [hadoop-spark-master]

hadoop-spark-master: starting namenode, logging to /usr/myapp/hadoop/logs/hadoop-root-namenode-hadoop-spark-master.out

hadoop-spark-salve2: starting datanode, logging to /usr/myapp/hadoop/logs/hadoop-root-datanode-hadoop-spark-salve2.out

hadoop-spark-salve1: starting datanode, logging to /usr/myapp/hadoop/logs/hadoop-root-datanode-hadoop-spark-salve1.out

Starting secondary namenodes [0.0.0.0]

0.0.0.0: starting secondarynamenode, logging to /usr/myapp/hadoop/logs/hadoop-root-secondarynamenode-hadoop-spark-master.out

[root@hadoop-spark-master sbin]# ./start-yarn.sh

starting yarn daemons

starting resourcemanager, logging to /usr/myapp/hadoop/logs/yarn-root-resourcemanager-hadoop-spark-master.out

hadoop-spark-salve1: starting nodemanager, logging to /usr/myapp/hadoop/logs/yarn-root-nodemanager-hadoop-spark-salve1.out

hadoop-spark-salve2: starting nodemanager, logging to /usr/myapp/hadoop/logs/yarn-root-nodemanager-hadoop-spark-salve2.out
[root@hadoop-spark-master sbin]# jps

5671 NameNode

5975 SecondaryNameNode

6231 ResourceManager

6503 Jps
然后到其他两台slave上可以看到dataNode都开启了。
[root@hadoop-spark-salve1 ~]# jps

 Jps

 DataNode

 NodeManager
[root@hadoop-spark-salve2 ~]# jps

 Jps

 DataNode

 NodeManager
到此hadoop就搭建完成了。
三:Spark搭建
如果仅仅是搭建spark 的 standalone模式的话,只需要在conf下修改slave文件即可,把两个work节点塞进去。
[root@hadoop-spark-master conf]# tail -  slaves

# A Spark Worker will be started on each of the machines listed below

hadoop-spark-salve1

hadoop-spark-salve2

[root@hadoop-spark-master conf]# pwd

/usr/myapp/spark/conf
然后还是通过scp 把整个conf文件copy过去即可,然后在sbin目录下执行start-all.sh 脚本即可。
[root@hadoop-spark-master sbin]# ./start-all.sh

starting org.apache.spark.deploy.master.Master, logging to /usr/myapp/spark/logs/spark-root-org.apache.spark.deploy.master.Master--hadoop-spark-master.out

hadoop-spark-salve1: starting org.apache.spark.deploy.worker.Worker, logging to /usr/myapp/spark/logs/spark-root-org.apache.spark.deploy.worker.Worker--hadoop-spark-salve1.out

hadoop-spark-salve2: starting org.apache.spark.deploy.worker.Worker, logging to /usr/myapp/spark/logs/spark-root-org.apache.spark.deploy.worker.Worker--hadoop-spark-salve2.out

[root@hadoop-spark-master sbin]# jps

 Master

 Jps

 NameNode

 SecondaryNameNode

 ResourceManager

[root@hadoop-spark-master sbin]#
然后你会发现slave1 和 slave2 节点上多了一个work节点。
[root@hadoop-spark-salve1 ~]# jps

 DataNode

 NodeManager

 Jps

 Worker
[root@hadoop-spark-salve2 ~]# jps

 Jps

 DataNode

 NodeManager

 Worker
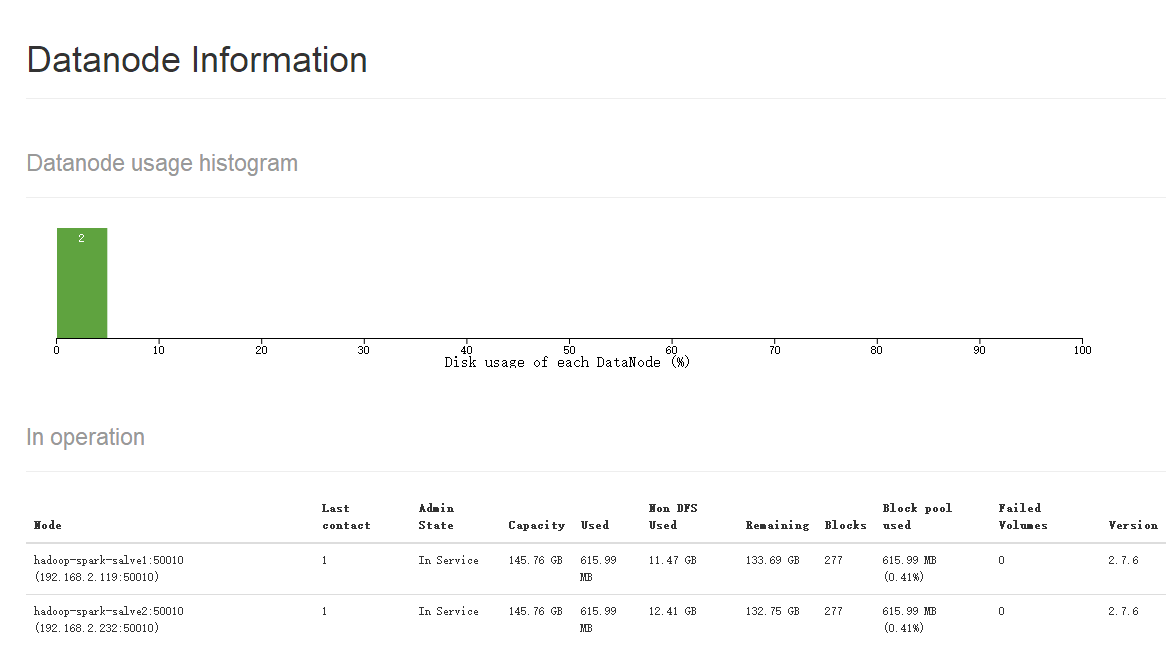
接下来就可以看下成果啦。
http://hadoop-spark-master:50070/dfshealth.html#tab-datanode 这个是hdfs 的监控视图,可以清楚的看到有两个DataNode。
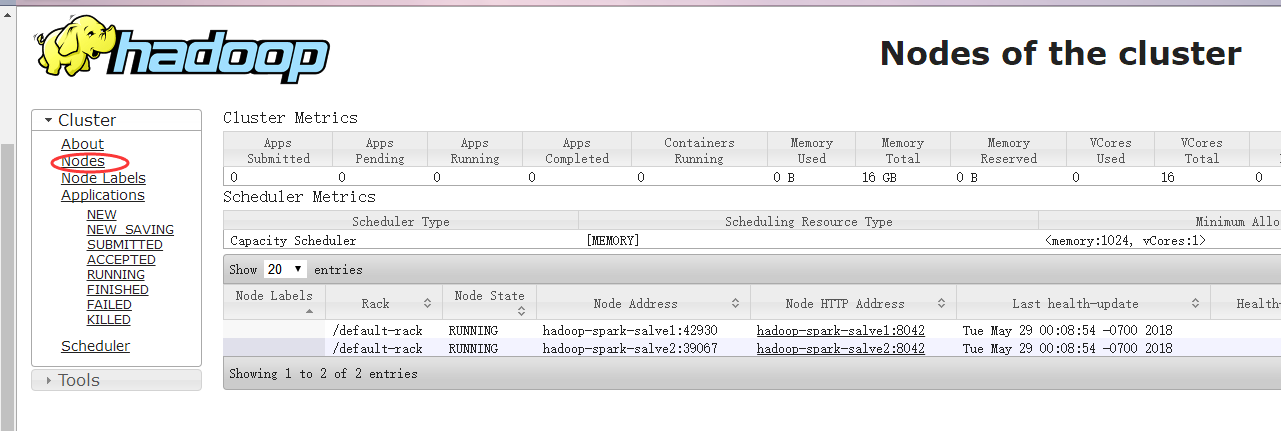
http://hadoop-spark-master:8088/cluster/nodes 这个是yarn的一个节点监控。
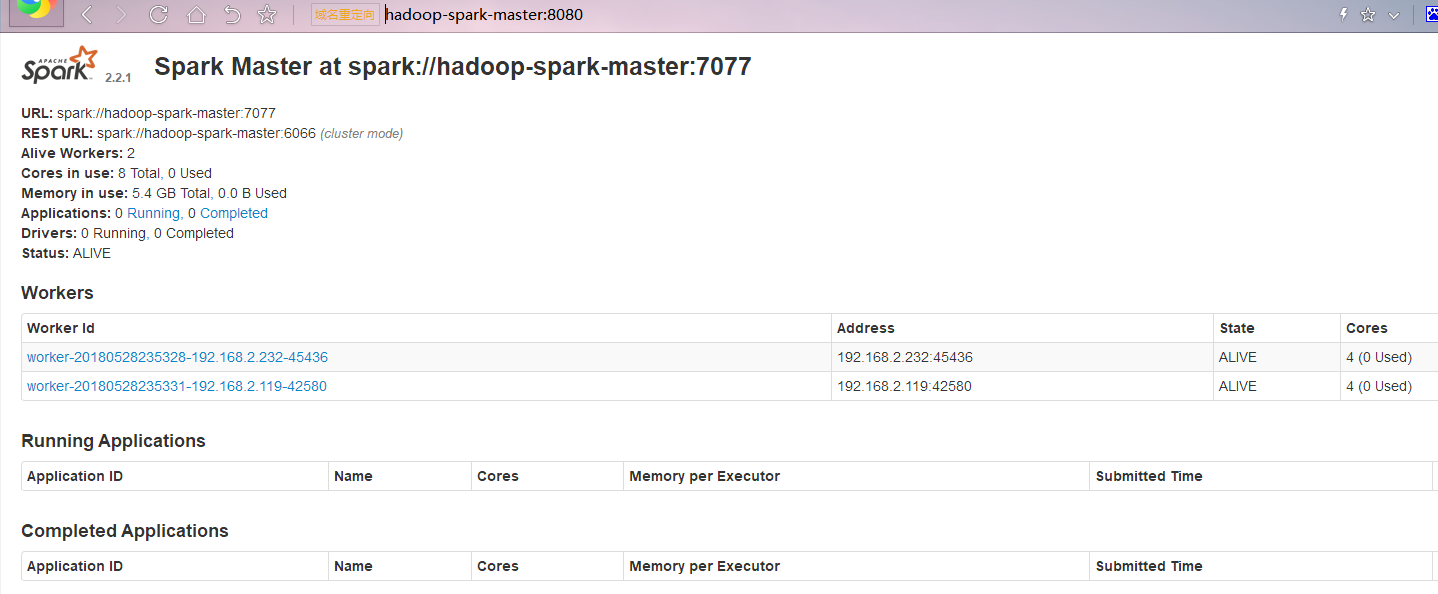
http://hadoop-spark-master:8080/ 这个就是spark的计算集群。
四: 使用sqoop导入数据
基础架构搭建之后,现在就可以借助sqoop将mysql的数据导入到hadoop中,导入的格式采用parquet 列式存储格式,不过这里要注意的一点就是一定要
把mysql-connector-java-5.1.46.jar 这个驱动包丢到 sqoop的lib目录下。
[root@hadoop-spark-master lib]# ls

ant-contrib-.0b3.jar          commons-logging-1.1..jar      kite-data-mapreduce-1.1..jar        parquet-format-2.2.-rc1.jar

ant-eclipse-1.0-jvm1..jar     hsqldb-1.8.0.10.jar            kite-hadoop-compatibility-1.1..jar  parquet-generator-1.6..jar

avro-1.8..jar                 jackson-annotations-2.3..jar  mysql-connector-java-5.1..jar      parquet-hadoop-1.6..jar

avro-mapred-1.8.-hadoop2.jar  jackson-core-2.3..jar         opencsv-2.3.jar                      parquet-jackson-1.6..jar

commons-codec-1.4.jar          jackson-core-asl-1.9..jar    paranamer-2.7.jar                    slf4j-api-1.6..jar

commons-compress-1.8..jar     jackson-databind-2.3..jar     parquet-avro-1.6..jar               snappy-java-1.1.1.6.jar

commons-io-1.4.jar             jackson-mapper-asl-1.9..jar  parquet-column-1.6..jar             xz-1.5.jar

commons-jexl-2.1..jar         kite-data-core-1.1..jar       parquet-common-1.6..jar

commons-lang3-3.4.jar          kite-data-hive-1.1..jar       parquet-encoding-1.6..jar

[root@hadoop-spark-master lib]# pwd

/usr/myapp/sqoop/lib
接下来我们就可以导入数据了,我准备把db=zuanzhan ,table=dsp_customertag的表,大概155w的数据导入到hadoop的test路径中,因为是测试环
境没办法,文件格式为parquet列式存储。
[root@hadoop-spark-master lib]# [root@hadoop-spark-master bin]# sqoop import --connect jdbc:mysql://192.168.2.166:3306/zuanzhan --username admin --password 123456 --table dsp_customertag --m 1 --target-dir test --as-parquetfile

bash: [root@hadoop-spark-master: command not found...

[root@hadoop-spark-master lib]# sqoop import --connect jdbc:mysql://192.168.2.166:3306/zuanzhan --username admin --password 123456 --table dsp_customertag --m 1 --target-dir test --as-parquetfile

Warning: /usr/myapp/sqoop/bin/../../hbase does not exist! HBase imports will fail.

Please set $HBASE_HOME to the root of your HBase installation.

Warning: /usr/myapp/sqoop/bin/../../hcatalog does not exist! HCatalog jobs will fail.

Please set $HCAT_HOME to the root of your HCatalog installation.

Warning: /usr/myapp/sqoop/bin/../../accumulo does not exist! Accumulo imports will fail.

Please set $ACCUMULO_HOME to the root of your Accumulo installation.

Warning: /usr/myapp/sqoop/bin/../../zookeeper does not exist! Accumulo imports will fail.

Please set $ZOOKEEPER_HOME to the root of your Zookeeper installation.

// :: INFO sqoop.Sqoop: Running Sqoop version: 1.4.

// :: WARN tool.BaseSqoopTool: Setting your password on the command-line is insecure. Consider using -P instead.

// :: INFO manager.MySQLManager: Preparing to use a MySQL streaming resultset.

// :: INFO tool.CodeGenTool: Beginning code generation

// :: INFO tool.CodeGenTool: Will generate java class as codegen_dsp_customertag

// :: INFO manager.SqlManager: Executing SQL statement: SELECT t.* FROM `dsp_customertag` AS t LIMIT

// :: INFO manager.SqlManager: Executing SQL statement: SELECT t.* FROM `dsp_customertag` AS t LIMIT

// :: INFO orm.CompilationManager: HADOOP_MAPRED_HOME is /usr/myapp/hadoop

Note: /tmp/sqoop-root/compile/0020f679e735b365bf96dabecb1611de/codegen_dsp_customertag.java uses or overrides a deprecated API.

Note: Recompile with -Xlint:deprecation for details.

// :: INFO orm.CompilationManager: Writing jar file: /tmp/sqoop-root/compile/0020f679e735b365bf96dabecb1611de/codegen_dsp_customertag.jar

// :: WARN manager.MySQLManager: It looks like you are importing from mysql.

// :: WARN manager.MySQLManager: This transfer can be faster! Use the --direct

// :: WARN manager.MySQLManager: option to exercise a MySQL-specific fast path.

// :: INFO manager.MySQLManager: Setting zero DATETIME behavior to convertToNull (mysql)

// :: WARN manager.CatalogQueryManager: The table dsp_customertag contains a multi-column primary key. Sqoop will default to the column CustomerTagId only for this job.

// :: WARN manager.CatalogQueryManager: The table dsp_customertag contains a multi-column primary key. Sqoop will default to the column CustomerTagId only for this job.

// :: INFO mapreduce.ImportJobBase: Beginning import of dsp_customertag

// :: INFO Configuration.deprecation: mapred.jar is deprecated. Instead, use mapreduce.job.jar

// :: INFO manager.SqlManager: Executing SQL statement: SELECT t.* FROM `dsp_customertag` AS t LIMIT

// :: INFO manager.SqlManager: Executing SQL statement: SELECT t.* FROM `dsp_customertag` AS t LIMIT

// :: WARN spi.Registration: Not loading URI patterns in org.kitesdk.data.spi.hive.Loader

// :: INFO Configuration.deprecation: mapred.map.tasks is deprecated. Instead, use mapreduce.job.maps

// :: INFO client.RMProxy: Connecting to ResourceManager at hadoop-spark-master/192.168.2.227:

// :: INFO db.DBInputFormat: Using read commited transaction isolation

// :: INFO mapreduce.JobSubmitter: number of splits:

// :: INFO mapreduce.JobSubmitter: Submitting tokens for job: job_1527575811851_0001

// :: INFO impl.YarnClientImpl: Submitted application application_1527575811851_0001

// :: INFO mapreduce.Job: The url to track the job: http://hadoop-spark-master:8088/proxy/application_1527575811851_0001/

// :: INFO mapreduce.Job: Running job: job_1527575811851_0001

// :: INFO mapreduce.Job: Job job_1527575811851_0001 running in uber mode : false

// :: INFO mapreduce.Job:  map % reduce %

// :: INFO mapreduce.Job:  map % reduce %

// :: INFO mapreduce.Job: Job job_1527575811851_0001 completed successfully

// :: INFO mapreduce.Job: Counters:

    File System Counters

        FILE: Number of bytes read=

        FILE: Number of bytes written=

        FILE: Number of read operations=

        FILE: Number of large read operations=

        FILE: Number of write operations=

        HDFS: Number of bytes read=

        HDFS: Number of bytes written=

        HDFS: Number of read operations=

        HDFS: Number of large read operations=

        HDFS: Number of write operations=

    Job Counters

        Launched map tasks=

        Other local map tasks=

        Total time spent by all maps in occupied slots (ms)=

        Total time spent by all reduces in occupied slots (ms)=

        Total time spent by all map tasks (ms)=

        Total vcore-milliseconds taken by all map tasks=

        Total megabyte-milliseconds taken by all map tasks=

    Map-Reduce Framework

        Map input records=

        Map output records=

        Input split bytes=

        Spilled Records=

        Failed Shuffles=

        Merged Map outputs=

        GC time elapsed (ms)=

        CPU time spent (ms)=

        Physical memory (bytes) snapshot=

        Virtual memory (bytes) snapshot=

        Total committed heap usage (bytes)=

    File Input Format Counters

        Bytes Read=

    File Output Format Counters

        Bytes Written=

// :: INFO mapreduce.ImportJobBase: Transferred 27.6133 MB in 32.896 seconds (859.5585 KB/sec)

// :: INFO mapreduce.ImportJobBase: Retrieved  records.
然后可以在UI中看到有这么一个parquet文件。

五:使用python对spark进行操作
之前使用scala对spark进行操作,使用maven进行打包,用起来不大方便,采用python还是很方便的,大家先要下载一个pyspark的安装包,一定要和spark
的版本对应起来。 pypy官网:https://pypi.org/project/pyspark/2.2.1/

你可以在master机器和开发机上直接安装 pyspark 2.2.1 模板,这样master机上执行就不需要通过pyspark-shell提交给spark集群了,下面我使用清华大学的
临时镜像下载的,毕竟官网的pip install不要太慢。
pip install -i https://pypi.tuna.tsinghua.edu.cn/simple pyspark==2.2.
下面就是app.py脚本,采用spark sql 的模式。
# coding=utf-

import time;

import sys;

from pyspark.sql import SparkSession;

from pyspark.conf import SparkConf

# reload(sys);

# sys.setdefaultencoding('utf8');

logFile = "hdfs://hadoop-spark-master:9000/user/root/test/fbd52109-d87a-4f8c-aa4b-26fcc95368eb.parquet";

sparkconf = SparkConf();

# sparkconf.set("spark.cores.max", "");

# sparkconf.set("spark.executor.memory", "512m");

spark = SparkSession.builder.appName("mysimple").config(conf=sparkconf).master(

    "spark://hadoop-spark-master:7077").getOrCreate();

df = spark.read.parquet(logFile);

df.createOrReplaceTempView("dsp_customertag");

starttime = time.time();

spark.sql("select TagName,TradeCount,TradeAmount from dsp_customertag").show();

endtime = time.time();

print("time:" + str(endtime - starttime));

spark.stop();
然后到shell上执行如下:
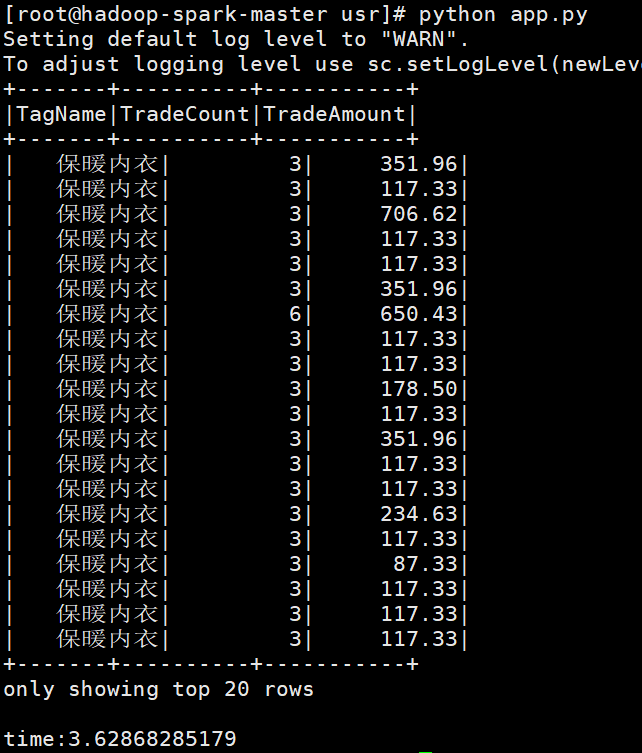
好了,本篇就说这么多了,你可以使用更多的sql脚本,输入数据量特别大还可以将结果再次写入到hdfs或者mongodb中给客户端使用,搭建过程中你可能会踩上
无数的坑,对于不能翻墙的同学,你尽可以使用bing国际版 寻找答案吧!!!
spark集群搭建整理之解决亿级人群标签问题的更多相关文章
- Spark集群搭建中的问题
参照<Spark实战高手之路>学习的,书籍电子版在51CTO网站 资料链接 Hadoop下载[链接](http://archive.apache.org/dist/hadoop/core/ ...
- hadoop+spark集群搭建入门
忽略元数据末尾 回到原数据开始处 Hadoop+spark集群搭建 说明: 本文档主要讲述hadoop+spark的集群搭建,linux环境是centos,本文档集群搭建使用两个节点作为集群环境:一个 ...
- (四)Spark集群搭建-Java&Python版Spark
Spark集群搭建 视频教程 1.优酷 2.YouTube 安装scala环境 下载地址http://www.scala-lang.org/download/ 上传scala-2.10.5.tgz到m ...
- Spark集群搭建简要
Spark集群搭建 1 Spark编译 1.1 下载源代码 git clone git://github.com/apache/spark.git -b branch-1.6 1.2 修改pom文件 ...
- Spark集群搭建简配+它到底有多快?【单挑纯C/CPP/HADOOP】
最近耳闻Spark风生水起,这两天利用休息时间研究了一下,果然还是给人不少惊喜.可惜,笔者不善JAVA,只有PYTHON和SCALA接口.花了不少时间从零开始认识PYTHON和SCALA,不少时间答了 ...
- Spark集群搭建_Standalone
2017年3月1日, 星期三 Spark集群搭建_Standalone Driver: node1 Worker: node2 Worker: node3 1.下载安装 下载地址 ...
- Spark集群搭建_YARN
2017年3月1日, 星期三 Spark集群搭建_YARN 前提:参考Spark集群搭建_Standalone 1.修改spark中conf中的spark-env.sh 2.Spark on ...
- spark集群搭建
文中的所有操作都是在之前的文章scala的安装及使用文章基础上建立的,重复操作已经简写: 配置中使用了master01.slave01.slave02.slave03: 一.虚拟机中操作(启动网卡)s ...
- Spark 集群搭建
0. 说明 Spark 集群搭建 [集群规划] 服务器主机名 ip 节点配置 s101 192.168.23.101 Master s102 192.168.23.102 Worker s103 19 ...
随机推荐
- tomcat启动报错:Address already in use: JVM_Bind
tomcat启动时出现Address already in use: JVM_Bind 的原因是因为端口被占用,有可能是因为多次启动tomcat或者启动了多个tomcat,或者是其他应用程序或者服务占 ...
- StringBuffer与StringBuilder
有些时候,需要由较短的字符串构建字符串.比如,按键或来自文件中的单词.采用字符串连接的方式达到此目的效率比较低.每次连接字符串的时候,都会构建一个新的String对象,既耗时,又浪费空间.使用Stri ...
- 适合Python 新手的5大练手项目,你练了么?
接下来就给大家介绍几种适合新手的练手项目. 0.算法系列-排序与查找 Python写swap很方便,就一句话(a, b = b, a),于是写基于比较的排序能短小精悍.刚上手一门新语言练算法最合适不过 ...
- SSIS 处理 bit 列
一般的编程语言,例如,C#.Java和R等都有布尔类型,用于表示逻辑真(true)和假(false),SQL Server没有布尔类型,但是,在编程时,可以使用bit 类型来代替,bit类型只有两个有 ...
- Urllib库的使用
一.任务描述 本实验任务主要对urllib库进行一些基本操作,通过完成本实验任务,要求学生熟练掌握urllib库的使用,并对urllib库的基本操作进行整理并填写工作任务报告. 二.任务目标 1. ...
- 基于SpringBoot + Mybatis实现SpringMVC Web项目
一.热身 一个现实的场景是:当我们开发一个Web工程时,架构师和开发工程师可能更关心项目技术结构上的设计.而几乎所有结构良好的软件(项目)都使用了分层设计.分层设计是将项目按技术职能分为几个内聚的部分 ...
- python 3 中的raw_input 报错
raw_input() was renamed to input()
- 剑指offer(javascript实现)
1.二维数组中的查找 在一个二维数组中,每一行都按照从左到右递增的顺序排序,每一列都按照从上到下递增的顺序排序.请完成一个函数,输入这样的一个二维数组和一个整数,判断数组中是否含有该整数. funct ...
- 『网络の转载』关于初学者上传文件到github的方法
说来也惭愧,我是最近开始用github,小白一个,昨天研究了一个下午.终于可以上传了,所以今天写点,一来分享是自己的一些经验,二来也是做个记录,万一哪天又不记得了:) 废话不多说,直接来,这次主要介绍 ...
- Android 自定义 ViewPager 打造千变万化的图片切换效果
转载请标明出处:http://blog.csdn.net/lmj623565791/article/details/38026503 记得第一次见到ViewPager这个控件,瞬间爱不释手,做东西的主 ...