用caffe一步一步实现人脸检测
学习深度学习已有一段时间了,总想着拿它做点什么,今天终于完成了一个基于caffe的人脸检测,这篇博文将告诉你怎样通过caffe一步步实现人脸检测。本文主要参考唐宇迪老师的教程,在这里感谢老师的辛勤付出。
传统机器学习方法实现人脸检测:
人脸检测在opencv中已经帮我们实现了,我们要把它玩起来很简单,只需要简简单单的几行代码其实就可以搞定。(haarcascade_frontalface_alt.xml这个文件在opencv的安装目录下能找到,笔者的路径是:E:\opencv2.4.10\opencv\sources\data\haarcascades,大家可根据自己的安装路径找到)
 #include <opencv2\core\core.hpp>
 #include <opencv2\highgui\highgui.hpp>
 #include <opencv2\imgproc\imgproc.hpp>
 #include <opencv2\objdetect\objdetect.hpp>
 #include <iostream>
 #include <vector>

 using namespace std;
 using namespace cv;

 string xmlName = "haarcascade_frontalface_alt.xml";
 CascadeClassifier face_cascade;
 void detectFaces(Mat image);

 int main()
 {
     Mat image = imread("kobe1.jpg");
     if (!image.data)
     {
         cout << "read image failed……" << endl;
         ;
     }
     face_cascade.load(xmlName);
     detectFaces(image);
     waitKey();
 }

 void detectFaces(Mat image)
 {
     vector<Rect> faces;
     Mat face_gray;
     cvtColor(image, face_gray, CV_BGR2GRAY);
     face_cascade.detectMultiScale(face_gray, faces, ,  | CV_HAAR_SCALE_IMAGE, Size(, ));
     cout << faces.size() << endl;
     ; i < faces.size(); i++)
     {
         Rect r(faces[i].x, faces[i].y, faces[i].width, faces[i].height);
         rectangle(image, r, Scalar(, , ), );
     }
     namedWindow("face", CV_WINDOW_NORMAL);
     imshow("face", image);
 }
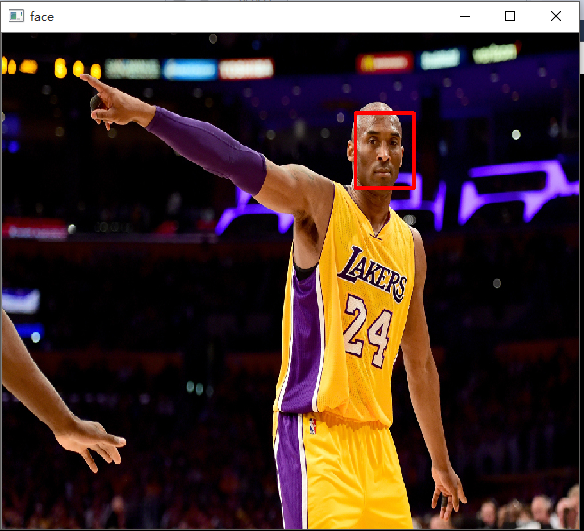
运行结果:
caffe实现人脸检测:
我是在ubuntu16.04环境下完成的实验,渣渣笔记本有不起GPU跑训练,所有实验也是基于CPU的。要想把人脸检测玩起来,首先你得保证你的ubuntu已经安装了opencv和caffe,初次配这两个环境初学者往往会弄到吐血,而且还是吐老血,我自己已经记不清到底花了多久才把它们搞定(估计是我太怂,也许你很快就能弄好哟,加油)。这里给两个参考链接,opencv在ubuntu下的配置和测试:http://blog.csdn.net/a1429331875/article/details/31539129;ubuntu16.04上caffe的配置与安装(CPU ONLY):http://blog.csdn.net/u010402483/article/details/51506616;以上两个链接仅供参考,配置过程出了问题大家就多去网上搜解决方案吧,总会有人也遇到过和你一样的问题。配置好以后大家可以先跑跑MNIST手写字体识别这个案例吧,这个案例算是给自己的一个安慰。 到这里就已经默认大家环境已经配置好了。
第一步:(这样写感觉很蠢,但还是写得尽量详细吧)在桌面或者你喜欢的路径下建一个文件夹,这个文件夹将用来存放我们实验中用到的所有东西。我自己是在桌面建了一个文件夹,取名:faceDetect
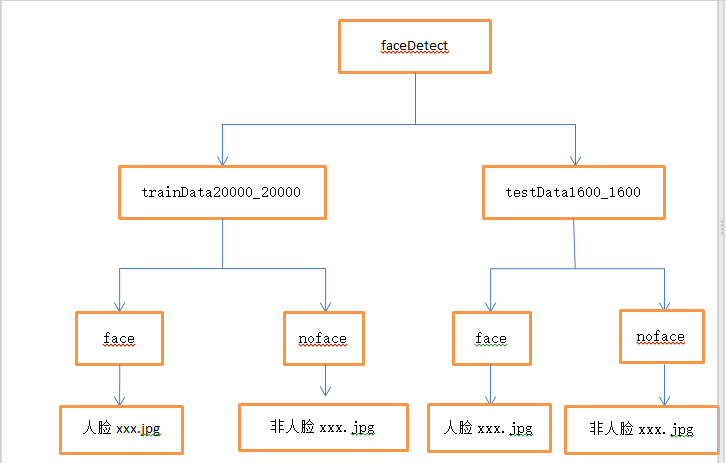
第二步:获取人脸和非人脸图片当作训练集和验证集。首先我们一定要有样本,在本实验中我们的样本是一个二分类的样本,大家可以自行去网上找数据集,当然也可以给我发邮件(likai_uestc@163.com),我这里有数据集。数据集我们分训练集(trainData20000_20000)和验证集(testData1600_1600),trainData20000_20000文件夹和testData1600_1600文件夹我们把它们两个都放在faceDetect文件夹下,trainData20000_20000文件夹和testData1600_1600文件夹下又都放两个文件夹face和noface,人脸图片我们放在face文件夹下,非人脸图片我们放在noface文件夹下。此时的目录结构如下:
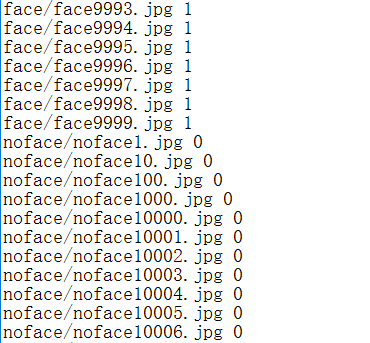
第三步:给样本打标签。本实验中是人脸我们给的标签是1,不是人脸给标签0.训练样本的标签我们写入train.txt,验证样本的标签我们写入test.txt. train.txt和test.txt文件我们放在faceDetect目录下。 txt文件中的内容如下:
生成txt文件的内容的参考代码如下:(仅供参考)
#include <opencv2\opencv.hpp>
#include <iostream>
#include <fstream>
#include <vector>
#include <string>
#include <cstdlib>

using namespace std;
using namespace cv;

int main()
{
    Directory dir;
    string basePath = "face";
    string exten = "*";
    bool addPath = true;
    vector<string> fileNames = dir.GetListFiles(basePath, exten, addPath);
    cout << fileNames.size() << endl;
    ofstream outData("train.txt");
    ; i < fileNames.size(); i++)
    {
        cout << fileNames[i] << endl;
        outData << fileNames[i] << " << endl;
    }
    outData.close();
    system("pause");
    ;
}
第四步:制作LMDB数据源。通过shell脚本制作,脚本文件名 face-lmdb.sh,face-lmdb.sh也放在faceDetect路径下。脚本的内容:
重点关注第5,6,7,9,10,14,16,17,44,45,54,55行。第5第6行就是你faceDetect的路径,第7行是你caffe中tools的路径,第9第10行是训练样本和验证样本的路径,第14行为true表示对图片进行resize操作,第16,17行填写resize的大小,第44行和54行就是填标签文件,第45和55行是生成的lmdb文件存放的文件夹名,这两个文件夹不能自己手动提前建立。
 #!/usr/bin/env sh
 # Create the face_48 lmdb inputs
 # N.B. set the path to the face_48 train + val data dirs

 EXAMPLE=/home/kobe/Desktop/faceDetect
 DATA=/home/kobe/Desktop/faceDetect
 TOOLS=/home/kobe/caffe/build/tools

 TRAIN_DATA_ROOT=/home/kobe/Desktop/faceDetect/trainData20000_20000/
 VAL_DATA_ROOT=/home/kobe/Desktop/faceDetect/testData1600_1600/

 # Set RESIZE= x . Leave as false if images have
 # already been resized using another tool.
 RESIZE=true
 if $RESIZE; then
   RESIZE_HEIGHT=227
   RESIZE_WIDTH=227
 else
   RESIZE_HEIGHT=
   RESIZE_WIDTH=
 fi

 if [ ! -d "$TRAIN_DATA_ROOT" ]; then
   echo "Error: TRAIN_DATA_ROOT is not a path to a directory: $TRAIN_DATA_ROOT"
   echo "Set the TRAIN_DATA_ROOT variable in create_face_48.sh to the path" \
        "where the face_48 training data is stored."
   exit
 fi

 if [ ! -d "$VAL_DATA_ROOT" ]; then
   echo "Error: VAL_DATA_ROOT is not a path to a directory: $VAL_DATA_ROOT"
   echo "Set the VAL_DATA_ROOT variable in create_face_48.sh to the path" \
        "where the face_48 validation data is stored."
   exit
 fi

 echo "Creating train lmdb..."

 GLOG_logtostderr= $TOOLS/convert_imageset \
     --resize_height=$RESIZE_HEIGHT \
     --resize_width=$RESIZE_WIDTH \
     --shuffle \
     $TRAIN_DATA_ROOT \
     $DATA/train.txt \
     $EXAMPLE/face_train_lmdb

 echo "Creating val lmdb..."

 GLOG_logtostderr= $TOOLS/convert_imageset \
     --resize_height=$RESIZE_HEIGHT \
     --resize_width=$RESIZE_WIDTH \
     --shuffle \
     $VAL_DATA_ROOT \
     $DATA/test.txt \
     $EXAMPLE/face_test_lmdb

 echo "Done."
 Status API Training Shop Blog About
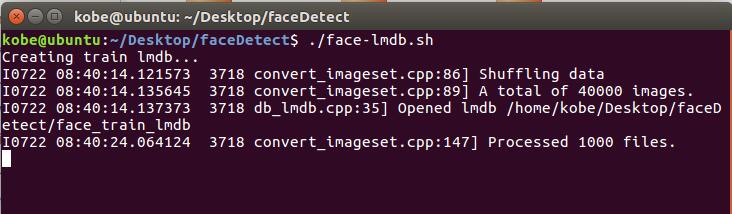
现在在终端执行 ./face-lmdb.sh 命令即可,执行截图如下:
第五步:准备网络模型文件(train.prototxt)及超参数文件(solver.prototxt)。train.prototxt和solver.prototxt文件也放在faceDetect路径下。网络模型各层参数详解及超参数文件详解可参考:https://wenku.baidu.com/view/f77c73d02f60ddccdb38a025.html。
网络模型文件:
#############################  DATA Layer  #############################

name: "face_train_val"

layer {

  top: "data"

  top: "label"

  name: "data"

  type: "Data"

  data_param {

    source: "/home/kobe/Desktop/faceDetect/face_train_lmdb"#改成自己的路径

    backend:LMDB

    batch_size: 64

  }

  transform_param {

     #mean_file: "/home/test/Downloads/caffe-master/data/ilsvrc12/imagenet_mean.binaryproto"

     mirror: true

  }

  include: { phase: TRAIN }

}

layer {

  top: "data"

  top: "label"

  name: "data"

  type: "Data"

  data_param {

    source: "/home/kobe/Desktop/faceDetect/face_test_lmdb"#改成自己的路径

    backend:LMDB

    batch_size: 64

  }

  transform_param {

    #mean_file: "/home/test/Downloads/caffe-master/data/ilsvrc12/imagenet_mean.binaryproto"

    mirror: true

  }

  include: {

    phase: TEST

  }

}

layer {

  name: "conv1"

  type: "Convolution"

  bottom: "data"

  top: "conv1"

  param {

    lr_mult:

    decay_mult:

  }

  param {

    lr_mult:

    decay_mult:

  }

  convolution_param {

    num_output:

    kernel_size:

    stride:

    weight_filler {

      type: "gaussian"

      std: 0.01

    }

    bias_filler {

      type: "constant"

      value:

    }

  }

}

layer {

  name: "relu1"

  type: "ReLU"

  bottom: "conv1"

  top: "conv1"

}

layer {

  name: "norm1"

  type: "LRN"

  bottom: "conv1"

  top: "norm1"

  lrn_param {

    local_size:

    alpha: 0.0001

    beta: 0.75

  }

}

layer {

  name: "pool1"

  type: "Pooling"

  bottom: "norm1"

  top: "pool1"

  pooling_param {

    pool: MAX

    kernel_size:

    stride:

  }

}

layer {

  name: "conv2"

  type: "Convolution"

  bottom: "pool1"

  top: "conv2"

  param {

    lr_mult:

    decay_mult:

  }

  param {

    lr_mult:

    decay_mult:

  }

  convolution_param {

    num_output:

    pad:

    kernel_size:

    group:

    weight_filler {

      type: "gaussian"

      std: 0.01

    }

    bias_filler {

      type: "constant"

      value: 0.1

    }

  }

}

layer {

  name: "relu2"

  type: "ReLU"

  bottom: "conv2"

  top: "conv2"

}

layer {

  name: "norm2"

  type: "LRN"

  bottom: "conv2"

  top: "norm2"

  lrn_param {

    local_size:

    alpha: 0.0001

    beta: 0.75

  }

}

layer {

  name: "pool2"

  type: "Pooling"

  bottom: "norm2"

  top: "pool2"

  pooling_param {

    pool: MAX

    kernel_size:

    stride:

  }

}

layer {

  name: "conv3"

  type: "Convolution"

  bottom: "pool2"

  top: "conv3"

  param {

    lr_mult:

    decay_mult:

  }

  param {

    lr_mult:

    decay_mult:

  }

  convolution_param {

    num_output:

    pad:

    kernel_size:

    weight_filler {

      type: "gaussian"

      std: 0.01

    }

    bias_filler {

      type: "constant"

      value:

    }

  }

}

layer {

  name: "relu3"

  type: "ReLU"

  bottom: "conv3"

  top: "conv3"

}

layer {

  name: "conv4"

  type: "Convolution"

  bottom: "conv3"

  top: "conv4"

  param {

    lr_mult:

    decay_mult:

  }

  param {

    lr_mult:

    decay_mult:

  }

  convolution_param {

    num_output:

    pad:

    kernel_size:

    group:

    weight_filler {

      type: "gaussian"

      std: 0.01

    }

    bias_filler {

      type: "constant"

      value: 0.1

    }

  }

}

layer {

  name: "relu4"

  type: "ReLU"

  bottom: "conv4"

  top: "conv4"

}

layer {

  name: "conv5"

  type: "Convolution"

  bottom: "conv4"

  top: "conv5"

  param {

    lr_mult:

    decay_mult:

  }

  param {

    lr_mult:

    decay_mult:

  }

  convolution_param {

    num_output:

    pad:

    kernel_size:

    group:

    weight_filler {

      type: "gaussian"

      std: 0.01

    }

    bias_filler {

      type: "constant"

      value: 0.1

    }

  }

}

layer {

  name: "relu5"

  type: "ReLU"

  bottom: "conv5"

  top: "conv5"

}

layer {

  name: "pool5"

  type: "Pooling"

  bottom: "conv5"

  top: "pool5"

  pooling_param {

    pool: MAX

    kernel_size:

    stride:

  }

}

layer {

  name: "fc6"

  type: "InnerProduct"

  bottom: "pool5"

  top: "fc6"

  param {

    lr_mult:

    decay_mult:

  }

  param {

    lr_mult:

    decay_mult:

  }

  inner_product_param {

    num_output:

    weight_filler {

      type: "gaussian"

      std: 0.005

    }

    bias_filler {

      type: "constant"

      value: 0.1

    }

  }

}

layer {

  name: "relu6"

  type: "ReLU"

  bottom: "fc6"

  top: "fc6"

}

layer {

  name: "drop6"

  type: "Dropout"

  bottom: "fc6"

  top: "fc6"

  dropout_param {

    dropout_ratio: 0.5

  }

}

layer {

  name: "fc7"

  type: "InnerProduct"

  bottom: "fc6"

  top: "fc7"

  param {

    lr_mult:

    decay_mult:

  }

  param {

    lr_mult:

    decay_mult:

  }

  inner_product_param {

    num_output:

    weight_filler {

      type: "gaussian"

      std: 0.005

    }

    bias_filler {

      type: "constant"

      value: 0.1

    }

  }

}

layer {

  name: "relu7"

  type: "ReLU"

  bottom: "fc7"

  top: "fc7"

}

layer {

  name: "drop7"

  type: "Dropout"

  bottom: "fc7"

  top: "fc7"

  dropout_param {

    dropout_ratio: 0.5

  }

}

layer {

  name: "fc8-expr"

  type: "InnerProduct"

  bottom: "fc7"

  top: "fc8-expr"

  param {

    lr_mult:

    decay_mult:

  }

  param {

    lr_mult:

    decay_mult:

  }

  inner_product_param {

    num_output:

    weight_filler {

      type: "gaussian"

      std: 0.01

    }

    bias_filler {

      type: "constant"

      value:

    }

  }

}

layer {

  name: "accuracy"

  type: "Accuracy"

  bottom: "fc8-expr"

  bottom: "label"

  top: "accuracy"

  include {

    phase: TEST

  }

}

layer {

  name: "loss"

  type: "SoftmaxWithLoss"

  bottom: "fc8-expr"

  bottom: "label"

  top: "loss"

}
超参数文件:
第1行网络模型文件的路径,第15行训练得到的模型的保存路径,在本实验中自己在faceDetect文件夹下建一个model文件夹用于保存得到的模型文件。net: "/home/kobe/Desktop/faceDetect/train.prototxt"
test_iter: 50
test_interval: 500
# lr for fine-tuning should be lower than when starting from scratch
base_lr: 0.001
lr_policy: "step"
gamma: 0.1
# stepsize should also be lower, as we're closer to being done
stepsize: 20000
display: 100
max_iter: 100000
momentum: 0.9
weight_decay: 0.0005
snapshot: 10000
snapshot_prefix: "/home/kobe/Desktop/faceDetect/model/"
# uncomment the following to default to CPU mode solving
solver_mode: CPU
第六步:开始训练。运行train.sh脚本进行训练,train.sh也放在faceDetect路径下。脚本的内容:(根据自己的实际路径进行修改)
 #!/usr/bin/env sh

 /home/kobe/caffe/build/tools/caffe train --solver=/home/kobe/Desktop/faceDetect/solver.prototxt #\
 #--weights=models/bvlc_reference_caffenet/bvlc_reference_caffenet.caffemodel \
 #--gpu
在终端中运行 ./train.sh 就可以开始训练了,训练很花时间的,根据机器配置不同所花时间也不同。训练截图如下:
训练结束后,我们得到以下的文件(model下的文件),caffemodel结尾的文件就是我们最终需要的文件了:

第七步:实现多尺度人脸检测。基于滑动窗口的人脸检测,在训练的时候样本已经resize成227*227,所以对于输入图片,我们在输入图片中截取227*227大小的窗口放入模型进行分类,依次这样进行窗口滑动,最终找出其中的人脸区域。但是图片中人脸并不一定就是227*227大小的,所以我们需要进行多尺度变换,所谓多尺度变换就是指对于输入图片我们进行放大和缩小变换,这样输入一张图片,就可以得到很多经过放大或缩小的图片了,把所有图片当作一组输入进行人脸检测。那么现在问题又来了,我们输入的是不同大小的图片,网络中有一个全连接层,全连接层的存在导致输入的图片大小必须一样大小,要解决这个问题我们的解决方法是把全连接层转换成全卷积层(可参考caffe官网进行操作)。
转换过程中需要用到的两个deploy文件。
全连接时使用(deploy.prototxt):
name: "CaffeNet"
input: "data"
input_dim:
input_dim:
input_dim:
input_dim:
layer {
  name: "conv1"
  type: "Convolution"
  bottom: "data"
  top: "conv1"
  param {
    lr_mult:
    decay_mult:
  }
  param {
    lr_mult:
    decay_mult:
  }
  convolution_param {
    num_output:
    kernel_size:
    stride:
    weight_filler {
      type: "gaussian"
      std: 0.01
    }
    bias_filler {
      type: "constant"
      value:
    }
  }
}
layer {
  name: "relu1"
  type: "ReLU"
  bottom: "conv1"
  top: "conv1"
}
layer {
  name: "pool1"
  type: "Pooling"
  bottom: "conv1"
  top: "pool1"
  pooling_param {
    pool: MAX
    kernel_size:
    stride:
  }
}
layer {
  name: "norm1"
  type: "LRN"
  bottom: "pool1"
  top: "norm1"
  lrn_param {
    local_size:
    alpha: 0.0001
    beta: 0.75
  }
}
layer {
  name: "conv2"
  type: "Convolution"
  bottom: "norm1"
  top: "conv2"
  param {
    lr_mult:
    decay_mult:
  }
  param {
    lr_mult:
    decay_mult:
  }
  convolution_param {
    num_output:
    pad:
    kernel_size:
    group:
    weight_filler {
      type: "gaussian"
      std: 0.01
    }
    bias_filler {
      type: "constant"
      value:
    }
  }
}
layer {
  name: "relu2"
  type: "ReLU"
  bottom: "conv2"
  top: "conv2"
}
layer {
  name: "pool2"
  type: "Pooling"
  bottom: "conv2"
  top: "pool2"
  pooling_param {
    pool: MAX
    kernel_size:
    stride:
  }
}
layer {
  name: "norm2"
  type: "LRN"
  bottom: "pool2"
  top: "norm2"
  lrn_param {
    local_size:
    alpha: 0.0001
    beta: 0.75
  }
}
layer {
  name: "conv3"
  type: "Convolution"
  bottom: "norm2"
  top: "conv3"
  param {
    lr_mult:
    decay_mult:
  }
  param {
    lr_mult:
    decay_mult:
  }
  convolution_param {
    num_output:
    pad:
    kernel_size:
    weight_filler {
      type: "gaussian"
      std: 0.01
    }
    bias_filler {
      type: "constant"
      value:
    }
  }
}
layer {
  name: "relu3"
  type: "ReLU"
  bottom: "conv3"
  top: "conv3"
}
layer {
  name: "conv4"
  type: "Convolution"
  bottom: "conv3"
  top: "conv4"
  param {
    lr_mult:
    decay_mult:
  }
  param {
    lr_mult:
    decay_mult:
  }
  convolution_param {
    num_output:
    pad:
    kernel_size:
    group:
    weight_filler {
      type: "gaussian"
      std: 0.01
    }
    bias_filler {
      type: "constant"
      value:
    }
  }
}
layer {
  name: "relu4"
  type: "ReLU"
  bottom: "conv4"
  top: "conv4"
}
layer {
  name: "conv5"
  type: "Convolution"
  bottom: "conv4"
  top: "conv5"
  param {
    lr_mult:
    decay_mult:
  }
  param {
    lr_mult:
    decay_mult:
  }
  convolution_param {
    num_output:
    pad:
    kernel_size:
    group:
    weight_filler {
      type: "gaussian"
      std: 0.01
    }
    bias_filler {
      type: "constant"
      value:
    }
  }
}
layer {
  name: "relu5"
  type: "ReLU"
  bottom: "conv5"
  top: "conv5"
}
layer {
  name: "pool5"
  type: "Pooling"
  bottom: "conv5"
  top: "pool5"
  pooling_param {
    pool: MAX
    kernel_size:
    stride:
  }
}
layer {
  name: "fc6"
  type: "InnerProduct"
  bottom: "pool5"
  top: "fc6"
  param {
    lr_mult:
    decay_mult:
  }
  param {
    lr_mult:
    decay_mult:
  }
  inner_product_param {
    num_output:
    weight_filler {
      type: "gaussian"
      std: 0.005
    }
    bias_filler {
      type: "constant"
      value:
    }
  }
}
layer {
  name: "relu6"
  type: "ReLU"
  bottom: "fc6"
  top: "fc6"
}
layer {
  name: "drop6"
  type: "Dropout"
  bottom: "fc6"
  top: "fc6"
  dropout_param {
    dropout_ratio: 0.5
  }
}
layer {
  name: "fc7"
  type: "InnerProduct"
  bottom: "fc6"
  top: "fc7"
  # Note that lr_mult can be  to disable any fine-tuning of this, and any other, layer
  param {
    lr_mult:
    decay_mult:
  }
  param {
    lr_mult:
    decay_mult:
  }
  inner_product_param {
    num_output:
    weight_filler {
      type: "gaussian"
      std: 0.005
    }
    bias_filler {
      type: "constant"
      value:
    }
  }
}
layer {
  name: "relu7"
  type: "ReLU"
  bottom: "fc7"
  top: "fc7"
}
layer {
  name: "drop7"
  type: "Dropout"
  bottom: "fc7"
  top: "fc7"
  dropout_param {
    dropout_ratio: 0.5
  }
}
layer {
  name: "fc8_flickr"
  type: "InnerProduct"
  bottom: "fc7"
  top: "fc8_flickr"
  # lr_mult is set to higher than for other layers, because this layer is starting from random while the others are already trained
  param {
    lr_mult:
    decay_mult:
  }
  param {
    lr_mult:
    decay_mult:
  }
  inner_product_param {
    num_output:
    weight_filler {
      type: "gaussian"
      std: 0.01
    }
    bias_filler {
      type: "constant"
      value:
    }
  }
}
layer {
  name: "prob"
  type: "Softmax"
  bottom: "fc8_flickr"
  top: "prob"
}
全卷积时使用(deploy_full_conv.prototxt):
name: "CaffeNet_full_conv"
input: "data"
input_dim:
input_dim:
input_dim:
input_dim:

layer {
  name: "conv1"
  type: "Convolution"
  bottom: "data"
  top: "conv1"
  param {
    lr_mult:
    decay_mult:
  }
  param {
    lr_mult:
    decay_mult:
  }
  convolution_param {
    num_output:
    kernel_size:
    stride:
    weight_filler {
      type: "gaussian"
      std: 0.01
    }
    bias_filler {
      type: "constant"
      value:
    }
  }
}
layer {
  name: "relu1"
  type: "ReLU"
  bottom: "conv1"
  top: "conv1"
}
layer {
  name: "pool1"
  type: "Pooling"
  bottom: "conv1"
  top: "pool1"
  pooling_param {
    pool: MAX
    kernel_size:
    stride:
  }
}
layer {
  name: "norm1"
  type: "LRN"
  bottom: "pool1"
  top: "norm1"
  lrn_param {
    local_size:
    alpha: 0.0001
    beta: 0.75
  }
}
layer {
  name: "conv2"
  type: "Convolution"
  bottom: "norm1"
  top: "conv2"
  param {
    lr_mult:
    decay_mult:
  }
  param {
    lr_mult:
    decay_mult:
  }
  convolution_param {
    num_output:
    pad:
    kernel_size:
    group:
    weight_filler {
      type: "gaussian"
      std: 0.01
    }
    bias_filler {
      type: "constant"
      value:
    }
  }
}
layer {
  name: "relu2"
  type: "ReLU"
  bottom: "conv2"
  top: "conv2"
}
layer {
  name: "pool2"
  type: "Pooling"
  bottom: "conv2"
  top: "pool2"
  pooling_param {
    pool: MAX
    kernel_size:
    stride:
  }
}
layer {
  name: "norm2"
  type: "LRN"
  bottom: "pool2"
  top: "norm2"
  lrn_param {
    local_size:
    alpha: 0.0001
    beta: 0.75
  }
}
layer {
  name: "conv3"
  type: "Convolution"
  bottom: "norm2"
  top: "conv3"
  param {
    lr_mult:
    decay_mult:
  }
  param {
    lr_mult:
    decay_mult:
  }
  convolution_param {
    num_output:
    pad:
    kernel_size:
    weight_filler {
      type: "gaussian"
      std: 0.01
    }
    bias_filler {
      type: "constant"
      value:
    }
  }
}
layer {
  name: "relu3"
  type: "ReLU"
  bottom: "conv3"
  top: "conv3"
}
layer {
  name: "conv4"
  type: "Convolution"
  bottom: "conv3"
  top: "conv4"
  param {
    lr_mult:
    decay_mult:
  }
  param {
    lr_mult:
    decay_mult:
  }
  convolution_param {
    num_output:
    pad:
    kernel_size:
    group:
    weight_filler {
      type: "gaussian"
      std: 0.01
    }
    bias_filler {
      type: "constant"
      value:
    }
  }
}
layer {
  name: "relu4"
  type: "ReLU"
  bottom: "conv4"
  top: "conv4"
}
layer {
  name: "conv5"
  type: "Convolution"
  bottom: "conv4"
  top: "conv5"
  param {
    lr_mult:
    decay_mult:
  }
  param {
    lr_mult:
    decay_mult:
  }
  convolution_param {
    num_output:
    pad:
    kernel_size:
    group:
    weight_filler {
      type: "gaussian"
      std: 0.01
    }
    bias_filler {
      type: "constant"
      value:
    }
  }
}
layer {
  name: "relu5"
  type: "ReLU"
  bottom: "conv5"
  top: "conv5"
}
layer {
  name: "pool5"
  type: "Pooling"
  bottom: "conv5"
  top: "pool5"
  pooling_param {
    pool: MAX
    kernel_size:
    stride:
  }
}
layer {
  name: "fc6-conv"
  type: "Convolution"
  bottom: "pool5"
  top: "fc6-conv"
  param {
    lr_mult:
    decay_mult:
  }
  param {
    lr_mult:
    decay_mult:
  }
  convolution_param {
    num_output:
    kernel_size:
    weight_filler {
      type: "gaussian"
      std: 0.005
    }
    bias_filler {
      type: "constant"
      value:
    }
  }
}
layer {
  name: "relu6"
  type: "ReLU"
  bottom: "fc6-conv"
  top: "fc6-conv"
}
layer {
  name: "drop6"
  type: "Dropout"
  bottom: "fc6-conv"
  top: "fc6-conv"
  dropout_param {
    dropout_ratio: 0.5
  }
}
layer {
  name: "fc7-conv"
  type: "Convolution"
  bottom: "fc6-conv"
  top: "fc7-conv"
  param {
    lr_mult:
    decay_mult:
  }
  param {
    lr_mult:
    decay_mult:
  }
  convolution_param {
    num_output:
    kernel_size:
    weight_filler {
      type: "gaussian"
      std: 0.005
    }
    bias_filler {
      type: "constant"
      value:
    }
  }
}
layer {
  name: "relu7"
  type: "ReLU"
  bottom: "fc7-conv"
  top: "fc7-conv"
}
layer {
  name: "drop7"
  type: "Dropout"
  bottom: "fc7-conv"
  top: "fc7-conv"
  dropout_param {
    dropout_ratio: 0.5
  }
}
layer {
  name: "fc8-conv"
  type: "Convolution"
  bottom: "fc7-conv"
  top: "fc8-conv"
  param {
    lr_mult:
    decay_mult:
  }
  param {
    lr_mult:
    decay_mult:
  }
  convolution_param {
    num_output:
    kernel_size:
    weight_filler {
      type: "gaussian"
      std: 0.01
    }
    bias_filler {
      type: "constant"
      value:
    }
  }
}
layer {
  name: "prob"
  type: "Softmax"
  bottom: "fc8-conv"
  top: "prob"
}
全连接转全卷积参考代码:
# -*- coding: utf- -*-
import caffe
#matplotlib inline
import numpy as np
import matplotlib.pyplot as plt
import matplotlib.cbook as cbook
#import Image
import sys
import os
from  math import pow
from PIL import Image, ImageDraw, ImageFont
import cv2
import math
import random
caffe_root = '/home/kobe/caffe/'

sys.path.insert(, caffe_root + 'python')
os.environ['

caffe.set_mode_cpu()
#####################################################################################################
# Load the original network and extract the fully connected layers' parameters.
net = caffe.Net('/home/kobe/Desktop/faceDetect/project/deploy.prototxt',
                '/home/kobe/Desktop/faceDetect/model/_iter_50000.caffemodel',
                caffe.TEST)
params = ['fc6', 'fc7', 'fc8_flickr']
# fc_params = {name: (weights, biases)}
fc_params = {pr: (net.].data, net.].data) for pr in params}

for fc in params:
    print ].shape, fc_params[fc][].shape)
#######################################################################################################
# Load the fully convolutional network to transplant the parameters.
net_full_conv = caffe.Net('/home/kobe/Desktop/faceDetect/project/deploy_full_conv.prototxt',
                          '/home/kobe/Desktop/faceDetect/model/_iter_50000.caffemodel',
                          caffe.TEST)
params_full_conv = ['fc6-conv', 'fc7-conv', 'fc8-conv']
# conv_params = {name: (weights, biases)}
conv_params = {pr: (net_full_conv.].data, net_full_conv.].data) for pr in params_full_conv}

for conv in params_full_conv:
    print ].shape, conv_params[conv][].shape)
#############################################################################################################
for pr, pr_conv in zip(params, params_full_conv):
    conv_params[pr_conv][].flat = fc_params[pr][].flat  # flat unrolls the arrays
    conv_params[pr_conv][][...] = fc_params[pr][]
##############################################################################################################
net_full_conv.save('/home/kobe/Desktop/faceDetect/alexnet_iter_50000_full_conv.caffemodel')
转换后得到另一个模型(alexnet_iter_50000_full_conv.caffemodel).
实现多尺度人脸检测代码:
# -*- coding: utf- -*-
import caffe
#matplotlib inline
import numpy as np
import matplotlib.pyplot as plt
import matplotlib.cbook as cbook
#import Image
import sys
import os
from  math import pow
from PIL import Image, ImageDraw, ImageFont
import cv2
import math
import random
caffe_root = '/home/kobe/caffe/'

sys.path.insert(, caffe_root + 'python')
os.environ['

caffe.set_mode_cpu()

#非极大值抑制算法NMS
class Point(object):
    def __init__(self, x, y):
        self.x = x
        self.y = y
def calculateDistance(x1,y1,x2,y2):  #计算人脸框的对角线距离
    dist = math.sqrt((x2 - x1)** + (y2 - y1)**)
    return dist

def range_overlap(a_min, a_max, b_min, b_max):

    return (a_min <= b_max) and (b_min <= a_max)

def rect_overlaps(r1,r2):
    return range_overlap(r1.left, r1.right, r2.left, r2.right) and range_overlap(r1.bottom, r1.top, r2.bottom, r2.top)

def rect_merge(r1,r2, mergeThresh):

    if rect_overlaps(r1,r2):
        # dist = calculateDistance((r1.left + r1.right)/, (r1.top + r1.bottom)/, (r2.left + r2.right)/, (r2.top + r2.bottom)/)
        SI= abs(min(r1.right, r2.right) - max(r1.left, r2.left)) * abs(max(r1.bottom, r2.bottom) - min(r1.top, r2.top))
        SA = abs(r1.right - r1.left)*abs(r1.bottom - r1.top)
        SB = abs(r2.right - r2.left)*abs(r2.bottom - r2.top)
        S=SA+SB-SI
        ratio = float(SI) / float(S)
        if ratio > mergeThresh :

class Rect(object):
    def __init__(self, p1, p2): #p1和p2为对角线上的两个点
        '''Store the top, bottom, left and right values for points
               p1 and p2 are the (corners) in either order
        '''
        self.left   = min(p1.x, p2.x) #?????
        self.right  = max(p1.x, p2.x)
        self.bottom = min(p1.y, p2.y)
        self.top    = max(p1.y, p2.y)

    def __str__(self):
        return "Rect[%d, %d, %d, %d]" % ( self.left, self.top, self.right, self.bottom )
def nms_average(boxes, groupThresh=, overlapThresh=0.2):
    rects = []
    temp_boxes = []
    weightslist = []
    new_rects = []
    for i in range(len(boxes)):
        ] > 0.2:
            rects.append([boxes[i,], boxes[i,], boxes[i,]-boxes[i,], boxes[i,]-boxes[i,]])

    rects, weights = cv2.groupRectangles(rects, groupThresh, overlapThresh) #函数解释http://blog.csdn.net/nongfu_spring/article/details/38977833

    rectangles = []
    for i in range(len(rects)):

        testRect = Rect( Point(rects[i,], rects[i,]), Point(rects[i,]+rects[i,], rects[i,]+rects[i,]))
        rectangles.append(testRect)
    clusters = []
    for rect in rectangles:
        matched =
        for cluster in clusters:
            if (rect_merge( rect, cluster , 0.2) ):
                matched=
                cluster.left   =  (cluster.left + rect.left   )/
                cluster.right  = ( cluster.right+  rect.right  )/
                cluster.top    = ( cluster.top+    rect.top    )/
                cluster.bottom = ( cluster.bottom+ rect.bottom )/

        if ( not matched ):
            clusters.append( rect )
    result_boxes = []
    for i in range(len(clusters)):

        result_boxes.append([clusters[i].left, clusters[i].bottom, clusters[i].right, clusters[i].top, ])

    return result_boxes

def generateBoundingBox(featureMap, scale): #由于做了scale变换,所以在这里还要将坐标反变换回去
    boundingBox = [] #存储候选框,以及属于人脸的概率
    stride =  #感受野的大小,filter大小,这个需要自己不断地去调整;
    cellSize =  #人脸框的大小,它这里是认为特征图上的一块区域的prob大于95%,就以那个点在原始图像中相应的位置作为人脸框的左上角点,然后框出候选框,但这么做感觉会使候选框变多
    #遍历最终的特征图,寻找属于人脸的概率大于95%的那些区域,加上Box
    for (x,y), prob in np.ndenumerate(featureMap):
        if(prob >= 0.95):
            boundingBox.append([float(stride * y)/ scale,
                                float(x * stride)/scale,
                                )/scale,
                                )/scale, prob])

    return boundingBox

def face_detection(imgFile):
    net_full_conv = caffe.Net(os.path.join(caffe_root, 'faceDetect', 'deploy_full_conv.prototxt'),
                              os.path.join(caffe_root, 'faceDetect', 'alexnet_iter_50000_full_conv.caffemodel'),
                              caffe.TEST)#全卷积网络(导入训练好的模型和deploy配置文件)
    randNum = random.randint(,) #设置一个在1到10000之间的随机数

    scales = []  #设置几个scale,组成图像金字塔
    factor = 0.793700526  #图像放大或者缩小的一个因子(经验值)

    img = cv2.imread(imgFile) #读入测试图像

    largest = min(, /max(img.shape[:])) #设定做scale变幻时最大的scale
    scale = largest
    minD = largest*min(img.shape[:]) #设定最小的scale
    : #只要最小的边做完最大的scale变换后大于227,之前得到的largest就可以作为最大的scale来用,并依此乘上factor,加入到scale列表中
        scales.append(scale)
        scale *= factor
        minD *= factor

    total_boxes = []  #存储所有的候选框
    #进行多尺度的人脸检测
    for scale in scales:

        scale_img = cv2.resize(img,((] * scale), ] * scale))))  #调整图像的长和高
        cv2.imwrite('/home/kobe/Desktop/faceDetect/project/1.jpg',scale_img) #保存图像
        #图像预处理
        im = caffe.io.load_image('/home/kobe/Desktop/faceDetect/project/1.jpg') #得到的特征值是0到1之间的小数
        net_full_conv.blobs[,,scale_img.shape[],scale_img.shape[]) #blobs['data']指data层,字典用法;同时由于图像大小发生了变化,data层的输入接口也要发生相应的变化
        transformer = caffe.io.Transformer({'data': net_full_conv.blobs['data'].data.shape}) #设定图像的shape格式
        transformer.set_mean('data', np.load(caffe_root +
                                             ).mean()) #减去均值操作
        transformer.set_transpose(,,))  #move image channels to outermost dimension
        transformer.set_channel_swap(,,)) #swap channels from RGB to BGR
        transformer.set_raw_scale(,] to [,]

        out = net_full_conv.forward_all(data=np.asarray([transformer.preprocess('data', im)])) #进行一次前向传播,out包括所有经过每一层后的特征图,其中元素为[(x,y),prob](特征图中的每一个小区域都代表一个概率)

        boxes = generateBoundingBox(,], scale)  #输出两类的可能性,并经过筛选获得候选框
        if(boxes):
            total_boxes.extend(boxes)  #将每次scale变换后的图片得到的候选框存进total_boxes中

    boxes_nms = np.array(total_boxes)
    true_boxes = nms_average(boxes_nms, , 0.2)  #利用非极大值算法过滤出人脸概率最大的框
    if not true_boxes == []:
        (x1, y1, x2, y2) = true_boxes[][:-]
        print (x1, y1, x2, y2)
        cv2.rectangle(img, (,,),thickness = )
        cv2.imwrite('/home/kobe/Desktop/faceDetect/project/result.jpg',img)

imgFile = '/home/kobe/Desktop/faceDetect/project/test.jpg'
print('start detect')
face_detection(imgFile)
print('finish detect')
#image_file = cbook.get_sample_data(imgFile)
img = plt.imread(imgFile)
plt.imshow(img)
plt.show()
运行结果:
用caffe一步一步实现人脸检测的更多相关文章
- 如何一步一步用DDD设计一个电商网站(九)—— 小心陷入值对象持久化的坑
阅读目录 前言 场景1的思考 场景2的思考 避坑方式 实践 结语 一.前言 在上一篇中(如何一步一步用DDD设计一个电商网站(八)—— 会员价的集成),有一行注释的代码: public interfa ...
- 如何一步一步用DDD设计一个电商网站(八)—— 会员价的集成
阅读目录 前言 建模 实现 结语 一.前言 前面几篇已经实现了一个基本的购买+售价计算的过程,这次再让售价丰满一些,增加一个会员价的概念.会员价在现在的主流电商中,是一个不大常见的模式,其带来的问题是 ...
- 如何一步一步用DDD设计一个电商网站(十)—— 一个完整的购物车
阅读目录 前言 回顾 梳理 实现 结语 一.前言 之前的文章中已经涉及到了购买商品加入购物车,购物车内购物项的金额计算等功能.本篇准备把剩下的购物车的基本概念一次处理完. 二.回顾 在动手之前我对之 ...
- 如何一步一步用DDD设计一个电商网站(七)—— 实现售价上下文
阅读目录 前言 明确业务细节 建模 实现 结语 一.前言 上一篇我们已经确立的购买上下文和销售上下文的交互方式,传送门在此:http://www.cnblogs.com/Zachary-Fan/p/D ...
- 如何一步一步用DDD设计一个电商网站(六)—— 给购物车加点料,集成售价上下文
阅读目录 前言 如何在一个项目中实现多个上下文的业务 售价上下文与购买上下文的集成 结语 一.前言 前几篇已经实现了一个最简单的购买过程,这次开始往这个过程中增加一些东西.比如促销.会员价等,在我们的 ...
- 如何一步一步用DDD设计一个电商网站(五)—— 停下脚步,重新出发
阅读目录 前言 单元测试 纠正错误,重新出发 结语 一.前言 实际编码已经写了2篇了,在这过程中非常感谢有听到观点不同的声音,借着这个契机,今天这篇就把大家提出的建议一个个的过一遍,重新整理,重新出发 ...
- 如何一步一步用DDD设计一个电商网站(四)—— 把商品卖给用户
阅读目录 前言 怎么卖 领域服务的使用 回到现实 结语 一.前言 上篇中我们讲述了“把商品卖给用户”中的商品和用户的初步设计.现在把剩余的“卖”这个动作给做了.这里提醒一下,正常情况下,我们的每一步业 ...
- 如何一步一步用DDD设计一个电商网站(三)—— 初涉核心域
一.前言 结合我们本次系列的第一篇博文中提到的上下文映射图(传送门:如何一步一步用DDD设计一个电商网站(一)—— 先理解核心概念),得知我们这个电商网站的核心域就是销售子域.因为电子商务是以信息网络 ...
- 一步一步使用ABP框架搭建正式项目系列教程
研究ABP框架好多天了,第一次看到这个框架的名称到现在已经很久了,但由于当时内功有限,看不太懂,所以就只是大概记住了ABP这个名字.最近几天,看到了园友@阳光铭睿的系列ABP教程,又点燃了我内心要研究 ...
随机推荐
- activeMQ的安装
1.下载ActiveMQ 去官方网站下载:http://activemq.apache.org/ 2.运行ActiveMQ 解压缩apache-activemq-5.5.1-bin.zip, 修改配置 ...
- java中static关键字的作用
java中static关键字主要有两种作用: 第一:为某特定数据类型或对象分配单一的存储空间,而与创建对象的个数无关. 第二,实现某个方法或属性与类而不是对象关联在一起 简单来说,在Java语言中,s ...
- 【论文:麦克风阵列增强】Speech Enhancement Based on the General Transfer Function GSC and Postfiltering
作者:桂. 时间:2017-06-06 16:10:47 链接:http://www.cnblogs.com/xingshansi/p/6951494.html 原文链接:http://pan.ba ...
- PHP面向对象笔记解析
PHP的面向对象是很重要的内容,也是很常用的内容.所以现在就把PHP面向对象进行整理了一下. 顺带,我会在后面把我整理的一整套CSS3,PHP,MYSQL的开发的笔记打包放到百度云,有需要可以直接去百 ...
- centOS6.4安装python3.5,并且安装pip
前言: 如果你也是用的centos系统,打算装python3.0以上版本,再装python下载工具pip,那么恭喜你,你可能也会像我一样遇到各种各样的问题! 另外非常重要的一点:centos都会自带p ...
- MongoDB--操作符
$gt -- > $lt -- < $gte -- >= $lte -- <= $all 与 in 类似,不同的是必须满足[]内所有的值 $exists 字段是否存在 db.s ...
- jsp图片上传
1.要实现图片上传,首先需要一个组件,这里我用的是smartupload.jar可以到这里下载http://download.csdn.net/detail/mengdecike/8279247 2. ...
- java自带uuid生成
java自带uuid生成UUID.randomUUID().toString()
- php通过curl扩展进行模拟登录(含验证码)
以下为本人工作中遇到的需要做的事情,之前也没怎么用过curl,查了好多资料,才稍微弄明白一点:本文所有内容只是自己平日工作的记录,仅供大家参考:<?php/*** 模拟登录*/header(&q ...
- 【Android Developers Training】 12. 支持不同屏幕
注:本文翻译自Google官方的Android Developers Training文档,译者技术一般,由于喜爱安卓而产生了翻译的念头,纯属个人兴趣爱好. 原文链接:http://developer ...