通过J2EE Web工程添加Flex项目,进行BlazeDS开发
http://www.cnblogs.com/noam/archive/2010/07/22/1782955.html
环境:Eclipse 7.5 + Flex Builder 4 plugin for eclipse.
步骤:
1. 建立J2EE Web工程,略,工程名为Sample。
2. 安装配置BlazeDS。
下载blazeds.war,解压,得到目录结构:
blazeds
├─META-INF
└─WEB-INF
├─classes
├─flex
├─lib
└─src
将blazeds\WEB-INF\lib下的所有jar文件复制到目录Sample\WebRoot\WEB-INF\lib下:
cfgatewayadapter.jarcommons-codec-1.3.jarcommons-httpclient-3.0.1.jarcommons-logging.jarflex-messaging-common.jarflex-messaging-core.jarflex-messaging-opt.jarflex-messaging-proxy.jarflex-messaging-remoting.jarflex-rds-server.jar
xalan.jar
在WEB工程下Sample\WebRoot\WEB-INF目录下新建目录flex,将blazeds\WEB-INF\flex下的所有文件复制到新建目录下:
messaging-config.xml
proxy-config.xmlremoting-config.xmlservices-config.xmlversion.properties
将blazeds\WEB-INF\web.xml中的配置信息复制到WEB工程下的web.xml中:
    <!-- Http Flex Session attribute and binding listener support -->

    <listener>

        <listener-class>flex.messaging.HttpFlexSession</listener-class>

    </listener>

    <!-- MessageBroker Servlet -->

    <servlet>

        <servlet-name>MessageBrokerServlet</servlet-name>

        <display-name>MessageBrokerServlet</display-name>

        <servlet-class>flex.messaging.MessageBrokerServlet</servlet-class>

        <init-param>

            <param-name>services.configuration.file</param-name>

            <param-value>/WEB-INF/flex/services-config.xml</param-value>

       </init-param>

        <load-on-startup>1</load-on-startup>

    </servlet>

    <servlet-mapping>

        <servlet-name>MessageBrokerServlet</servlet-name>

        <url-pattern>/messagebroker/*</url-pattern>

    </servlet-mapping>
3. 添加配置Flex项目。
部署Sample项目到Tomcat,启动Tomcat。下一步需要Web服务验证。
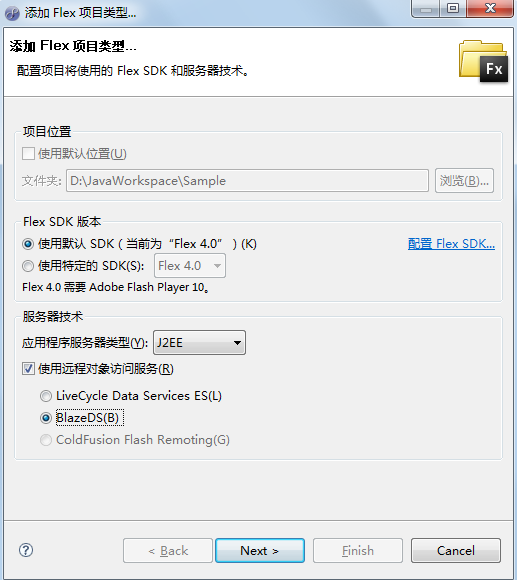
右键点击Sample项目,选择=》添加/更改项目类型=》添加Flex项目类型。
在“使用远程对象访问服务”选项选择BlazeDS,然后Next。
选择Web服务器webapps下的Sample目录作为根文件夹,根URL填写Web项目的Web访问路径,点击“验证配置”,若服务器正常,则验证有效,然后Finish。
4. 配置完毕,可以开始开始BlazeDS开发了。


参考文献:
Sujit Reddy G, 用Flash Builder 4 beta建立连接BlazeDS远程端的Flex应用程序 http://www.adobe.com/cn/devnet/flex/articles/flashbuilder4_blazeds.html
普通Java Web工程流行使用ssh框架,而当前台使用Flex制作的时候,后台就不需要用Struts了,通过使用BlazeDS远程方法调用即可。
首先,新建Java Web工程,然后添加Flex项目,详情见通过J2EE Web工程添加Flex项目,进行BlazeDS开发 。
随后,导入Jar包,flex相关的jar包在添加Flex项目的时候已经导入,这里主要是导入Spring和Hibernate相关的jar包以及spring和flex集成的jar包,我用的是spring 3.0.3和hibernate 3.2.1。 下面是lib列表:
antlr-2.7.6.jar
asm-2.2.3.jarasm-commons-2.2.3.jarasm-util-2.2.3.jaraspectjlib.jaraspectjrt.jaraspectjweaver.jarbackport-util-concurrent.jarc3p0-0.9.1.jarcfgatewayadapter.jarcglib-nodep-2.1_3.jarcom.springsource.edu.emory.mathcs.backport-3.0.0.jarcom.springsource.net.sf.cglib-2.2.0.jarcom.springsource.org.aopalliance-1.0.0.jarcommons-codec-1.3.jarcommons-collections-3.1.jarcommons-httpclient-3.0.1.jarcommons-io-1.4.jarcommons-lang-2.3.jarcommons-logging.jardom4j-1.6.1.jarehcache-1.2.3.jarflex-messaging-common.jarflex-messaging-core.jarflex-messaging-opt.jarflex-messaging-proxy.jarflex-messaging-remoting.jarflex-rds-server.jarfreemarker-2.3.15.jarhibernate-commons-annotations-3.2.0.Final.jarhibernate-core-3.5.4-Final.jarhibernate-jpa-2.0-api-1.0.0.Final.jarjackson-lgpl-0.9.5.jarjavassist.jarjta-1.1.jarlog4j-1.2.15.jarmysql-connector-java-5.1.13-bin.jarorg.springframework.aop-3.0.3.RELEASE.jarorg.springframework.asm-3.0.3.RELEASE.jarorg.springframework.aspects-3.0.3.RELEASE.jarorg.springframework.beans-3.0.3.RELEASE.jarorg.springframework.context-3.0.3.RELEASE.jarorg.springframework.context.support-3.0.3.RELEASE.jarorg.springframework.core-3.0.3.RELEASE.jarorg.springframework.expression-3.0.3.RELEASE.jarorg.springframework.flex-1.0.3.RELEASE.jarorg.springframework.instrument-3.0.3.RELEASE.jarorg.springframework.instrument.tomcat-3.0.3.RELEASE.jarorg.springframework.jdbc-3.0.3.RELEASE.jarorg.springframework.jms-3.0.3.RELEASE.jarorg.springframework.orm-3.0.3.RELEASE.jarorg.springframework.oxm-3.0.3.RELEASE.jarorg.springframework.test-3.0.3.RELEASE.jarorg.springframework.transaction-3.0.3.RELEASE.jarorg.springframework.web-3.0.3.RELEASE.jarorg.springframework.web.portlet-3.0.3.RELEASE.jarorg.springframework.web.servlet-3.0.3.RELEASE.jarorg.springframework.web.struts-3.0.3.RELEASE.jarslf4j-api-1.5.8.jarslf4j-log4j12-1.5.8.jarxalan.jar
修改配置文件,web.xml,其中最重要的是修改原先MessegeBroker Servlet,改为由Spring web应用前端控制器处理所有请求。
代码

    <!-- MessageBroker Servlet 单独为Flex配置xml-->

    <servlet>

        <servlet-name>flex</servlet-name>

        <servlet-class>

            org.springframework.web.servlet.DispatcherServlet

        </servlet-class>

        <init-param>

            <param-name>contextConfigLocation</param-name>

            <param-value>

                /WEB-INF/config/flex-application-config.xml

            </param-value>

        </init-param>

        <load-on-startup>1</load-on-startup>

    </servlet>


    <!--

    Map all /messagbroker requests to the DispatcherServlet for handling

    -->

    <servlet-mapping>

        <servlet-name>flex</servlet-name>

        <url-pattern>/messagebroker/*</url-pattern>

    </servlet-mapping>
配置 flex-application-config.xml,注意增加的几个命名空间,需要包org.springframework.flex-1.0.3.RELEASE.jar,同时在这个文件里定义了bean,在mxml里面会引用到:
flex-application-config.xml

<?xml version="1.0" encoding="UTF-8"?>

<beans xmlns="http://www.springframework.org/schema/beans"

    xmlns:flex="http://www.springframework.org/schema/flex"

    xmlns:xsi="http://www.w3.org/2001/XMLSchema-instance"

    xsi:schemaLocation="

        http://www.springframework.org/schema/beans

        http://www.springframework.org/schema/beans/spring-beans-2.5.xsd

        http://www.springframework.org/schema/flex

        http://www.springframework.org/schema/flex/spring-flex-1.0.xsd">

    <!-- Bootstraps and exposes the BlazeDS MessageBroker simplest form -->

    <flex:message-broker/>


    <bean id="test" class="sample.Test">

          <property name="userDAO">

            <ref bean="userDAO" />

        </property>

          <flex:remoting-destination />

    </bean>

</beans>
hibernate的配置,用到c0p0.jar,
daoContext.xml
<?xml version="1.0" encoding="UTF-8"?>

<beans

    xmlns="http://www.springframework.org/schema/beans"

    xmlns:xsi="http://www.w3.org/2001/XMLSchema-instance"

    xmlns:p="http://www.springframework.org/schema/p"

    xsi:schemaLocation="http://www.springframework.org/schema/beans http://www.springframework.org/schema/beans/spring-beans-2.5.xsd">


    <!-- 使用c3p0定义数据源Bean -->

    <bean id="dataSource" class="com.mchange.v2.c3p0.ComboPooledDataSource" destroy-method="close">

        <property name="driverClass" value="com.mysql.jdbc.Driver"/>

        <property name="jdbcUrl" value="jdbc:mysql://localhost:3306/db"/>

        <property name="user" value="user"/>

        <property name="password" value="pass"/>

    </bean>

    <bean id="sessionFactory" class="org.springframework.orm.hibernate3.LocalSessionFactoryBean">

        <property name="dataSource" ref="dataSource"></property>


        <property name="hibernateProperties">

            <props>

                <prop key="hibernate.dialect">

                    org.hibernate.dialect.MySQLDialect

                </prop>

                <prop key="hibernate.show_sql">

                    true

                </prop>

                <prop key="hibernate.format_sql">

                    true

                </prop>

                <prop key="hibernate.show_statistics">

                    false

                </prop>

            </props>

        </property>


        <property name="mappingResources">

            <list>

                <value>sample/dao/User.hbm.xml</value>

            </list>

        </property>

    </bean>


    <bean id="userDAO" class="sample.dao.UserDAO">

        <property name="sessionFactory">

            <ref bean="sessionFactory" />

        </property>

    </bean>

</beans>
test.mxml,这里主要是定义和调用远程对象,远程对象的bean在上面的flex-application-config.xml里面有定义,调用类sample.Test.java中的createUser方法。
<?xml version="1.0" encoding="utf-8"?>
<s:Application xmlns:fx="http://ns.adobe.com/mxml/2009"

               xmlns:s="library://ns.adobe.com/flex/spark"

               xmlns:mx="library://ns.adobe.com/flex/mx" minWidth="955" minHeight="600">

    <fx:Script>

        <![CDATA[


            import mx.rpc.events.FaultEvent;

            import mx.rpc.events.ResultEvent;

            protected function button_clickHandler(event:MouseEvent):void

            {

                // TODO Auto-generated method stub

                test.createUser("name","pass");

            }


            protected function resulth(event:ResultEvent):void

            {

                label.text="Succeed!";

            }


            protected function faulth(event:FaultEvent):void

            {

                label.text="failed!";

            }

        ]]>

    </fx:Script>

    <fx:Declarations>

        <!-- 将非可视元素(例如服务、值对象)放在此处 -->

        <mx:RemoteObject id="ro" destination="test" result="resulth(event);" fault="faulth(event);" />

    </fx:Declarations>

    <s:Button x="165" y="96" label="点一下" width="414" height="110" fontSize="26" id="button" click="button_clickHandler(event)"/>

    <s:Label x="287" y="290" text="远程调用测试" width="202" height="50" verticalAlign="middle" textAlign="center" fontSize="22" id="label"/>

</s:Application>
总结:这篇笔记不大全,只是大概展现了整合这些框架的要点,其中,主要是Flex4,spring3和BlazeDS4之间的整合。尤其需要注意的是jar包的导入。
本文没有涉及到blazeDS和spring整合实现远程方法调用服务和消息服务的配置,会在接下来写。
这里有一个个人觉得还蛮不错的Flex教程:Flex系列教程BY蒲公英
通过J2EE Web工程添加Flex项目,进行BlazeDS开发的更多相关文章
- 也谈基于Web的含工作流项目的一般开发流程
项目包含的通用模块代码等我有时间一并剥离贡献出来(基于WebSocket的通知引擎,工作流整合模块,自定义表单,基于RBAC权限设计),最近太忙了,Web项目有一段时间没碰,有点生疏的感觉,主要在忙G ...
- eclipse+maven+tomcat构建web工程
我们要利用Maven构建一个web应用,开发环境为eclipse+tomcat.构建过程如下: 1.工具准备 eclipse:版本为eclipse 4.2(Juno Service),maven插件的 ...
- 在javaEE下学习web(在eclipse中开发动态的WEB工程,servlet的环境搭建,及servlet的一些方法)
一个简便的方法实现javaee版的eclipse开发动态的WEB工程(javaWEB项目)1.把开发选项切换到javaEE2. 可以在window->shou view 中找到package e ...
- 于Heroku平台部署maven webapp(java web)工程
眼下,需要Heroku上述部署java web工程,该项目必须使用maven管理 一:新maven webapp工程 编者pom.xml档,增加下面的配置为例, <project xmlns=& ...
- 使用Eclipse创建动态的web工程
使用Eclipse创建动态的web工程 作者:尹正杰 版权声明:原创作品,谢绝转载!否则将追究法律责任. 一.修改工作区的编码 1>.点击Window选择Preferences 2>.将默 ...
- Eclipse中把Java工程修改成web工程
Eclipse中把Java工程修改成web工程 点击项目:右击:选择properties--输入project facets,将“Dynamic Web Module”打勾即可:
- 项目自动化建构工具gradle 入门5——在intellij中做一个gradle的web工程
之前的几个小节,都是纯手工建文件夹,纯手工拷贝war包,或者纯手工解压个zip看看结果,,,,这还是我写了玩的helloWorld.若是玩大工程.几十个人的团队协同开发时,这么玩,,,,暴躁的程序员估 ...
- Tomcat设置默认启动项目及Java Web工程设置默认启动页面
Tomcat设置默认启动项目 Tomcat设置默认启动项目,顾名思义,就是让可以在浏览器的地址栏中输入ip:8080,就能访问到我们的项目.具体操作如下: 1.打开tomcat的安装根目录,找到Tom ...
- eclipse 创建maven 项目 动态web工程报错
Eclipse 创建maven 项目 动态web工程 注:Eclipse版本为(Version: Mars.1 Release (4.5.1))maven版本为(apache-maven-3.3.9) ...
随机推荐
- 拼图的几个网上找到的Demo
东西就直接放到云盘里了 https://yunpan.cn/ck8eCzJe9Pknm 访问密码 ee53
- css3 - 字体图标库使用方法
一些字体图标库的网站 https://icomoon.io/app/#/selecthttp://www.iconfont.cn/http://www.bootcss.com/ http://www. ...
- Android 判断是否是Rtl
第一种方法: private boolean isRtl() { return TextUtils.getLayoutDirectionFromLocale(Locale.getDefault()) ...
- Servlet 工程 web.xml 中的 servlet 和 servlet-mapping 标签 《转载》
摘录某个工程的 web.xml 文件片段: 访问顺序为1—>2—>3—>4,其中2和3的值必须相同. url-pattern 标签中的值是要在浏览器地址栏中输入的 url,可以自己命 ...
- luogu P1379 八数码难题(A*算法入门详细讲解)
代码实现细节 #include<cstdio> #include<cstring> #include<iostream> using namespace std; ...
- 解决jquery在IE下removeAttr不生效的问题
使用jquery动态操纵DOM的时候在IE下会遇到remvoeAttr() 不生效的问题, 解决的办法是使用prop()方法: var node = $("div>input" ...
- iOS - 初学iPad开发入门
iPad是一款苹果公司于2010年发布的平板电脑定位介于苹果的智能手机iPhone和笔记本电脑MacBook产品之间跟iPhone一样,搭载的是iOS操作系统 iPhone和iPad开发的区别 屏幕的 ...
- Linux操作系统上ADSL拨号上网的方法详解
1.安装 yum install rp-pppoe.x86_64 2.配置PPPOE客户端软件 安装完软件包后,必须配置pppoe的配置文件/etc/ppp/pppoe.conf,从而让ADSL拨号时 ...
- 微信小程序 --- app.json文件
app.json文件用于配置项目:用于对小程序进行全局设置: pages:定义小程序的路由.(凡是不在这个配置里面的东西,都无法打开) (特别注意:结尾不能有 逗号 否则会出错) window:定义小 ...
- 第k最短路A*启发式搜索
Remmarguts' Date Time Limit: 4000MS Memory Limit: 65536K Total Submissions: 21549 Accepted: 5862 ...