windows下 go安装qt绑定
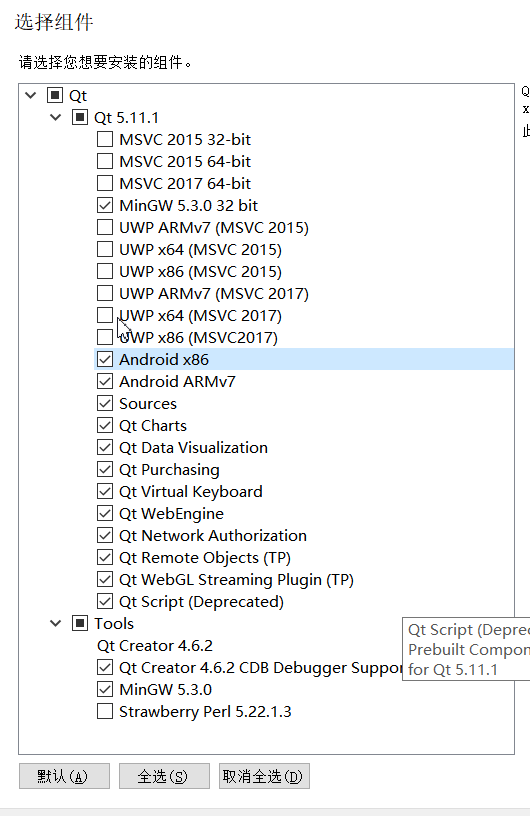
1.下载安装QT
离线版QT地址: https://download.qt.io/official_releases/qt/5.11/5.11.1/qt-opensource-windows-x86-5.11.1.exe
注意:
最好全部安装,否则在后续的安装过程中会提示相应的文件找不到
2. 在环境变量中指定QT_DIR
默认的QT_DIR为C:\Qt

如果不指定QT_DIR,在后续安装过程中会出现如下错误

3. 将g++所在路径加入环境变量PATH中
C:\Qt\Qt5.11.1\Tools\mingw530_32\bin

C:\Qt\Qt5.11.1\5.11.\mingw53_32\bin

C:\Qt\Qt5.11.1\Tools\mingw530_32\opt\bin

C:\Qt\Qt5.11.1\Tools\mingw530_32\bin 目录下包含了gcc、g++等编译链接工具
C:\Qt\Qt5.11.1\5.11.1\mingw53_32\bin 目录下包含了qmake.exe以及程序运行过程中需要的动态链接库(.dll)文件
4. 安装go
下载地址: https://golang.org/dl/
5. 下载安装therecipe/qt
# 下载

go get -v github.com/therecipe/qt/cmd/...

# 安装

%GOPATH%\bin\qtsetup.exe
安装过程中出现的硬链接失败可以忽略
生成的静态库所在路径为: %GOPATH%\pkg\windows_386\github.com\therecipe\qt
总共预计安装39个静态库文件(后缀名为.a)。其中安装成功38个,安装失败1个(winextras)。
安装记录如下:
F:\>qtsetup
[36mINFO[0m[] running: 'qtsetup prep'
[31mERRO[0m[] failed to run command [31mcmd[0m="cmd /C mklink /H C:\\Go\\bin\\qtrcc.exe F:\\Workspace\\go\\bin\\qtrcc.exe" [31mdir[0m= [31menv[0m= [31merror[0m="exit status 1" [31mfunc[0m=RunCmdOptional [31mname[0m="failed to create qtrcc symlink in your PATH (C:\\Go\\bin\\qtrcc.exe); please use F:\\Workspace\\go\\bin\\qtrcc.exe instead"
ϵͳ�����ļ��Ƶ���ͬ�Ĵ����������� [31mERRO[0m[] failed to run command [31mcmd[0m="cmd /C mklink /H C:\\Go\\bin\\qtmoc.exe F:\\Workspace\\go\\bin\\qtmoc.exe" [31mdir[0m= [31menv[0m= [31merror[0m="exit status 1" [31mfunc[0m=RunCmdOptional [31mname[0m="failed to create qtmoc symlink in your PATH (C:\\Go\\bin\\qtmoc.exe); please use F:\\Workspace\\go\\bin\\qtmoc.exe instead"
ϵͳ�����ļ��Ƶ���ͬ�Ĵ����������� [31mERRO[0m[] failed to run command [31mcmd[0m="cmd /C mklink /H C:\\Go\\bin\\qtminimal.exe F:\\Workspace\\go\\bin\\qtminimal.exe" [31mdir[0m= [31menv[0m= [31merror[0m="exit status 1" [31mfunc[0m=RunCmdOptional [31mname[0m="failed to create qtminimal symlink in your PATH (C:\\Go\\bin\\qtminimal.exe); please use F:\\Workspace\\go\\bin\\qtminimal.exe instead"
ϵͳ�����ļ��Ƶ���ͬ�Ĵ����������� [31mERRO[0m[] failed to run command [31mcmd[0m="cmd /C mklink /H C:\\Go\\bin\\qtdeploy.exe F:\\Workspace\\go\\bin\\qtdeploy.exe" [31mdir[0m= [31menv[0m= [31merror[0m="exit status 1" [31mfunc[0m=RunCmdOptional [31mname[0m="failed to create qtdeploy symlink in your PATH (C:\\Go\\bin\\qtdeploy.exe); please use F:\\Workspace\\go\\bin\\qtdeploy.exe instead"
ϵͳ�����ļ��Ƶ���ͬ�Ĵ����������� [36mINFO[0m[] running: 'qtsetup check windows' [docker=false] [vagrant=false]
[36mINFO[0m[] GOOS: 'windows'
[36mINFO[0m[] GOARCH: 'amd64'
[36mINFO[0m[] GOVERSION: 'go1.10.1'
[36mINFO[0m[] GOROOT: * 'C:\Go\'
[36mINFO[0m[] GOPATH: * 'F:\Workspace\go'
[36mINFO[0m[] GOBIN: 'F:\Workspace\go\bin'
[36mINFO[0m[] QT_HASH: 'd0f30a6e4c39e0989b1b00169b66abbca442becf'
[36mINFO[0m[] QT_VERSION: '5.11.1'
[36mINFO[0m[] QT_VERSION_MAJOR: '5.11.1'
[36mINFO[0m[] QT_DIR: * 'C:\Qt\Qt5.11.1'
[36mINFO[0m[] QT_STUB: 'false'
[36mINFO[0m[] QT_DEBUG: 'false'
[36mINFO[0m[] QT_QMAKE_DIR: ''
[36mINFO[0m[] QT_WEBKIT: 'false'
[36mINFO[0m[] QT_MSYS2: 'false'
[36mINFO[0m[] running: 'qtsetup generate windows' [docker=false] [vagrant=false]
[36mINFO[0m[] generating full qt/core
[36mINFO[0m[] generating full qt/androidextras
[36mINFO[0m[] generating full qt/gui
[36mINFO[0m[] generating full qt/network
[36mINFO[0m[] generating full qt/xml
[36mINFO[0m[] generating full qt/dbus
[36mINFO[0m[] generating full qt/nfc
[36mINFO[0m[] generating full qt/script
[36mINFO[0m[] generating full qt/sensors
[36mINFO[0m[] generating full qt/positioning
[36mINFO[0m[] generating full qt/widgets
[36mINFO[0m[] generating full qt/sql
[36mINFO[0m[] generating full qt/qml
[36mINFO[0m[] generating full qt/websockets
[36mINFO[0m[] generating full qt/xmlpatterns
[36mINFO[0m[] generating full qt/bluetooth
[36mINFO[0m[] generating full qt/webchannel
[36mINFO[0m[] generating full qt/svg
[36mINFO[0m[] generating full qt/multimedia
[36mINFO[0m[] generating full qt/quick
[36mINFO[0m[] generating full qt/help
[36mINFO[0m[] generating full qt/location
[36mINFO[0m[] generating full qt/scripttools
[36mINFO[0m[] generating full qt/uitools
[36mINFO[0m[] generating full qt/winextras
[36mINFO[0m[] generating full qt/testlib
[36mINFO[0m[] generating full qt/serialport
[36mINFO[0m[] generating full qt/serialbus
[36mINFO[0m[] generating full qt/printsupport
[36mINFO[0m[] generating full qt/designer
[36mINFO[0m[] generating full qt/scxml
[36mINFO[0m[] generating full qt/gamepad
[36mINFO[0m[] generating full qt/purchasing
[36mINFO[0m[] generating full qt/datavisualization
[36mINFO[0m[] generating full qt/charts
[36mINFO[0m[] generating full qt/speech
[36mINFO[0m[] generating full qt/quickcontrols2
[36mINFO[0m[] generating full qt/sailfish
[36mINFO[0m[] generating full qt/remoteobjects
[36mINFO[0m[] running: 'qtsetup install windows' [docker=false] [vagrant=false]
[36mINFO[0m[] installing full qt/core
[36mINFO[0m[] installing full qt/androidextras
[36mINFO[0m[] installing full qt/gui
[36mINFO[0m[] installing full qt/network
[36mINFO[0m[] installing full qt/xml
[36mINFO[0m[] installing full qt/dbus
[36mINFO[0m[] installing full qt/nfc
[36mINFO[0m[] installing full qt/script
[36mINFO[0m[] installing full qt/sensors
[36mINFO[0m[] installing full qt/positioning
[36mINFO[0m[] installing full qt/widgets
[36mINFO[0m[] installing full qt/sql
[36mINFO[0m[] installing full qt/qml
[36mINFO[0m[] installing full qt/websockets
[36mINFO[0m[] installing full qt/xmlpatterns
[36mINFO[0m[] installing full qt/bluetooth
[36mINFO[0m[] installing full qt/webchannel
[36mINFO[0m[] installing full qt/svg
[36mINFO[0m[] installing full qt/multimedia
[36mINFO[0m[] installing full qt/quick
[36mINFO[0m[] installing full qt/help
[36mINFO[0m[] installing full qt/location
[36mINFO[0m[] installing full qt/scripttools
[36mINFO[0m[] installing full qt/uitools
[36mINFO[0m[] installing full qt/winextras
github.com/therecipe/qt
github.com/therecipe/qt/winextras
# github.com/therecipe/qt/winextras
[36mINFO[0m[] installing full qt/testlib
[36mINFO[0m[] installing full qt/serialport
[36mINFO[0m[] installing full qt/serialbus
[36mINFO[0m[] installing full qt/printsupport
[36mINFO[0m[] installing full qt/designer
[36mINFO[0m[] installing full qt/scxml
[36mINFO[0m[] installing full qt/gamepad
[36mINFO[0m[] installing full qt/purchasing
[36mINFO[0m[] installing full qt/datavisualization
[36mINFO[0m[] installing full qt/charts
[36mINFO[0m[] installing full qt/speech
[36mINFO[0m[] installing full qt/quickcontrols2
[36mINFO[0m[] installing full qt/sailfish
[36mINFO[0m[] installing full qt/remoteobjects
[33mWARN[0m[0161] failed to install:
[33mWARN[0m[0161] winextras
[36mINFO [0m[] running: 'qtsetup test windows' [docker=false] [vagrant=false]
[36mINFO [0m[] testing widgets\line_edits
[36mINFO [0m[] testing widgets\pixel_editor
[36mINFO [0m[] testing widgets\textedit
[36mINFO [0m[] testing qml\application
[36mINFO [0m[] testing qml\drawer_nav_x
[36mINFO [0m[] testing qml\gallery
[36mINFO [0m[] testing quick\calc
运行的测试代码所在目录源码目录(therecipe\qt)下的的internal\examples目录下。
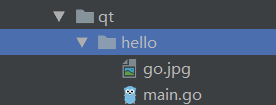
6. 简单的程序
目录结构:
代码:
package main

import (

    "os"

    "github.com/therecipe/qt/widgets"

    "github.com/therecipe/qt/gui"

    "github.com/therecipe/qt/core"

)

func main() {

    // 创建应用程序

    app := widgets.NewQApplication(len(os.Args), os.Args)

    // 创建主窗口

    window := widgets.NewQWidget(nil, )

    // 设置窗口最小尺寸

    window.SetMinimumSize2(, )

    // 设置标题

    window.SetWindowTitle("hello QT, hello GO")

    mainLayout := widgets.NewQVBoxLayout()

    // 创建垂直布局

    window.SetLayout(mainLayout)

    lineEidt := widgets.NewQLineEdit(nil)

    //创建一个label,用于存放go logo

    icon := gui.NewQPixmap5("go.jpg", "", core.Qt__AutoColor)

    iconLabel := widgets.NewQLabel(nil, )

    iconLabel.SetPixmap(icon)

    btn := widgets.NewQPushButton2("点我", nil)

    btn.ConnectClicked(func(bool) {

        widgets.QMessageBox_Information(nil, "我是对话框", "hello go,hello qt", widgets.QMessageBox__Ok, widgets.QMessageBox__Ok)

    })

    // !!!! 注意是AddWidget 不是AddChildWidget

    mainLayout.AddWidget(lineEidt, , )

    mainLayout.AddWidget(iconLabel, , )

    window.Layout().AddWidget(btn)

    // 显示窗口

    window.Show()

    // 进入消息循环

    app.Exec()

}
main.go
生成目标exe文件
F:\Workspace\go\src\gui\qt>qtdeploy build desktop hello
需要将go.jpg拷贝至hello\deploy\windows\目录下(与hello.exe处于一个目录下)方可正常运行。
运行效果:

遇到的问题:
1) "xxx/src/github.com/therecipe/qt/gui" has no buildable Go source files
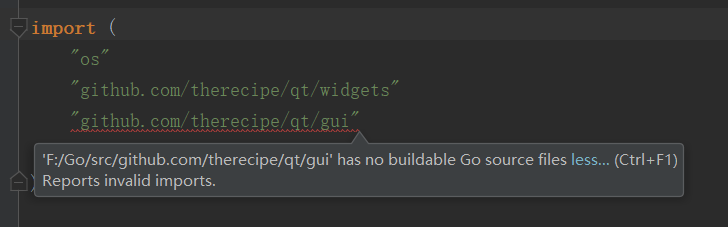
解决方法:
点击 Help > Edit Custom Properties

#添加如下内容

idea.max.intellisense.filesize=

由于静态库gui.a很大,因此需要提高goland智能补全所允许的 单个文件大小上限
2) 运行时内存不足
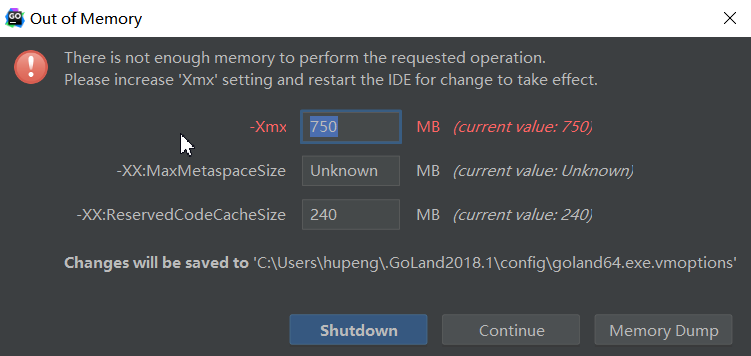
解决方法:
点击Goland 的开始菜单 Help > Edit Custom VM Options
根据配置 修改-Xmx选项,例如:
-Xms512m

-Xmx4096m

-XX:ReservedCodeCacheSize=480m

-XX:+UseConcMarkSweepGC

-XX:SoftRefLRUPolicyMSPerMB=

-ea

-Dsun.io.useCanonCaches=false

-Djava.net.preferIPv4Stack=true

-XX:+HeapDumpOnOutOfMemoryError

-XX:-OmitStackTraceInFastThrow
-Xmx value limits the maximum heap memory size that the JVM can allocate.
参考:
https://github.com/therecipe/qt/wiki/Getting-Started
https://github.com/therecipe/qt/wiki/Installation-on-Windows
https://github.com/therecipe/qt/issues/90
windows下 go安装qt绑定的更多相关文章
- QT在windows下的安装与配置
先了解Qt: Qt一直以来,分为商业.开源两个版本,商业版本为用户提供了二级制的动态库,直接安装既可以使用,但是需要花钱购买license,而开源版本则遵守GPL协议,提供了源码,用户需要自行编译,才 ...
- mediawiki在windows下的安装
mediawiki在windows下的安装 对于刚接触wiki的朋友们来说,配置一个服务器环境,安装并运行mediawiki是一件很麻烦的事情,在这里,我尽量用通俗易懂的语言,介绍mw(mediawi ...
- Windows下GIT安装与使用(上传远程端)
Windows下GIT安装与使用(上传远程服务器) 1. 登陆http://msysgit.github.io/并下载Git 2. 打开下载的exe文件,一路默认(路径可以去修改).有可能电脑需要 ...
- flume 1.7在windows下的安装与运行
flume 1.7在windows下的安装与运行 一.安装 安装java,配置环境变量. 安装flume,flume的官网http://flume.apache.org/,下载地址,下载后直接解压即可 ...
- 关于在windows下部署发布QT程序的总结
原文请看:http://www.cnblogs.com/javaexam2/archive/2011/05/18/2632916.html 关于在windows下部署发布QT程序的总结 2008-06 ...
- windows下python安装Numpy、Scipy、matplotlib模块(转载)
python下载链接 Numpy下载链接 python中Numpy包的安装及使用 Numpy包的安装 准备工作 Python安装 pip安装 将pip所在的文件夹添加到环境变量path路径中 ...
- memcache的windows下的安装和简单使用
原文:memcache的windows下的安装和简单使用 memcache是为了解决网站访问量大,数据库压力倍增的解决方案之一,由于其简单实用,很多站点现在都在使用memcache,但是memcach ...
- Windows下pry安装和配置
Windows下pry安装和配置 pry是一个增强型的交互式命令行工具,比irb强大. 有自动完成功能,自动缩进,有颜色.有更强大的调试功能. pry 安装很简单. 在终端输入: gem instal ...
- Windows下虚拟机安装Mac OS X ----- VM12安装Mac OS X 10.11
Windows下虚拟机安装Mac OS X -– VM12安装Mac OS X 10.11 随着Iphone在国内大行其道,越来越多的开发者涌入iOS开发大军 中,但都苦于没有苹果机,本文即将介绍WI ...
随机推荐
- 玩转BLE(3)_使用微信蓝牙精简协议伪造记步数据
1. 前言 在物联网时代,有一个问题肯定会让人头疼(现在已经初露端倪了): 物联网中的IOT设备有两个主要特点: 1)简单小巧(不具备复杂的人机交互接口,需要手机等终端设备辅助完成配置.控制等功能). ...
- 删除Docker镜像
删除镜像:1)先杀死镜像中所有容器 docker kill $(docker ps -a -q)2)删除镜像中所有容器: docker rm $(docker ps -a -q)3)删除镜像: ...
- css中换行与不换行的样式
常见的css样式分为换行与不换行两种需求 1.不换行显示省略号 text-overflow:ellipsis; white-space:normal; 2.换行自适应 word-break: brea ...
- 《Pro SQL Server Internals, 2nd edition》
设计和优化索引 定义一种应用于所有地方的索引策略是不可能的.每个系统都是独特的,需要基于工作,业务需求和其他一些因素的自己的索引方法.然而,有几个设计的注意事项和指导方针可以被应用到每个系统. 在我们 ...
- nw 引用 sqlite
0.好吧,这对于我这个c 小白来说,真的有点难度. 1.安装Python 2.7.14 https://www.python.org/downloads/ 2.安装最新的nodejs+npm http ...
- element 多个文件上传多次http请求解决方法
第一步 action="#" 第二步 :auto-upload = "false" 第三步 给元素绑定click事件触发提交方法,注意,把其他没有用的文件都给去 ...
- 二进制按位与(&) 按位或(|) 异或运算(^)
1.参加运算的两个数据,按照二进制进行按位与的运算. 运算规则:0&0=0; 0&1=0; 1&0=0; 1&1=1; 即:两位同时为“1”,结果才为 ...
- git教程:管理修改
转载:管理修改 现在,假定你已经完全掌握了暂存区的概念.下面,我们要讨论的就是,为什么Git比其他版本控制系统设计得优秀,因为Git跟踪并管理的是修改,而非文件. 你会问,什么是修改?比如你新增了一行 ...
- Alienware R8外星人台式机安装双系统(WIN10+Ubuntu)的总结
新电脑终于到了,然而外星人的系统比较特殊,很多东西和别的品牌(包括DELL)不一样, 同时NVIDIA显卡也带来了很多问题.重装了十几遍,查阅了上百篇文章后之后终于搞定了双系统. 其实核心问题很傻,就 ...
- Golang微服务:micro实践
micro 使用 工具安装 使用protoc生成代码,依赖两个插件:protoc-gen-go.protoc-gen-micro micro 工具 go get -u github.com/micro ...