(转载)自定义ExpandableListView,实现二级列表效果
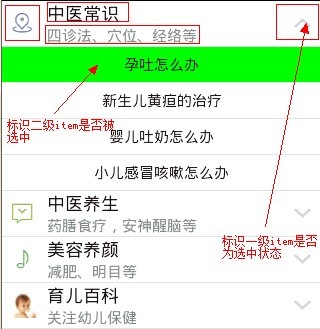
先看效果图:

上图是我们要实现的效果,那么现在我们开始着手去做,主要分为以下几步:
一丶我们需要根据效果图去思考该如何动手,从上图分析看,我们可以用一个相对布局RelativeLayout来完成group(一级item)的布局设计,至于child(二级item)的布局,我们可以用一个TextView来完成,当然,如果如要更复杂的效果可以参照一级item的布局方式进行。
以下是main.xml丶group.xml和child.xml的布局:
main.xml
<?xml version="1.0" encoding="utf-8"?>
<LinearLayout xmlns:android="http://schemas.android.com/apk/res/android"
android:layout_width="fill_parent"
android:layout_height="fill_parent"
android:orientation="vertical" >
<ExpandableListView
android:id="@+id/list"
android:layout_width="fill_parent"
android:layout_height="fill_parent"
android:background="#ffffff"
android:cacheColorHint="#00000000"
android:listSelector="#00000000"
>
</ExpandableListView>
</LinearLayout>
group.xml
<?xml version="1.0" encoding="utf-8"?>
<RelativeLayout xmlns:android="http://schemas.android.com/apk/res/android"
android:layout_width="match_parent"
android:layout_height="match_parent"
android:id="@+id/group_layout">
<ImageView
android:id="@+id/group_logo"
android:layout_width="wrap_content"
android:layout_height="wrap_content"
android:layout_alignParentLeft="true"
android:layout_centerInParent="true"
android:layout_marginLeft="10dp"
android:contentDescription="@string/list_logo" />
<TextView
android:id="@+id/group_title"
android:layout_width="wrap_content"
android:layout_height="wrap_content"
android:layout_marginLeft="10dp"
android:layout_toRightOf="@id/group_logo"
android:textColor="#130c0e"
android:textSize="18sp" />
<TextView
android:id="@+id/group_text"
android:layout_width="wrap_content"
android:layout_height="wrap_content"
android:layout_below="@id/group_title"
android:layout_marginLeft="10dp"
android:layout_toRightOf="@id/group_logo"
android:textColor="#838B8B"
android:textSize="15sp" />
<ImageView
android:id="@+id/group_state"
android:layout_width="wrap_content"
android:layout_height="wrap_content"
android:layout_alignParentRight="true"
android:layout_centerInParent="true"
android:layout_marginRight="10dp"
android:contentDescription="@string/list_state" />
</RelativeLayout>
child.xml
<?xml version="1.0" encoding="utf-8"?>
<RelativeLayout xmlns:android="http://schemas.android.com/apk/res/android"
android:layout_width="match_parent"
android:layout_height="match_parent" >
<TextView
android:id="@+id/child_text"
android:layout_width="wrap_content"
android:layout_height="20dp"
android:layout_centerInParent="true"
android:layout_marginTop="15dp"
android:textColor="#130c0e"
android:textSize="15sp" />
</RelativeLayout>
二、布局文件设置好以后,我们开始着手去实现代码,首先谈谈我在实现过程中遇到的问题:
一:在刚开始为二级item(expandableListView.setOnChildClickListener)设置点击事件时,自己思维进入了一个误区,刷新代码写错位置导致二级item不能实时表明选中状态,实验了一番发现自己脑子发抽,其实把代码转移到点击事件中就OK了。
二:为一级item设置点击事件时,刚开始想套用二级Item点击事件的方法去做,发现行不通后,自己实验了一番,定义了一个整型数组来存放对应groupPosition的点击次数,根据点击次数来设置状态图标,功能虽然实现了,但是感觉自己的这个方法不大实用,如果是动态加入就有点问题了,这个还希望各位看官给点建议。
好了,废话不多说了,下面是实现的代码,希望各位不吝指教:
/**
* 自定义ExpandableList列表类
*
* @author jgduan
*
*/
public class ExpandableList extends Activity {
// 这个数组是用来存储一级item的点击次数的,根据点击次数设置一级标签的选中、为选中状态
private int[] group_checked = new int[]{0,0,0,0,0,0,0,0,0,0,0,0,0,0,0,0,0,0,0,0,0,0,0,0};
// 用来标识是否设置二級item背景色为绿色,初始值为-1既为选中状态
private int child_groupId = -1;
private int child_childId = -1;
protected void onCreate(Bundle savedInstanceState) {
super.onCreate(savedInstanceState);
// 隐藏标题
requestWindowFeature(Window.FEATURE_NO_TITLE);
// 指定布局
setContentView(R.layout.main);
// 新建一个ExpandableListView
ExpandableListView expandableListView = (ExpandableListView) findViewById(R.id.list);
// 设置默认图标为不显示状态
expandableListView.setGroupIndicator(null);
// 为列表绑定数据源
expandableListView.setAdapter(adapter);
// 设置一级item点击的监听器
expandableListView.setOnGroupClickListener(new OnGroupClickListener() {
@Override
public boolean onGroupClick(ExpandableListView parent, View v,
int groupPosition, long id) {
group_checked[groupPosition] = group_checked[groupPosition]+1;
// 刷新界面
((BaseExpandableListAdapter) adapter).notifyDataSetChanged();
return false;
}
});
// 设置二级item点击的监听器
expandableListView.setOnChildClickListener(new OnChildClickListener() {
@Override
public boolean onChildClick(ExpandableListView parent, View v,
int groupPosition, int childPosition, long id) {
// 将被点击的一丶二级标签的位置记录下来
child_groupId = groupPosition;
child_childId = childPosition;
// 刷新界面
((BaseExpandableListAdapter) adapter).notifyDataSetChanged();
return false;
}
});
}
final ExpandableListAdapter adapter = new BaseExpandableListAdapter() {
// 一级标签上的logo图片数据源
int[] group_logo_array = new int[] { R.drawable.map,
R.drawable.message, R.drawable.music, R.drawable.children };
// 一级标签上的标题数据源
private String[] group_title_arry = new String[] { "中医常识", "中医养生",
"美容养颜", "育儿百科" };
// 一级标签的描述文本数据源
private String[] group_text_array = new String[] { "四诊法、穴位、经络等",
"药膳食疗,安神醒脑等", "减肥、明目等", "关注幼儿保健" };
// 子视图显示文字
private String[][] child_text_array = new String[][] {
{ "孕吐怎么办", "新生儿黄疸的治疗", "婴儿吐奶怎么办", "小儿感冒咳嗽怎么办" },
{ "孕吐怎么办", "新生儿黄疸的治疗", "婴儿吐奶怎么办", "小儿感冒咳嗽怎么办" },
{ "孕吐怎么办", "新生儿黄疸的治疗", "婴儿吐奶怎么办", "小儿感冒咳嗽怎么办" },
{ "孕吐怎么办", "新生儿黄疸的治疗", "婴儿吐奶怎么办", "小儿感冒咳嗽怎么办" } };
// 一级标签上的状态图片数据源
int[] group_state_array = new int[] { R.drawable.group_down,
R.drawable.group_up };
// 重写ExpandableListAdapter中的各个方法
/**
* 获取一级标签总数
*/
@Override
public int getGroupCount() {
return group_text_array.length;
}
/**
* 获取一级标签内容
*/
@Override
public Object getGroup(int groupPosition) {
return group_text_array[groupPosition];
}
/**
* 获取一级标签的ID
*/
@Override
public long getGroupId(int groupPosition) {
return groupPosition;
}
/**
* 获取一级标签下二级标签的总数
*/
@Override
public int getChildrenCount(int groupPosition) {
return child_text_array[groupPosition].length;
}
/**
* 获取一级标签下二级标签的内容
*/
@Override
public Object getChild(int groupPosition, int childPosition) {
return child_text_array[groupPosition][childPosition];
}
/**
* 获取二级标签的ID
*/
@Override
public long getChildId(int groupPosition, int childPosition) {
return childPosition;
}
/**
* 指定位置相应的组视图
*/
@Override
public boolean hasStableIds() {
return true;
}
/**
* 对一级标签进行设置
*/
@Override
public View getGroupView(int groupPosition, boolean isExpanded,
View convertView, ViewGroup parent) {
// 为视图对象指定布局
convertView = (RelativeLayout) RelativeLayout.inflate(
getBaseContext(), R.layout.group, null);
/**
* 声明视图上要显示的控件
*/
// 新建一个ImageView对象,用来显示一级标签上的logo图片
ImageView group_logo = (ImageView) convertView
.findViewById(R.id.group_logo);
// 新建一个TextView对象,用来显示一级标签上的标题信息
TextView group_title = (TextView) convertView
.findViewById(R.id.group_title);
// 新建一个TextView对象,用来显示一级标签上的大体描述的信息
TextView group_text = (TextView) convertView
.findViewById(R.id.group_text);
// 新建一个ImageView对象,根据用户点击来标识一级标签的选中状态
ImageView group_state = (ImageView) convertView
.findViewById(R.id.group_state);
/**
* 设置相应控件的内容
*/
// 设置要显示的图片
group_logo.setBackgroundResource(group_logo_array[groupPosition]);
// 设置标题上的文本信息
group_title.setText(group_title_arry[groupPosition]);
// 设置整体描述上的文本信息
group_text.setText(group_text_array[groupPosition]);
if(group_checked[groupPosition] % 2 == 1){
// 设置默认的图片是选中状态
group_state.setBackgroundResource(group_state_array[1]);
}else{
for(int test : group_checked){
if(test == 0 || test % 2 == 0){
// 设置默认的图片是未选中状态
group_state.setBackgroundResource(group_state_array[0]);
}
}
}
// 返回一个布局对象
return convertView;
}
/**
* 对一级标签下的二级标签进行设置
*/
@Override
public View getChildView(int groupPosition, int childPosition,
boolean isLastChild, View convertView, ViewGroup parent) {
// 为视图对象指定布局
convertView = (RelativeLayout) RelativeLayout.inflate(
getBaseContext(), R.layout.child, null);
/**
* 声明视图上要显示的控件
*/
// 新建一个TextView对象,用来显示具体内容
TextView child_text = (TextView) convertView
.findViewById(R.id.child_text);
/**
* 设置相应控件的内容
*/
// 设置要显示的文本信息
child_text.setText(child_text_array[groupPosition][childPosition]);
// 判断item的位置是否相同,如相同,则表示为选中状态,更改其背景颜色,如不相同,则设置背景色为白色
if (child_groupId == groupPosition
&& child_childId == childPosition) {
// 设置背景色为绿色
convertView.setBackgroundColor(Color.GREEN);
} else {
// 设置背景色为白色
convertView.setBackgroundColor(Color.WHITE);
}
// 返回一个布局对象
return convertView;
}
/**
* 当选择子节点的时候,调用该方法
*/
@Override
public boolean isChildSelectable(int groupPosition, int childPosition) {
return true;
}
};
}
}
【推荐】极光开发者服务平台,五大功能一站集齐
【推荐】腾讯云域名+云解析 限时折扣抓紧抢购
【推荐】阿里云“全民云计算”优惠升级
【推荐】一小时搭建人工智能应用,让技术更容易入门


Powered by:
博客园
Copyright © 土鳖程序员
(转载)自定义ExpandableListView,实现二级列表效果的更多相关文章
- (转载)ExpandableListView 安卓二级菜单
ExpandableListView 安卓二级菜单 ExpandableListView可以显示一个视图垂直滚动显示两级列表中的条目,这不同于列表视图(ListView).ExpandableLi ...
- 【深入篇】自定义ExpandableListView,实现二级列表效果
先看效果图: 上图是我们要实现的效果,那么现在我们开始着手去做,主要分为以下几步: 一丶我们需要根据效果图去思考该如何动手,从上图分析看,我们可以用一个相对布局RelativeLayout来完成gro ...
- ExpandableListView控件实现二级列表
效果图如下: 二级列表附有点击事件. 1.布局文件: 此处加了一个自定义的导航RelativeLayout,记得注activity的时候添加 android:theme="@style/Th ...
- 使用jQuery 中的显示与隐藏动画效果实现折叠下拉菜单的收缩和展开,在页面的列表中有若干项,列表的每项中有一个二级列表,二级列表默认为隐藏状态。点击列表的项,切换二级列表的显示或隐藏状态
查看本章节 查看作业目录 需求说明: 使用jQuery 中的显示与隐藏动画效果实现折叠下拉菜单的收缩和展开,在页面的列表中有若干项,列表的每项中有一个二级列表,二级列表默认为隐藏状态.点击列表的项,切 ...
- ExpandableListView 安卓二级菜单
ExpandableListView可以显示一个视图垂直滚动显示两级列表中的条目,这不同于列表视图(ListView).ExpandableListView允许有两个层次:一级列表中有二级列表.比如在 ...
- Dedecms自定义表单后台列表展现方式更改
Dedecms有自定义表单功能,方便我们收集用户信息.个人通常喜欢拿这个功能做问卷调查,在线留言等功能.但是如果使用过这个功能的朋友就会知道,Dedecms自定义表单后台列表展现方式并不好看. 上面就 ...
- 自定义view实现水波纹效果
水波纹效果: 1.标准正余弦水波纹: 2.非标准圆形液柱水波纹: 虽说都是水波纹,但两者在实现上差异是比较大的,一个通过正余弦函数模拟水波纹效果,另外一个会运用到图像的混合模式(PorterDuffX ...
- vue实现二级联动效果
你如城市与省份间的二级联动效果 <!DOCTYPE html> <html> <head> <meta charset="UTF-8"&g ...
- AngularJS学习笔记(1)——MVC模式的清单列表效果
MVC模式的清单列表效果 使用WebStorm新建todo.html并链入bootstrap.css.bootstrap-theme.css.angular.js.要链入的相关css和js文件预先准备 ...
随机推荐
- week5_notebooke1
大纲: 01 装饰器进阶 02 函数的有效信息 03 可迭代对象.迭代器 04 生成器 列表生成式 生成器表达式 05 内置函数 06 二分查找 01 装饰器进阶 #多个装饰器装饰同一个函数: ## ...
- 关于flex布局中的兼容性问题
这几天在做项目中用到了flex布局,但是在测试的过程中发现他的兼容性实在是太差了,仅仅用到水平和垂直居中的样式,没想到兼容性代码就写了好几行. display:flex; display:-webki ...
- reflect 反射结合集合泛型的总结
集合泛型: 可以放任何对象的 ArrayList ArrayList list = new ArrayList(); 没有限定泛型类型. list.add("lilin");l ...
- 照片放大软件PhotoZoom怎么用?
做设计时,难免常常要上网找一些图片素材,但是有时候我们找到图片效果不尽人意,图片风格符合设计要求的的却图片太小,用photoshop放大后,图片的色块像素就出来了,效果极为不理想,这就要我们将图片进行 ...
- Hihocoder1061-Beautiful String
时间限制:10000ms单点时限:1000ms内存限制:256MB 描述 We say a string is beautiful if it has the equal amount of 3 or ...
- Nginx虚拟主机以及自动启动脚本详解
想要部署Nginx虚拟主机,那么首先需要nginx的环境,那么我们一起来看一下吧systemctl stop firewalldiptables -Fsetenforce 01)安装支持软件yum - ...
- centos 7 防火墙配置
centos 7里的防火墙使用的是firewall. 之前问过一个运维大牛,selinux的位置有点尴尬,说他们在工作中一般都会在第一时间关闭掉.我记得当时自己假设网站的时候就被这个坑了大半晚上.这个 ...
- sdoi2013 spring(hash+容斥)
大体思路是先求出来\(f[i]\)代表有至少\(i\)个位置相同的点对数. 然后就已经没什么好害怕的了(跟BZOJ3622一样) 然后这个\(f[i\)]怎么求呢? 最无脑的方法就是枚举位置,然后\( ...
- Http请求和相应模式(B/S)(1)
B/S模式 服务器端的接受数据 :浏览器端 表单格式 <form></form> GET:请求方式, /index.html Web浏览器上的资源路径 uname=bjxt& ...
- ASP.NET-技巧01
==符号的写法 ViewBag.StatusMessage = message == ManageMessageId.ChangePasswordSuccess ? "你的密码已更改.&qu ...


