Struts2 源码分析-----工作原理分析
请求过程
struts2 架构图如下图所示:
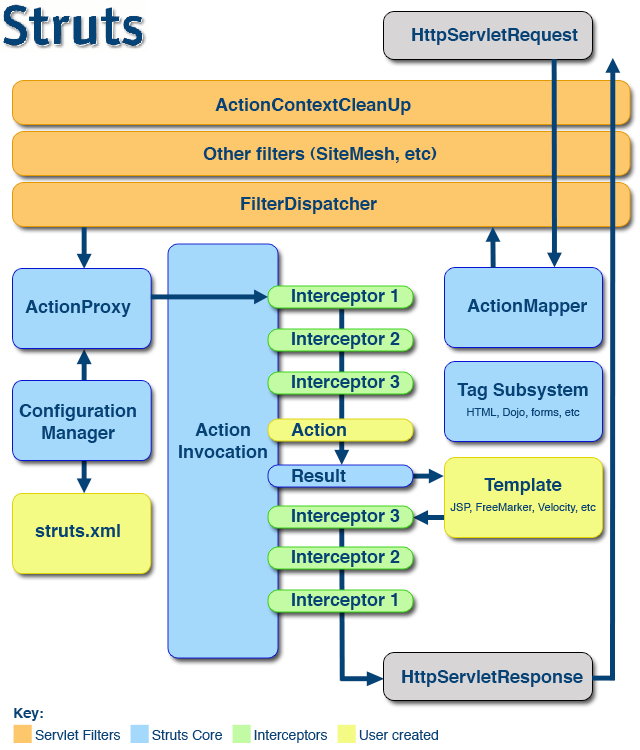
依照上图,我们可以看出一个请求在struts的处理大概有如下步骤:
1、客户端初始化一个指向Servlet容器(例如Tomcat)的请求;
2、这个请求经过一系列的过滤器(Filter)(这些过滤器中有一个叫做ActionContextCleanUp的可选过滤器,这个过滤器对于Struts2和其他框架的集成很有帮助,例如:SiteMesh Plugin);
3、接着StrutsPrepareAndExecuteFilter被调用,StrutsPrepareAndExecuteFilter询问ActionMapper来决定这个请求是否需要调用某个Action;
4、如果ActionMapper决定需要调用某个Action,FilterDispatcher把请求的处理交给ActionProxy;
5、ActionProxy通过Configuration Manager询问框架的配置文件,找到需要调用的Action类;
6、ActionProxy创建一个ActionInvocation的实例。
7、ActionInvocation实例使用命名模式来调用,在调用Action的过程前后,涉及到相关拦截器(Intercepter)的调用。
8、一旦Action执行完毕,ActionInvocation负责根据struts.xml中的配置找到对应的返回结果。返回结果通常是(但不总是,也可能是另外的一个Action链)一个需要被表示的JSP或者FreeMarker的模版。在表示的过程中可以使用Struts2 框架中继承的标签。在这个过程中需要涉及到ActionMapper。
9、接着按照相反次序执行拦截器链 ( 执行 Action 调用之后的部分 )。最后,响应通过滤器链返回(过滤器技术执行流程与拦截器一样,都是先执行前面部分,后执行后面部)。如果过滤器链中存在 ActionContextCleanUp,FilterDispatcher 不会清理线程局部的 ActionContext。如果不存在 ActionContextCleanUp 过滤器,FilterDispatcher 会清除所有线程局部变量。
strut2源码分析
首先我们使用struts2框架都会在web.xml中注册和映射struts2,配置内容如下:
- <filter>
- <filter-name>struts2</filter-name>
- <filter-class>org.apache.struts2.dispatcher.ng.filter.StrutsPrepareAndExecuteFilter</filter-class>
- </filter>
- <filter-mapping>
- <filter-name>struts2</filter-name>
- <url-pattern>/*</url-pattern>
- </filter-mapping>
注:在早期的struts2中,都是使用FilterDispathcer,从Struts 2.1.3开始,它已不推荐使用。如果你使用的Struts的版本 >= 2.1.3,推荐升级到新的Filter,StrutsPrepareAndExecuteFilter。在此研究的是StrutsPrepareAndExecuteFilter。
StrutsPrepareAndExecuteFilter中的方法:
| void init(FilterConfig filterConfig) | 继承自Filter,过滤器的初始化 |
| doFilter(ServletRequest req, ServletResponse res, FilterChain chain) | 继承自Filter,执行过滤器 |
| void destroy() | 继承自Filter,用于资源释放 |
| void postInit(Dispatcher dispatcher, FilterConfig filterConfig) | Callback for post initialization(一个空的方法,用于方法回调初始化) |
web容器一启动,就会初始化核心过滤器StrutsPrepareAndExecuteFilter,并执行初始化方法,初始化方法如下:
- public void init(FilterConfig filterConfig) throws ServletException {
- InitOperations init = new InitOperations();
- Dispatcher dispatcher = null;
- try {
- //封装filterConfig,其中有个主要方法getInitParameterNames将配置文件中的初始化参数名字以String格式存储在List中
- FilterHostConfig config = new FilterHostConfig(filterConfig);
- //初始化struts内部日志
- init.initLogging(config);
- //创建dispatcher ,并初始化
- dispatcher = init.initDispatcher(config);
- init.initStaticContentLoader(config, dispatcher);
- //初始化类属性:prepare 、execute
- prepare = new PrepareOperations(filterConfig.getServletContext(), dispatcher);
- execute = new ExecuteOperations(filterConfig.getServletContext(), dispatcher);
- this.excludedPatterns = init.buildExcludedPatternsList(dispatcher);
- //回调空的postInit方法
- postInit(dispatcher, filterConfig);
- } finally {
- if (dispatcher != null) {
- dispatcher.cleanUpAfterInit();
- }
- init.cleanup();
- }
- }
关于封装filterConfig,首先看下FilterHostConfig ,源码如下:
- public class FilterHostConfig implements HostConfig {
- private FilterConfig config;
- //构造方法
- public FilterHostConfig(FilterConfig config) {
- this.config = config;
- }
- //根据init-param配置的param-name获取param-value的值
- public String getInitParameter(String key) {
- return config.getInitParameter(key);
- }
- //返回初始化参数名的迭代器
- public Iterator<String> getInitParameterNames() {
- return MakeIterator.convert(config.getInitParameterNames());
- }
- //返回Servlet上下文
- public ServletContext getServletContext() {
- return config.getServletContext();
- }
- }
接下来,看下StrutsPrepareAndExecuteFilter中init方法中dispatcher = init.initDispatcher(config);这是初始化dispatcher的。
- public Dispatcher initDispatcher( HostConfig filterConfig ) {
- Dispatcher dispatcher = createDispatcher(filterConfig);
- dispatcher.init();
- return dispatcher;
- }
创建Dispatcher,会读取 filterConfig 中的配置信息,将配置信息解析出来,封装成为一个Map,然后根绝servlet上下文和参数Map构造Dispatcher :
- private Dispatcher createDispatcher( HostConfig filterConfig ) {
- //存放参数的Map
- Map<String, String> params = new HashMap<String, String>();
- //将参数存放到Map
- for ( Iterator e = filterConfig.getInitParameterNames(); e.hasNext(); ) {
- String name = (String) e.next();
- String value = filterConfig.getInitParameter(name);
- params.put(name, value);
- }
- //根据servlet上下文和参数Map构造Dispatcher
- return new Dispatcher(filterConfig.getServletContext(), params);
- }
这样dispatcher对象创建完成,接着就是dispatcher对象的初始化,打开Dispatcher类,看到它的init方法如下:
- public void init() {
- if (configurationManager == null) {
- configurationManager = createConfigurationManager(BeanSelectionProvider.DEFAULT_BEAN_NAME);
- }
- try {
- init_FileManager();
- //加载org/apache/struts2/default.properties
- init_DefaultProperties();
- //加载struts-default.xml,struts-plugin.xml,struts.xml
- init_TraditionalXmlConfigurations();
- init_LegacyStrutsProperties();
- //用户自己实现的ConfigurationProviders类
- init_CustomConfigurationProviders();
- //Filter的初始化参数
- init_FilterInitParameters() ;
- init_AliasStandardObjects() ;
- Container container = init_PreloadConfiguration();
- container.inject(this);
- init_CheckWebLogicWorkaround(container);
- if (!dispatcherListeners.isEmpty()) {
- for (DispatcherListener l : dispatcherListeners) {
- l.dispatcherInitialized(this);
- }
- }
- } catch (Exception ex) {
- if (LOG.isErrorEnabled())
- LOG.error("Dispatcher initialization failed", ex);
- throw new StrutsException(ex);
- }
- }
这里主要是加载一些配置文件的,将按照顺序逐一加载:default.properties,struts-default.xml,struts-plugin.xml,struts.xml,……
现在,我们回到StrutsPrepareAndExecuteFilter类中,刚才我们分析了StrutsPrepareAndExecuteFilter类的init方法,该方法在web容器一启动就会调用的,当用户访问某个action的时候,首先调用核心过滤器StrutsPrepareAndExecuteFilter的doFilter方法,该方法内容如下:
- public void doFilter(ServletRequest req, ServletResponse res, FilterChain chain) throws IOException, ServletException {
- HttpServletRequest request = (HttpServletRequest) req;
- HttpServletResponse response = (HttpServletResponse) res;
- try {
- //设置编码和国际化
- prepare.setEncodingAndLocale(request, response);
- //创建action上下文
- prepare.createActionContext(request, response);
- prepare.assignDispatcherToThread();
- if (excludedPatterns != null && prepare.isUrlExcluded(request, excludedPatterns)) {
- chain.doFilter(request, response);
- } else {
- request = prepare.wrapRequest(request);
- ActionMapping mapping = prepare.findActionMapping(request, response, true);
- //如果mapping为空,则认为不是调用action,会调用下一个过滤器链,直到获取到mapping才调用action
- if (mapping == null) {
- boolean handled = execute.executeStaticResourceRequest(request, response);
- if (!handled) {
- chain.doFilter(request, response);
- }
- } else {
- //执行action
- execute.executeAction(request, response, mapping);
- }
- }
- } finally {
- prepare.cleanupRequest(request);
- }
- }
下面对doFilter方法中的重点部分一一讲解:
(1)prepare.setEncodingAndLocale(request, response)
- public void setEncodingAndLocale(HttpServletRequest request, HttpServletResponse response) {
- dispatcher.prepare(request, response);
- }
这方法里面我们可以看到它只是调用了dispatcher的prepare方法而已,下面我们看看dispatcher的prepare方法:
- String encoding = null;
- if (defaultEncoding != null) {
- encoding = defaultEncoding;
- }
- // check for Ajax request to use UTF-8 encoding strictly http://www.w3.org/TR/XMLHttpRequest/#the-send-method
- if ("XMLHttpRequest".equals(request.getHeader("X-Requested-With"))) {
- encoding = "UTF-8";
- }
- Locale locale = null;
- if (defaultLocale != null) {
- locale = LocalizedTextUtil.localeFromString(defaultLocale, request.getLocale());
- }
- if (encoding != null) {
- applyEncoding(request, encoding);
- }
- if (locale != null) {
- response.setLocale(locale);
- }
- if (paramsWorkaroundEnabled) {
- request.getParameter("foo"); // simply read any parameter (existing or not) to "prime" the request
- }
- }
我们可以看到该方法只是简单的设置了encoding 和locale ,做的只是一些辅助的工作。
(2)prepare.createActionContext(request, response)
我们回到StrutsPrepareAndExecuteFilter的doFilter方法,看到第10行代码:prepare.createActionContext(request, response);这是action上下文的创建,ActionContext是一个容器,这个容易主要存储request、session、application、parameters等相关信 息.ActionContext是一个线程的本地变量,这意味着不同的action之间不会共享ActionContext,所以也不用考虑线程安全问 题。其实质是一个Map,key是标示request、session、……的字符串,值是其对应的对象,我们可以看到com.opensymphony.xwork2.ActionContext类中时如下定义的:
- static ThreadLocal<ActionContext> actionContext = new ThreadLocal<ActionContext>();
我们看下PrepareOperations类的createActionContext方法:
- public void prepare(HttpServletRequest request, HttpServletResponse response) {
- /**
- * Creates the action context and initializes the thread local
- */
- public ActionContext createActionContext(HttpServletRequest request, HttpServletResponse response) {
- ActionContext ctx;
- Integer counter = 1;
- Integer oldCounter = (Integer) request.getAttribute(CLEANUP_RECURSION_COUNTER);
- if (oldCounter != null) {
- counter = oldCounter + 1;
- }
- //此处是从ThreadLocal中获取此ActionContext变量
- ActionContext oldContext = ActionContext.getContext();
- if (oldContext != null) {
- // detected existing context, so we are probably in a forward
- ctx = new ActionContext(new HashMap<String, Object>(oldContext.getContextMap()));
- } else {
- ValueStack stack = dispatcher.getContainer().getInstance(ValueStackFactory.class).createValueStack();
- stack.getContext().putAll(dispatcher.createContextMap(request, response, null, servletContext));
- //stack.getContext()返回的是一个Map<String,Object>,根据此Map构造一个ActionContext
- ctx = new ActionContext(stack.getContext());
- }
- request.setAttribute(CLEANUP_RECURSION_COUNTER, counter);
- //将ActionContext存到ThreadLocal
- ActionContext.setContext(ctx);
- return ctx;
- }
上面第18行代码中dispatcher.createContextMap,如何封装相关参数:
- public Map<String,Object> createContextMap(HttpServletRequest request, HttpServletResponse response,
- ActionMapping mapping, ServletContext context) {
- // request map wrapping the http request objects
- Map requestMap = new RequestMap(request);
- // parameters map wrapping the http parameters. ActionMapping parameters are now handled and applied separately
- Map params = new HashMap(request.getParameterMap());
- // session map wrapping the http session
- Map session = new SessionMap(request);
- // application map wrapping the ServletContext
- Map application = new ApplicationMap(context);
- //requestMap、params、session等Map封装成为一个上下文Map
- Map<String,Object> extraContext = createContextMap(requestMap, params, session, application, request, response, context);
- if (mapping != null) {
- extraContext.put(ServletActionContext.ACTION_MAPPING, mapping);
- }
- return extraContext;
- }
(3)request = prepare.wrapRequest(request)
我们再次回到StrutsPrepareAndExecuteFilter的doFilter方法中,看到第15行:request = prepare.wrapRequest(request);这一句是对request进行包装的,我们看下prepare的wrapRequest方法:
- public HttpServletRequest wrapRequest(HttpServletRequest oldRequest) throws ServletException {
- HttpServletRequest request = oldRequest;
- try {
- // Wrap request first, just in case it is multipart/form-data
- // parameters might not be accessible through before encoding (ww-1278)
- request = dispatcher.wrapRequest(request, servletContext);
- } catch (IOException e) {
- throw new ServletException("Could not wrap servlet request with MultipartRequestWrapper!", e);
- }
- return request;
- }
我们看下dispatcher的wrapRequest:
- public HttpServletRequest wrapRequest(HttpServletRequest request, ServletContext servletContext) throws IOException {
- // don't wrap more than once
- if (request instanceof StrutsRequestWrapper) {
- return request;
- }
- String content_type = request.getContentType();
- //如果content_type是multipart/form-data类型,则将request包装成MultiPartRequestWrapper对象,否则包装成StrutsRequestWrapper对象
- if (content_type != null && content_type.contains("multipart/form-data")) {
- MultiPartRequest mpr = getMultiPartRequest();
- LocaleProvider provider = getContainer().getInstance(LocaleProvider.class);
- request = new MultiPartRequestWrapper(mpr, request, getSaveDir(servletContext), provider);
- } else {
- request = new StrutsRequestWrapper(request, disableRequestAttributeValueStackLookup);
- }
- return request;
- }
此次包装根据请求内容的类型不同,返回不同的对象,如果为multipart/form-data类型,则返回MultiPartRequestWrapper类型的对象,该对象服务于文件上传,否则返回StrutsRequestWrapper类型的对象,MultiPartRequestWrapper是StrutsRequestWrapper的子类,而这两个类都是HttpServletRequest接口的实现。
(4)ActionMapping mapping = prepare.findActionMapping(request, response, true)
包装request后,通过ActionMapper的getMapping()方法得到请求的Action,Action的配置信息存储在ActionMapping对象中,如StrutsPrepareAndExecuteFilter的doFilter方法中第16行:ActionMapping mapping = prepare.findActionMapping(request, response, true);我们找到prepare对象的findActionMapping方法:
- public ActionMapping findActionMapping(HttpServletRequest request, HttpServletResponse response, boolean forceLookup) {
- //首先从request对象中取mapping对象,看是否存在
- ActionMapping mapping = (ActionMapping) request.getAttribute(STRUTS_ACTION_MAPPING_KEY);
- //不存在就创建一个
- if (mapping == null || forceLookup) {
- try {
- //首先创建ActionMapper对象,通过ActionMapper对象创建mapping对象
- mapping = dispatcher.getContainer().getInstance(ActionMapper.class).getMapping(request, dispatcher.getConfigurationManager());
- if (mapping != null) {
- request.setAttribute(STRUTS_ACTION_MAPPING_KEY, mapping);
- }
- } catch (Exception ex) {
- dispatcher.sendError(request, response, servletContext, HttpServletResponse.SC_INTERNAL_SERVER_ERROR, ex);
- }
- }
- return mapping;
- }
下面是ActionMapper接口的实现类DefaultActionMapper的getMapping()方法的源代码:
- public ActionMapping getMapping(HttpServletRequest request, ConfigurationManager configManager) {
- ActionMapping mapping = new ActionMapping();
- //获得请求的uri,即请求路径URL中工程名以后的部分,如/userAction.action
- String uri = getUri(request);
- //修正url的带;jsessionid 时找不到的bug
- int indexOfSemicolon = uri.indexOf(";");
- uri = (indexOfSemicolon > -1) ? uri.substring(0, indexOfSemicolon) : uri;
- //删除扩展名,如.action或者.do
- uri = dropExtension(uri, mapping);
- if (uri == null) {
- return null;
- }
- //从uri中分离得到请求的action名、命名空间。
- parseNameAndNamespace(uri, mapping, configManager);
- //处理特殊的请求参数
- handleSpecialParameters(request, mapping);
- //如果允许动态方法调用,即形如/userAction!getAll.action的请求,分离action名和方法名
- return parseActionName(mapping);
- }
下面对getMapping方法中的重要部分一一讲解:
①:parseNameAndNamespace(uri, mapping, configManager)
我们主要看下第14行的parseNameAndNamespace(uri, mapping, configManager);这个方法的主要作用是分离出action名和命名空间:
- protected void parseNameAndNamespace(String uri, ActionMapping mapping, ConfigurationManager configManager) {
- String namespace, name;
- int lastSlash = uri.lastIndexOf("/"); //最后的斜杆的位置
- if (lastSlash == -1) {
- namespace = "";
- name = uri;
- } else if (lastSlash == 0) {
- // ww-1046, assume it is the root namespace, it will fallback to
- // default
- // namespace anyway if not found in root namespace.
- namespace = "/";
- name = uri.substring(lastSlash + 1);
- //允许采用完整的命名空间,即设置命名空间是否必须进行精确匹配
- } else if (alwaysSelectFullNamespace) {
- // Simply select the namespace as everything before the last slash
- namespace = uri.substring(0, lastSlash);
- name = uri.substring(lastSlash + 1);
- } else {
- // Try to find the namespace in those defined, defaulting to ""
- Configuration config = configManager.getConfiguration();
- String prefix = uri.substring(0, lastSlash); //临时的命名空间,将会用来进行匹配
- namespace = "";//将命名空间暂时设为""
- boolean rootAvailable = false;//rootAvailable作用是判断配置文件中是否配置了命名空间"/"
- // Find the longest matching namespace, defaulting to the default
- for (Object cfg : config.getPackageConfigs().values()) { //循环遍历配置文件中的package标签
- String ns = ((PackageConfig) cfg).getNamespace(); //获取每个package标签的namespace属性
- //进行匹配
- if (ns != null && prefix.startsWith(ns) && (prefix.length() == ns.length() || prefix.charAt(ns.length()) == '/')) {
- if (ns.length() > namespace.length()) {
- namespace = ns;
- }
- }
- if ("/".equals(ns)) {
- rootAvailable = true;
- }
- }
- name = uri.substring(namespace.length() + 1);
- // Still none found, use root namespace if found
- if (rootAvailable && "".equals(namespace)) {
- namespace = "/";
- }
- }
- if (!allowSlashesInActionNames) {
- int pos = name.lastIndexOf('/');
- if (pos > -1 && pos < name.length() - 1) {
- name = name.substring(pos + 1);
- }
- }
- //将分离后的acion名和命名空间保存到mapping对象
- mapping.setNamespace(namespace);
- mapping.setName(cleanupActionName(name));
- }
看到上面代码的第14行,参数alwaysSelectFullNamespace我们可以通过名字就能大概猜出来"允许采用完整的命名空间",即设置命名空间是否必须进行精确匹配,true必须,false可以模糊匹配,默认是false。进行精确匹配时要求请求url中的命名空间必须与配置文件中配置的某个命名空间必须相同,如果没有找到相同的则匹配失败。这个参数可通过struts2的"struts.mapper.alwaysSelectFullNamespace"常量配置,如:
- <constant name="struts.mapper.alwaysSelectFullNamespace" value="true" />
当alwaysSelectFullNamespace为true时,将uri以lastSlash为分割,左边的为namespace,右边的为name。如:http://localhost:8080/myproject/home/actionName!method.action,此时uri为/home/actionName!method.action(不过前面把后缀名去掉了,变成/home/actionName!method),lastSlash的,当前值是5,这样namespace为"/home", name为actionName!method。
②:parseActionName(mapping)
我们看到18行:return parseActionName(mapping);主要是用来处理形如/userAction!getAll.action的请求,分离action名和方法名:
- protected ActionMapping parseActionName(ActionMapping mapping) {
- if (mapping.getName() == null) {
- return null;
- }
- //如果允许动态方法调用
- if (allowDynamicMethodCalls) {
- // handle "name!method" convention.
- String name = mapping.getName();
- int exclamation = name.lastIndexOf("!");
- //如果包含"!"就进行分离
- if (exclamation != -1) {
- //分离出action名
- mapping.setName(name.substring(0, exclamation));
- //分离出方法名
- mapping.setMethod(name.substring(exclamation + 1));
- }
- }
- return mapping;
- }
到此为止getMapping方法已经分析结束了!
(5)execute.executeAction(request, response, mapping)
上面我们分析完了mapping的获取,继续看doFilter方法:
- //如果mapping为空,则认为不是调用action,会调用下一个过滤器链
- if (mapping == null) {
- //执行请求css,js文件。并返回是否成功。
- boolean handled = execute.executeStaticResourceRequest(request, response);
- if (!handled) {
- chain.doFilter(request, response);
- }
- } else {
- //执行action
- execute.executeAction(request, response, mapping);
- }
如果mapping对象不为空,则会执行action
- public void executeAction(HttpServletRequest request, HttpServletResponse response, ActionMapping mapping) throws ServletException {
- dispatcher.serviceAction(request, response, servletContext, mapping);
- }
我们可以看到它里面只是简单的调用了dispatcher的serviceAction方法:我们找到dispatcher的serviceAction方法:
- public void serviceAction(HttpServletRequest request, HttpServletResponse response, ActionMapping mapping)
- throws ServletException {
- //封转上下文环境,主要将requestMap、params、session等Map封装成为一个上下文Map
- Map<String, Object> extraContext = createContextMap(request, response, mapping);
- //如果之前没有值栈,就从ActionContext中先取出值栈,放入extraContext
- ValueStack stack = (ValueStack) request.getAttribute(ServletActionContext.STRUTS_VALUESTACK_KEY);
- boolean nullStack = stack == null;
- if (nullStack) {
- ActionContext ctx = ActionContext.getContext();
- if (ctx != null) {
- stack = ctx.getValueStack();
- }
- }
- if (stack != null) {
- extraContext.put(ActionContext.VALUE_STACK, valueStackFactory.createValueStack(stack));
- }
- String timerKey = "Handling request from Dispatcher";
- try {
- UtilTimerStack.push(timerKey);
- String namespace = mapping.getNamespace();//获得request请求里面的命名空间,即是struts.xml是的package节点元素
- String name = mapping.getName();//获得request请求里面的action名
- String method = mapping.getMethod();//要执行action的方法
- ActionProxy proxy = getContainer().getInstance(ActionProxyFactory.class).createActionProxy(namespace, name,
- method, extraContext, true, false);//获得action的代理
- request.setAttribute(ServletActionContext.STRUTS_VALUESTACK_KEY, proxy.getInvocation().getStack());
- // 如果action映射是直接就跳转到网页的话,
- if (mapping.getResult() != null) {
- Result result = mapping.getResult();
- result.execute(proxy.getInvocation());
- } else {
- proxy.execute();//这里就是执行action
- }
- if (!nullStack) {
- request.setAttribute(ServletActionContext.STRUTS_VALUESTACK_KEY, stack);
- }
- } catch (ConfigurationException e) {
- logConfigurationException(request, e);
- sendError(request, response, HttpServletResponse.SC_NOT_FOUND, e);
- } catch (Exception e) {
- if (handleException || devMode) {
- sendError(request, response, HttpServletResponse.SC_INTERNAL_SERVER_ERROR, e);
- } else {
- throw new ServletException(e);
- }
- } finally {
- UtilTimerStack.pop(timerKey);
- }
- }
1.根据传入的参数request, response, mapping来新建一个上下文Map。上下文Map就是一个存了关于RequestMap类,SessionMap类,ApplicationMap类等实例。即是request请求相关的信息,只是把他变成了对应的MAP类而以。
2.从request请求中找到对应的值栈(ValueStack)。如果没有就新建值栈。然后存放到上下文Map里面,对应的KEY为ActionContext.VALUE_STACK常量的值。即是"com.opensymphony.xwork2.util.ValueStack.ValueStack"。
3.从Mapping参数中提取对应的request请求的命名空间,action名字和方法名。
4.从Container容器中找到ActionProxyFactory类,并根据request请求的命名空间,action名字和方法名,上下文Map来获得对应的action代理类(ActionProxy)。然后更新request请求中的对应的值栈(ValueStack)。
5.根据Mapping参数来判断是否为直接输出结果。还是执行action代理类。
6.最后在判断之前是否request请求没有找到对应的值栈(ValueStack)。如果有找到值栈(ValueStack),则更新request请求中的对应的值栈(ValueStack)。
所以我们的目标很明确就是要去看一下action代理类(ActionProxy)。了解他到底做了什么。才能明白如何找到对应的action类,并执行对应的方法。从上面我们也知道action代理类的新建是通过ActionProxyFactory接口实例来进行的。即是DefaultActionProxyFactory类的实例。显然就是一个简章的工厂模式。让我们看一下新建action代理类的代码吧。
DefaultActionProxyFactory类:
- public ActionProxy createActionProxy(String namespace, String actionName, String methodName, Map<String, Object> extraContext, boolean executeResult, boolean cleanupContext) {
- ActionInvocation inv = createActionInvocation(extraContext, true);
- container.inject(inv);
- return createActionProxy(inv, namespace, actionName, methodName, executeResult, cleanupContext);
- }
Dispatcher类是重要的调结者,DefaultActionInvocation类是执行action类实例的行动者。而action代理类(ActionProxy类)则是他们之间的中间人。相当于Dispatcher类通过action代理类(ActionProxy类)命令DefaultActionInvocation类去执行action类实例。
DefaultActionProxyFactory类:
- public ActionProxy createActionProxy(ActionInvocation inv, String namespace, String actionName, String methodName, boolean executeResult, boolean cleanupContext) {
- DefaultActionProxy proxy = new DefaultActionProxy(inv, namespace, actionName, methodName, executeResult, cleanupContext);
- container.inject(proxy);
- proxy.prepare();
- return proxy;
- }
DefaultActionProxy类:
- protected void prepare() {
- String profileKey = "create DefaultActionProxy: ";
- try {
- UtilTimerStack.push(profileKey);
- config = configuration.getRuntimeConfiguration().getActionConfig(namespace, actionName);//根据空间命名和action名来找到对应的配置信息
- if (config == null && unknownHandlerManager.hasUnknownHandlers()) {
- config = unknownHandlerManager.handleUnknownAction(namespace, actionName);
- }
- if (config == null) {
- throw new ConfigurationException(getErrorMessage());
- }
- resolveMethod();//找到对应的方法名。
- if (config.isAllowedMethod(method)) {
- invocation.init(this);
- } else {
- throw new ConfigurationException(prepareNotAllowedErrorMessage());
- }
- } finally {
- UtilTimerStack.pop(profileKey);
- }
- }
1.获得ActionConfig类实例。并通过ActionConfig类实例找到对应的方法名。ActionConfig类就是存放配置文件里面的action元素节点的信息。
2.实初始化DefaultActionInvocation类的实例。即是根据ActionProxy类实例找到对应的action类实例(用户自己定义的类)。
DefaultActionProxy类:
- private void resolveMethod() {
- // 从配置中获得方法名。如果还是空的话,就用默认的值。即是"execute"方法。
- if (StringUtils.isEmpty(this.method)) {
- this.method = config.getMethodName();
- if (StringUtils.isEmpty(this.method)) {
- this.method = ActionConfig.DEFAULT_METHOD;
- }
- methodSpecified = false;
- }
- }
DefaultActionInvocation类:
- public void init(ActionProxy proxy) {
- this.proxy = proxy;
- Map<String, Object> contextMap = createContextMap();
- // Setting this so that other classes, like object factories, can use the ActionProxy and other
- // contextual information to operate
- ActionContext actionContext = ActionContext.getContext();
- if (actionContext != null) {
- actionContext.setActionInvocation(this);
- }
- createAction(contextMap);//找到对应的action类实例
- if (pushAction) {
- stack.push(action);
- contextMap.put("action", action);
- }
- invocationContext = new ActionContext(contextMap);
- invocationContext.setName(proxy.getActionName());
- createInterceptors(proxy);
- }
看了代码就能清楚的知道一件事情。如果我们在struts.xml配置文件里面action元素节点里面没有指定方法的时候,就用会默认的方法。即是execute方法。而关于init方法就能明确明白为了找到action类并实例他。init方法里面调用了俩个非重要的方法。一个是用于新建action类实例的方法createAction。一个是用于获得相关拦截器的方法createInterceptors。看一下代码吧。
DefaultActionInvocation类:
- protected void createAction(Map<String, Object> contextMap) {
- // load action
- String timerKey = "actionCreate: " + proxy.getActionName();
- try {
- UtilTimerStack.push(timerKey);
- action = objectFactory.buildAction(proxy.getActionName(), proxy.getNamespace(), proxy.getConfig(), contextMap);
- } catch (InstantiationException e) {
- throw new XWorkException("Unable to instantiate Action!", e, proxy.getConfig());
- } catch (IllegalAccessException e) {
- throw new XWorkException("Illegal access to constructor, is it public?", e, proxy.getConfig());
- } catch (Exception e) {
- String gripe;
- if (proxy == null) {
- gripe = "Whoa! No ActionProxy instance found in current ActionInvocation. This is bad ... very bad";
- } else if (proxy.getConfig() == null) {
- gripe = "Sheesh. Where'd that ActionProxy get to? I can't find it in the current ActionInvocation!?";
- } else if (proxy.getConfig().getClassName() == null) {
- gripe = "No Action defined for '" + proxy.getActionName() + "' in namespace '" + proxy.getNamespace() + "'";
- } else {
- gripe = "Unable to instantiate Action, " + proxy.getConfig().getClassName() + ", defined for '" + proxy.getActionName() + "' in namespace '" + proxy.getNamespace() + "'";
- }
- gripe += (((" -- " + e.getMessage()) != null) ? e.getMessage() : " [no message in exception]");
- throw new XWorkException(gripe, e, proxy.getConfig());
- } finally {
- UtilTimerStack.pop(timerKey);
- }
- if (actionEventListener != null) {
- action = actionEventListener.prepare(action, stack);
- }
- }
DefaultActionInvocation类:
- protected void createInterceptors(ActionProxy proxy) {
- // Get a new List so we don't get problems with the iterator if someone changes the original list
- List<InterceptorMapping> interceptorList = new ArrayList<>(proxy.getConfig().getInterceptors());
- interceptors = interceptorList.iterator();
- }
action代理类(ActionProxy类)的准备工作完成之后,就开始执行了。最顶部的代码中就很明确的看的出来(serviceAction方法)。先是根据参数mapping来判断是否为直接回返。如果不是才去执行action代理类(ActionProxy类)的execute方法。这便是action代理类(ActionProxy类)的主要工作。即是执行action请求。那么让我们看一下action代理类(ActionProxy类)的execute方法源码吧。
- public String execute() throws Exception {
- ActionContext nestedContext = ActionContext.getContext();
- ActionContext.setContext(invocation.getInvocationContext());
- String retCode = null;
- String profileKey = "execute: ";
- try {
- UtilTimerStack.push(profileKey);
- retCode = invocation.invoke();
- } finally {
- if (cleanupContext) {
- ActionContext.setContext(nestedContext);
- }
- UtilTimerStack.pop(profileKey);
- }
- return retCode;
- }
从红色的代码部分我们就知道就是去执行DefaultActionInvocation类实例的invoke方法
DefaultActionInvocation类:
- public String invoke() throws Exception {
- String profileKey = "invoke: ";
- try {
- UtilTimerStack.push(profileKey);
- if (executed) {
- throw new IllegalStateException("Action has already executed");
- }
- if (interceptors.hasNext()) {//获得一个拦截器
- final InterceptorMapping interceptor = interceptors.next();
- String interceptorMsg = "interceptor: " + interceptor.getName();
- UtilTimerStack.push(interceptorMsg);
- try {
- resultCode = interceptor.getInterceptor().intercept(DefaultActionInvocation.this);//执行拦截器
- } finally {
- UtilTimerStack.pop(interceptorMsg);
- }
- } else {
- resultCode = invokeActionOnly();
- }
- // this is needed because the result will be executed, then control will return to the Interceptor, which will
- // return above and flow through again
- if (!executed) {
- if (preResultListeners != null) {
- LOG.trace("Executing PreResultListeners for result [{}]", result);
- for (Object preResultListener : preResultListeners) {
- PreResultListener listener = (PreResultListener) preResultListener;
- String _profileKey = "preResultListener: ";
- try {
- UtilTimerStack.push(_profileKey);
- listener.beforeResult(this, resultCode);
- }
- finally {
- UtilTimerStack.pop(_profileKey);
- }
- }
- }
- // now execute the result, if we're supposed to
- if (proxy.getExecuteResult()) {
- executeResult();
- }
- executed = true;
- }
- return resultCode;
- }
- finally {
- UtilTimerStack.pop(profileKey);
- }
- }
上面的红色的代码是这个方法的核心点之一。让我们看一下红色代码做什么?判断interceptors是否有拦截器。如果没有就直接执行invokeActionOnly方法。即是执行action类实例对应的方法。如果有就获得拦截器并执行拦截器(执行intercept方法)。好了。关键点就在这个执行拦截器身上。即是执行intercept方法。intercept方法有一个参数就是DefaultActionInvocation类的接口。这个参数让struts2的AOP思想能够进行。为什么这样子讲呢?不清楚读者有没有想过。为什么这边判断拦截器是用if而不是用for 或是 while呢?必竟拦截器不只一个。我们都清楚AOP的目标就是让业务模块选择对应的切面。那么就有可能存在多个拦截器。这也是为什么亮点的原因了。看一下拦截器的代码就知道了。如下
LoggingInterceptor类:
- public String intercept(ActionInvocation invocation) throws Exception {
- logMessage(invocation, START_MESSAGE);
- String result = invocation.invoke();
- logMessage(invocation, FINISH_MESSAGE);
- return result;
- }
拦截器开始的时候,执行相关的拦截器逻辑,然后又重新调用DefaultActionInvocation类的invoke方法。从而获得下一个拦截器。就是这样子下一个拦截器又开始执行自己的intercept方法。做了相关的拦截器逻辑之后。又一次重新调用DefaultActionInvocation类的invoke方法。又做了相似的工作。只到没有了拦截器,执行用户action类实例的方法并返回结果。有了结果之后,就开始续继执行当前上一个拦截器的后半部分代码。直到返回到最开始的拦截器执行后半部分的代码。
Struts2 源码分析-----工作原理分析的更多相关文章
- Spring Cloud Netflix Eureka源码导读与原理分析
Spring Cloud Netflix技术栈中,Eureka作为服务注册中心对整个微服务架构起着最核心的整合作用,因此对Eureka还是有很大的必要进行深入研究. 本文主要分为四部分,一是对项目构建 ...
- Struts2 源码分析——Action代理类的工作
章节简言 上一章笔者讲到关于如何加载配置文件里面的package元素节点信息.相信读者到这里心里面对struts2在启动的时候加载相关的信息有了一定的了解和认识.而本章将讲到关于struts2启动成功 ...
- Spring Boot 揭秘与实战 源码分析 - 工作原理剖析
文章目录 1. EnableAutoConfiguration 帮助我们做了什么 2. 配置参数类 – FreeMarkerProperties 3. 自动配置类 – FreeMarkerAutoCo ...
- Struts2 源码分析——过滤器(Filter)
章节简言 上一章笔者试着建一个Hello world的例子.是一个空白的struts2例子.明白了运行struts2至少需要用到哪一些Jar包.而这一章笔者将根据前面章节(Struts2 源码分析—— ...
- Tomcat源码分析——请求原理分析(上)
前言 谈起Tomcat的诞生,最早可以追溯到1995年.近20年来,Tomcat始终是使用最广泛的Web服务器,由于其使用Java语言开发,所以广为Java程序员所熟悉.很多人早期的J2EE项目,由程 ...
- Struts2 源码分析——DefaultActionInvocation类的执行action
本章简言 上一章讲到关于拦截器的机制的知识点,让我们对拦截器有了一定的认识.我们也清楚的知道在执行用户action类实例之前,struts2会先去执行当前action类对应的拦截器.而关于在哪里执行a ...
- Struts2 源码分析——拦截器的机制
本章简言 上一章讲到关于action代理类的工作.即是如何去找对应的action配置信息,并执行action类的实例.而这一章笔者将讲到在执行action需要用到的拦截器.为什么要讲拦截器呢?可以这样 ...
- Struts2 源码分析——配置管理之PackageProvider接口
本章简言 上一章讲到关于ContainerProvider的知识.让我们知道struts2是如何注册相关的数据.也知道如何加载相关的配置信息.本章笔者将讲到如何加载配置文件里面的package元素节点 ...
- Struts2 源码分析——配置管理之ContainerProvider接口
本章简言 上一章笔者讲到关于Dispatcher类的执行action功能,知道了关于执行action需要用到的信息.而本章将会讲到的内容也跟Dispatcher类有关系.那就是配置管理中的Contai ...
随机推荐
- php简单实现通讯录采集,我的第一个php,适合新手
起源于要整理通讯录,原先用的是文件调查,现在学了php,就自己试一下.程序短小精悍,适于学习.有两个文件,bj.html用于显示和采集表单信息.bj.php用于处理数据和反馈结果.突出之处在于可以上传 ...
- plsql点击不再提示后需重新提示
工具--首选项---用户界面---选项---DSA对话框---内容如下 ;显示含有“不再显示这个信息”的对话框;你可以删除用于你要启用的信息的行 CharSetMismatch@RIM40=1Char ...
- python 正则表达式(一)
正则表达式(简称RE)本质上可以看作一个小的.高度专业化的编程语言,在Python中可以通过re模块使用它.使用正则表达式,你需要为想要匹配的字符串集合指定一套规则,字符串集合可以包含英文句子.e-m ...
- Java中常见的集合框架
1. 一.collection (有序)接口的实现的接口 set list 其中set接口的实现类是HashSet,List接口的实现类是ArrayList.LinkList.Vector 二.Ma ...
- Silk codec的一些资料
Skype表示它最近将开始向第三方开发人员和硬件制造商提供免版税认证(RF)的Silk宽带音频编码器. Silk下载地址如下 http://developer.skype.com/silk/SILK_ ...
- [转]CSS遮罩——如何在CSS中使用遮罩
特别声明:此篇文章由D姐根据Christian Schaefer的英文文章原名<CSS Masks – How To Use Masking In CSS Now>进行翻译,整个译文带有我 ...
- Docker容器里的进程为什么要前台运行
<第一本Docker书>里面,讲到Docker容器启动web服务时,都指定了前台运行的参数,例如apache: ENTRYPOINT [ "/usr/sbin/apache2&q ...
- c++11中用_sntprintf代替_stprintf
sprintf.swprintf 分别是对单字节/双字节字符格式化的,wsprintf根据预定义指示符的不同可以对单字节/双字节字符格式化. wsprintf和swprintf比较,其实这两个函数对用 ...
- n文件的上传和下载,struts2和springmvc
首先,struts2的上传下载的配置 因为struts2是配置的上传的拦截器,很简单的步揍就可以上传, 首先是配置struts的action映射 <!-- 4. 修改上传文件的最大大小为30M ...
- 【转】 Pro Android学习笔记(六七):HTTP服务(1):HTTP GET
目录(?)[-] HTTP GET小例子 简单小例子 出现异常NetworkOnMainThreadException 通过StrictMode进行处理 URL带键值对 Andriod应用可利用ser ...