Spring容器启动源码解析
1. 前言
最近搭建的工程都是基于SpringBoot,简化配置的感觉真爽。但有个以前的项目还是用SpringMvc写的,看到满满的配置xml文件,却有一种想去深入了解的冲动。折腾了好几天,决心去写这篇关于Spring启动的博客,自己是个刚入职的小白,技术水平有限,也是硬着头皮看源码去Debug,很多不懂的地方还请谅解!
2. 概述
先给出几个让我头皮发麻的概念:web容器,Spring容器,SpringMvc容器
容器就是管理对象的地方,例如web容器就是管理servlet的地方,Spring容器就是管理Service,dao等Bean的地方,SpringMvc就是管理Controller等bean的地方(下文会做解释)。一个SpringMvc项目的启动离不开上述三个容器。所以这就是这篇文章的讲点,各个容器的启动过程解析。
3. Web容器初始化过程
官方文档是对于Web容器初始化时是这样描述的(英文不懂,已翻译成中文)
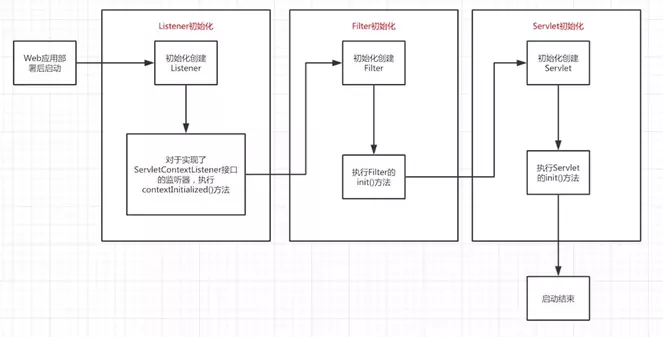
1. 部署描述文件(web.xml)中的<listener>标记的监听器会被创建和初始化
2. 对于实现了ServletContextListener的监听器,会执行它的初始化方法 contextInitialized()
3. 部署描述文件中的<filter>标记的过滤器会被创建和初始化,调用其init()方法
4. 部署描述文件中的<servlet>标记的servlet会根据<load-on-startup>中的序号创建和初始化,调用init()方法

大致流程了解之后,结合自己的SpringMvc项目一步步深入,先贴一下基本的web.xml文件
<?xml version="1.0" encoding="UTF-8"?>

<web-app xmlns:xsi="http://www.w3.org/2001/XMLSchema-instance" xmlns:web="http://java.sun.com/xml/ns/javaee" xmlns="http://java.sun.com/xml/ns/javaee" xsi:schemaLocation="http://java.sun.com/xml/ns/javaee http://java.sun.com/xml/ns/javaee/web-app_2_5.xsd" id="WebApp_ID" version="2.5">

  <display-name>dmpserver</display-name>

  <welcome-file-list>

    <welcome-file>login.jsp</welcome-file>

  </welcome-file-list>

  <context-param>

    <param-name>contextConfigLocation</param-name>

    <param-value>classpath:spring.xml</param-value>

  </context-param>

  <context-param>

    <param-name>log4jConfigLocation</param-name>

    <param-value>classpath:log4jConfig.xml</param-value>

  </context-param>

  <filter>

    <filter-name>encodingFilter</filter-name>

    <filter-class>org.springframework.web.filter.CharacterEncodingFilter</filter-class>

    <init-param>

      <param-name>encoding</param-name>

      <param-value>utf-8</param-value>

    </init-param>

  </filter>

  <filter-mapping>

    <filter-name>encodingFilter</filter-name>

    <url-pattern>/*</url-pattern>

  </filter-mapping>

  <listener>

    <listener-class>org.springframework.web.context.ContextLoaderListener</listener-class>

  </listener>

   <listener>

    <listener-class>org.springframework.web.util.Log4jConfigListener</listener-class>

  </listener>

  <servlet>

    <description>spring mvc servlet</description>

    <servlet-name>rest</servlet-name>

    <servlet-class>org.springframework.web.servlet.DispatcherServlet</servlet-class>

    <init-param>

        <param-name>contextConfigLocation</param-name>

        <param-value>

            classpath:spring-mvc.xml

        </param-value>

    </init-param>

    <load-on-startup>1</load-on-startup>

  </servlet>

</web-app>
1. 容器会先解析<context-param>中的键值对(上述代码重点关注Spring配置文件Spring.xml)
2. 容器创建一个application内置对象servletContext(可以理解为servlet上下文或web容器),用于全局变量共享
3. 将解析的<context-param>键值对存放在application即servletContext中
4. 读取<listener>中的监听器,一般会使用ContextLoaderListener类,调用其contextInitialized方法,创建IOC容器(Spring容器)webApplicationContext。将webApplication容器放入application(servlet上下文)中作为根IOC容器,键名为WebApplicationContext.ROOT_WEB_APPLICATION_CONTEXT_ATTRIBUTE 注意的是,webApplicationContext是全局唯一的,一个web应用只能有一个根IOC容器。因为这个根IOC容器是读取<context-param>配置的键值对来创建Bean,这个根IOC容器只能访问spring.xml中配置的Bean,我们在Spring.xml中一般配置的是service,dao等Bean。所以根IOC容器(Spring容器)只能管理service,dao等Bean
5. listener加载完毕后,加载filter过滤器
6. 加载servlet,一般springMvc项目中会优先加载 DispatcherServlet(现在开始加载SpringMvc容器了)
7. DispatcherServlet的父类FrameworkServlet重写了其父类的initServletBean()方法,在初始化时调用initWebApplicationContext()方法和onRefresh()方法
8. initWebApplicationContext()方法会在servletContext(即当前servlet上下文)创建一个子IOC容器(即SpringMvc容器),如果存在上述的根IOC容器,就设置根IOC容器作为父容器,如果不存在,就将父容器设置为NULL
9. 读取<servlet>标签的<init-param>配置的xml文件并加载相关Bean。此时加载的是Spring-mvc.xml配置文件,管理的是Controller等Bean
10. onRefresh()加载其他组件
4. 启动过程分析
4.1 listener初始化Spring容器
tomcat启动后,<context-param>标签的内容读取后会被放进application中,做为Web应用的全局变量使用,接下来创建listener时会使用到这个全局变量,因此,Web应用在容器中部署后,进行初始化时会先读取这个全局变量,之后再进行上述讲解的初始化启动过程。
查看ContextLoaderListener源码
public class ContextLoaderListener extends ContextLoader implements ServletContextListener {

    public ContextLoaderListener() {

    }

    public ContextLoaderListener(WebApplicationContext context) {

        super(context);

    }

    public void contextInitialized(ServletContextEvent event) {

        this.initWebApplicationContext(event.getServletContext());

    }

    public void contextDestroyed(ServletContextEvent event) {

        this.closeWebApplicationContext(event.getServletContext());

        ContextCleanupListener.cleanupAttributes(event.getServletContext());

    }

}
据官方文档说明,实现ServletContextListener接口,执行contextInitialized(),进入initWebApplicationContext方法。contextInitialized()和contextDestroyed()方法会在web容器启动或销毁时执行。网上查了下此处设计模式用到的是观察者模式和代理模式,自己也不懂就不做详解了
查看ContextLoader.class中的initWebApplicationContext方法
public WebApplicationContext initWebApplicationContext(ServletContext servletContext) {

        /*

        首先通过WebApplicationContext.ROOT_WEB_APPLICATION_CONTEXT_ATTRIBUTE

        这个String类型的静态变量获取一个根IoC容器,根IoC容器作为全局变量

        存储在application对象中,如果存在则有且只能有一个

        如果在初始化根WebApplicationContext即根IoC容器时发现已经存在

        则直接抛出异常,因此web.xml中只允许存在一个ContextLoader类或其子类的对象

        */

        if (servletContext.getAttribute(WebApplicationContext.ROOT_WEB_APPLICATION_CONTEXT_ATTRIBUTE) != null) {

            throw new IllegalStateException("Cannot initialize context because there is already a root application context present - check whether you have multiple ContextLoader* definitions in your web.xml!");

        } else {

            Log logger = LogFactory.getLog(ContextLoader.class);

            servletContext.log("Initializing Spring root WebApplicationContext");

            if (logger.isInfoEnabled()) {

                logger.info("Root WebApplicationContext: initialization started");

            }

            long startTime = System.currentTimeMillis();

            try {

                if (this.context == null) {

                    // 创建一个根IOC容器

                    this.context = this.createWebApplicationContext(servletContext);

                }

                if (this.context instanceof ConfigurableWebApplicationContext) {

                    ConfigurableWebApplicationContext cwac = (ConfigurableWebApplicationContext)this.context;

                    if (!cwac.isActive()) {

                        if (cwac.getParent() == null) {

                            // 为根IOC容器设置一个父容器

                            ApplicationContext parent = this.loadParentContext(servletContext);

                            cwac.setParent(parent);

                        }

                        this.configureAndRefreshWebApplicationContext(cwac, servletContext);

                    }

                }

                //将创建好的IoC容器放入到application对象中,并设置key为WebApplicationContext.ROOT_WEB_APPLICATION_CONTEXT_ATTRIBUTE

                servletContext.setAttribute(WebApplicationContext.ROOT_WEB_APPLICATION_CONTEXT_ATTRIBUTE, this.context);

                ClassLoader ccl = Thread.currentThread().getContextClassLoader();

                if (ccl == ContextLoader.class.getClassLoader()) {

                    currentContext = this.context;

                } else if (ccl != null) {

                    currentContextPerThread.put(ccl, this.context);

                }

                if (logger.isDebugEnabled()) {

                    logger.debug("Published root WebApplicationContext as ServletContext attribute with name [" + WebApplicationContext.ROOT_WEB_APPLICATION_CONTEXT_ATTRIBUTE + "]");

                }

                if (logger.isInfoEnabled()) {

                    long elapsedTime = System.currentTimeMillis() - startTime;

                    logger.info("Root WebApplicationContext: initialization completed in " + elapsedTime + " ms");

                }

                return this.context;

            } catch (RuntimeException var8) {

                logger.error("Context initialization failed", var8);

                servletContext.setAttribute(WebApplicationContext.ROOT_WEB_APPLICATION_CONTEXT_ATTRIBUTE, var8);

                throw var8;

            } catch (Error var9) {

                logger.error("Context initialization failed", var9);

                servletContext.setAttribute(WebApplicationContext.ROOT_WEB_APPLICATION_CONTEXT_ATTRIBUTE, var9);

                throw var9;

            }

        }

    }
initWebApplicationContext方法的主要目的是创建一个根IOC容器,并放入servlet上下文中。看上述源码可知,根IOC容器只能仅有一个,作为全局变量存储在servletContext中。将根IoC容器放入到application对象之前进行了IoC容器的配置和刷新操作,调用了configureAndRefreshWebApplicationContext()方法,该方法源码如下:
protected void configureAndRefreshWebApplicationContext(ConfigurableWebApplicationContext wac, ServletContext sc) {

        String configLocationParam;

        if (ObjectUtils.identityToString(wac).equals(wac.getId())) {

            configLocationParam = sc.getInitParameter("contextId");

            if (configLocationParam != null) {

                wac.setId(configLocationParam);

            } else {

                wac.setId(ConfigurableWebApplicationContext.APPLICATION_CONTEXT_ID_PREFIX + ObjectUtils.getDisplayString(sc.getContextPath()));

            }

        }

        wac.setServletContext(sc);

        /*

            在容器启动时,会把<context-param>中的内容放入servlet上下文的全局变量中,

            此时获取key为contextConfigLocation的变量,及Spring.xml配置文件

            将其放入到webApplicationContext中

        */

        configLocationParam = sc.getInitParameter("contextConfigLocation");

        if (configLocationParam != null) {

            wac.setConfigLocation(configLocationParam);

        }

        ConfigurableEnvironment env = wac.getEnvironment();

        if (env instanceof ConfigurableWebEnvironment) {

            ((ConfigurableWebEnvironment)env).initPropertySources(sc, (ServletConfig)null);

        }

        this.customizeContext(sc, wac);

        wac.refresh();

    }
configureAndRefreshWebApplicationContext方法比较重要的是把配置文件信息放入根IOC容器中。方法最后调用了refresh()方法,对配置文件信息(Bean)进行加载。因为refresh()这是个ConfigurableApplication-Context接口方法,想到了它的常用实现类ClassPathXmlApplicationContext,一层层进去找到了Abstract-ApplicationContext,实现了refresh(),见如下源码:
public void refresh() throws BeansException, IllegalStateException {

        Object var1 = this.startupShutdownMonitor;

        synchronized(this.startupShutdownMonitor) {

            this.prepareRefresh();

            ConfigurableListableBeanFactory beanFactory = this.obtainFreshBeanFactory();

            this.prepareBeanFactory(beanFactory);

            try {

                this.postProcessBeanFactory(beanFactory);

                this.invokeBeanFactoryPostProcessors(beanFactory);

                this.registerBeanPostProcessors(beanFactory);

                this.initMessageSource();

                this.initApplicationEventMulticaster();

                this.onRefresh();

                this.registerListeners();

                this.finishBeanFactoryInitialization(beanFactory);

                this.finishRefresh();

            } catch (BeansException var9) {

                if (this.logger.isWarnEnabled()) {

                    this.logger.warn("Exception encountered during context initialization - cancelling refresh attempt: " + var9);

                }

                this.destroyBeans();

                this.cancelRefresh(var9);

                throw var9;

            } finally {

                this.resetCommonCaches();

            }

        }

    }
该方法主要用于创建并初始化contextConfigLocation类配置的xml文件中的Bean,因此,如果我们在配置Bean时出错,在Web应用启动时就会抛出异常,而不是等到运行时才抛出异常。因为技术能力有限加上此处方法太多,就不在一一解析了。到此为止,整个Spring容器加载完毕,下面开始加载SpringMVC容器
4.2 Filter初始化
因为Filter的操作没有涉及IOC容器,此处不做详解,上面web.xml中配置的是一个UTF8编码过滤器
5. 总结
时间有限,只大致介绍了Spring容器的初始化,后面还没来得及整理,对于springMvc容器的创建和初始化下篇文章见
Spring容器启动源码解析的更多相关文章
- Spring容器启动源码分析
1. 前言 最近搭建的工程都是基于SpringBoot,简化配置的感觉真爽.但有个以前的项目还是用SpringMvc写的,看到满满的配置xml文件,却有一种想去深入了解的冲动.折腾了好几天,决心去写这 ...
- Spring Boot 启动源码解析结合Spring Bean生命周期分析
转载请注明出处: 1.SpringBoot 源码执行流程图 2. 创建SpringApplication 应用,在构造函数中推断启动应用类型,并进行spring boot自动装配 public sta ...
- Spring Security 解析(七) —— Spring Security Oauth2 源码解析
Spring Security 解析(七) -- Spring Security Oauth2 源码解析 在学习Spring Cloud 时,遇到了授权服务oauth 相关内容时,总是一知半解,因 ...
- Feign 系列(05)Spring Cloud OpenFeign 源码解析
Feign 系列(05)Spring Cloud OpenFeign 源码解析 [TOC] Spring Cloud 系列目录(https://www.cnblogs.com/binarylei/p/ ...
- spring boot @Value源码解析
Spring boot 的@Value只能用于bean中,在bean的实例化时,会给@Value的属性赋值:如下面的例子: @SpringBootApplication @Slf4j public c ...
- 异步任务spring @Async注解源码解析
1.引子 开启异步任务使用方法: 1).方法上加@Async注解 2).启动类或者配置类上@EnableAsync 2.源码解析 虽然spring5已经出来了,但是我们还是使用的spring4,本文就 ...
- Spring @Import注解源码解析
简介 Spring 3.0之前,创建Bean可以通过xml配置文件与扫描特定包下面的类来将类注入到Spring IOC容器内.而在Spring 3.0之后提供了JavaConfig的方式,也就是将IO ...
- Spring Security 访问控制 源码解析
上篇 Spring Security 登录校验 源码解析 分析了使用Spring Security时用户登录时验证并返回token过程,本篇分析下用户带token访问时,如何验证用户登录状态及权限问 ...
- SpringMvc启动源码解析
1. 前言 上篇文章介绍了Spring容器的初始化https://www.cnblogs.com/xiaobingblog/p/11738747.html,接下来介绍SpringMvc容器的初始化 2 ...
随机推荐
- elasticsearch document的索引过程分析
elasticsearch专栏:https://www.cnblogs.com/hello-shf/category/1550315.html 一.预备知识 1.1.索引不可变 看到这篇文章相信大家都 ...
- SpringBoot启动zipkin-server报错Error creating bean with name ‘armeriaServer’ defined in class path resource
目前,GitHub 上最新 release 版本是 Zipkin 2.12.9,从 2.12.6 版本开始有个较大的更新,迁移使用 Armeria HTTP 引擎. 从此版本开始,若直接添加依赖的 S ...
- Docker学习之docker架构
docker架构 解释 1.docker命令提交给docker daemon进行处理,可以拖取镜像,运行容器等等. 2.最右边的实际上是互联网的sass服务,docker daemon可以和Regis ...
- 微服务SpringCloud之zipkin链路追踪
随着业务发展,系统拆分导致系统调用链路愈发复杂一个前端请求可能最终需要调用很多次后端服务才能完成,当整个请求变慢或不可用时,我们是无法得知该请求是由某个或某些后端服务引起的,这时就需要解决如何快读定位 ...
- C++中类型强制转换
C++中强制类型转换有四种: 1.static_cast 格式:static_cast<Type>(Value); --用于基本类型间的转换,但不能用于基本类型指针间的转换: int i ...
- 【深度学习】Focal Loss 与 GHM——解决样本不平衡问题
Focal Loss 与 GHM Focal Loss Focal Loss 的提出主要是为了解决难易样本数量不平衡(注意:这有别于正负样本数量不均衡问题)问题.下面以目标检测应用场景来说明. 一些 ...
- hadoop之mapreduce详解(进阶篇)
上篇文章hadoop之mapreduce详解(基础篇)我们了解了mapreduce的执行过程和shuffle过程,本篇文章主要从mapreduce的组件和输入输出方面进行阐述. 一.mapreduce ...
- maven war包打包去除jar包瘦身
1.pom文件配置 <!-- war包 --> <plugin> <groupId>org.apache.maven.plugins</groupId> ...
- tomcat设置指定jdk版本
windows 1.解压下载的tomcat; 2.找到bin下的setclasspath.bat文件:在文件的开始出添加如下代码来设定JAVA_HOME和JRE_HOME的路径: set JAVA_H ...
- Linux 文件复制命令cp
文件复制命令cp 命令格式:cp [-adfilprsu] 源文件(source) 目标文件(destination) cp [option] source1 source2 source3 ... ...
