2.Ansible Playbook剧本
1.playbook?playbook翻译过来就是“剧本”,那playbook组成如下
play: 定义的是主机的角色task: 定义的是具体执行的任务playbook: 由一个或多个play组成,一个play可以包含多个task任务简单理解为: 使用不同的模块完成一件事情通俗理解playbook?- playbook 剧本 <---文件 YAML- play 找谁 明星 找那个主机 web01- task 做什么 干什么事情 yum copy service- 找多个明星,做多件事情- 找一个明星,做多件事情
2.playbook的优势
1.功能比ad-hoc更全2.能很好的控制先后执行顺序, 以及依赖关系3.语法展现更加的直观4.ad-hoc无法持久使用,playbook可以持久使用
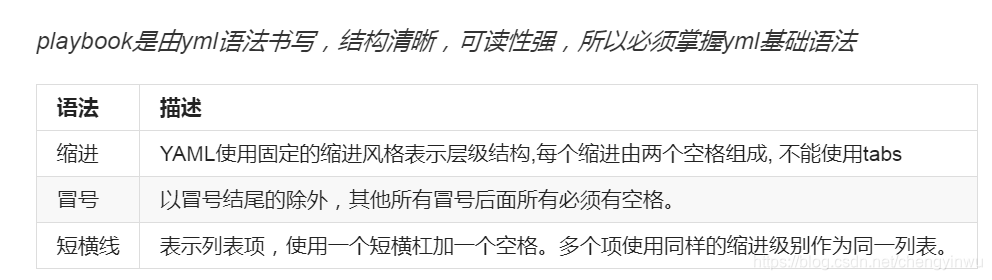
3.playbook的配置语法是由yaml语法描述的,扩展名是yaml
缩进YAML使用固定的缩进风格表示层级结构,每个缩进由两个空格组成, 不能使用tabs冒号以冒号结尾的除外,其他所有冒号后面所有必须有空格。短横线表示列表项,使用一个短横杠加一个空格。多个项使用同样的缩进级别作为同一列表Playbook执行结果返回颜色状态:红色: 表示有task执行失败或者提醒的信息黄色:表示执行了且改变了远程主机状态绿色:表示执行成功
4.使用playbook编写一个创建文件的yml
创建一个文件---》两种方法[root@manager project1]# cat f1.yml- hosts: webserverstasks:- name: Create New Filefile: path=/tmp/123.txt state=touch owner=root group=root mode=600- name: Create New File2file:path: /tmp/456.txtstate: touchowner: rootgroup: rootmode: 0666
案例一、使用ansible安装并配置nfs服务
---》172.16.1.31 nfs---》172.16.1.7 clinet---》172.16.1.8 clinet#1.新增一台nfs服务器[root@manager project1]# cat hosts[nfsservers]172.16.1.31[webservers]172.16.1.7172.16.1.8下发公钥至存储服务器[root@manager project1]# ssh-copy-id -i ~/.ssh/id_rsa.pub root@172.16.1.31#2.测试三台主机是否通[root@manager project1]# ansible all -m ping -i hosts#3.编写一个nfs-server的yml1.安装nfs yum2.配置nfs copy3.初始化环境用户 group user目录 file授权 file4.启动服务 systemd[root@manager project1]# cat nfs_server.yml- hosts: nfsserverstasks:- name: Installed NFS Serveryum:name: nfs-utilsstate: present- name: Configure NFS Servercopy:src: ./file/exports.j2dest: /etc/exportsowner: rootgroup: rootmode: 0644backup: yes- name: Create NFS Group wwwgroup:name: wwwgid: 666- name: Create NFS User wwwuser:name: wwwgroup: wwwuid: 666create_home: noshell: /sbin/nologin- name: Create NFS Share Directoryfile:path: /ansible_datastate: directoryowner: wwwgroup: wwwmode: 0755recurse: yes- name: Systemd NFS Serversystemd:name: nfsstate: restartedenabled: yes#4.编写一个nfs-clinet的yml[root@manager project1]# cat nfs_client.yml- hosts: webserverstasks:- name: Mount NFS Server share directorymount:src: 172.16.1.31:/ansible_datapath: /mntfstype: nfsopts: defaultsstate: mounted
案例二、使用ansible安装并配置nginx服务
1.安装 yum2.配置 copy3.启动 systmd4.触发重启 handlers[root@manager project1]# cat nginx.yml- hosts: webserverstasks:- name: Installed Nginx Serveryum:name: nginxstate: present- name: Configure Nginx Servercopy:src: ./file/nginx.conf.j2dest: /etc/nginx/nginx.confowner: rootgroup: rootmode: 0644backup: yesnotify: Restart Nginx Server- name: Systmd nginx Serversystemd:name: nginxstate: startedenabled: yeshandlers:- name: Restart Nginx Serversystemd:name: nginxstate: restarted
案例三:使用AnsiblePlaybook方式构建LAP架构,具体操作步骤如下:
1.使用yum安装 httpd、php、firewalld等 7.1 5.32.使用get_url下载http://fj.xuliangwei.com/public/index.php文件3.启动httpd、firewalld、等服务4.添加防火墙规则,放行http的流量#1.配置主机清单[root@manager project1]# cat hosts[nfsservers]172.16.1.31[backupservers]172.16.1.41[web:children]nfsserversbackupservers[webservers]172.16.1.7172.16.1.8#2.lamp剧本具体配置[root@manager project1]# cat lamp.yml- hosts: webtasks:- name: Installed Httpd Server //1.安装httpdyum:name: httpdstate: present- name: Installed PHP Server //2.安装PHPyum:name: phpstate: present- name: Configure Httpd WebSite //3.配置站点get_url:url: http://fj.xuliangwei.com/public/index.phpdest: /var/www/html/index.phpmode: 0644- name: Systemd Httpd Server //4.启动http服务systemd:name: httpdstate: started- name: Systemd Firewalld Server //5.启动防火墙firewalldsystemd:name: firewalldstate: started- name: Configure Firewalld Rule //6.放行httpfirewalld:service: httpstate: enabled
案例四、搭建可道云网盘 31 41 apache+php
1.安装 apache+php2,下载代码3.启动 systemd4.下载代码 wget 解压[root@manager project1]# cat kod.yml- hosts: webtasks:- name: Installed Httpd Serveryum:name: httpdstate: present- name: Installed PHP Serveryum:name: phpstate: present- name: Get kodcloud codesynchronize:src: ./file/koddest: /var/www/html/kodcloud- name: Chmod kodcloudfile:path: /var/www/htmlowner: rootgroup: rootmode: 0777recurse: yes- name: Systemd Httpd Serversystemd:name: httpdstate: restarted
案例五: Nginx+PHP 搭建可道云
先手动实现,其次再写剧本- 1.配置yum源 nginx php- 2.安装软件包 (循环的方式)- nginx php71w- 3.创建用户 www 统一UID和GID- 4.配置nginx.conf配置文件,修改启用用户为www- 5.配置php的权限 /etc/php-fpm.d/www.conf- 6.添加虚拟主机 /etc/nginx/conf.d/xx.conf- 7.创建网站的站点目录- 8.传输代码至站点目录- 9.启动nginx和php- 10.修改配置还需要能够实现自动重启剧本配置如下:[root@manager project1]# cat lnp.yml- hosts: webserverstasks:#1.配置nginx源- name: Installed Nginx repoyum_repository:name: nginxdescription: nginx repobaseurl: http://nginx.org/packages/centos/$releasever/$basearch/gpgcheck: no#2.配置php源- name: Installed PHP repoyum_repository:name: phpdescription: webtatic-phpbaseurl: http://192.168.0.128/phpgpgcheck: no#3.安装nginx和php软件- name: Installed Nginx and PHP Packagesyum:name: "{{ packages }}"vars:packages:- nginx- php71w- php71w-cli- php71w-common- php71w-devel- php71w-gd- mod_php71w- php71w-fpm- php71w-opcache#4.创建属组www- name: Create Group wwwgroup:name: wwwgid: 666#5.创建属主www- name: Create User wwwuser:name: wwwgroup: wwwuid: 666create_home: noshell: /sbin/nologin#6.管理nginx配置文件- name: Configure Nginx.confcopy:src: ./file/nginx.conf.j2dest: /etc/nginx/nginx.confnotify: Restart Nginx Server#7.管理php-fpm配置文件- name: Configure php-fpm.confcopy:src: ./file/php-www.conf.j2dest: /etc/php-fpm.d/www.confnotify: Restart PHP-fpm Server#8.创建虚拟主机- name: Add Nginx VirtHost kod.cheng.comcopy:src: ./file/kod.cheng.com.conf.j2dest: /etc/nginx/conf.d/kod.cheng.com.confnotify: Restart Nginx Server#9.创建站点目录- name: Init Nginx BseEnvfile:path: /codestate: directoryowner: wwwgroup: wwwrecurse: yes#10.同步代码至站点目录- name: Push kodcloud codesynchronize:src: ./file/koddest: /code#11.授权站点目录权限- name: Chmod kodcloudfile:path: /codeowner: wwwgroup: wwwmode: 0777recurse: yes#12.启动nginx服务- name: Systemd Nginx Serversystemd:name: nginxstate: startedenabled: yes#13.启动php-fpm- name: Systemd PHP-fpm Serversystemd:name: php-fpmstate: startedenabled: yeshandlers:- name: Restart Nginx Serversystemd:name: nginxstate: restarted- name: Restart PHP-fpm Serversystemd:name: php-fpmstate: restarted
6.模块练习:
1.安装httpd服务 yum2.编写简单网页测试内容 copy3.启动服务并加入开机自启 service|systemd4.放行对应的端口 firewalld
2.Ansible Playbook剧本的更多相关文章
- ansible基础-playbook剧本的使用
ansible基础-playbook剧本的使用 作者:尹正杰 版权声明:原创作品,谢绝转载!否则将追究法律责任. 一.YAML概述 1>.YAML的诞生 YAML是一个可读性高,用来表达数据序 ...
- ansible的playbook剧本
一.playbook剧本介绍 1)playbook介绍 Playbooks是Ansible的配置,部署和编排语言.它们可以描述您希望远程系统执行的策略,或一般IT流程中的一组步骤. 如果说ansibl ...
- Ansible之playbook剧本
Ansible之playbook剧本 目录 Ansible之playbook剧本 1. playbook的组成 2. 剧本示例test1 2.1 剧本制作 2.2 准备http.conf 2.3 运行 ...
- ansible笔记(10):初识ansible playbook
ansible笔记():初识ansible playbook 假设,我们想要在test70主机上安装nginx并启动,我们可以在ansible主机中执行如下3条命令 ansible test70 -m ...
- Ansible Playbook 简介
我们去远程执行命令时要使用 command 模块,拷贝文件时要使用 copy 模块,如果我们要操作的东西很多,那就要执行很多条不同模块的命令Playbook 是一个 yaml 配置文件,我们可以把不同 ...
- Ansible playbook基础组件介绍
本节内容: ansible playbook介绍 ansible playbook基础组件 playbook中使用变量 一.ansible playbook介绍 playbook是由一个或多个“pla ...
- ansible入门四(Ansible playbook基础组件介绍)
本节内容: ansible playbook介绍 ansible playbook基础组件 playbook中使用变量 一.ansible playbook介绍 playbook是由一个或多个“pla ...
- ansible playbook模式及语法
一.什么是playbook及其组成 什么是playbook playbook 翻译过来就是"剧本" playbook的组成 play:定义的是主机的角色 task:定义的是具体执行 ...
- Playbook剧本小结
1.Playbook剧本小结 1.什么是playbook,playbook翻译过来就是"剧本",那playbook组成如下 play: 定义的是主机的角色task: 定义的是具体执 ...
随机推荐
- 不给糖果就捣乱,用Python绘制有趣的万圣节南瓜怪【华为云分享】
关于万圣节 万圣节又叫诸圣节,在每年的11月1日,是西方的传统节日:而万圣节前夜的10月31日是这个节日最热闹的时刻.在中文里,常常把万圣节前夜(Halloween)讹译为万圣节(All Saints ...
- 还在用背单词App?使用Python开发英语单词自测工具,助你逆袭单词王!
学英语广告 最近也许是刚开学的原因,不管是公众号,还是刷抖音,导出都能看到关于学英语.背单词的广告. 不知道现在学生们背单词买的什么辅导材料.反正我们上学那会,<星火阅读>特别的火.记得当 ...
- h5-面试题
干货!各种常见布局实现+知名网站实例分析 前端面试考点多?看这些文章就够了(2019年6月更新版) 前端面试:这50个经典前端面试题面试者必看! Vue面试中,经常会被问到的面试题/Vue知识点整理 ...
- 压缩感知重构算法之OMP算法python实现
压缩感知重构算法之OMP算法python实现 压缩感知重构算法之CoSaMP算法python实现 压缩感知重构算法之SP算法python实现 压缩感知重构算法之IHT算法python实现 压缩感知重构 ...
- .Net Core使用分布式缓存Redis:数据结构
一.前言 本篇主要使用StackExchangeRedis在.Net Core中使用Redis,使用基础见:点击此处. 二.五种基础数据结构 1.字符串类型String 字符串类型是Redis中最基本 ...
- servlet读取请求参数后流失效的问题
在用reset接口的时候,常常会使用request.getInputStream()方法,但是流只能读取一次,一旦想要加上一个过滤器用来检测用户请求的数据时就会出现异常. 在过滤器中通过流读取出用户p ...
- NTFS在openwrt下的挂载问题
在openwrt上市可以挂载ntfs分区的,但是如果原来如果搞过win,或者异常关机,那么会遇到以下的错误: root@Openwrt:/etc/config# mount -t ntfs -o rw ...
- HPS端的GPIO如何控制
该笔记主要记录HPS端的GPIO如何控制,包括控制LED和Key 1.GPIO地址映射 Peripheral Base Address 0xf000_0000 64M 2.HPS外设 (1)GPIO ...
- Android WebView 基本设置与H5 交互
mWebView.setDrawingCacheEnabled(true); WebChromeClient webChromeClient = new WebChromeClient(); mWeb ...
- Sql中将datetime转换成字符串的方法(CONVERT())
语法格式:CONVERT (<data_ type>[ length ], <expression> [, style]) style的含义:style 是将DATATIME ...