Spring-Cloud之Spring-Boot框架-1
一、Spring Boot 是由 Pivotal 团队开发的 Spring 框架,采用了生产就绪的观点 ,旨在简化配置,致力于快速开发。 Spring Boot 框架提供了自动装配和起步依赖,使开发人员不需要配置各种xml 文件。通过这种方式,极大地提高了程序的开发速度。
在过去的 Spring 发中,需要引入大量的 xml 文件 Spring 2.5 引入了包扫描,消除了显式的配置 Beano Spring 3.0 又引入了基于 JavaBean 的配置,这种方式可以取代 xml 文件。尽管如此,在实际的开发中还是需要配置 xml 文件,例如配 SpringMVC 事务管理器、过滤器、切面等。
在项目开发过程中,如果按照原来的方式去开发,我们首先就需要解决的问题就是jar包之间依赖冲突的问题,所以我们通过springboot相关maven配置,较少其自定义配置带来的很多冲突问题。springboot框架很大程度上解决了spring带来的jar包依赖问题。
二、特点:
对比之前的 Spring, Spring Boot 有三大特点 :自动配置、起步依赖和 Actuator 运行状态的监控。
1)自动配置就是程序需要什么, Spring Boot 会装配什么。
2)起步依赖,主要是springboot提供了一套基本需要的jar依赖,不在需要自己单独去,配置各种jar包。
3)Actuator ,springboot相对来说简化了更多东西,但是我们需要查看注入的bean时,Actuator 组件就提供了对程序的运行状态的监控功能。
三、优点:
Spring Boot 不仅提供了自动装配、起步依赖,还自带了不少非功能性的特性,例如安全、度量、健康检查、内 Servi et 容器和外置配置。开发人员可以更加敏捷快速地开发 Spring程序,专注于应用程序本身的业务开发,而不是在 Spring 的配置上花费大量的精力。
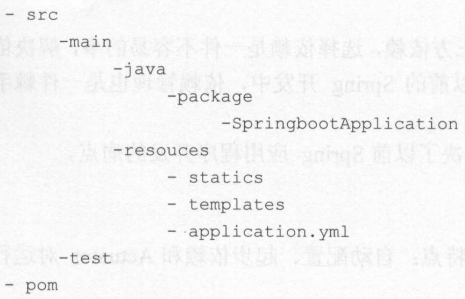
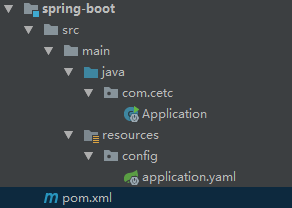
四、springboot的基本目录结构
<?xml version="1.0" encoding="UTF-8"?>

<project xmlns="http://maven.apache.org/POM/4.0.0"

         xmlns:xsi="http://www.w3.org/2001/XMLSchema-instance"

         xsi:schemaLocation="http://maven.apache.org/POM/4.0.0 http://maven.apache.org/xsd/maven-4.0.0.xsd">

    <modelVersion>4.0.0</modelVersion>

    <artifactId>spring-boot</artifactId>

    <parent>

        <groupId>org.springframework.boot</groupId>

        <artifactId>spring-boot-starter-parent</artifactId>

        <version>2.0.2.RELEASE</version>

    </parent>

    <dependencies>

        <dependency>

            <groupId>org.springframework.boot</groupId>

            <artifactId>spring-boot-starter-web</artifactId>

        </dependency>

        <dependency>

            <groupId>org.springframework.boot</groupId>

            <artifactId>spring-boot-starter-test</artifactId>

            <scope>test</scope>

        </dependency>

    </dependencies>

    <build>

        <plugins>

            <plugin>

                <groupId>org.springframework.boot</groupId>

                <artifactId>spring-boot-maven-plugin</artifactId>

            </plugin>

        </plugins>

    </build>

</project>
容器启动
package com.cetc;

import org.springframework.boot.SpringApplication;

import org.springframework.boot.autoconfigure.SpringBootApplication;

@SpringBootApplication

public class Application {

    public static void main(String[] args) {

        SpringApplication.run(Application.class);

    }

}
server:

  port: 8080
目录结构
2)WEB工程
注解@RestController相当于原来的@Controller 注解和@ResponseBody 注解之和。
@RequestMapping、@GetMapping、@PostMapping:配置URL映射
package com.cetc.web.rest; import org.springframework.web.bind.annotation.GetMapping;
import org.springframework.web.bind.annotation.RequestMapping;
import org.springframework.web.bind.annotation.RestController; @RestController
@RequestMapping("/api/hello")
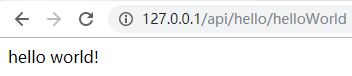
public class HelloResource { @GetMapping("/helloWorld")
public String helloWorld() {
return "hello world!";
}
}
测试:

3)springboot测试
package com.cetc;

import org.junit.After;

import org.junit.Before;

import org.junit.Test;

import org.junit.runner.RunWith;

import org.springframework.beans.factory.annotation.Autowired;

import org.springframework.boot.test.context.SpringBootTest;

import org.springframework.boot.test.web.client.TestRestTemplate;

import org.springframework.boot.web.server.LocalServerPort;

import org.springframework.http.HttpMethod;

import org.springframework.http.ResponseEntity;

import org.springframework.test.context.junit4.SpringRunner;

@RunWith(SpringRunner.class)

@SpringBootTest(webEnvironment = SpringBootTest.WebEnvironment.RANDOM_PORT)

public class HelloTest {

    @LocalServerPort

    private Integer port;

    private String url;

    @Autowired

    private TestRestTemplate testRestTemplate;

    @Before

    public void before() {

        System.out.println("test start");

        this.url = "http://localhost:" + port + "/api/hello/helloWorld";

    }

    @Testpublic void test() {

        ResponseEntity<String> responseEntity = testRestTemplate.getForEntity(url, String.class);

        System.out.println(responseEntity.getBody());

    }

    @After

    public void after() {

        System.out.println("test end");

    }

}
Spring Boot 开启测试也非常简单只需要@RunWith(SpringRunner.class)和 SpringBootTest注解,在@SpringBootTest 注解加上Web 测试环景端口为随机端口的配置。 TestRestTemplate类为 RestTemplate 试类 RestTemplate 用于远程调用 HttpAPI 接口。
测试:

4)springboot的配置文件
在任何目录下都可以建立application开头的文件,文件格式一般有properties和yaml/yml格式。两种方式配置大同小异。
yaml/yml为
server:

  port: 8080
properties
server.port=8080
配置的文件中的数据可以通过@Value("${<name>}")读取
package com.cetc.web.rest;

import org.springframework.beans.factory.annotation.Value;

import org.springframework.web.bind.annotation.GetMapping;

import org.springframework.web.bind.annotation.RequestMapping;

import org.springframework.web.bind.annotation.RestController;

@RestController

@RequestMapping("/api/hello")

public class HelloResource {

    @Value("${server.port}")

    private Integer port;

    @GetMapping("/getPort")

    public Integer port() {

        return port;

    }

}

将配置文件属性赋给实体
properties文件配置(当然这里可以使用yaml/yml的形式配置):
my.name=test

my.age=25
配置转给实体
package com.cetc.config;

import org.springframework.boot.context.properties.ConfigurationProperties;

import org.springframework.context.annotation.Configuration;

@Configuration

@ConfigurationProperties(prefix = "my")

public class MyProperties {

    private String name;

    private Integer age;

    public String getName() {

        return name;

    }

    public void setName(String name) {

        this.name = name;

    }

    public Integer getAge() {

        return age;

    }

    public void setAge(Integer age) {

        this.age = age;

    }

}
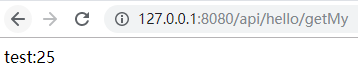
测试:
package com.cetc.web.rest;

import com.cetc.config.MyProperties;

import org.springframework.beans.factory.annotation.Autowired;import org.springframework.web.bind.annotation.GetMapping;

import org.springframework.web.bind.annotation.RequestMapping;

import org.springframework.web.bind.annotation.RestController;

@RestController

@RequestMapping("/api/hello")

public class HelloResource {

    @Autowired

    private MyProperties myProperties;

    @GetMapping("/getMy")

    private String getMy() {

        return myProperties.getName() + ":" + myProperties.getAge();

    }

}
说明:
@ConfigurationProperties:说明该类为配置类
@Configuration:了解为xml中的beans,这里也可以使用@Component加入容器
5)自定义配置文件
a、编写配置文件(custom.properties)
custom.name=custom

custom.age=25
b、配置实体赋予属性
package com.cetc.config;

import org.springframework.boot.context.properties.ConfigurationProperties;

import org.springframework.context.annotation.Configuration;

import org.springframework.context.annotation.PropertySource;

@Configuration

@ConfigurationProperties(prefix = "custom")

@PropertySource(value = "classpath:config/custom.properties")

public class CustomProperties {

    private String name;

    private Integer age;

    public String getName() {

        return name;

    }

    public void setName(String name) {

        this.name = name;

    }

    public Integer getAge() {

        return age;

    }

    public void setAge(Integer age) {

        this.age = age;

    }

}
c、测试
package com.cetc.web.rest;

import com.cetc.config.CustomProperties;

import com.cetc.config.MyProperties;

import org.springframework.beans.factory.annotation.Autowired;import org.springframework.web.bind.annotation.GetMapping;

import org.springframework.web.bind.annotation.RequestMapping;

import org.springframework.web.bind.annotation.RestController;

@RestController

@RequestMapping("/api/hello")

public class HelloResource {

    @Autowired

    private CustomProperties customProperties;

    @GetMapping("/getCustom")

    public String getCustom() {

        return customProperties.getName() + ":" + customProperties.getAge();

    }

}

d、说明:
@PropertySource:指定文件源路径。
6)错误说明:在4)和5)中按照这样配置也没有问题,但是会出现警告,要求加入
<dependency>

    <groupId>org.springframework.boot</groupId>

    <artifactId>spring-boot-configuration-processor</artifactId>

    <optional>true</optional>

</dependency>
如果不使用@Configuration和@Component加入容器的话,就必须使用使用@EnableConfigurationProperties(value={<class>})来加入到容器中
package com.cetc.config;

import org.springframework.boot.context.properties.ConfigurationProperties;

import org.springframework.boot.context.properties.EnableConfigurationProperties;

import org.springframework.context.annotation.Configuration;

import org.springframework.context.annotation.PropertySource;

@Configuration

@EnableConfigurationProperties(value = {CustomAutoProperties.AutoProperties.class})

public class CustomAutoProperties {

    @ConfigurationProperties(prefix = "custom")

    @PropertySource(value = "classpath:config/custom.properties")

    public class AutoProperties {

        private String name;

        private Integer age;

        public String getName() {

            return name;

        }

        public void setName(String name) {

            this.name = name;

        }

        public Integer getAge() {

            return age;

        }

        public void setAge(Integer age) {

            this.age = age;

        }

    }

}
说明:这里我为了简化,采用的内部类的方式,实际可以使用独立类的方式编写。
测试:
package com.cetc.web.rest;

import com.cetc.config.CustomAutoProperties;

import com.cetc.config.CustomProperties;

import com.cetc.config.MyProperties;

import org.springframework.beans.factory.annotation.Autowired;import org.springframework.web.bind.annotation.GetMapping;

import org.springframework.web.bind.annotation.RequestMapping;

import org.springframework.web.bind.annotation.RestController;

@RestController

@RequestMapping("/api/hello")

public class HelloResource {

    @Autowired

    private CustomAutoProperties.AutoProperties autoProperties;

    @GetMapping("/getCustomAuto")

    public String getCustomAuto() {

        return autoProperties.getName() + ":" + autoProperties.getAge();

    }

}

7)多文件配置
a、我们在实际开发过程中存在很多种环境,如果频繁的改配置,会增加很多工作量和不必要的麻烦。所以,多配置文件才是更好的选择。一般使用方式为
application-{profile} .properties
b、实例
我们把application.yaml中的端口去掉。
然后编写三个文件
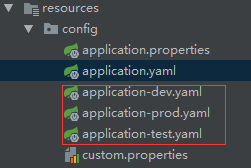
文件内容为
server:

  port: 不同值
dev:8080 prod:80 test:9000
在application.yaml激活对应配置
#server:

#  port: 8080

spring:

  profiles:

    active: dev # dev/prod/test
效果分别为:


8)运行状态监控(Actuator)
a、Actuator 监控数据可以通过REST远程shell 和JMX方式获得。
b、REST方式引入依赖包
     <dependency>

            <groupId>org.springframework.boot</groupId>

            <artifactId>spring-boot-starter-actuator</artifactId>

        </dependency>
c、在application.yaml加入以下配置
management:

  server:

    port: 8888

  endpoint:

    env:

      enabled: false #关闭安全验证

    health:

      show-details: always # 总是显示健康详情

  endpoints:

    web:

      exposure:

        include: ["*"] #["health", "info", "beans"] # 需要放开的接口
说明:这里的配置只是针对2.0版本过后。在2.0过后处于安全考虑只放开了/health和/info接口,可以通过management.endpoints.web.exposure.include配置需要的接口,详情参考官网:官网入口
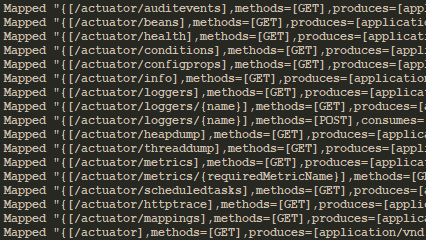
d、启动项目后
我们可以看到多开启了一个容器

Actuator 接口


注意:2.0以后部分需要加上context为"/actuator",部分功能需要单独开启,比如/shutdown等
测试:


management:

  server:

    port: 8888

  endpoint:

    shutdown:

      enabled: true # 开启shutdown功能
测试:因为shutdown为post请求,所以我们使用postman测试
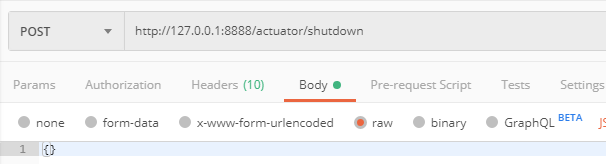
响应:

f、上面讲述的为rest接口方式来处理的,下面引入shell的方式
依赖包:
     <dependency>

            <groupId>org.springframework.boot</groupId>

            <artifactId>spring-boot-starter-remote-shell</artifactId>

        </dependency>
注意:此功能在2.0.x后已经移除了,所以这里只讲使用,但是不建议用这种方式
启动过后出现密码
Using default password for shell access : 45f17018-583 78e-ala 6de4cc82d4f
用户名为user
可以自己使用shell工具连接,默认端口2000。
9)jpa的使用
a、加入依赖
     <dependency>

            <groupId>org.springframework.boot</groupId>

            <artifactId>spring-boot-starter-data-jpa</artifactId>

        </dependency>

        <dependency>

            <groupId>mysql</groupId>

            <artifactId>mysql-connector-java</artifactId>

            <scope>runtime</scope>

        </dependency>
b、数据库连接配置
spring:

  datasource:

    druid:

      driver-class-name: com.mysql.jdbc.Driver

      url: jdbc:mysql://127.0.0.1:3306/video?useUnicode=true&characterEncoding=utf-8&useSSL=false&allowMultiQueries=true&autoReconnect=true

      username: root

      password: root

      initial-size: 5

      min-idle: 5

      max-active: 500

      max-wait: 600000

      test-on-borrow: true

      validation-query: SELECT 1 FROM DUAL

  jpa:

    hibernate:

      ddl-auto: update

      naming:

        physical-strategy: org.springframework.boot.orm.jpa.hibernate.SpringPhysicalNamingStrategy

        implicit-strategy: org.springframework.boot.orm.jpa.hibernate.SpringImplicitNamingStrategy

    show-sql: true

    database-platform: org.hibernate.dialect.MySQL5InnoDBDialect

    database: mysql
具体使用请参考:spring-boot、spring-data-jpa整合。
10)redis的使用请参考:springboot之redis的应用
数据操作层的 RedisDao 类通过@Repository 注解来注入 Spring IoC 容器中 该类是通过RedisTemplate 来访问 Redis 。通过注入 StringRedisTemplate Bean 来对 Redis 数据库中的字符串类型的数据进行操作, 写了两个方 ,包括向 Red is 中设 String 类型的数据和从 Redis中读取 String 类型的数据。
11)swagger2的使用
引入依赖
     <dependency>

            <groupId>io.springfox</groupId>

            <artifactId>springfox-swagger2</artifactId>

            <version>2.7.0</version>

        </dependency>

        <dependency>

            <groupId>io.springfox</groupId>

            <artifactId>springfox-swagger-ui</artifactId>

            <version>2.7.0</version>

        </dependency>
配置
package com.cetc.config;

import org.springframework.boot.autoconfigure.condition.ConditionalOnProperty;

import org.springframework.context.annotation.Bean;

import org.springframework.context.annotation.Configuration;

import springfox.documentation.builders.ApiInfoBuilder;

import springfox.documentation.builders.PathSelectors;

import springfox.documentation.builders.RequestHandlerSelectors;

import springfox.documentation.service.ApiInfo;

import springfox.documentation.service.Contact;

import springfox.documentation.spi.DocumentationType;

import springfox.documentation.spring.web.plugins.Docket;

import springfox.documentation.swagger2.annotations.EnableSwagger2;

@Configuration

@EnableSwagger2

@ConditionalOnProperty(value = "swagger.enable", havingValue = "true")

public class SwaggerConfiguration {

    @Bean

    public Docket createRestApi() {

        return new Docket(DocumentationType.SWAGGER_2)

                .apiInfo(apiInfo())

                .select()

                //为当前包路径

                .apis(RequestHandlerSelectors.basePackage("com.cetc.web.rest"))

                .paths(PathSelectors.any())

                .build();

    }

    //构建 api文档的详细信息函数,注意这里的注解引用的是哪个

    private ApiInfo apiInfo() {

        return new ApiInfoBuilder()

                //页面标题

                .title("RestFul API")

                //创建人

                .contact(new Contact("lilin", "https://www.cnblogs.com/ll409546297", ""))

                //版本号

                .version("1.1")

                //描述

                .build();

    }

}
其中@ConditionalOnProperty(value = "swagger.enable", havingValue = "true")的目的是让swagger生效。需要在application.yaml中加入以下配置
swagger:

  enable: false
false为关闭,true为开启。
使用:

package com.cetc.web.rest;

import com.cetc.config.CustomAutoProperties;

import com.cetc.config.CustomProperties;

import com.cetc.config.MyProperties;

import io.swagger.annotations.Api;

import io.swagger.annotations.ApiOperation;

import org.springframework.beans.factory.annotation.Autowired;import org.springframework.web.bind.annotation.GetMapping;

import org.springframework.web.bind.annotation.RequestMapping;

import org.springframework.web.bind.annotation.RestController;

@RestController

@RequestMapping("/api/hello")

@Api(value = "哈喽")

public class HelloResource {

    @Autowired

    private CustomAutoProperties.AutoProperties autoProperties;

    @ApiOperation(value = "获取自定义配置")

    @GetMapping("/getCustomAuto")

    public String getCustomAuto() {

        return autoProperties.getName() + ":" + autoProperties.getAge();

    }

}
开启后查看http://127.0.0.1:8080/swagger-ui.html

六、源码地址:https://github.com/lilin409546297/spring-cloud/tree/master/spring-boot
Spring-Cloud之Spring-Boot框架-1的更多相关文章
- 一起来学spring Cloud | 第一章:spring Cloud 与Spring Boot
目前大家都在说微服务,其实微服务不是一个名字,是一个架构的概念,大家现在使用的基于RPC框架(dubbo.thrift等)架构其实也能算作一种微服务架构. 目前越来越多的公司开始使用微服务架构,所以在 ...
- Spring Cloud和Spring Boot的区别
Spring MVC: Spring MVC属于SpringFrameWork的后续产品,已经融合在Spring Web Flow里面.Spring 框架提供了构建 Web 应用程序的全功能 MVC ...
- 【微服务】使用spring cloud搭建微服务框架,整理学习资料
写在前面 使用spring cloud搭建微服务框架,是我最近最主要的工作之一,一开始我使用bubbo加zookeeper制作了一个基于dubbo的微服务框架,然后被架构师否了,架构师曰:此物过时.随 ...
- spring cloud和spring boot两个完整项目
spring cloud和spring boot两个完整项目 spring cloud 是基于Spring Cloud的云分布式后台管理系统架构,核心技术采用Eureka.Fegin.Ribbon.Z ...
- Spring Cloud和Spring Boot的版本问题
很多人在使用springboot和springcloud,但是对于这两者之间的版本关系不是很清楚,特别是在面临升级的时候不知道该如何操作.本文简要摘录的官方文档的部分内容作为依据,供广大同行参考. 问 ...
- Spring Cloud与Spring Boot版本匹配关系
Spring Cloud是什么? “Spring Cloud provides tools for developers to quickly build some of the common pat ...
- 【spring boot】spring cloud下spring boot微服务启动没有报错,但是访问访问不到
spring cloud下spring boot微服务启动没有报错,但是访问访问不到 解决方法: 可能是端口被占用了,但是依旧启用成功了. 更改一下项目启用的端口号,再重新启动查看是否可以正常访问.
- spring cloud 与spring boot 版本不匹配引发的问题总结
为了将前期项目慢慢转移到微服务上,今天开始搭建eureka服务时,出现以下错误: org.springframework.context.ApplicationContextException: Un ...
- 如何选择Spring cloud和 Spring Boot对应的版本
如何选择Spring cloud和 Spring Boot对应的版本 首先,我们进入Spring Cloud官网,查询Spring cloud的版本和对应的Spring Boot版本 打开Spring ...
- Spring Boot,Spring Cloud,Spring Cloud Alibaba 版本选择说明以及整理归纳
前言 本文的核心目的: 1.方便自己以后的查找,预览,参考 2.帮助那些不知道如何选择版本的朋友进行指引,而不是一味的跟风网上的版本,照抄. Spring Boot 版本 版本查询: https:// ...
随机推荐
- SQL Mode
SQL Mode简介 在MySQL中,SQL Mode常常用来解决以下问题: 1.通过设置SQL Mode,可以完成不同严格程度的数据校验,有效保证数据准确性. 2.通过设置SQL Mode为ANSI ...
- redis三种模式对比
模式类型 主从模式(redis2.8版本之前的模式).哨兵sentinel模式(redis2.8及之后的模式).redis cluster模式(redis3.0版本之后) 主从模式原理 同Mysql主 ...
- WSL调用Windows下的ParaView对OpenFOAM进行后处理
OpenFOAM可以在windows下的Linux子系统(WSL)安装,但是很麻烦的一个问题是WSL没有图形化的界面,只有一个控制台窗口,在后处理的过程中我们就没有办法直接调用paraFoam命令启动 ...
- Spring不能直接@autowired注入Static变量
一.业务场景 spring框架应用中有些静态方法需要依赖被容器管理的类,就像这样: @Component public class Test { @Autowired private static U ...
- [技术博客]nginx 部署 apt 源
[技术博客] nginx 部署 apt 源 出于各种各样的原因, 有时需要自己配置apt源, 比如发布自己编写的debian软件包, 内网中只有一台电脑可以访问外网,或者在本地配置自己的apt源.我们 ...
- Unity资源商店 Asset store下载文件夹的位置
Win10 C:\Users\用户名\AppData\Roaming\Unity\Asset Store-5.x\ Mac OS X ~/Library/Unity/Asset Store
- DVT JetBrains License Server(JetBrains授权服务器)2018 v1.1 最新版 含32位/64位
DVT JetBrains License Server是JetBrains系列软件授权服务器,支持2017版本得jetbrains pycharm,JetBrainswebstorm,JetBrai ...
- CentOS7 升级 cmake
编译cmake文件时,报错:CMake 3.0.0 or higher is required. You are running version 2.8.12.2 很明显,这是 cmake 版本过低导 ...
- Jenkins 发布项目到远程服务器上
最近公司弄一个项目,jenkins在本地服务器,需要打包发布到远程的阿里云服务器上,弄了好一阵子. 这里记录下中间的几个坑. 这个Remote DIrectory 很重要,到时候时候会拷贝到这个目录下 ...
- setDefaultDllDirectories无法定位动态链接库kernel32.dll
参考链接 : https://blog.csdn.net/gdali/article/details/93084828 https://tieba.baidu.com/p/5795675519?red ...