②SpringBoot之Web综合开发
Spring boot初级教程 :《SpringBoot入门教学篇①》,方便大家快速入门、了解实践Spring boot特性,本文介绍springBoot的web开发
web开发
spring boot web开发非常的简单,其中包括常用的json输出、filters、property、log等。
json 接口开发
- 在以前的spring 开发的时候需要我们提供json接口的时候需要做那些配置呢?
- 添加 jackjson 等相关jar包
- 配置spring controller扫描
- 对接的方法添加@ResponseBody
就这样我们会经常由于配置错误,导致406错误等等,spring boot如何做呢,只需要类添加 @RestController 即可,默认类中的方法都会以json的格式返回。
自定义Filter
我们常常在项目中会使用filters用于录调用日志、排除有XSS威胁的字符、执行权限验证等等。Spring Boot自动添加了OrderedCharacterEncodingFilter和HiddenHttpMethodFilter,并且我们可以自定义Filter。
两个步骤:
- 实现Filter接口,实现Filter方法
- 添加@Configurationz 注解,将自定义Filter加入过滤链
代码示例:
- import java.io.IOException;
- import javax.servlet.Filter;
- import javax.servlet.FilterChain;
- import javax.servlet.FilterConfig;
- import javax.servlet.ServletException;
- import javax.servlet.ServletRequest;
- import javax.servlet.ServletResponse;
- import javax.servlet.http.HttpServletRequest;
- import org.apache.catalina.filters.RemoteIpFilter;
- import org.springframework.boot.web.servlet.FilterRegistrationBean;
- import org.springframework.context.annotation.Bean;
- import org.springframework.context.annotation.Configuration;
- @Configuration
- public class WebConfiguration {
- @Bean
- public RemoteIpFilter remoteIpFilter() {
- return new RemoteIpFilter();
- }
- @Bean
- public FilterRegistrationBean testFilterRegistration() {
- FilterRegistrationBean registration = new FilterRegistrationBean();
- registration.setFilter(new MyFilter());
- registration.addUrlPatterns("/*");
- registration.addInitParameter("paramName", "paramValue");
- registration.setName("MyFilter");
- registration.setOrder();
- return registration;
- }
- public class MyFilter implements Filter {
- @Override
- public void destroy() {
- // TODO Auto-generated method stub
- }
- @Override
- public void doFilter(ServletRequest srequest, ServletResponse sresponse, FilterChain filterChain)
- throws IOException, ServletException {
- HttpServletRequest request = (HttpServletRequest) srequest;
- System.out.println("this is MyFilter,url :"+request.getRequestURI());
- filterChain.doFilter(srequest, sresponse);
- }
- @Override
- public void init(FilterConfig arg0) throws ServletException {
- // TODO Auto-generated method stub
- }
- }
- }
自定义Property
在web开发的过程中,我经常需要自定义一些配置文件,如何使用呢?
配置在application.properties中。
- com.bosssoft.title=springBoot测试
- com.bosssoft.description=测试配置文件
自定义配置类
- import org.springframework.beans.factory.annotation.Value;
- public class BossProperties {
- @Value("${com.bosssoft.title}")
- private String title;
- @Value("${com.bosssoft.description}")
- private String description;
- public String getTitle() {
- return title;
- }
- public void setTitle(String title) {
- this.title = title;
- }
- public String getDescription() {
- return description;
- }
- public void setDescription(String description) {
- this.description = description;
- }
- }
log配置
配置输出的地址和输出级别:
- logging.path=/user/local/log
- logging.level.com.favorites=DEBUG
- logging.level.org.springframework.web=INFO
- logging.level.org.hibernate=ERROR
path为本机的log地址,logging.level 后面可以根据包路径配置不同资源的log级别。
数据库操作
在这里我重点讲述mysql、spring data jpa的使用,其中mysql 就不用说了大家很熟悉,jpa是利用Hibernate生成各种自动化的sql,如果只是简单的增删改查,基本上不用手写了,spring内部已经帮大家封装实现了。
下面简单介绍一下如何在spring boot中使用。
1、添加相jar包
- <dependency>
- <groupId>org.springframework.boot</groupId>
- <artifactId>spring-boot-starter-data-jpa</artifactId>
- </dependency>
- <dependency>
- <groupId>mysql</groupId>
- <artifactId>mysql-connector-java</artifactId>
- </dependency>
2、添加配置文件
- spring.datasource.url=jdbc:mysql://localhost:3306/springboot
- spring.datasource.username=root
- spring.datasource.password=
- spring.datasource.driver-class-name=com.mysql.jdbc.Driver
- spring.jpa.properties.hibernate.hbm2ddl.auto=update
- spring.jpa.properties.hibernate.dialect=org.hibernate.dialect.MySQL5InnoDBDialect
- spring.jpa.show-sql= true
其实这个hibernate.hbm2ddl.auto参数的作用主要用于:自动创建|更新|验证数据库表结构,有四个值:
- .create: 每次加载hibernate时都会删除上一次的生成的表,然后根据你的model类再重新来生成新表,哪怕两次没有任何改变也要这样执行,这就是导致数据库表数据丢失的一个重要原因。
- .create-drop :每次加载hibernate时根据model类生成表,但是sessionFactory一关闭,表就自动删除。
- .update:最常用的属性,第一次加载hibernate时根据model类会自动建立起表的结构(前提是先建立好数据库),以后加载hibernate时根据 model类自动更新表结构,即使表结构改变了但表中的行仍然存在不会删除以前的行。
要注意的是当部署到服务器后,表结构是不会被马上建立起来的,是要等应用第一次运行起来后才会。- .validate :每次加载hibernate时,验证创建数据库表结构,只会和数据库中的表进行比较,不会创建新表,但是会插入新值。
dialect 主要是指定生成表名的存储引擎为InneoDB show-sql 是否打印出自动生产的SQL,方便调试的时候查看。
3、添加实体类和Dao
- @Entity
- public class User implements Serializable {
- private static final long serialVersionUID = 1L;
- @Id
- @GeneratedValue
- private Long id;
- @Column(nullable = false, unique = true)
- private String userName;
- @Column(nullable = false)
- private String passWord;
- @Column(nullable = false, unique = true)
- private String email;
- @Column(nullable = true, unique = true)
- private String nickName;
- @Column(nullable = false)
- private String regTime;
- public User() {
- super();
- }
- public User(String email, String nickName, String passWord, String userName, String regTime) {
- super();
- this.email = email;
- this.nickName = nickName;
- this.passWord = passWord;
- this.userName = userName;
- this.regTime = regTime;
- }
- public Long getId() {
- return id;
- }
- public void setId(Long id) {
- this.id = id;
- }
- public String getUserName() {
- return userName;
- }
- public void setUserName(String userName) {
- this.userName = userName;
- }
- public String getPassWord() {
- return passWord;
- }
- public void setPassWord(String passWord) {
- this.passWord = passWord;
- }
- public String getEmail() {
- return email;
- }
- public void setEmail(String email) {
- this.email = email;
- }
- public String getNickName() {
- return nickName;
- }
- public void setNickName(String nickName) {
- this.nickName = nickName;
- }
- public String getRegTime() {
- return regTime;
- }
- public void setRegTime(String regTime) {
- this.regTime = regTime;
- }
- }
dao只要继承JpaRepository类就可以,几乎可以不用写方法,还有一个特别有尿性的功能非常赞,就是可以根据方法名来自动的生产SQL,比如findByUserName 会自动生产一个以 userName 为参数的查询方法,比如 findAlll 自动会查询表里面的所有数据,比如自动分页等等。
Entity中不映射成列的字段得加@Transient 注解,不加注解也会映射成列。
- import java.util.List;
- import org.springframework.data.jpa.repository.JpaRepository;
- public interface UserRepository extends JpaRepository<User, Long> {
- User findByUserName(String userName);
- User findByUserNameOrEmail(String userName, String email);
- List<User> getUsersByUserName(String userName);
- }
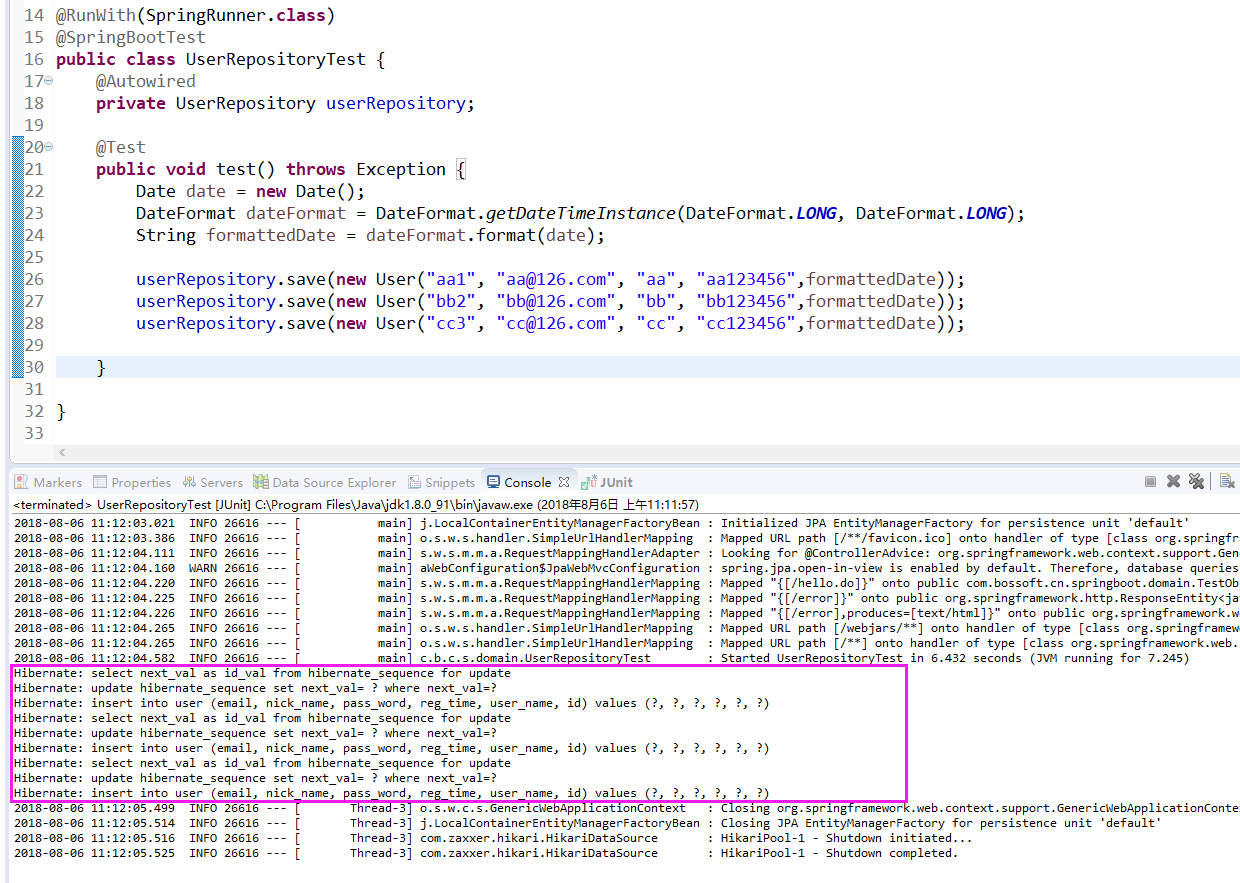
4、测试
- @RunWith(SpringRunner.class)
- @SpringBootTest
- public class UserRepositoryTests {
- @Autowired
- private UserRepository userRepository;
- @Test
- public void test() throws Exception {
- Date date = new Date();
- DateFormat dateFormat = DateFormat.getDateTimeInstance(DateFormat.LONG, DateFormat.LONG);
- String formattedDate = dateFormat.format(date);
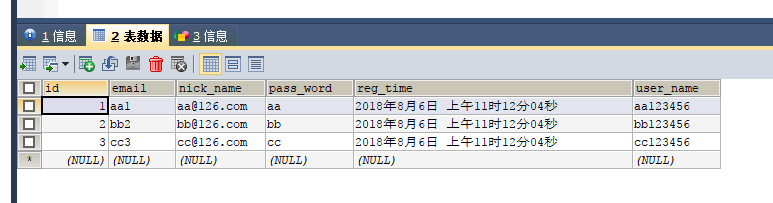
- userRepository.save(new User("aa1", "aa@126.com", "aa", "aa123456",formattedDate));
- userRepository.save(new User("bb2", "bb@126.com", "bb", "bb123456",formattedDate));
- userRepository.save(new User("cc3", "cc@126.com", "cc", "cc123456",formattedDate));
- /*Assert.assertEquals(9, userRepository.findAll().size());
- Assert.assertEquals("bb", userRepository.findByUserNameOrEmail("bb", "cc@126.com").getNickName());
- userRepository.delete(userRepository.findByUserName("aa1"));*/
- }
- }
当让 spring data jpa 还有很多功能,比如封装好的分页,可以自己定义SQL,主从分离等等,这里就不详细讲了。
thymeleaf模板
Spring boot 推荐使用来代替jsp,thymeleaf模板到底是什么来头呢,下面来聊聊。
Thymeleaf 介绍
Thymeleaf是一款用于渲染XML/XHTML/HTML5内容的模板引擎。类似JSP,Velocity,FreeMaker等,它也可以轻易的与Spring MVC等Web框架进行集成作为Web应用的模板引擎。与其它模板引擎相比,Thymeleaf最大的特点是能够直接在浏览器中打开并正确显示模板页面,而不需要启动整个Web应用。
好了,你们说了我们已经习惯使用了什么 velocity,FreeMaker,beetle之类的模版,那么到底好在哪里呢? 比一比吧 Thymeleaf是与众不同的,因为它使用了自然的模板技术。这意味着Thymeleaf的模板语法并不会破坏文档的结构,模板依旧是有效的XML文档。模板还可以用作工作原型,Thymeleaf会在运行期替换掉静态值。Velocity与FreeMarker则是连续的文本处理器。 下面的代码示例分别使用Velocity、FreeMarker与Thymeleaf打印出一条消息:
- Velocity: <p>$message</p>
- FreeMarker: <p>${message}</p>
- Thymeleaf: <p th:text="${message}">Hello World!</p>
注意,由于Thymeleaf使用了XML DOM解析器,因此它并不适合于处理大规模的XML文件。
URL
URL在Web应用模板中占据着十分重要的地位,需要特别注意的是Thymeleaf对于URL的处理是通过语法@{…}来处理的。Thymeleaf支持绝对路径URL:
- <a th:href="@{http://www.thymeleaf.org}">Thymeleaf</a>
条件求值
- <a th:href="@{/login}" th:unless=${session.user != null}>Login</a>
for循环
- <tr th:each="prod : ${prods}">
- <td th:text="${prod.name}">Onions</td>
- <td th:text="${prod.price}">2.41</td>
- <td th:text="${prod.inStock}? #{true} : #{false}">yes</td>
- </tr>
WebJars
WebJars是一个很神奇的东西,可以让大家以jar包的形式来使用前端的各种框架、组件。
什么是WebJars
什么是WebJars?WebJars是将客户端(浏览器)资源(JavaScript,Css等)打成jar包文件,以对资源进行统一依赖管理。WebJars的jar包部署在Maven中央仓库上。
为什么使用
我们在开发Java web项目的时候会使用像Maven,Gradle等构建工具以实现对jar包版本依赖管理,以及项目的自动化管理,但是对于JavaScript,Css等前端资源包,我们只能采用拷贝到webapp下的方式,这样做就无法对这些资源进行依赖管理。那么WebJars就提供给我们这些前端资源的jar包形势,我们就可以进行依赖管理。
如何使用
1、 WebJars主官网 查找对于的组件,比如bootstrap:
- <dependency>
- <groupId>org.webjars.bower</groupId>
- <artifactId>bootstrap</artifactId>
- <version>3.0.</version>
- </dependency>
2、页面引入
- <link th:href="@{/webjars/bootstrap/3.3.6/dist/css/bootstrap.css}" rel="stylesheet"></link>
就可以正常使用了!
②SpringBoot之Web综合开发的更多相关文章
- SpringBoot的Web开发
一.创建Web项目 创建的时候勾选对应web选项即可,会自动引入相应的starter,pom如下: <dependency> <groupId>org.springframew ...
- SpringBoot学习(七)-->SpringBoot在web开发中的配置
SpringBoot在web开发中的配置 Web开发的自动配置类:在Maven Dependencies-->spring-boot-1.5.2.RELEASE.jar-->org.spr ...
- springBoot 搭建web项目(前后端分离,附项目源代码地址)
springBoot 搭建web项目(前后端分离,附项目源代码地址) 概述 该项目包含springBoot-example-ui 和 springBoot-example,分别为前端与后端,前后端 ...
- 从Spring到SpringBoot构建WEB MVC核心配置详解
目录 理解Spring WEB MVC架构的演变 认识Spring WEB MVC 传统时代的Spring WEB MVC 新时代Spring WEB MVC SpringBoot简化WEB MVC开 ...
- SpringBoot日记——Web开发篇
准备开始实战啦!~~~~ 我们先来看,SpringBoot的web是如何做web开发的呢?通常的步骤如下: 1.创建springboot应用,指定模块: 2.配置部分参数配置: 3.编写业务代码: 为 ...
- SpringBoot:Web开发
西部开源-秦疆老师:基于SpringBoot 2.1.6 的博客教程 , 基于atguigu 1.5.x 视频优化 秦老师交流Q群号: 664386224 未授权禁止转载!编辑不易 , 转发请注明出处 ...
- 基于springboot的web项目最佳实践
springboot 可以说是现在做javaweb开发最火的技术,我在基于springboot搭建项目的过程中,踩过不少坑,发现整合框架时并非仅仅引入starter 那么简单. 要做到简单,易用,扩展 ...
- SpringBoot 基于web应用开发(请求参数获取,静态资源,webjars)
SpringBoot 基于web应用开发 一.Lombok使用 1.导入依赖库 <dependency> <groupId>org.projectlombok</g ...
- springboot 整合 web 项目找不到 jsp 文件
今天遇到一个问题,就是使用springboot整合web项目的时候,怎么都访问不到 \webapp\WEB-INF\jsp\index.jsp 页面.这个问题搞了半天,试了各种方式.最后是因为在启动的 ...
随机推荐
- COS-3OS的用户接口
操作系统是用户和计算机的接口,同时也是计算机硬件和其他软件的接口.操作系统的功能包括管理计算机系统的硬件.软件及数据资源,控制程序运行,改善人机界面,为其它应用软件提供支持,让计算机系统所有资源最大限 ...
- API接口幂等性框架设计
表单重复提价问题 rpc远程调用时候 发生网络延迟 可能有重试机制 MQ消费者幂等(保证唯一)一样 解决方案: token 令牌 保证唯一的并且是临时的 过一段时间失效 分布式: redis+to ...
- BOOST编译方法
Windowsbjam --toolset=msvc-9.0 --prefix=C:\vc9_boost\vc9 --build-type=complete link=static threading ...
- Hebernate -- 映射继承关系
1. Employee 为基类, 派生出HourEmployee 和 SalaryEmployee两个类. 采用 subclass 元素的继承映射(1) 采用 subclass 的继承映射可以实现对于 ...
- plot 含缺失值的图
x = np.linspace(1,10,25) y = (x-4)**2 index = random.sample(range(25),5) # 从1-24中不放回随机抽取5个数 y[index ...
- HttpClient发送Json数据到指定接口
项目中遇到将Json数据发送到指定接口,于是结合网上利用HttpClient进行发送. /** * post发送json数据 * @param url * @param param * @return ...
- CSS设置小技巧
水平居中 对于元素的水平居中,有三种情况: 行内元素(文字.图片等):text-align: center; 定宽块状元素(有设置宽度的block元素):margin: 0 auto; 不定宽块状元素 ...
- 【Demo】CSS3 2D转换
2D转换transform 2D变换方法: translate() 根据左(X轴)和顶部(Y轴)位置给定的参数,从当前元素位置移动. div { transform: translate(50px,1 ...
- 用OpenCV进行视频截取
记录用OpenCV进行视频截取. 核心代码如下: CvCapture* capture = cvCreateFileCapture(src_avi_file.c_str()); if (capture ...
- vue2项目中better-scroll 插件使用时候页面不滚动
参考这里 1.外面包裹层的高度没有设置或者条目的高度没有超过外面包裹层的高度 2.初始化BetterScroll的时机不对,当前元素还没有正常渲染出来,导致BetterScroll的高度的计算错误