[SPDK/NVMe存储技术分析]004 - SSD设备的发现
源代码及NVMe协议版本
- SPDK : spdk-17.07.1
- DPDK : dpdk-17.08
- NVMe Spec: 1.2.1
基本分析方法
- 01 - 到官网http://www.spdk.io/下载spdk-17.07.1.tar.gz
- 02 - 到官网http://www.dpdk.org/下载dpdk-17.08.tar.xz
- 03 - 创建目录nvme/src, 将spdk-17.07.1.tar.gz和dpdk-17.08.tar.xz解压缩到nvme/src中,然后用OpenGrok创建网页版的源代码树
- 04 - 阅读SPDK/NVMe驱动源代码, 同时参考NVMeDirect和Linux内核NVMe驱动
1. 识别NVMe固态硬盘的方法
NVMe SSD是一个PCIe设备, 那么怎么识别这种类型的设备? 有两种方法。
方法1: 通过Device ID + Vendor ID
方法2: 通过Class Code
在Linux内核NVMe驱动中,使用的是第一种方法。而在SPDK中,使用的是第二种方法。 上代码:
- src/spdk-17.07.1/include/spdk/pci_ids.h
52 /**

53  * PCI class code for NVMe devices.

54  *

55  * Base class code 01h: mass storage

56  * Subclass code 08h: non-volatile memory

57  * Programming interface 02h: NVM Express

58  */

59 #define SPDK_PCI_CLASS_NVME          0x010802
而Class Code (0x010802) 在NVMe Specification中的定义如下:

2. Hello World
开始学习一门新的语言或者开发套件的时候,总是离不开"Hello World"。 SPDK也不例外, 让我们从hello_world.c开始, 看一下main()是如何使用SPDK/NVMe驱动的API的,从而帮助我们发现使用NVMe SSDs的主逻辑,
- src/spdk-17.07.1/examples/nvme/hello_world/hello_world.c
306 int main(int argc, char **argv)

307 {

308     int rc;

309     struct spdk_env_opts opts;

310

311     /*

312      * SPDK relies on an abstraction around the local environment

313      * named env that handles memory allocation and PCI device operations.

314      * This library must be initialized first.

315      *

316      */

317     spdk_env_opts_init(&opts);

318     opts.name = "hello_world";

319     opts.shm_id = 0;

320     spdk_env_init(&opts);

321

322     printf("Initializing NVMe Controllers\n");

323

324     /*

325      * Start the SPDK NVMe enumeration process.  probe_cb will be called

326      *  for each NVMe controller found, giving our application a choice on

327      *  whether to attach to each controller.  attach_cb will then be

328      *  called for each controller after the SPDK NVMe driver has completed

329      *  initializing the controller we chose to attach.

330      */

331     rc = spdk_nvme_probe(NULL, NULL, probe_cb, attach_cb, NULL);

332     if (rc != 0) {

333             fprintf(stderr, "spdk_nvme_probe() failed\n");

334             cleanup();

335             return 1;

336     }

337

338     if (g_controllers == NULL) {

339             fprintf(stderr, "no NVMe controllers found\n");

340             cleanup();

341             return 1;

342     }

343

344     printf("Initialization complete.\n");

345     hello_world();

346     cleanup();

347     return 0;

348 }
main()的处理流程为:
001 - 317     spdk_env_opts_init(&opts);

002 - 320     spdk_env_init(&opts);

003 - 331     rc = spdk_nvme_probe(NULL, NULL, probe_cb, attach_cb, NULL);

004 - 345     hello_world();

005 - 346     cleanup();
- 001-002,spdk运行环境初始化
- 003,调用函数spdk_nvme_probe()主动发现NVMe SSDs设备。 显然, 接下来我们要分析的关键函数就是spdk_nvme_probe()。
- 004,调用函数hello_world()做简单的读写操作
- 005,调用函数cleanup()以释放内存资源,detach NVMe SSD设备等。
在分析关键函数spdk_nvme_probe()之前,让我们先搞清楚两个问题:
- 问题1: 每一块NVMe固态硬盘里都一个控制器(Controller), 那么发现的所有NVMe固态硬盘(也就是NVMe Controllers)以什么方式组织在一起?
- 问题2: 每一块NVMe固态硬盘都可以划分为多个NameSpace (类似逻辑分区的概念), 那么这些NameSpace以什么方式组织在一起?
对有经验的C程序员来说,回答这两个问题很easy,那就是链表。我们的hello_world.c也是这么干的。看代码:
39 struct ctrlr_entry {

40      struct spdk_nvme_ctrlr  *ctrlr;

41      struct ctrlr_entry      *next;

42      char                    name[1024];

43 };

44

45 struct ns_entry {

46      struct spdk_nvme_ctrlr  *ctrlr;

47      struct spdk_nvme_ns     *ns;

48      struct ns_entry         *next;

49      struct spdk_nvme_qpair  *qpair;

50 };

51

52 static struct ctrlr_entry *g_controllers = NULL;

53 static struct ns_entry *g_namespaces = NULL;
其中,
- g_controllers是管理所有NVMe固态硬盘(i.e. NVMe Controllers)的全局链表头。
- g_namespaces是管理所有的namespaces的全局链表头。
那么,回到main()的L338-342, 就很好理解了。 因为g_controllers指针为NULL, 所以没有找到NVMe SSD盘啊,于是cleanup后退出。
338     if (g_controllers == NULL) {

339             fprintf(stderr, "no NVMe controllers found\n");

340             cleanup();

341             return 1;

342     }
现在看看hello_world.c是如何使用spdk_nvme_probe()的,
331 rc = spdk_nvme_probe(NULL, NULL, probe_cb, attach_cb, NULL);
显然,probe_cb和attach_cb是两个callback函数, (其实还有remove_cb, L331未使用)
- probe_cb: 当枚举到一个NVMe设备的时候被调用
- attach_cb: 当一个NVMe设备已经被attach(挂接?)到一个用户态的NVMe 驱动的时候被调用
probe_cb, attach_cb以及remove_cb的相关定义如下:
- src/spdk-17.07.1/include/spdk/nvme.h
268 /**

269  * Callback for spdk_nvme_probe() enumeration.

270  *

271  * \param opts NVMe controller initialization options.  This structure will be populated with the

272  * default values on entry, and the user callback may update any options to request a different

273  * value.  The controller may not support all requested parameters, so the final values will be

274  * provided during the attach callback.

275  * \return true to attach to this device.

276  */

277 typedef bool (*spdk_nvme_probe_cb)(void *cb_ctx, const struct spdk_nvme_transport_id *trid,

278                                struct spdk_nvme_ctrlr_opts *opts);

279

280 /**

281  * Callback for spdk_nvme_probe() to report a device that has been attached to the userspace NVMe driver.

282  *

283  * \param opts NVMe controller initialization options that were actually used.  Options may differ

284  * from the requested options from the probe call depending on what the controller supports.

285  */

286 typedef void (*spdk_nvme_attach_cb)(void *cb_ctx, const struct spdk_nvme_transport_id *trid,

287                                 struct spdk_nvme_ctrlr *ctrlr,

288                                 const struct spdk_nvme_ctrlr_opts *opts);

289

290 /**

291  * Callback for spdk_nvme_probe() to report that a device attached to the userspace NVMe driver

292  * has been removed from the system.

293  *

294  * The controller will remain in a failed state (any new I/O submitted will fail).

295  *

296  * The controller must be detached from the userspace driver by calling spdk_nvme_detach()

297  * once the controller is no longer in use.  It is up to the library user to ensure that

298  * no other threads are using the controller before calling spdk_nvme_detach().

299  *

300  * \param ctrlr NVMe controller instance that was removed.

301  */

302 typedef void (*spdk_nvme_remove_cb)(void *cb_ctx, struct spdk_nvme_ctrlr *ctrlr);

303

304 /**

305  * \brief Enumerate the bus indicated by the transport ID and attach the userspace NVMe driver

306  * to each device found if desired.

307  *

308  * \param trid The transport ID indicating which bus to enumerate. If the trtype is PCIe or trid is NULL,

309  * this will scan the local PCIe bus. If the trtype is RDMA, the traddr and trsvcid must point at the

310  * location of an NVMe-oF discovery service.

311  * \param cb_ctx Opaque value which will be passed back in cb_ctx parameter of the callbacks.

312  * \param probe_cb will be called once per NVMe device found in the system.

313  * \param attach_cb will be called for devices for which probe_cb returned true once that NVMe

314  * controller has been attached to the userspace driver.

315  * \param remove_cb will be called for devices that were attached in a previous spdk_nvme_probe()

316  * call but are no longer attached to the system. Optional; specify NULL if removal notices are not

317  * desired.

318  *

319  * This function is not thread safe and should only be called from one thread at a time while no

320  * other threads are actively using any NVMe devices.

321  *

322  * If called from a secondary process, only devices that have been attached to the userspace driver

323  * in the primary process will be probed.

324  *

325  * If called more than once, only devices that are not already attached to the SPDK NVMe driver

326  * will be reported.

327  *

328  * To stop using the the controller and release its associated resources,

329  * call \ref spdk_nvme_detach with the spdk_nvme_ctrlr instance returned by this function.

330  */

331 int spdk_nvme_probe(const struct spdk_nvme_transport_id *trid,

332                 void *cb_ctx,

333                 spdk_nvme_probe_cb probe_cb,

334                 spdk_nvme_attach_cb attach_cb,

335                 spdk_nvme_remove_cb remove_cb);
为了不被proce_cb, attach_cb, remove_cb带跑偏了,我们接下来看看结构体struct spdk_nvme_transport_id和spdk_nvme_probe()函数的主逻辑。
- src/spdk-17.07.1/include/spdk/nvme.h
142 /**

143  * NVMe transport identifier.

144  *

145  * This identifies a unique endpoint on an NVMe fabric.

146  *

147  * A string representation of a transport ID may be converted to this type using

148  * spdk_nvme_transport_id_parse().

149  */

150 struct spdk_nvme_transport_id {

151     /**

152      * NVMe transport type.

153      */

154     enum spdk_nvme_transport_type trtype;

155

156     /**

157      * Address family of the transport address.

158      *

159      * For PCIe, this value is ignored.

160      */

161     enum spdk_nvmf_adrfam adrfam;

162

163     /**

164      * Transport address of the NVMe-oF endpoint. For transports which use IP

165      * addressing (e.g. RDMA), this should be an IP address. For PCIe, this

166      * can either be a zero length string (the whole bus) or a PCI address

167      * in the format DDDD:BB:DD.FF or DDDD.BB.DD.FF

168      */

169     char traddr[SPDK_NVMF_TRADDR_MAX_LEN + 1];

170

171     /**

172      * Transport service id of the NVMe-oF endpoint.  For transports which use

173      * IP addressing (e.g. RDMA), this field shoud be the port number. For PCIe,

174      * this is always a zero length string.

175      */

176     char trsvcid[SPDK_NVMF_TRSVCID_MAX_LEN + 1];

177

178     /**

179      * Subsystem NQN of the NVMe over Fabrics endpoint. May be a zero length string.

180      */

181     char subnqn[SPDK_NVMF_NQN_MAX_LEN + 1];

182 };
对于NVMe over PCIe, 我们只需要关注"NVMe transport type"这一项:
154 enum spdk_nvme_transport_type trtype;
而目前,支持两种传输类型, PCIe和RDMA。
130 enum spdk_nvme_transport_type {

131     /**

132      * PCIe Transport (locally attached devices)

133      */

134     SPDK_NVME_TRANSPORT_PCIE = 256,

135

136     /**

137      * RDMA Transport (RoCE, iWARP, etc.)

138      */

139     SPDK_NVME_TRANSPORT_RDMA = SPDK_NVMF_TRTYPE_RDMA,

140 };
有关RDMA的问题,我们后面暂时不做讨论,因为我们目前主要关心NVMe over PCIe。
接下来看函数spdk_nvme_probe()的代码,
- src/spdk-17.07.1/lib/nvme/nvme.c
396 int

397 spdk_nvme_probe(const struct spdk_nvme_transport_id *trid, void *cb_ctx,

398             spdk_nvme_probe_cb probe_cb, spdk_nvme_attach_cb attach_cb,

399             spdk_nvme_remove_cb remove_cb)

400 {

401     int rc;

402     struct spdk_nvme_ctrlr *ctrlr;

403     struct spdk_nvme_transport_id trid_pcie;

404

405     rc = nvme_driver_init();

406     if (rc != 0) {

407             return rc;

408     }

409

410     if (trid == NULL) {

411             memset(&trid_pcie, 0, sizeof(trid_pcie));

412             trid_pcie.trtype = SPDK_NVME_TRANSPORT_PCIE;

413             trid = &trid_pcie;

414     }

415

416     if (!spdk_nvme_transport_available(trid->trtype)) {

417             SPDK_ERRLOG("NVMe trtype %u not available\n", trid->trtype);

418             return -1;

419     }

420

421     nvme_robust_mutex_lock(&g_spdk_nvme_driver->lock);

422

423     nvme_transport_ctrlr_scan(trid, cb_ctx, probe_cb, remove_cb);

424

425     if (!spdk_process_is_primary()) {

426             TAILQ_FOREACH(ctrlr, &g_spdk_nvme_driver->attached_ctrlrs, tailq) {

427                     nvme_ctrlr_proc_get_ref(ctrlr);

428

429                     /*

430                      * Unlock while calling attach_cb() so the user can call other functions

431                      *  that may take the driver lock, like nvme_detach().

432                      */

433                     nvme_robust_mutex_unlock(&g_spdk_nvme_driver->lock);

434                     attach_cb(cb_ctx, &ctrlr->trid, ctrlr, &ctrlr->opts);

435                     nvme_robust_mutex_lock(&g_spdk_nvme_driver->lock);

436             }

437

438             nvme_robust_mutex_unlock(&g_spdk_nvme_driver->lock);

439             return 0;

440     }

441

442     nvme_robust_mutex_unlock(&g_spdk_nvme_driver->lock);

443     /*

444      * Keep going even if one or more nvme_attach() calls failed,

445      *  but maintain the value of rc to signal errors when we return.

446      */

447

448     rc = nvme_init_controllers(cb_ctx, attach_cb);

449

450     return rc;

451 }
spdk_nvme_probe()的处理流程为:
001 405:         rc = nvme_driver_init();

002 410-414: set trid if it is NULL

003 416:     check NVMe trtype via spdk_nvme_transport_available(trid->trtype)

004 423:     nvme_transport_ctrlr_scan(trid, cb_ctx, probe_cb, remove_cb);

005 425:     check spdk process is primary, if not, do something at L426-440

006 448:         rc = nvme_init_controllers(cb_ctx, attach_cb);
接下来,让我们看看函数nvme_transport_ctrlr_scan(),
423 nvme_transport_ctrlr_scan(trid, cb_ctx, probe_cb, remove_cb);
/* src/spdk-17.07.1/lib/nvme/nvme_transport.c#92 */

91 int

92 nvme_transport_ctrlr_scan(const struct spdk_nvme_transport_id *trid,

93                        void *cb_ctx,

94                        spdk_nvme_probe_cb probe_cb,

95                        spdk_nvme_remove_cb remove_cb)

96 {

97      NVME_TRANSPORT_CALL(trid->trtype, ctrlr_scan, (trid, cb_ctx, probe_cb, remove_cb));

98 }
而宏NVME_TRANSPORT_CALL的定义是:
/* src/spdk-17.07.1/lib/nvme/nvme_transport.c#60 */

52 #define TRANSPORT_PCIE(func_name, args)      case SPDK_NVME_TRANSPORT_PCIE: return nvme_pcie_ ## func_name args;

..

60 #define NVME_TRANSPORT_CALL(trtype, func_name, args)         \

61      do {                                                    \

62              switch (trtype) {                               \

63              TRANSPORT_PCIE(func_name, args)                 \

64              TRANSPORT_FABRICS_RDMA(func_name, args)         \

65              TRANSPORT_DEFAULT(trtype)                       \

66              }                                               \

67              SPDK_UNREACHABLE();                             \

68      } while (0)

..
于是, nvme_transport_ctrlr_scan()被转化为nvme_pcie_ctrlr_scan()调用(对NVMe over PCIe)来说,
/* src/spdk-17.07.1/lib/nvme/nvme_pcie.c#620 */

619 int

620 nvme_pcie_ctrlr_scan(const struct spdk_nvme_transport_id *trid,

621                  void *cb_ctx,

622                  spdk_nvme_probe_cb probe_cb,

623                  spdk_nvme_remove_cb remove_cb)

624 {

625     struct nvme_pcie_enum_ctx enum_ctx = {};

626

627     enum_ctx.probe_cb = probe_cb;

628     enum_ctx.cb_ctx = cb_ctx;

629

630     if (strlen(trid->traddr) != 0) {

631             if (spdk_pci_addr_parse(&enum_ctx.pci_addr, trid->traddr)) {

632                     return -1;

633             }

634             enum_ctx.has_pci_addr = true;

635     }

636

637     if (hotplug_fd < 0) {

638             hotplug_fd = spdk_uevent_connect();

639             if (hotplug_fd < 0) {

640                     SPDK_TRACELOG(SPDK_TRACE_NVME, "Failed to open uevent netlink socket\n");

641             }

642     } else {

643             _nvme_pcie_hotplug_monitor(cb_ctx, probe_cb, remove_cb);

644     }

645

646     if (enum_ctx.has_pci_addr == false) {

647             return spdk_pci_nvme_enumerate(pcie_nvme_enum_cb, &enum_ctx);

648     } else {

649             return spdk_pci_nvme_device_attach(pcie_nvme_enum_cb, &enum_ctx, &enum_ctx.pci_addr);

650     }

651 }
接下来重点看看L647对应的函数spck_pci_nvme_enumerate()就好,因为我们的目标是看明白是如何利用Class Code发现SSD设备的。
647 return spdk_pci_nvme_enumerate(pcie_nvme_enum_cb, &enum_ctx);
/* src/spdk-17.07.1/lib/env_dpdk/pci_nvme.c */

81 int

82 spdk_pci_nvme_enumerate(spdk_pci_enum_cb enum_cb, void *enum_ctx)

83 {

84      return spdk_pci_enumerate(&g_nvme_pci_drv, enum_cb, enum_ctx);

85 }
注意: L84第一个参数为一个全局变量g_nvme_pci_drv的地址, ( 看到一个全局结构体变量总是令人兴奋的:-) )
/* src/spdk-17.07.1/lib/env_dpdk/pci_nvme.c */

38 static struct rte_pci_id nvme_pci_driver_id[] = {

39 #if RTE_VERSION >= RTE_VERSION_NUM(16, 7, 0, 1)

40      {

41              .class_id = SPDK_PCI_CLASS_NVME,

42              .vendor_id = PCI_ANY_ID,

43              .device_id = PCI_ANY_ID,

44              .subsystem_vendor_id = PCI_ANY_ID,

45              .subsystem_device_id = PCI_ANY_ID,

46      },

47 #else

48      {RTE_PCI_DEVICE(0x8086, 0x0953)},

49 #endif

50      { .vendor_id = 0, /* sentinel */ },

51 };

..

53 static struct spdk_pci_enum_ctx g_nvme_pci_drv = {

54      .driver = {

55              .drv_flags      = RTE_PCI_DRV_NEED_MAPPING,

56              .id_table       = nvme_pci_driver_id,

..

66      },

67

68      .cb_fn = NULL,

69      .cb_arg = NULL,

70      .mtx = PTHREAD_MUTEX_INITIALIZER,

71      .is_registered = false,

72 };
啊哈! 终于跟Class Code (SPDK_PCI_CLASS_NVME=0x010802)扯上了关系。 全局变量g_nvme_pci_drv就是在L53行定义的,而g_nvme_pci_drv.driver.id_table则是在L38行定义的。
38 static struct rte_pci_id nvme_pci_driver_id[] = {

..

41              .class_id = SPDK_PCI_CLASS_NVME,

..

53 static struct spdk_pci_enum_ctx g_nvme_pci_drv = {

54      .driver = {

..

56              .id_table       = nvme_pci_driver_id,

..
那么,我们只需要进一步深挖spdk_pci_enumerate()就可以找到SSD设备是如何被发现的了...
/* src/spdk-17.07.1/lib/env_dpdk/pci.c#150 */

149 int

150 spdk_pci_enumerate(struct spdk_pci_enum_ctx *ctx,

151                spdk_pci_enum_cb enum_cb,

152                void *enum_ctx)

153 {

...

168

169 #if RTE_VERSION >= RTE_VERSION_NUM(17, 05, 0, 4)

170     if (rte_pci_probe() != 0) {

171 #else

172     if (rte_eal_pci_probe() != 0) {

173 #endif

...

184     return 0;

185 }
省略了一些代码,我们接下来重点关注L170,
170 if (rte_pci_probe() != 0) {
从rte_pci_probe()函数的实现开始,我们就深入到DPDK的内部了,代码如下,
/* src/dpdk-17.08/lib/librte_eal/common/eal_common_pci.c#413 */

407 /*

408  * Scan the content of the PCI bus, and call the probe() function for

409  * all registered drivers that have a matching entry in its id_table

410  * for discovered devices.

411  */

412 int

413 rte_pci_probe(void)

414 {

415     struct rte_pci_device *dev = NULL;

416     size_t probed = 0, failed = 0;

417     struct rte_devargs *devargs;

418     int probe_all = 0;

419     int ret = 0;

420

421     if (rte_pci_bus.bus.conf.scan_mode != RTE_BUS_SCAN_WHITELIST)

422             probe_all = 1;

423

424     FOREACH_DEVICE_ON_PCIBUS(dev) {

425             probed++;

426

427             devargs = dev->device.devargs;

428             /* probe all or only whitelisted devices */

429             if (probe_all)

430                     ret = pci_probe_all_drivers(dev);

431             else if (devargs != NULL &&

432                     devargs->policy == RTE_DEV_WHITELISTED)

433                     ret = pci_probe_all_drivers(dev);

434             if (ret < 0) {

435                     RTE_LOG(ERR, EAL, "Requested device " PCI_PRI_FMT

436                              " cannot be used\n", dev->addr.domain, dev->addr.bus,

437                              dev->addr.devid, dev->addr.function);

438                     rte_errno = errno;

439                     failed++;

440                     ret = 0;

441             }

442     }

443

444     return (probed && probed == failed) ? -1 : 0;

445 }
L430是我们关注的重点,
430 ret = pci_probe_all_drivers(dev);
函数pci_probe_all_drivers()的实现如下:
/* src/dpdk-17.08/lib/librte_eal/common/eal_common_pci.c#307 */

301 /*

302  * If vendor/device ID match, call the probe() function of all

303  * registered driver for the given device. Return -1 if initialization

304  * failed, return 1 if no driver is found for this device.

305  */

306 static int

307 pci_probe_all_drivers(struct rte_pci_device *dev)

308 {

309     struct rte_pci_driver *dr = NULL;

310     int rc = 0;

311

312     if (dev == NULL)

313             return -1;

314

315     /* Check if a driver is already loaded */

316     if (dev->driver != NULL)

317             return 0;

318

319     FOREACH_DRIVER_ON_PCIBUS(dr) {

320             rc = rte_pci_probe_one_driver(dr, dev);

321             if (rc < 0)

322                     /* negative value is an error */

323                     return -1;

324             if (rc > 0)

325                     /* positive value means driver doesn't support it */

326                     continue;

327             return 0;

328     }

329     return 1;

330 }
L320是我们关注的重点,
320 rc = rte_pci_probe_one_driver(dr, dev);
/* src/dpdk-17.08/lib/librte_eal/common/eal_common_pci.c#200 */

195 /*

196  * If vendor/device ID match, call the probe() function of the

197  * driver.

198  */

199 static int

200 rte_pci_probe_one_driver(struct rte_pci_driver *dr,

201                      struct rte_pci_device *dev)

202 {

203     int ret;

204     struct rte_pci_addr *loc;

205

206     if ((dr == NULL) || (dev == NULL))

207             return -EINVAL;

208

209     loc = &dev->addr;

210

211     /* The device is not blacklisted; Check if driver supports it */

212     if (!rte_pci_match(dr, dev))

213             /* Match of device and driver failed */

214             return 1;

215

216     RTE_LOG(INFO, EAL, "PCI device "PCI_PRI_FMT" on NUMA socket %i\n",

217                     loc->domain, loc->bus, loc->devid, loc->function,

218                     dev->device.numa_node);

219

220     /* no initialization when blacklisted, return without error */

221     if (dev->device.devargs != NULL &&

222             dev->device.devargs->policy ==

223                     RTE_DEV_BLACKLISTED) {

224             RTE_LOG(INFO, EAL, "  Device is blacklisted, not"

225                     " initializing\n");

226             return 1;

227     }

228

229     if (dev->device.numa_node < 0) {

230             RTE_LOG(WARNING, EAL, "  Invalid NUMA socket, default to 0\n");

231             dev->device.numa_node = 0;

232     }

233

234     RTE_LOG(INFO, EAL, "  probe driver: %x:%x %s\n", dev->id.vendor_id,

235             dev->id.device_id, dr->driver.name);

236

237     if (dr->drv_flags & RTE_PCI_DRV_NEED_MAPPING) {

238             /* map resources for devices that use igb_uio */

239             ret = rte_pci_map_device(dev);

240             if (ret != 0)

241                     return ret;

242     }

243

244     /* reference driver structure */

245     dev->driver = dr;

246     dev->device.driver = &dr->driver;

247

248     /* call the driver probe() function */

249     ret = dr->probe(dr, dev);

250     if (ret) {

251             dev->driver = NULL;

252             dev->device.driver = NULL;

253             if ((dr->drv_flags & RTE_PCI_DRV_NEED_MAPPING) &&

254                     /* Don't unmap if device is unsupported and

255                      * driver needs mapped resources.

256                      */

257                     !(ret > 0 &&

258                             (dr->drv_flags & RTE_PCI_DRV_KEEP_MAPPED_RES)))

259                     rte_pci_unmap_device(dev);

260     }

261

262     return ret;

263 }
L212是我们关注的重点,
212 if (!rte_pci_match(dr, dev))
而rte_pci_match()的实现如下,
/* src/dpdk-17.08/lib/librte_eal/common/eal_common_pci.c#163 */

151 /*

152  * Match the PCI Driver and Device using the ID Table

153  *

154  * @param pci_drv

155  *  PCI driver from which ID table would be extracted

156  * @param pci_dev

157  *  PCI device to match against the driver

158  * @return

159  *  1 for successful match

160  *  0 for unsuccessful match

161  */

162 static int

163 rte_pci_match(const struct rte_pci_driver *pci_drv,

164               const struct rte_pci_device *pci_dev)

165 {

166     const struct rte_pci_id *id_table;

167

168     for (id_table = pci_drv->id_table; id_table->vendor_id != 0;

169          id_table++) {

170             /* check if device's identifiers match the driver's ones */

171             if (id_table->vendor_id != pci_dev->id.vendor_id &&

172                             id_table->vendor_id != PCI_ANY_ID)

173                     continue;

174             if (id_table->device_id != pci_dev->id.device_id &&

175                             id_table->device_id != PCI_ANY_ID)

176                     continue;

177             if (id_table->subsystem_vendor_id !=

178                 pci_dev->id.subsystem_vendor_id &&

179                 id_table->subsystem_vendor_id != PCI_ANY_ID)

180                     continue;

181             if (id_table->subsystem_device_id !=

182                 pci_dev->id.subsystem_device_id &&

183                 id_table->subsystem_device_id != PCI_ANY_ID)

184                     continue;

185             if (id_table->class_id != pci_dev->id.class_id &&

186                             id_table->class_id != RTE_CLASS_ANY_ID)

187                     continue;

188

189             return 1;

190     }

191

192     return 0;

193 }
看到这里,我们终于找到了SSD设备是如何被发现的, L185-187是我们最希望看到的三行代码:
185             if (id_table->class_id != pci_dev->id.class_id &&

186                             id_table->class_id != RTE_CLASS_ANY_ID)

187                     continue;
而结构体struct rte_pci_driver和struct rte_pci_device的定义为:
/* src/dpdk-17.08/lib/librte_eal/common/include/rte_pci.h#100 */

96  /**

97   * A structure describing an ID for a PCI driver. Each driver provides a

98   * table of these IDs for each device that it supports.

99   */

100 struct rte_pci_id {

101     uint32_t class_id;            /**< Class ID (class, subclass, pi) or RTE_CLASS_ANY_ID. */

102     uint16_t vendor_id;           /**< Vendor ID or PCI_ANY_ID. */

103     uint16_t device_id;           /**< Device ID or PCI_ANY_ID. */

104     uint16_t subsystem_vendor_id; /**< Subsystem vendor ID or PCI_ANY_ID. */

105     uint16_t subsystem_device_id; /**< Subsystem device ID or PCI_ANY_ID. */

106 };

/* src/dpdk-17.08/lib/librte_eal/common/include/rte_pci.h#120 */

120 /**

121  * A structure describing a PCI device.

122  */

123 struct rte_pci_device {

124     TAILQ_ENTRY(rte_pci_device) next;       /**< Next probed PCI device. */

125     struct rte_device device;               /**< Inherit core device */

126     struct rte_pci_addr addr;               /**< PCI location. */

127     struct rte_pci_id id;                   /**< PCI ID. */

128     struct rte_mem_resource mem_resource[PCI_MAX_RESOURCE];

129                                             /**< PCI Memory Resource */

130     struct rte_intr_handle intr_handle;     /**< Interrupt handle */

131     struct rte_pci_driver *driver;          /**< Associated driver */

132     uint16_t max_vfs;                       /**< sriov enable if not zero */

133     enum rte_kernel_driver kdrv;            /**< Kernel driver passthrough */

134     char name[PCI_PRI_STR_SIZE+1];          /**< PCI location (ASCII) */

135 };

/* src/dpdk-17.08/lib/librte_eal/common/include/rte_pci.h#178 */

175 /**

176  * A structure describing a PCI driver.

177  */

178 struct rte_pci_driver {

179     TAILQ_ENTRY(rte_pci_driver) next;       /**< Next in list. */

180     struct rte_driver driver;               /**< Inherit core driver. */

181     struct rte_pci_bus *bus;                /**< PCI bus reference. */

182     pci_probe_t *probe;                     /**< Device Probe function. */

183     pci_remove_t *remove;                   /**< Device Remove function. */

184     const struct rte_pci_id *id_table;      /**< ID table, NULL terminated. */

185     uint32_t drv_flags;                     /**< Flags contolling handling of device. */

186 };
到此为止,我们可以对SSD设备发现做如下总结:
- 01 - 使用Class Code (0x010802)作为SSD设备发现的依据
- 02 - 发现SSD设备的时候,从SPDK进入到DPDK中,函数调用栈为:
00 hello_word.c

01 -> main()

02 --> spdk_nvme_probe()

03 ---> nvme_transport_ctrlr_scan()

04 ----> nvme_pcie_ctrlr_scan()

05 -----> spdk_pci_nvme_enumerate()

06 ------> spdk_pci_enumerate(&g_nvme_pci_drv, ...)                 | SPDK |

   =========================================================================

07 -------> rte_pci_probe()                                         | DPDK |

08 --------> pci_probe_all_drivers()

09 ---------> rte_pci_probe_one_driver()

10 ----------> rte_pci_match()
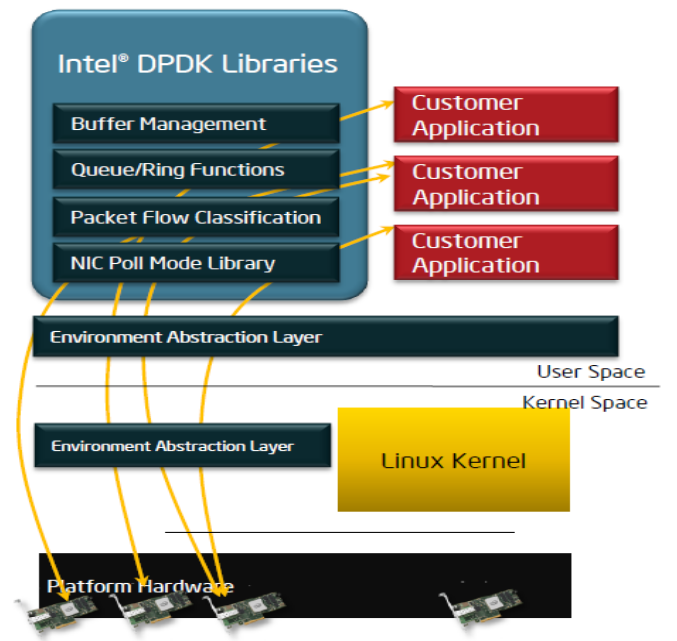
- 03 - DPDK中环境抽象层(EAL: Environment Abstraction Layer)的函数rte_pci_match()是发现SSD设备的关键。
- 04 - DPDK的EAL在DPDK架构中所处的位置,如下图所示:
Your greatness is measured by your horizons. | 你的成就是由你的眼界来衡量的。
[SPDK/NVMe存储技术分析]004 - SSD设备的发现的更多相关文章
- [SPDK/NVMe存储技术分析]003 - NVMeDirect论文
说明: 之所以要翻译这篇论文,是因为参考此论文可以很好地理解SPDK/NVMe的设计思想. NVMeDirect: A User-space I/O Framework for Application ...
- [SPDK/NVMe存储技术分析]002 - SPDK官方介绍
Introduction to the Storage Performance Development Kit (SPDK) | SPDK概述 By Jonathan S. (Intel), Upda ...
- [SPDK/NVMe存储技术分析]001 - SPDK/NVMe概述
1. NVMe概述 NVMe是一个针对基于PCIe的固态硬盘的高性能的.可扩展的主机控制器接口. NVMe的显著特征是提供多个队列来处理I/O命令.单个NVMe设备支持多达64K个I/O 队列,每个I ...
- [SPDK/NVMe存储技术分析]008 - RDMA概述
毫无疑问地,用来取代iSCSI/iSER(iSCSI Extensions for RDMA)技术的NVMe over Fabrics着实让RDMA又火了一把.在介绍NVMe over Fabrics ...
- [SPDK/NVMe存储技术分析]005 - DPDK概述
注: 之所以要中英文对照翻译下面的文章,是因为SPDK严重依赖于DPDK的实现. Introduction to DPDK: Architecture and PrinciplesDPDK概论:体系结 ...
- [SPDK/NVMe存储技术分析]012 - 用户态ibv_post_send()源码分析
OFA定义了一组标准的Verbs,并提供了一个标准库libibvers.在用户态实现NVMe over RDMA的Host(i.e. Initiator)和Target, 少不了要跟OFA定义的Ver ...
- [SPDK/NVMe存储技术分析]007 - 初识UIO
注: 要进一步搞清楚SSD盘对应的PCI的BAR寄存器的映射,有必要先了解一下UIO(Userspace I/O). UIO(Userspace I/O)是运行在用户空间的I/O技术.在Linux系统 ...
- [SPDK/NVMe存储技术分析]015 - 理解内存注册(Memory Registration)
使用RDMA, 必然关系到内存区域(Memory Region)的注册问题.在本文中,我们将以mlx5 HCA卡为例回答如下几个问题: 为什么需要注册内存区域? 注册内存区域有嘛好处? 注册内存区域的 ...
- [SPDK/NVMe存储技术分析]014 - (NVMe over PCIe)Host端的命令处理流程
NVMe over PCIe最新的NVMe协议是1.3. 在7.2.1讲了Command Processing流程.有图有真相. This section describes command subm ...
随机推荐
- [翻译]Introduction to JSON Web Tokens
JWT: Json Web Tokens JWT是一种开放标准(RFC 7519),它定义了一种紧凑且独立的方式,用于将各方之间的信息安全地传输为JSON对象.因为它是经过数字签名的,所以该信息可以进 ...
- java Excel 简单工具
我就简单的分享一下我常用的工具 这次由于个人问题工具注释全部乱码差点无法还原,也是为了防止数据丢失后期找不到再次保留方法把. 调用工具个别方法 <dependency> <group ...
- 我们一起来学Shell - shell的函数
文章目录 定义函数 执行不带参数的函数 执行带参数的函数 函数的执行总结 我们一起来学Shell - 初识shell 我们一起来学Shell - shell的变量 我们一起来学Shell - shel ...
- Ultra Math Preview : VSCode上的LaTeX公式实时预览插件
一直觉着 VS Code 的 TeX 公式(包括 markdown 和 LaTeX)只能在定界符上hover预览,或者开一个预览面板看,没有那种像 Typora 一样紧跟在公式后面的预览面板,多少有些 ...
- scrapy爬取《坏蛋是怎样练成的4》
scrapy具体介绍就不用说了,自己百度一下.或者参考以下文档 https://blog.csdn.net/u011054333/article/details/70165401 直接在cmd里运行 ...
- containerd与kubernetes集成部署
概念介绍 cri (Container runtime interface) cri is a containerd plugin implementation of Kubernetes conta ...
- vs2022 如何让.net库文件参与程序调试【可以.net库文件的源代码中设置断点,单步跟踪】
由于.net core 是开源的.所以可以让.net库文件参与程序调试.具体vs2022配置如下 1.设置VS2022 加载程序数据文件(.pdb俗称符号文件) 1)选择工具>选项>调试& ...
- (一) operator、explicit与implicit 操作符重载
原文地址: Click Here 操作符重载必须用public static 应为操作符是用来操作实例的. operator operator ...
- Qt:QThread
0.说明 QThread提供了一种与平台无关的线程管理方法. 一个QThread对象管理一个线程.QThread通过run()方法启动线程.默认情况下,run()方法通过exec()启动一个事件循环, ...
- jq获取不包含某些属性的元素
最近写项目,有个功能实现checkbox全选,但是被禁用的checkbox不能选中 点击全选后发现禁用checkbox的也被选中了,不符合需求. 但是想了半天,属性选择器都是判断某个属性值的,没有判断 ...