不规则形状的Mask动画
不规则形状的Mask动画

效果

源码
https://github.com/YouXianMing/Animations
//
// MaskShapeViewController.m
// Animations
//
// Created by YouXianMing on 16/7/10.
// Copyright © 2016年 YouXianMing. All rights reserved.
// #import "MaskShapeViewController.h"
#import "AppleSystemService.h"
#import "JSAnimatedImagesView.h"
#import "CutOutClearView.h"
#import "UIView+SetRect.h"
#import "UIFont+Fonts.h"
#import "FBShimmeringView.h" typedef enum : NSUInteger { kUpJsView = ,
kDownJsView, } EMaskShapeViewControllerValue; @interface MaskShapeViewController () <JSAnimatedImagesViewDataSource> @property (nonatomic, strong) JSAnimatedImagesView *upJsView;
@property (nonatomic, strong) NSArray *upDataSource; @property (nonatomic, strong) JSAnimatedImagesView *downJsView;
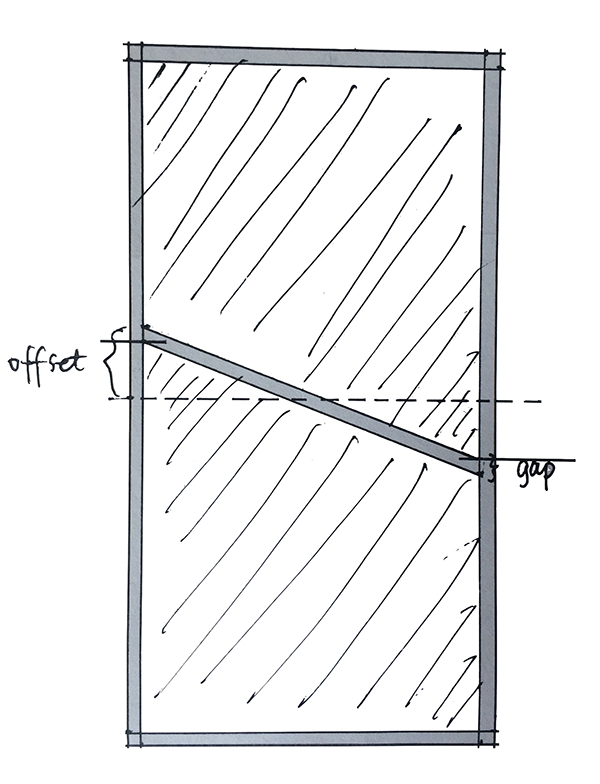
@property (nonatomic, strong) NSArray *downDataSource; @end @implementation MaskShapeViewController - (void)setup { [super setup]; self.backgroundView.backgroundColor = [UIColor blackColor]; CGFloat gap = .f;
CGFloat offset = .f; {
CutOutClearView *areaView = [[CutOutClearView alloc] initWithFrame:CGRectMake(, , Width, self.contentView.height / .f + offset - gap)];
areaView.fillColor = [UIColor clearColor];
areaView.areaColor = [UIColor blackColor]; UIBezierPath *path = [UIBezierPath bezierPath];
[path moveToPoint:CGPointMake(gap, gap)];
[path addLineToPoint:CGPointMake(Width - gap, gap)];
[path addLineToPoint:CGPointMake(Width - gap, areaView.height)];
[path addLineToPoint:CGPointMake(gap, areaView.height - (offset - gap) * - gap)];
[path closePath];
areaView.paths = @[path]; self.upDataSource = @[[UIImage imageNamed:@""],
[UIImage imageNamed:@""],
[UIImage imageNamed:@""],
[UIImage imageNamed:@""],
[UIImage imageNamed:@""]]; self.upJsView = [[JSAnimatedImagesView alloc] initWithFrame:CGRectMake(, , Width, self.contentView.height / .f + offset - gap)];
self.upJsView.transitionDuration = .f;
self.upJsView.tag = kUpJsView;
self.upJsView.dataSource = self;
self.upJsView.layer.masksToBounds = YES;
self.upJsView.maskView = areaView;
[self.contentView addSubview:self.upJsView];
} {
CutOutClearView *areaView = [[CutOutClearView alloc] initWithFrame:CGRectMake(, , Width, self.contentView.height / .f + (offset - gap))];
areaView.fillColor = [UIColor clearColor];
areaView.areaColor = [UIColor blackColor]; UIBezierPath *path = [UIBezierPath bezierPath];
[path moveToPoint:CGPointMake(gap, )];
[path addLineToPoint:CGPointMake(gap, areaView.height - gap)];
[path addLineToPoint:CGPointMake(Width - gap, areaView.height - gap)];
[path addLineToPoint:CGPointMake(Width - gap, (offset - gap) * + gap)];
[path closePath];
areaView.paths = @[path]; self.downDataSource = @[[UIImage imageNamed:@"pic_1"],
[UIImage imageNamed:@"pic_2"],
[UIImage imageNamed:@"pic_3"],
[UIImage imageNamed:@"pic_4"]]; self.downJsView = [[JSAnimatedImagesView alloc] initWithFrame:CGRectMake(, , Width, self.contentView.height / .f + offset - gap)];
self.downJsView.transitionDuration = .f;
self.downJsView.tag = kDownJsView;
self.downJsView.dataSource = self;
self.downJsView.layer.masksToBounds = YES;
self.downJsView.maskView = areaView; self.downJsView.bottom = self.contentView.height;
[self.contentView addSubview:self.downJsView];
}
} #pragma mark - JSAnimatedImagesViewDataSource - (NSUInteger)animatedImagesNumberOfImages:(JSAnimatedImagesView *)animatedImagesView { NSUInteger count = ;
animatedImagesView.tag == kUpJsView ? (count = self.upDataSource.count) : (count = self.downDataSource.count); return count;
} - (UIImage *)animatedImagesView:(JSAnimatedImagesView *)animatedImagesView imageAtIndex:(NSUInteger)index { UIImage *image = nil;
animatedImagesView.tag == kUpJsView ? (image = self.upDataSource[index]) : (image = self.downDataSource[index]); return image;
} #pragma mark - Overwrite methods. - (void)buildTitleView { [super buildTitleView]; // Title label.
UILabel *headlinelabel = [UILabel new];
headlinelabel.font = [UIFont HeitiSCWithFontSize:.f];
headlinelabel.textAlignment = NSTextAlignmentCenter;
headlinelabel.textColor = [UIColor cyanColor];
headlinelabel.text = self.title;
[headlinelabel sizeToFit]; headlinelabel.center = self.titleView.middlePoint; FBShimmeringView *shimmeringView = [[FBShimmeringView alloc] initWithFrame:self.titleView.bounds];
shimmeringView.shimmering = YES;
shimmeringView.shimmeringBeginFadeDuration = 0.3;
shimmeringView.shimmeringOpacity = 0.1f;
shimmeringView.shimmeringAnimationOpacity = .f;
[self.titleView addSubview:shimmeringView]; shimmeringView.contentView = headlinelabel; // Line.
UIView *line = [[UIView alloc] initWithFrame:CGRectMake(, 63.5, self.view.width, 0.5f)];
line.backgroundColor = [[UIColor grayColor] colorWithAlphaComponent:0.25f];
[self.titleView addSubview:line];
[self.titleView addSubview:headlinelabel]; // Back button.
UIImage *image = [UIImage imageNamed:@"backIconVer2"];
UIButton *backButton = [[UIButton alloc] initWithFrame:CGRectMake(, , , )];
backButton.center = CGPointMake(, self.titleView.middleY);
[backButton setImage:image forState:UIControlStateNormal];
[backButton addTarget:self action:@selector(popSelf) forControlEvents:UIControlEventTouchUpInside];
[backButton.imageView setContentMode:UIViewContentModeCenter];
[self.titleView addSubview:backButton];
} - (void)popSelf { [self popViewControllerAnimated:YES];
} @end
细节
//

//  CutOutClearView.h

//  Animations

//

//  Created by YouXianMing on 16/7/10.

//  Copyright © 2016年 YouXianMing. All rights reserved.

//

#import <UIKit/UIKit.h>

@interface CutOutClearView : UIView

/**

 *  The total fill color, you can used it as the view's background color.

 */

@property (nonatomic, strong) UIColor  *fillColor;

/**

 *  The paths area color.

 */

@property (nonatomic, strong) UIColor  *areaColor;

/**

 *  Path array.

 */

@property (nonatomic, strong) NSArray  <UIBezierPath *>  *paths;

@end
//

//  CutOutClearView.m

//  Animations

//

//  Created by YouXianMing on 16/7/10.

//  Copyright © 2016年 YouXianMing. All rights reserved.

//

#import "CutOutClearView.h"

@implementation CutOutClearView

- (instancetype)initWithFrame:(CGRect)frame {

    if (self = [super initWithFrame:frame]) {

        self.fillColor       = [UIColor whiteColor];

        self.backgroundColor = [UIColor clearColor];

        self.opaque          = NO;

    }

    return self;

}

- (void)drawRect:(CGRect)rect {

    [super drawRect:rect];

    [self.fillColor setFill];

    UIRectFill(rect);

    CGContextRef context = UIGraphicsGetCurrentContext();

    if (self.areaColor && self.paths.count) {

        UIBezierPath *path = nil;

        for (int i = ; i < self.paths.count; i++) {

            i ==  ? path = self.paths[i] : [path appendPath:self.paths[i]];

        }

        CGFloat red   = ;

        CGFloat green = ;

        CGFloat blue  = ;

        CGFloat alpha = ;

        [self.areaColor getRed:&red green:&green blue:&blue alpha:&alpha];

        CGContextAddPath(context, path.CGPath);

        CGContextSetRGBFillColor(context, red, green, blue, alpha);

        CGContextFillPath(context);

    } else {

        for (UIBezierPath *path in self.paths) {

            CGContextAddPath(context, path.CGPath);

            CGContextSetBlendMode(context, kCGBlendModeClear);

            CGContextFillPath(context);

        }

    }

}

@end
不规则形状的Mask动画的更多相关文章
- 使用Win32 API创建不规则形状&带透明色的窗口
前一阵突然想起了9月份电面某公司实习时的二面题,大概就是说怎么用Win32 API实现一个透明的窗口,估计当时我的脑残答案肯定让面试官哭笑不得吧.所以本人决定好好研究下这个问题.经过一下午的摸索,基本 ...
- cocos2d-x 不规则形状按钮的点击判定
cocos2d-x 不规则形状按钮的点击判定 原理: 1.OpeGL ES提供了glReadPixels[^footnote]函数,来获取当前framebuffer上的像素数据 2.cocos2d-x ...
- 图片碎片化mask动画
图片碎片化mask动画 效果 源码 https://github.com/YouXianMing/Animations // // TransformFadeViewController.m // A ...
- Unity---动画系统学习(6)---Avatar Mask动画融合、Layers动画分层、IK反向动力学
1. 介绍 Avatar Mask(动画融合) 前面我们一直介绍的都是动画混合,一般用于解决边跑边转弯的问题.而动画融合一般用于解决例如边跑边挥手的问题. 简单说就是让跑步去控制腿的骨骼,挥手控制手的 ...
- html5 svg实现不规则形状图片触发事件
html5 svg实现不规则形状图片触发事件<pre><!DOCTYPE html><html lang="en"> <head> ...
- 不规则形状的Ifc构件顶点坐标获取
不规则形状的Ifc构件顶点坐标获取 今天有人问我,ifc构件的顶点坐标怎么获取,自己前年的时候写过类似的程序,但有点记不清了,最近一直用C++解析ifc,慎重起见,还是重新再写一次,java版本的获取 ...
- Unity 制作不规则形状button
在游戏开发中,我们有时需要制作不规则形状的按键. Unity3d中使用UGUI的Button控件只能实现规则的长方形按钮.而通过给Button的Image组件添加对应的贴图(sprite)我们可以实现 ...
- 动效解析工厂:Mask 动画
转载自:http://www.cocoachina.com/ios/20160214/15250.html 前言:很多动效都是多种动画的组合,有时候你可能只是需要其中某个动画,但面对庞杂的代码库或是教 ...
- pyqt 不规则形状窗口显示
#coding=utf- import sys from PyQt5.QtCore import Qt from PyQt5.QtWidgets import QWidget, QApplicatio ...
随机推荐
- MAC下代理工具Charles使用
一.跟踪HTTPS 1.下载官方的证书ssl.zip证书,解压成*.crt 2.可以通过邮箱或者发布到自己的服务器的方式,然后用手机去下载安装crt文件. 3.charles设置Proxy--> ...
- OpenStack中的Multipath faulty device的成因及解决(part 1)
| 版权:本文版权归作者和博客园共有,欢迎转载,但未经作者同意必须保留此段声明,且在文章页面明显位置给出原文连接.如有问题,可以邮件:wangxu198709@gmail.com 简介: Multip ...
- Java第三阶段学习(十、XML学习)
一.XML学习 1.模拟Servlet执行 在学习完前端及java与数据库后,将进行WEB编程阶段的学习.在WEB编程中,可以通过浏览器访问WEB服务器上的数据.这时WEB服务器就相当于另一台计算机. ...
- 【LOJ】#2115. 「HNOI2015」落忆枫音
题解 如果不加这条边,那么答案是所有点入度的乘积 加上了这条边之后,我们转而统计不合法的方案数 就是相当于统计一条路径从y到x,新图所有点度的乘积除上这条路径所有点的点度乘积 初始化为\(f[y] = ...
- 000 关于IDEA的基本环境配置以及快速使用(git拉载程序,Jdk安装,tomcat部署,应用程序打包运行)
刚开始工作的时候,不熟悉,所以整理过这个文档. 一:导入git程序 1.准备 git链接 IDEA软件,最好是终极版 2.第一步选择从版本控制上选择git 3.拷贝源于目标地址 4.这时候根据引导进行 ...
- jQuery的类数组对象结构(转)
原文:http://www.imooc.com/code/3248 为什么是类数组对象呢? 很多人迷惑的jQuery为什么能像数组一样操作,通过对象get方法或者直接通过下标0索引就能转成DOM对象. ...
- shiro双realm验证
假设现在有这样一种需求:存在两张表user和admin,分别记录普通用户和管理员的信息.并且现在要实现普通用户和管理员的分开登录,即需要两个Realm——UserRealm和AdminRealm,分别 ...
- ADNI数据集相关概念整理
数据类型 临床 遗传 MRI图像 PET图像 生物样本 临床 ADNI临床数据集包括关于每个受试者的临床信息,包括招募,人口统计学,身体检查和认知评估数据.可以将整套临床数据作为逗号分隔值(CSV)文 ...
- 002.LVM创建
一 LVM创建步骤 创建分区 创建PV 创建VG 创建LV 格式化及挂载 二 创建分区 使用分区工具(如fdisk等)创建LVM分区,却将分区标识为LVM的分区类型8e. [root@kauai ~] ...
- 2019 A类