实验10: RIP
实验7-1 : RIPV1
实验目的
通过本实验可以掌握:
1. 在路由器上启动RIPv1 路由进程
2. 启用参与路由协议的接口,并且通告网络
3. 理解路由表的含义
4. 查看和调试RIPv1 路由协议相关信息
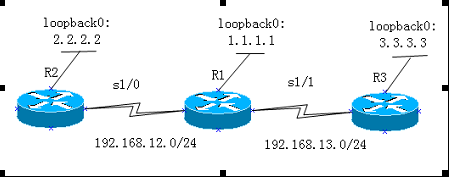
实验拓扑

实验步骤
n 步骤1:配置路由器R2
router(config)#host R2
R2(config)#no ip do lo
R2(config)#int s1/0
R2(config-if)#ip add 192.168.12.2 255.255.255.0
R2(config-if)#no sh
R2(config-if)#int lo0
R2(config-if)#ip add 2.2.2.2 255.255.255.0
R2(config)#router rip
R2(config-router)#version 1
R2(config-router)#network 2.0.0.0
R2(config-router)#network 192.168.12.0
R2(config-router)#passive-interface lo0
n 步骤2:配置路由器R1
router(config)#host R1
R1(config)#no ip do lo
R1(config)#int s1/0
R1(config-if)#ip add 192.168.12.1 255.255.255.0
R1(config-if)#clock rate 64000
R1(config-if)#no sh
R1(config)#int s1/1
R1(config-if)#ip add 192.168.13.1 255.255.255.0
R1(config-if)#clock rate 64000
R1(config-if)#no sh
R1(config-if)#int lo0
R1(config-if)#ip add 1.1.1.1 255.255.255.0
R1(config)#router rip
R1(config-router)#version 1
R1(config-router)#network 1.0.0.0
R1(config-router)#network 192.168.12.0
R1(config-router)#network 192.168.13.0
R1(config-router)#passive-interface lo0
n 步骤3:配置路由器R3
router(config)#host R3
R3(config)#no ip do lo
R3(config)#int s1/0
R3(config-if)#ip add 192.168.13.3 255.255.255.0
R3(config-if)#no sh
R3(config-if)#int lo0
R3(config-if)#ip add 3.3.3.3 255.255.255.0
R3(config)#router rip
R3(config-router)#version 1
R3(config-router)#network 3.3.3.0
R3(config-router)#network 192.168.13.0
R3(config-router)#passive-interface lo0
实验调试
n R1#show ip route
Codes: C - connected, S - static, R - RIP, M - mobile, B - BGP
D - EIGRP, EX - EIGRP external, O - OSPF, IA - OSPF inter area
N1 - OSPF NSSA external type 1, N2 - OSPF NSSA external type 2
E1 - OSPF external type 1, E2 - OSPF external type 2
i - IS-IS, su - IS-IS summary, L1 - IS-IS level-1, L2 - IS-IS level-2
ia - IS-IS inter area, * - candidate default, U - per-user static route
o - ODR, P - periodic downloaded static route
Gateway of last resort is not set
C 192.168.12.0/24 is directly connected, Serial1/0
1.0.0.0/24 is subnetted, 1 subnets
C 1.1.1.0 is directly connected, Loopback0
C 192.168.13.0/24 is directly connected, Serial1/1
R 2.0.0.0/8 [120/1] via 192.168.12.2, 00:00:08, Serial1/0
R 3.0.0.0/8 [120/1] via 192.168.13.3, 00:00:08, Serial1/1
n R1#debug ip rip
RIP protocol debugging is on
*Mar 1 00:39:09.591: RIP: sending v1 update to 255.255.255.255 via Serial1/1 (192.168.13.1)
*Mar 1 00:39:09.595: RIP: build update entries
*Mar 1 00:39:09.595: network 1.0.0.0 metric 1
*Mar 1 00:39:09.599: network 2.0.0.0 metric 1
*Mar 1 00:39:09.599: network 192.168.12.0 metric 1
*Mar 1 00:39:17.423: RIP: received v1 update from 192.168.13.3 on Serial1/1
*Mar 1 00:39:17.427: 3.0.0.0 in 1 hops
*Mar 1 00:39:19.327: RIP: received v1 update from 192.168.12.2 on Serial1/0
*Mar 1 00:39:19.331: 2.0.0.0 in 1 hops
*Mar 1 00:39:22.967: RIP: sending v1 update to 255.255.255.255 via Serial1/0 (192.168.12.1)
*Mar 1 00:39:39.011: RIP: sending v1 update to 255.255.255.255 via Serial1/1 (192.168.13.1)
【测试】
R2(config)#router rip
R2(config-router)#passive-interface s1/0
R2#debug ip rip
查看R2能否接收到来自R1的rip更新通告
R1#debug ip rip
查看R1能否接收到来自s1/0的rip更新通告
R2(config)#router rip
R2(config-router)#neighbor 192.168.12.1
R1#debug ip rip
查看R1能否接收到来自s1/0的rip更新通告
【提示】
被动接口只能接收路由更新,不能以广播或组播方式发送更新,但是可以以单播的方式发送更新,配置单播更新的命令如下:
R2(config)#router rip
R2(config-router)#passive-interface s1/0
R2(config-router)#neighbor 192.168.12.1
实验7-2 RIPV2
实验目的
通过本实验可以掌握:
(1)在路由器上启动RIPv2 路由进程
(2)启用参与路由协议的接口,并且通告网络
(3)auto-summary 的开启和关闭
(4)查看和调试RIPv2 路由协议相关信息
实验拓扑
实验步骤
n 路由器R2的主要配置
R2(config)#router rip
R2(config-router)#version 2
R2(config-router)#no auto-summary
R2(config-router)#network 2.2.2.0
R2(config-router)#network 192.168.12.0
n 路由器R1的主要配置
R1(config)#router rip
R1(config-router)#version 2
R1(config-router)#no auto-summary
R1(config-router)#network 192.168.12.0
R1(config-router)#network 192.168.13.0
R1(config-router)#network 1.1.1.0
n 路由器R3的主要配置
R3(config)#router rip
R3(config-router)#version 2
R3(config-router)#no auto-summary
R3(config-router)#network 192.168.13.0
R3(config-router)#network 3.3.3.0
实验调试
n R1#show ip route
Codes: C - connected, S - static, R - RIP, M - mobile, B - BGP
D - EIGRP, EX - EIGRP external, O - OSPF, IA - OSPF inter area
N1 - OSPF NSSA external type 1, N2 - OSPF NSSA external type 2
E1 - OSPF external type 1, E2 - OSPF external type 2
i - IS-IS, su - IS-IS summary, L1 - IS-IS level-1, L2 - IS-IS level-2
ia - IS-IS inter area, * - candidate default, U - per-user static route
o - ODR, P - periodic downloaded static route
Gateway of last resort is not set
C 192.168.12.0/24 is directly connected, Serial1/0
1.0.0.0/24 is subnetted, 1 subnets
C 1.1.1.0 is directly connected, Loopback0
C 192.168.13.0/24 is directly connected, Serial1/1
2.0.0.0/24 is subnetted, 1 subnets
R 2.2.2.0 [120/1] via 192.168.12.2, 00:00:28, Serial1/0
3.0.0.0/24 is subnetted, 1 subnets
R 3.3.3.0 [120/1] via 192.168.13.3, 00:00:07, Serial1/1
以上输出表明路由器R1 学到了2条RIP 路由,其中路由条目”R 3.3.3.0 [120/1] via 192.168.13.3, 00:00:07, Serial1/1”含义如下:
n R:路由条目是通过RIP 路由协议学习来的;
n 3.3.3.0/24:目的网络;
n 120:RIP 路由协议的默认管理距离;
n 1: 度量值,从路由器R1 到达网络3.3.3.0/24 的度量值为1 跳;
n 192.168.13.3:下一跳地址;
n 00:00:07:距离下一次更新还有23(30-7)秒;
n Serial1/0:接收该路由条目的本路由器的接口
【提示】可以看到auto-summary关闭后,通过RIPv2学到的不再是汇总到major-net的路由
n R1#show ip protocol //查看路由器协议配置和统计信息
Routing Protocol is "rip"
Outgoing update filter list for all interfaces is not set
Incoming update filter list for all interfaces is not set
Sending updates every 30 seconds, next due in 24 seconds
Invalid after 180 seconds, hold down 180, flushed after 240
Redistributing: rip
Default version control: send version 2, receive version 2
Interface Send Recv Triggered RIP Key-chain
Serial1/0 2 2
Serial1/1 2 2
Loopback0 2 2
Automatic network summarization is not in effect
Maximum path: 4
Routing for Networks:
1.0.0.0
192.168.12.0
192.168.13.0
Routing Information Sources:
Gateway Distance Last Update
192.168.13.3 120 00:00:04
192.168.12.2 120 00:00:27
Distance: (default is 120)
Routing Protocol is "rip"
//路由器上运行的路由协议是RIP
Outgoing update filter list for all interfaces is not set
//在出方向上没有设置过滤列表
Incoming update filter list for all interfaces is not set
//在入方向上没有设置过滤列表
Sending updates every 30 seconds, next due in 24 seconds
//更新周期是30 秒,距离下次更新还有24 秒
//为了防止更新同步,RIP 会以15%的误差发送更新,即实际发送更新的周期的范围是25.5-30 秒。
Invalid after 180 seconds, hold down 180, flushed after 240
//invalid after:路由条目在180 秒没有收到更新,则被标记为无效
//hold down:抑制计时器的时间为180 秒
//flushed after:路由条目如果在240 秒还没有收到更新,则从路由表中删除此路由条目
Redistributing: rip
//只运行RIP 协议,没有其它的协议重分布进来
Default version control: send version 2, receive version 2
//默认发送版本2的路由更新,接收本版2 的路由更新
Interface Send Recv Triggered RIP Key-chain
Serial1/0 2 2
Serial1/1 2 2
Loopback0 2 2
//以上三行显示了运行RIP 协议的接口,以及可以接收和发送的RIP 路由更新的版本RIPv2
【提示】 默认情况下只接收和发送版本2 的路由更新,可以通过命令“ip rip send version”和“ip rip receive version”来控制在路由器接口上接收和发送的版本,例如在s1/0 接口上接收版本1 和2 的路由更新,但是只发送版本2 的路由更新,配置如下:
R1(config-if)#ip rip send version 2
R1(config-if)#ip rip receive version 1 2
Automatic network summarization is not in effect
//RIP 路由协议关闭自动汇总功能
Maximum path: 4
//RIP 路由协议可以支持4 条等价路径,最大为6 条
【提示】可以通过下面的命令来修改RIP 路由协议支持等价路径的条数:
R1(config-router)#maximum-paths number-paths
Routing for Networks:
1.0.0.0
192.168.12.0
192.168.13.0
//以上三行表明RIP 通告的网络
Routing Information Sources:
Gateway Distance Last Update
192.168.13.3 120 00:00:04
192.168.12.2 120 00:00:27
//以上三行表明路由信息源,其中:
//gateway:学习路由信息的路由器的接口地址,也就是下一跳地址
//distance:管理距离
//last update:更新发生在多长时间以前
Distance: (default is 120)
//默认管理距离是120
实验7-3 : RIPV2 认证和触发更新
实验目的
通过本实验可以掌握:
(1)RIPv2 明文认证的配置和匹配原则
(2)RIPv2 MD5 认证的配置和匹配原则
(3)RIPv2 触发更新
实验拓扑

实验步骤
n 步骤1:配置路由器R2
R2(config)#key chain test //配置钥匙链
R2(config-keychain)#key 1 //配置KEY ID
R2(config-keychain-key)#key-string cisco //配置KEY ID 的密匙
R2(config)#interface s1/0
R2(config-if)#ip rip authentication mode md5
//启用认证,认证模式为密文,默认认证模式是明文,所以也可以不用指定
R2(config-if)#ip rip authentication key-chain test //在接口上调用钥匙链
R2(config-if)#ip rip triggered //在接口上启用触发更新
n 步骤2:配置路由器R1
R1(config)#key chain test
R1(config-keychain)#key 1
R1(config-keychain-key)#key-string cisco
R1(config)#interface s1/0
R1(config-if)#ip rip authentication mode md5
R1(config-if)#ip rip authentication key-chain test
R1(config-if)#ip rip triggered
R1(config-if)#interface s1/1
R1(config-if)#ip rip authentication mode md5
R1(config-if)#ip rip authentication key-chain test
R1(config-if)#ip rip triggered
n 步骤3:配置路由器R3
R3(config)#key chain test
R3(config-keychain)#key 1
R3(config-keychain-key)#key-string cisco
R3(config)#interface s1/1
R3(config-if)#ip rip authentication mode md5
R3(config-if)#ip rip authentication key-chain test
R3(config-if)#ip rip triggered
实验调试
(1)R1#show ip protocol
Routing Protocol is "rip"
Outgoing update filter list for all interfaces is not set
Incoming update filter list for all interfaces is not set
Sending updates every 30 seconds, next due in 23 seconds
Invalid after 180 seconds, hold down 0, flushed after 240
// 由于触发更新,hold down 计时器自动为0
Redistributing: rip
Default version control: send version 2, receive version 2
Interface Send Recv Triggered RIP Key-chain
Serial1/0 2 2 Yes test
Serial1/1 2 2 Yes test
Loopback0 2 2
//以上两行表明s1/0 和s1/1 接口启用了认证和触发更新
Automatic network summarization is not in effect
Maximum path: 4
Routing for Networks:
1.0.0.0
192.168.12.0
192.168.13.0
Routing Information Sources:
Gateway Distance Last Update
192.168.13.3 120 00:02:03
192.168.12.2 120 00:03:16
Distance: (default is 120)
(2)R1#debug ip rip
RIP protocol debugging is on
R1#clear ip route *
*Mar 1 01:15:11.099: RIP: sending triggered request on Serial1/0 to 224.0.0.9
*Mar 1 01:15:11.115: RIP: sending triggered request on Serial1/1 to 224.0.0.9
*Mar 1 01:15:11.119: RIP: sending request on Loopback0 to 224.0.0.9
*Mar 1 01:15:11.143: RIP: send v2 triggered flush update to 192.168.12.2 on Serial1/0 with no route
*Mar 1 01:15:11.143: RIP: start retransmit timer of 192.168.12.2
*Mar 1 01:15:11.143: RIP: send v2 triggered flush update to 192.168.13.3 on Serial1/1 with no route
*Mar 1 01:15:11.143: RIP: start retransmit timer of 192.168.13.3
*Mar 1 01:15:11.187: RIP: received packet with MD5 authentication
*Mar 1 01:15:11.191: RIP: received v2 triggered update from 192.168.12.2 on Serial1/0
*Mar 1 01:15:11.191: RIP: sending v2 ack to 192.168.12.2 via Serial1/0 (192.168.12.1),
flush, seq# 5
*Mar 1 01:15:11.199: 2.2.2.0/24 via 0.0.0.0 in 1 hops
*Mar 1 01:15:11.207: RIP: received packet with MD5 authentication
*Mar 1 01:15:11.211: RIP: received v2 triggered update from 192.168.12.2 on Serial1/0
*Mar 1 01:15:11.211: RIP: sending v2 ack to 192.168.12.2 via Serial1/0 (192.168.12.1),
flush, seq# 6
*Mar 1 01:15:11.231: 2.2.2.0/24 via 0.0.0.0 in 1 hops
*Mar 1 01:15:11.235: RIP: received packet with MD5 authentication
*Mar 1 01:15:11.235: RIP: received v2 triggered ack from 192.168.12.2 on Serial1/0
flush seq# 4
*Mar 1 01:15:11.239: RIP: send v2 triggered update to 192.168.12.2 on Serial1/0
*Mar 1 01:15:11.243: RIP: build update entries
*Mar 1 01:15:11.243: route 37: 1.1.1.0/24 metric 1, tag 0
*Mar 1 01:15:11.247: route 39: 192.168.13.0/24 metric 1, tag 0
*Mar 1 01:15:11.247: RIP: Update contains 2 routes, start 37, end 43
*Mar 1 01:15:11.251: RIP: start retransmit timer of 192.168.12.2
*Mar 1 01:15:11.279: RIP: received packet with MD5 authentication
*Mar 1 01:15:11.283: RIP: received v2 triggered update from 192.168.13.3 on Serial1/1
*Mar 1 01:15:11.287: RIP: sending v2 ack to 192.168.13.3 via Serial1/1 (192.168.13.1),
flush, seq# 5
*Mar 1 01:15:11.291: 3.3.3.0/24 via 0.0.0.0 in 1 hops
*Mar 1 01:15:11.295: RIP: received packet with MD5 authentication
*Mar 1 01:15:11.299: RIP: received v2 triggered update from 192.168.13.3 on Serial1/1
*Mar 1 01:15:11.303: RIP: sending v2 ack to 192.168.13.3 via Serial1/1 (192.168.13.1),
flush, seq# 6
*Mar 1 01:15:11.307: 3.3.3.0/24 via 0.0.0.0 in 1 hops
*Mar 1 01:15:11.311: RIP: received packet with MD5 authentication
*Mar 1 01:15:11.311: RIP: received v2 triggered ack from 192.168.13.3 on Serial1/1
flush seq# 3
【提示】 从上面的输出可以看出,在R1 上,虽然我们打开了debug ip rip,但是由于采用触发更新,所以并没有看到每30 秒更新一次的信息,而是清除了路由表这件事件触发了路由更新。而且所有的更新中都有“triggered”的字样,同时在接收的更新中带有“MD5 authentication”的字样,证明接口s1/0 和s1/1 启用了触发更新和密文认证
(3) R1#show ip rip database
1.0.0.0/8 auto-summary
1.1.1.0/24 directly connected, Loopback0
2.0.0.0/8 auto-summary
2.2.2.0/24
[1] via 192.168.12.2, 00:14:59 (permanent), Serial1/0
* Triggered Routes:
- [1] via 192.168.12.2, Serial1/0
3.0.0.0/8 auto-summary
3.3.3.0/24
[1] via 192.168.13.3, 00:14:59 (permanent), Serial1/1
* Triggered Routes:
- [1] via 192.168.13.3, Serial1/1
192.168.12.0/24 auto-summary
192.168.12.0/24 directly connected, Serial1/0
192.168.13.0/24 auto-summary
192.168.13.0/24 directly connected, Serial1/1
以上输出进一步说明了在s1/0 和s1/1 启用了触发更新。
(4) R1#show run | begin router rip
router rip
version 2
timers basic 30 180 0 240
//由于触发更新,在配置中自动加入上面一行,且hold down 计时器被设置为0
network 1.0.0.0
network 192.168.12.0
network 192.168.13.0
no auto-summary
实验10: RIP的更多相关文章
- 实验10.3_数值显示拓展_dword型数转变为表示十进制数的字符串
assume cs:code data segment db 10 dup (0) data ends code segment start : mov ax,4240H;F4240H=1000000 ...
- CCNA实验(3) -- RIP
RIP协议分为版本1和版本2,均具备以下特征:1.是距离向量路由协议2.使用跳数(Hop Count)作为度量值3.默认路由更新周期为30秒4.管理距离(AD)为1205.支持触发更新6.最大跳数为1 ...
- CCNA实验(10) -- Access List
使用包过滤技术在路由器上读取三层及四层报头的信息如源地址.目的地址.源端口.目的端口根据预先定义好的规则对包进行过滤 三种类型:1.标准ACL:表号范围1-99或1300-1999.仅对源IP地址进行 ...
- CCIE路由实验(10) -- IS-IS
1.配置基本的集成IS-IS路由协议2.多区域的集成IS-IS配置3.IS-IS认证4.IS-IS路由泄露5.IS-IS汇总6.在IS-IS中手动产生一条默认路由7.IS-IS协议重分布8.用IS-I ...
- c++实验10 图的应用实验
大体与上次实验相同,特点为图是邻接表存储结构 --博客后半部分有程序的所有代码-- 1.图邻接表存储结构表示及基本操作算法实现 所加载的库函数或常量定义及类的定义: #include "Se ...
- 实验10—— java读取歌词文件内容动画输出
1.Read.java package cn.tedu.demo; import java.io.BufferedReader; import java.io.File; import java.io ...
- 嵌入式02 STM32 实验10 定时器中断
优秀文章 https://blog.csdn.net/qq_38351824/article/details/82619734 一.STM32通用定时器(TIM2.TIM3.TIM4和TIM5共四个通 ...
- 【Python】【demo实验10】【练习实例】【打印斐波那契数列】
斐波那契数列介绍: 斐波那契数列(Fibonacci sequence),又称黄金分割数列.因数学家列昂纳多·斐波那契(Leonardoda Fibonacci)以兔子繁殖为例子而引入,故又称为“兔子 ...
- CCNA CCNP CCIE所有实验名称完整版
实验1:通过Console端口访问Cisco路由器 实验2:通过Telnet访问Cisco路由器 实验3:配置终端服务器 实验4:通过浏览器访问路由器 实验5:模式切换.上下文帮助及查看有关信 ...
随机推荐
- Windows Live Writer 语法高亮
1.WindowsLiveWriter.CNBlogs.CodeHighlighter.rar 这个插件生成的高亮代码与网页上的一模一样,插入后即可立即显示效果,不过貌似它必须联网才能实时显示效果,因 ...
- teamviewer早期版本下载链接
https://www.teamviewer.cn/cn/download/previous-versions/
- CentOS防火墙iptables使用
1.1 企业安全优化配置原则 尽可能不给服务器配置外网ip ,可以通过代理转发或者通过防火墙映射.并发不是特别大情况有外网ip,可以开启防火墙服务高并发的情况,不能开iptables,会影响性能,利用 ...
- CAP理论的理解
CAP理论作为分布式系统的基础理论,它描述的是一个分布式系统在以下三个特性中: 一致性(Consistency) 可用性(Availability) 分区容错性(Partition tolerance ...
- 漏洞挖掘 | 远程WWW服务支持TRACE请求
允许TRACE方法 漏洞描述 目标WEB服务器启用了TRACE方法.TRACE方法是HTTP(超文本传输)协议定义的一种协议调试方法,该方法使得服务器原样返回任何客户端请求的内容(可能会附加路由中间的 ...
- Asp.Net Core下的开源任务调度平台ScheduleMaster
从何说起 2017年初的时候,由于当时项目需要做了一个乞丐版定时调度系统,那时候只在单机上实现了核心的调度功能.做这个玩意之前也调研了社区中开源的解决方案,找了几个实地部署试跑了一下,其实都很不错.但 ...
- Qt 下QMessageBox下中文乱码问题
Qt版本 Qt Creator 2.4.1 Based on Qt 4.8.0 (64 bit) 现象 QMessageBox调用setText()一直是乱码 解决方法 QTextCodec::set ...
- 【转】常见Java面试题 – 第二部分:equals与==
ImportNew注: 本文是ImportNew编译整理的Java面试题系列文章之一.你可以从这里查看全部的Java面试系列. Q2.下面的代码片段的输出是什么? Object s1 = new St ...
- Java零基础搭建实时直播平台
https://www.cnblogs.com/scywkl/p/12101437.html
- IDEA不编译空文件夹
今天做项目的时候发现idea编译工程不会编译空文件夹,在resources下新建了个存储文件的空文件夹,编译后target里竟然没有,一直报空指针. 随便丢一个文件进去就行了,放一个demo.txt的 ...